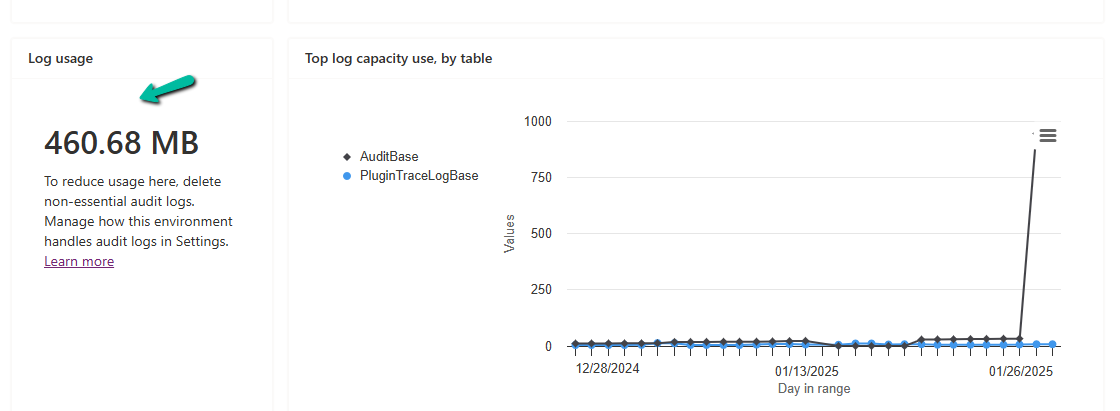
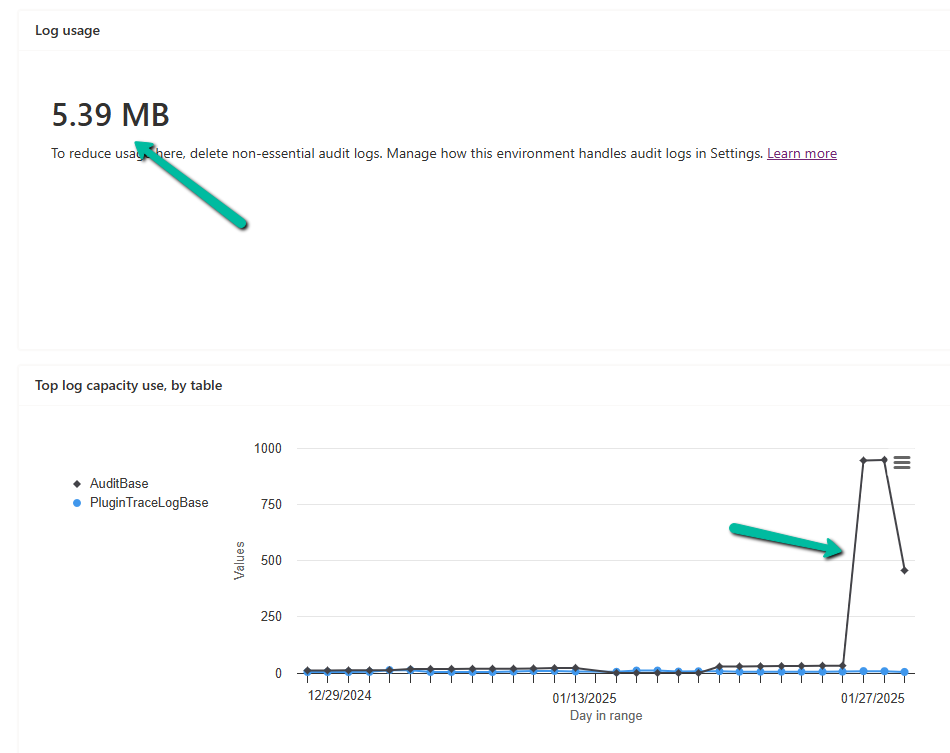
While importing a patch (unmanaged) solution we got the below error –
“Solution ‘abc_Configuration’ failed to import: Solution manifest import: FAILURE: Solution patch with version 1.6.1.1 already exists. Updating patch is not supported.”
This is because Dataverse does not allow updating an existing patch solution with the same version number. Dataverse treats patches as immutable once imported. So if a patch already exists in the target environment, we cannot re-import a patch with the same version. Unlike full solutions, patches cannot be updated or overwritten—they must be uniquely versioned.
To fix this we can increase the Patch Version in our source environment. Here we incremented the patch version (from 1.6.1.1 → 1.6.1.2). Exported the patch again and imported it into the target environment.
Dataverse considers each patch version as unique, so increasing the version allows re-import.
Below we can see the new version of the patch imported replacing the old one.
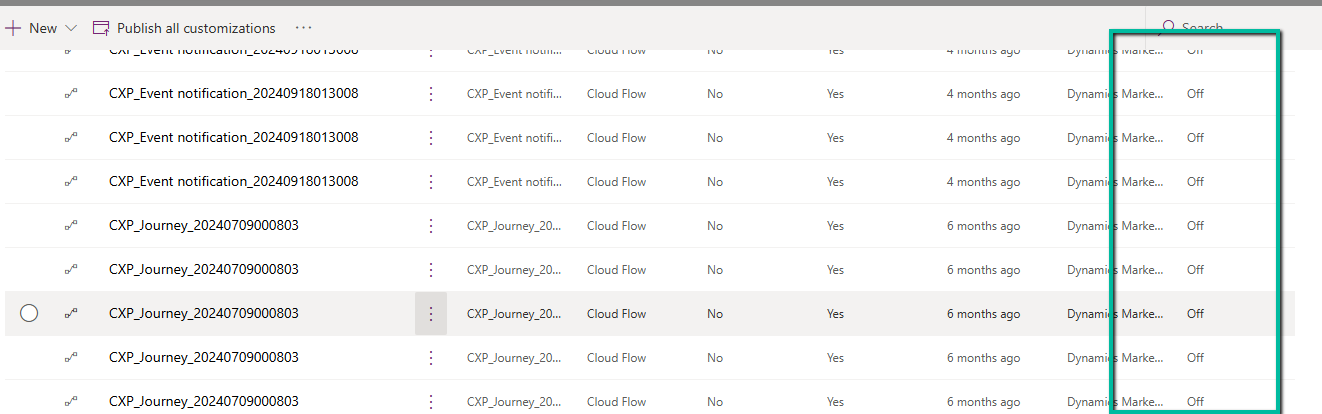
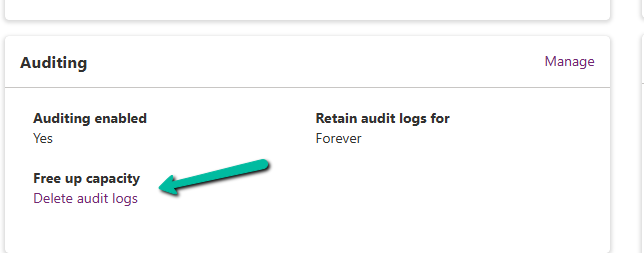
Recently we copied our UAT environment to one of the testing environments. After copying, we saw that all the cloud flows were in Off / Disabled state.
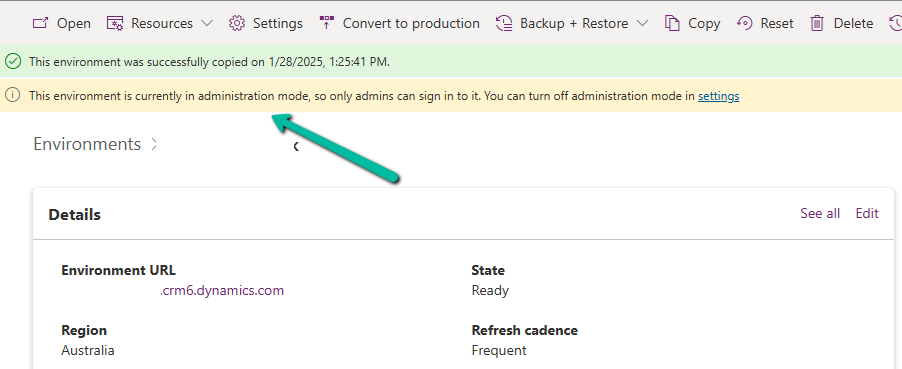
This was because during copy the environment is set in administration mode and background operations are also disabled.
Flows are automatically turned off to prevent –
Accidental execution of automation in a copied/test environment
Potential integration issues due to different connectors or authentication.
Unintended data modifications (e.g., flows interacting with external systems like SharePoint, SQL, or APIs).
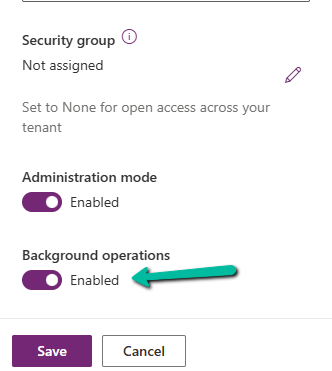
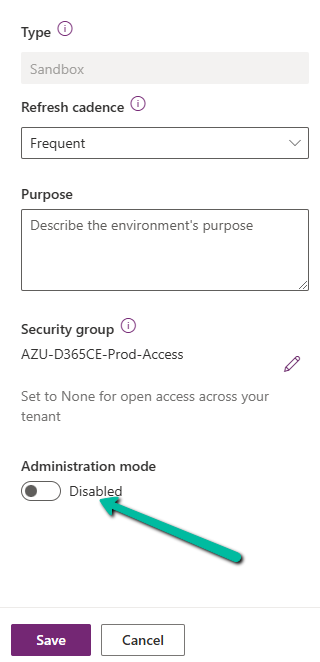
If required, we can disable the administration mode or at least enable the background operations.
However, the flows will not automatically switch On even if we enable either the Administration Mode or Background operations.
Here we need to switch them On manually or use PowerShell scripts or API to do so.
Connection References: If the flows use connection references (like SharePoint, Dataverse, Outlook, etc.), we need to verify them in Solution > Connection References and update them if necessary.
Environment Variables: If the flows depend on environment variables (e.g., API URLs, credentials), we need to update them the new environment.
Reassign Flow Owners: If the original owner of a flow is missing from the copied environment, we need to assign a new owner.
Lastly, if flows are not behaving correctly, check the callback registration records
Business Process Flows (BPF) in Dynamics 365 offer a structured way to guide users through a defined process. However, there are scenarios where progression to the next stage must be validated against specific business rules. In this blog, we see how to implement custom validations on stage progression using JavaScript.
Let us take a simple scenario where a Lead can only progress to the next stage of a BPF if
Lead Quality = Hot and Lead Source = Web
If these conditions are not met, users will receive a notification, and the stage change will be prevented.
Below is the sample code
function OnLoad(executionContext)
{
 var formContext = executionContext.getFormContext();
 formContext.data.process.addOnPreStageChange(validateStageProgression);
}


function validateStageProgression(executionContext)
{
	    var bpfSampleStage = "6e2b5d9e-da30-4a47-8ca9-d75c24fd51f4";
        var formContext = executionContext.getFormContext();
		var rating = formContext.getControl('header_process_leadqualitycode').getAttribute().getValue();
		var leadSource = formContext.getControl('header_process_leadsourcecode').getAttribute().getValue();
		var stageObj = formContext.data.process.getActiveStage();
        var stageId = stageObj.getId();
		var requiredFieldErrorId = "contractValidationNotificationId";
        formContext.ui.clearFormNotification(requiredFieldErrorId);

		if(stageId)
		{
			 if (stageId.toLowerCase() === bpfSampleStage)
			 {
				  if (executionContext.getEventArgs().getDirection() === "Next")
				{
                    executionContext.getEventArgs().preventDefault();
					if(rating == 1 && leadSource == 8) // rating = Hot and Source = Web
					{
						formContext.data.process.removeOnPreStageChange(validateStageProgression);
                        formContext.data.process.moveNext();
					}
					else
					{
						notificationMessage = "Cannot move to the next stage until conditions are met !";
						formContext.ui.setFormNotification(notificationMessage, "ERROR", requiredFieldErrorId)
					}
				}
			 }
		}
}
The addOnPreStageChange method registers the validation function on the form’s load event to monitor stage changes.
The preventDefault() method stops the stage transition if the conditions are not met, ensuring data integrity.
If the validation fails, an error notification is displayed using the setFormNotification() method, guiding users to correct the data.
Upon satisfying the conditions, moveNext() is invoked programmatically to move the process to the next stage.
As shown below, clicking on Next as rating and lead source values do not satisfy the condition, we can see the notification on the form and the user is not able to move to the next stage.
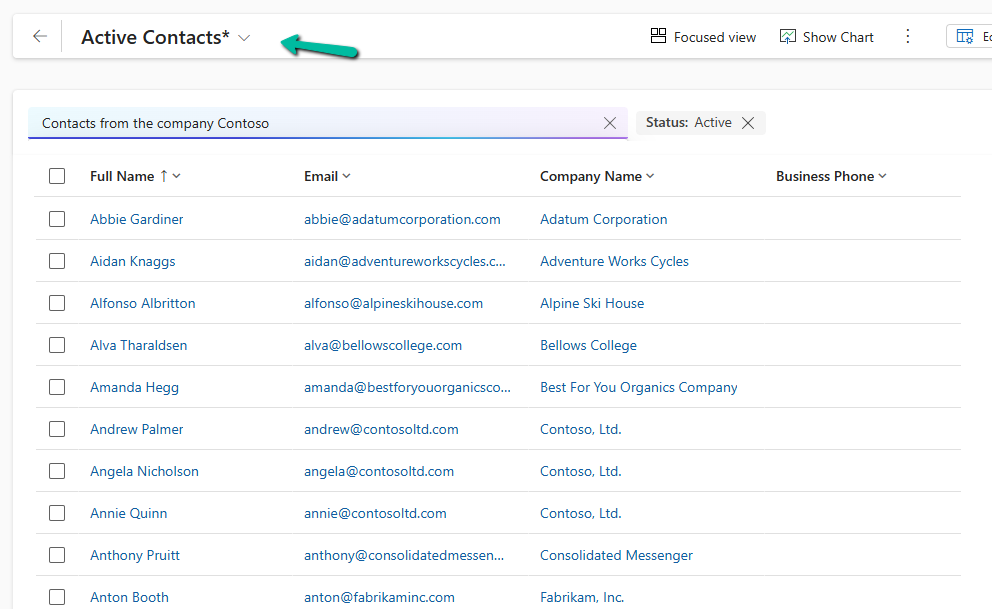
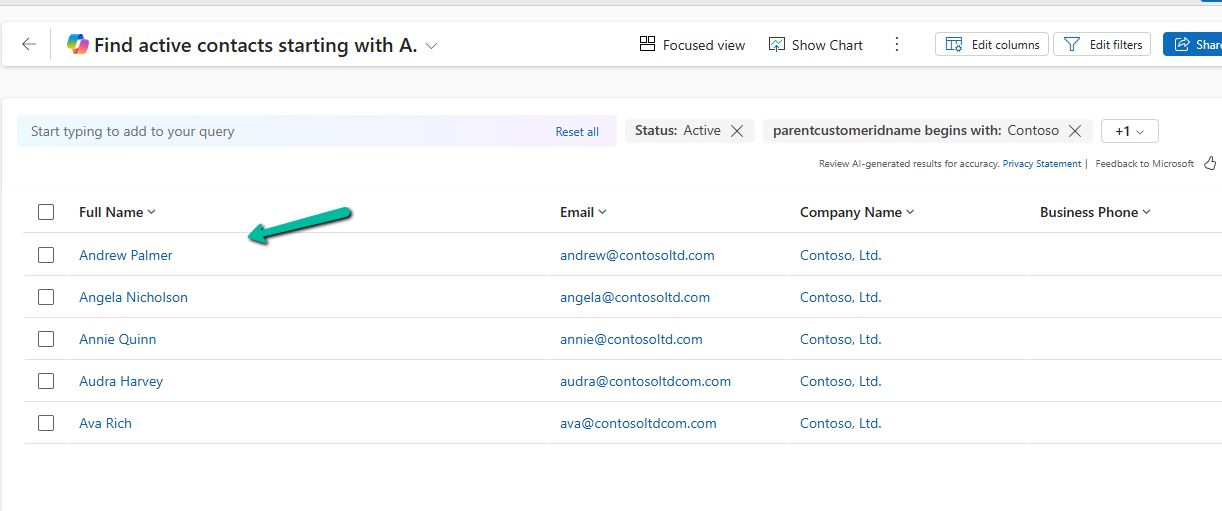
The new Smart Grid Preview feature allows us to find, filter, and sort data with natural language.
To enable it navigate to Environment >> Settings >> Features inside Power Platform Admin Center and turn on Natural Language Grid and View Search.
After enabling it we will see a search box on the grid page where we can type in questions about our data in plain English.
Let’s say we need to find “Contacts from the company Contoso”. Normally, this would mean defining the filters/query. But with the Smart Grid’s natural language search, we just type the request, and the system filters the view accordingly.
The result –
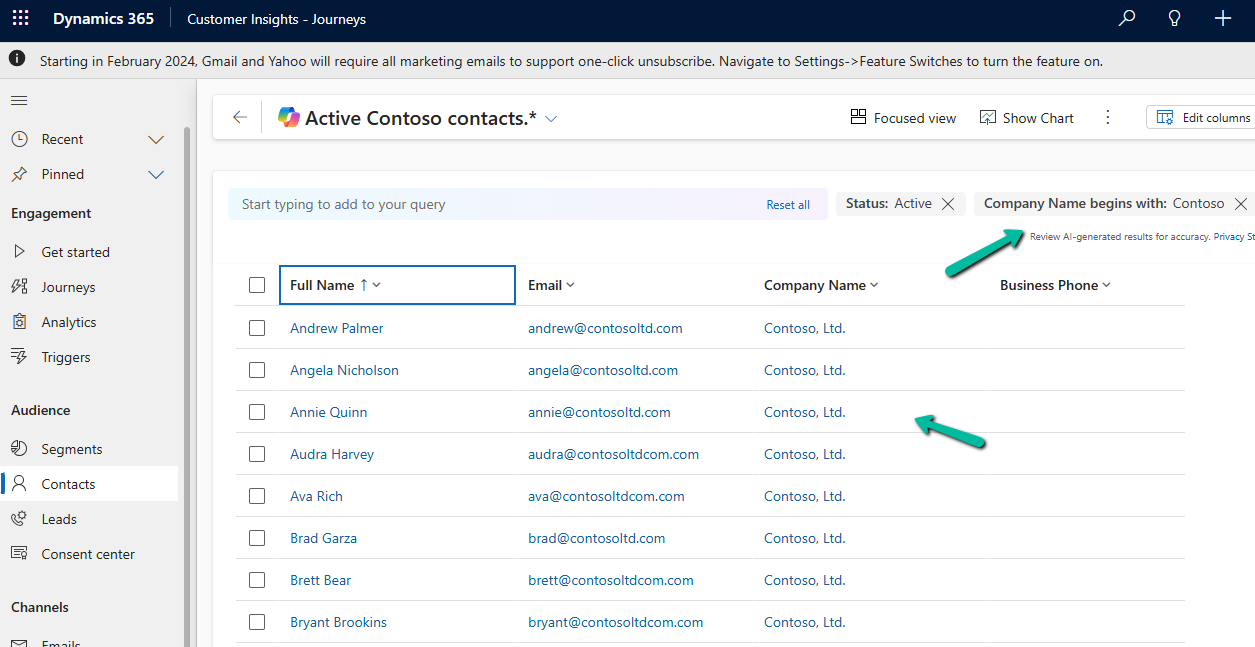
We can also use it to sort data.
Another example
The result –
Using natural language search has loads of benefits:
Ease of Use: Do complex searches without needing to be tech-savvy.
Speed: Find what you need quickly without navigating through multiple filters.
Accessibility: Makes data interaction easy for everyone, even if you’re not a tech pro.
As it’s still in preview, there are a few things the Smart Grid Preview doesn’t support yet:
Query Aggregation
Query Grouping
Adding Columns
Remember, it’s still a work in progress and not ready for full production use.
Recently we observed that our plugin registered on the Delete message of appointment on the PreValidation stage was not getting triggered when we were deleting or updating the occurrence of the Recurring Appointment.
For both of the below operations, our plugin was not getting triggered. The plugin had the logic to delete a few associated records to the appointment record.
Delete operation – This deletes all the existing appointment.
Recurrence Update –This deletes the existing appointment and creates new appointment records based on the new recurrence.
On trying out different things, we saw that the plugin was getting triggered if registered on the PreOperation.
For testing, we registered a sample plugin that throws the InvalidPluginExecutionException and saw it getting triggered in case of PreOpertaion as shown below.