Recently in one of our Plugins, which was using Azure.Storage.Blobs and Azure.Storage.Common libraries to move attachments from notes to Azure Blob Storage suddenly started throwing the below exception. The Plugin had been working fine and had been deployed long back to the production environment.
System.TypeInitializationException: The type initializer for ‘Azure.Response’ threw an exception. —> System.IO.FileNotFoundException: Could not load file or assembly ‘System.Memory.Data, Version=1.0.2.0, Culture=neutral, PublicKeyToken=cc7b13ffcd2ddd51’ or one of its dependencies. The system cannot find the file specified.
We raised the Microsoft Support for it and were informed that the reason for this was there was a platform update over that particular weekend to stop loading the “System.Memory.Data” assembly on the plugin server. And as we hadn’t included that assembly in our package (ILMerge), we started getting the exception.
Recently we got the below exception for one of our plugins.
Message: The plug-in execution failed because the Sandbox Worker process crashed. This is typically due to an error in the plug-in code. Please refer to this document: https://go.microsoft.com/fwlink/?linkid=2189390 Microsoft.Xrm.RemotePlugin.Grpc.ExceptionHandlers.SandboxFabricWorkerCommunicationException: Error communicating with SandboxFabric Worker —> Grpc.Core.RpcException: Status(StatusCode=”DeadlineExceeded”, Detail=”Deadline Exceeded”
If we refer to Microsoft Documentation below seems to be the cause of the issue in our case.
In our scenario, we had a Plugin that was Asynchronous and it was triggered on the Post Update of Work Order Service task. The plugin will fetch all the attachments (to notes associated with inspection attachments > inspection response > work order service task). There were many Service Tasks having more than 20 attachments exceeding 100 mb size total.
We were doing bulk updates which triggered the plugin creating too many requests eventually leading to that error.
Recently for some of our Dataverse environments, we found duplicate records getting created (same GUID) for Notes and Work Order Incident tables in the corresponding CSV files.
This was causing the Power BI reports built on top of it to fail.
On raising the ticket, the Microsoft Support team mentioned that this is a known bug for certain regions, and they immediately ran the de-duplication scripts in the background which quickly fixed the issue for us. Also, they specified they will be deploying the fix for the issue in the coming days.
Recently we got the below exception for one of our plugins Message: System.InvalidOperationException: Message size exceeded when attempting to send response to sandbox. Message Size 123 Mb. Max Allowed 128974848 Mb.
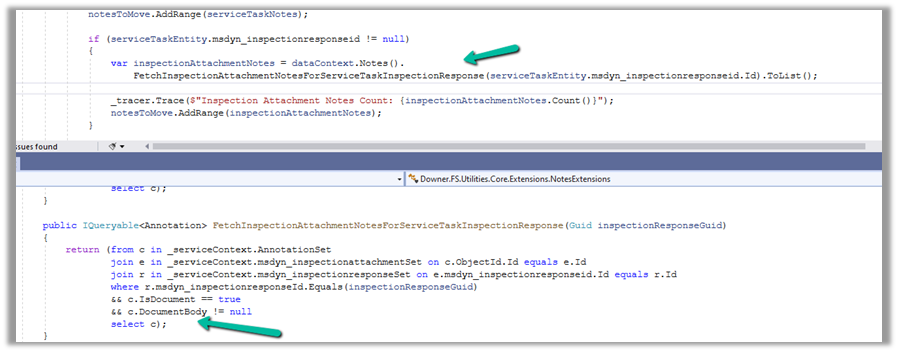
Below is the code where we were getting the error. We were retrieving the notes records associated with the inspection response/inspection attachments. (Dynamics 365 Field Service)
And if we had a total of all attachments to it more than 100 mb it was failing.
Below is the test Work Order Service Task record for which we were getting the error.
There were a couple of other attachments also to it making a total of more than 100 Mb.
Here to fix the error instead of fetching all the note details at once and then processing the notes attachments, we updated our logic to process the notes attachments one by one.
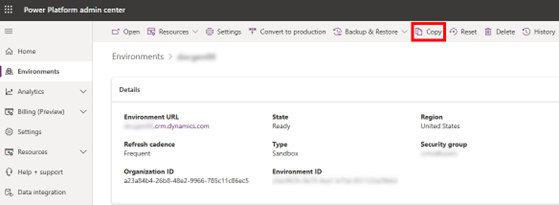
You have probably used the copy environment feature in the Microsoft Power Platform admin centre to copy data and customizations between environments.
However, there is a crucial aspect to consider data privacy and security. When transferring data, especially to sandbox environments which typically have less stringent access controls, there is an inherent risk of sensitive information becoming exposed to unauthorized personnel. Such scenarios pose a threat to compliance with stringent data privacy regulations, including GDPR, HIPAA, and CCPA.
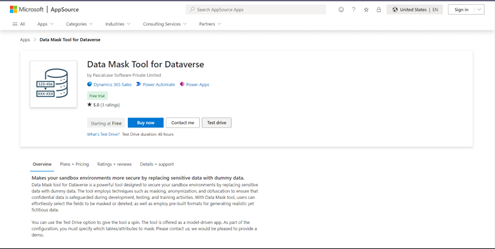
However, there is no out-of-box to mask data. Here comes Datamask App which helps with data protection by replacing sensitive information with dummy data.
Diving into the Strength of Data Masking
In the Power Platform sandbox environments, developers, and testers often grapple with the challenge of handling real data without compromising privacy and security. The Data Mask App steps in as a powerful solution to this dilemma. Its primary mission? To mask, anonymize, and obfuscate Dataverse data, offering a shield against potential data breaches.
How does Data Mask app work?
You can download the app from Microsoft AppSource, Download Data Mask app, and the app is available as managed solution.
Upon importing the solution, you need to configure the data mask app.
With configuration, users can selectively mask specific fields, choosing from options, such as replacing with dummy names, generating random strings, or employing asterisks for a discreet approach.
Configuration settings for masking Account number field in Account table.
Various configuration options for table records provide versatile ways to protect sensitive data configurations, it collectively empowers users to customize data protection strategies based on specific needs and compliance requirements.
This dynamic approach ensures that sensitive information, like full names and contact details, is transformed into a secure and privacy-preserving version while retaining its integrity.
When a data mask run is created the masking process starts and we can track the masking of records in the logs section.
Free plan and paid plan
If you would like to test, there is a ‘Test Drive’ option. Otherwise, you can install the app in your environment, but there is a 1000-record limit. If you would like to buy the tool, you can contact https://pascalcase.com for a license.
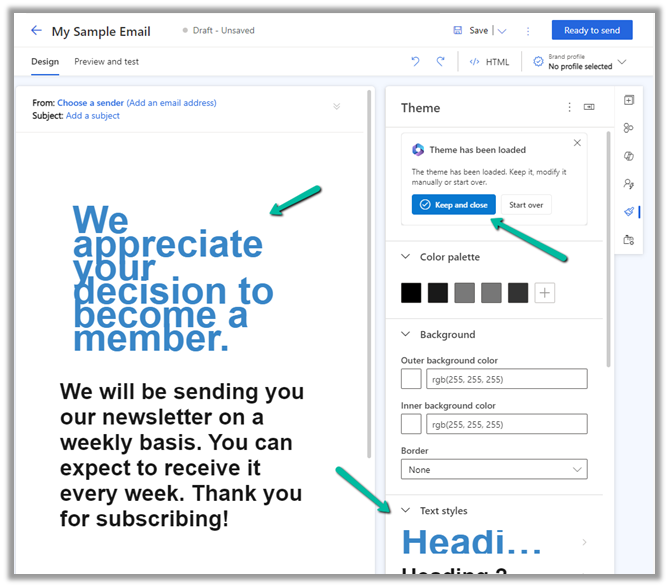
Using Copilot’s theme assistant we can fetch the styles from a website and apply it to our email. Microsoft strongly recommends using Theme Assistant only on websites owned and not on 3rd party websites.
To use this feature, open an existing email record, enter the Website’s URL in the theme assistant section, and click on the Fetch Styles button.
The theme assistant will fetch the styles from the website and apply them to the theme of the email. We can also see the changes in the email editor.
If we are happy with the theme applied we can select the Keep and close option or we can select Start over to specify another website.