Reduce log storage: Delete audit logs – Power Platform Admin Center


Recently we had to copy our production environment to one of our sandbox environments for some analysis and testing.

But before we copied we made sure we deleted the data/attachments/ logs that are not required to save some storage space.

Get more information – https://nishantrana.me/2024/10/15/free-up-storage-space-activitypointerbase-and-workflowlogbase-dataverse-dynamics-365/

We had around 950 MB of Log data in it.

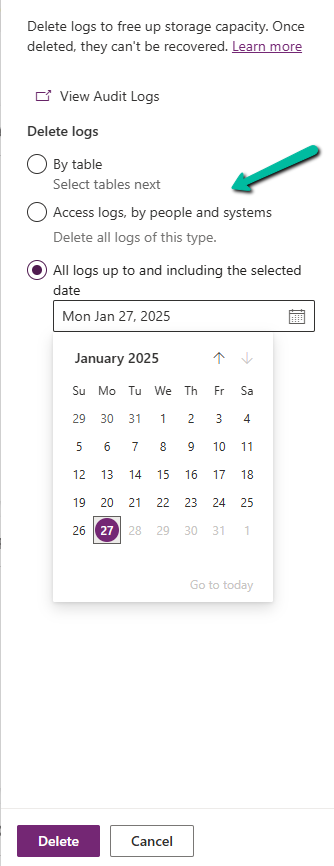
Below are the steps for deleting the audit logs –

Go to the Power Platform Admin Center, and sign in with the appropriate credentials.

Select the Environment, and select Manage Audit Logs in the Auditing section.

A screenshot of a computer

Description automatically generated

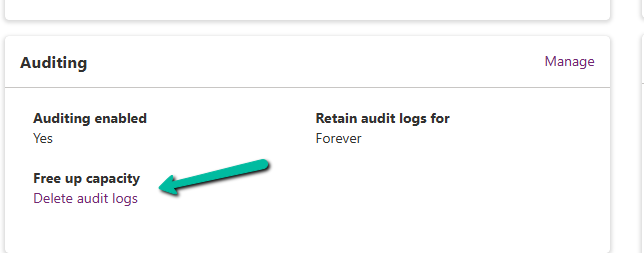
Click on Delete Audit Logs. We will be prompted to filter the logs to delete. Filter options may include:

  • By Table (e.g., logs related to a specific table or entity).
  • Delete logs, by people and systems.
  • Time (e.g., logs older than a specific date).
A screenshot of a calendar

Description automatically generated

Confirm Deletion.

A screenshot of a computer

Description automatically generated

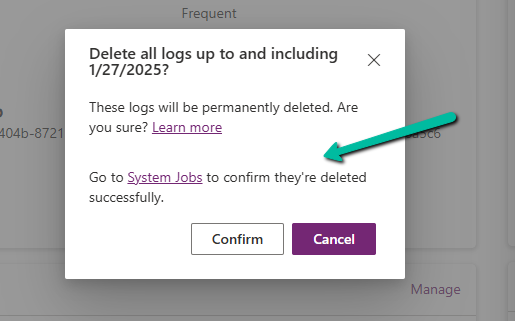
Review the summary of logs to be deleted. Click Delete to proceed. This action is irreversible.

Once the deletion is complete, the audit logs are permanently removed.

The storage won’t reflect it immediately.

A screen shot of a message

Description automatically generated
A screenshot of a computer

Description automatically generated
A screenshot of a computer

Description automatically generated

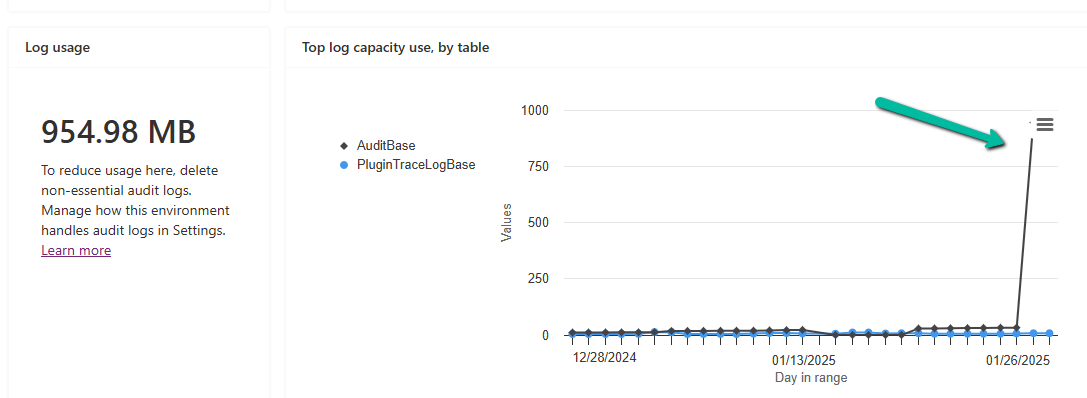
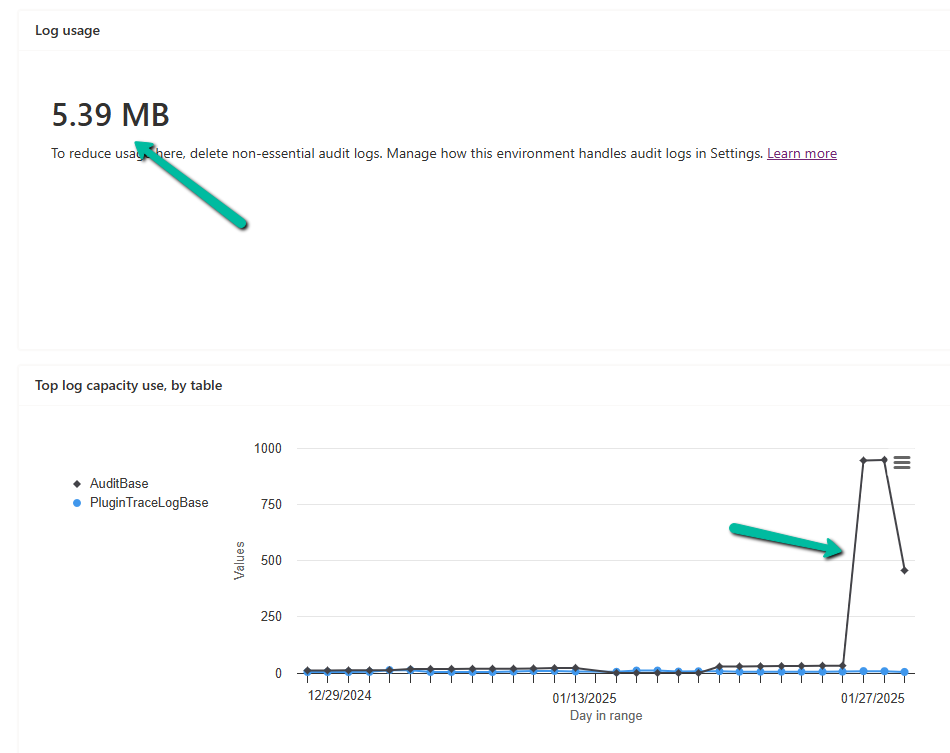
In our case, after 2 hours we could see log usage reduced to 460 MB from 954 MB.

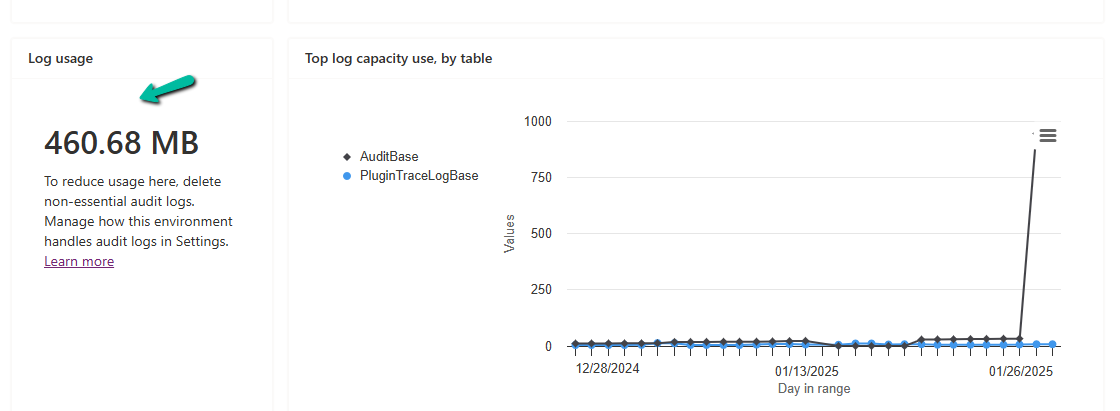
And almost after 24 hours, we could see it reduced to 5 MB.

A screenshot of a computer

Description automatically generated

Get all the details

Hope it helps..

Advertisements

Fixed – MisMatchingOAuthClaims – One or more claims either missing or does not match with the open authentication access control policy error – OAuth Authentication for HTTP Request trigger (Power Automate)ismatch


Recently while trying to invoke the HTTP Request trigger, on passing the token we got the below error from the Postman

{
    "error": {
        "code": "MisMatchingOAuthClaims",
        "message": "One or more claims either missing or does not match with the open authentication access control policy."
    }
}

Turned out that we missed the trailing slash for the resource’s value while generating the token.

Audience values as expected in the claim.

A screenshot of a computer

Description automatically generated

https://jwt.io/

On correcting the resource value, and using the new generated token,

fixed the mismatch claim issue

Below is our flow

A screenshot of a computer

Description automatically generated

Refer – https://nishantrana.me/2025/01/28/configure-oauth-authentication-for-http-request-triggers-specific-users-in-my-tenant-power-automate/

Get more details

Hope it helps..

Advertisements

Configure Case Handling Time widget for the Case form – Dynamics 365 Customer Service


The Case Handling Time widget (preview) can be added to the Case Form, giving a focused way to track case resolution efficiency. By using this feature, we can identify patterns, make informed decisions, and continuously refine processes.

To enable it to navigate to

Customer Service Admin Center >> Customer Support >> Case Settings >> Case handling time (preview)

Update Interval specifies how frequently the handling time widget is refreshed (it also updates the database). Can be between 10 to 60 minutes. The interesting point here is if 2 agents open the same case at the same time, the widget will display 20 minutes, after 10 minutes.

A screenshot of a computer

Description automatically generated

Next, open the form where we want to add the component, click on Get more components, and search for the Handling Time component to add it.

A screenshot of a computer

Description automatically generated

Configure the properties for the component –

Table – Time Trackers

View – All Time Trackers

Allow users to add time logs – True / False (enables agents to log time)

Show users only their contributed time – True / False (specifies whether an agent can only see their time or time entered by other agents also for that case)

Allow users to edit their automatic time tracked – True / False (specifies if an agent can edit automatic time tracked).

A screenshot of a computer

Description automatically generated

Save and publish the changes.

We can see the Handling Time widget at the bottom right corner in the minimized state on the form.

A screenshot of a computer

Description automatically generated

On maximizing it after some time, we can see the following details there.

Automatic Time Tracking, Manual Time Tracking, History section.

A screenshot of a device

Description automatically generated

Checking My Time shows the Live time spent by that particular agent.

A screenshot of a computer

Description automatically generated

Clicking on the plus button allows us to add manual Time log records.

A screenshot of a computer

Description automatically generated

If there is a second user who opens the form, the automatic time tracking shows the values applied to that user.

A screenshot of a computer

Description automatically generated

Get more information

Hope it helps..

Advertisements

How to use the setIsValid Method in Dataverse / Dynamics 365


We can use the setIsValid method for validating field values in Model-driven apps. This method helps ensure that the data entered by users meets the required criteria before it’s processed or saved.

The setIsValid method is used to set the validity of a column’s value. It can mark a field as valid or invalid based on custom validation logic.

formContext.getAttribute(arg).setIsValid(bool, message);

bool: A Boolean value. Set to false to mark the column value as invalid, and true to mark it as valid.

message: (Optional) A string containing the message to display when the value is invalid.

Below we are using the setIsValid method in the function that ensures that the “End Date” is earlier than or equal to the “Start Date”, else it will mark the “End Date” as invalid.

function validateDates(executionContext) {
    var formContext = executionContext.getFormContext();
    var startDate = formContext.getAttribute("custom_startdate");
    var endDate = formContext.getAttribute("custom_enddate");
  
    if (startDate && endDate && endDate.getValue() <= startDate.getValue()) {
        endDate.setIsValid(false, "End Date must be after Start Date.");
    } else {
        endDate.setIsValid(true);
    }
}

We have it registered in the On Change of the ‘Start Date’ and ‘End Date’ fields.

Here if we try saving the record, if the End Date is smaller than the Start Date, we will get the message specified.

Hope it helps..

Advertisements

Manage solution dependencies easily through the refreshed look – Dataverse


In Dataverse, solution dependencies are a vital aspect of managing and deploying applications. Dependencies ensure that required components are present for a solution to work seamlessly across environments. However, with complex solutions, understanding and managing these dependencies can become overwhelming.

The updated dependencies page is designed to simplify dependency management by offering a more intuitive, action-driven experience.

Select a particular component in the solution, right-click>> Advanced >> Show dependencies.

We can see 3 different tabs.

Delete Blocked By (tab): Displays any dependencies preventing deletion of a component. Below we can see that for the Age column, it shows Contact’s System Form as the dependency.

A screenshot of a computer

Description automatically generated

Clicking on the Open option takes us to the component page, where we can see all the forms for the contact table.

A screenshot of a computer

Description automatically generated

Used By (tab): Lists other components dependent on the selected component.

Uses (tab): Shows dependencies that the selected component relies upon.

A screenshot of a computer

Description automatically generated

On clicking Open, it opens the Columns page for that table.

A screenshot of a computer

Description automatically generated

The different actions that we can take are Open and inspect the object, Delete the object, Remove dependency, and open the relevant documentation.

Below we have selected the option Remove dependency. As we saw the dependency here refers to the Contact System form in which we have the age field used.

A screenshot of a computer

Description automatically generated
A screenshot of a computer

Description automatically generated

Select Remove.

A screenshot of a computer

Description automatically generated

We get the success message after the successful removal of the dependency.

i.e. we can see the field removed from the blocking Contact’s System form.

Now if we want we can easily delete that particular field with no object blocking the delete.

Lastly, the Delete option for the solution allows the delete (uninstall) the solution that has dependencies on the solution component.

Get all the details here.

Hope it helps..

Advertisements

Disable recent records (Disable most recently used items) for the Lookup field used in the Business Process Flow (Dataverse / Dynamics 365)


Suppose we have the below Customer Lookup in the Sample Stage of a Business Process Flow.

As we can see the lookup shows the Recent records there.

A screenshot of a computer

Description automatically generated

Now say we have applied filtering to the lookup using addPreSearch so we need to disable the recent records options in it.

To do so for the fields in BPF –

Open the corresponding table of the BPF (will have the same name as BPF)

A hand pointing to a computer screen

Description automatically generated

Open the form, select the Customer (lookup) field from the Tree View, and check the Disable most recently used items (save and publish the change)

A screenshot of a computer

Description automatically generated

As expected we can now see the recent records options not appearing for the Customer lookup in the BPF.

A screenshot of a computer

Description automatically generated

Hope it helps..

Advertisements