We had one flow on the creation of an account record, our flow was running fine, and then we made a few changes to it and saved it, after which it stopped getting triggered.
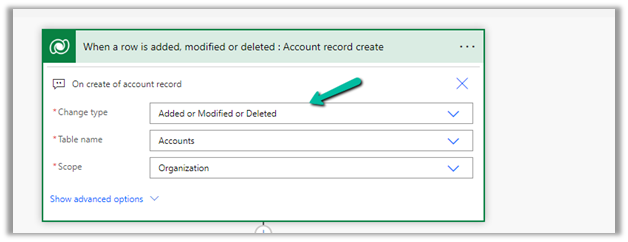
We could not figure out why it was not getting triggered so eventually we tried changing the Trigger Type to Added or Modified or Deleted, just to see if that will trigger it.
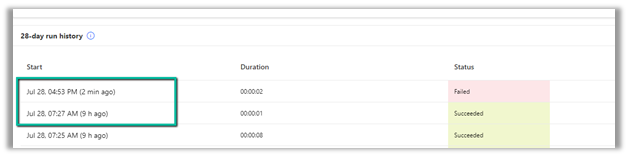
It ran this time on create of account record.
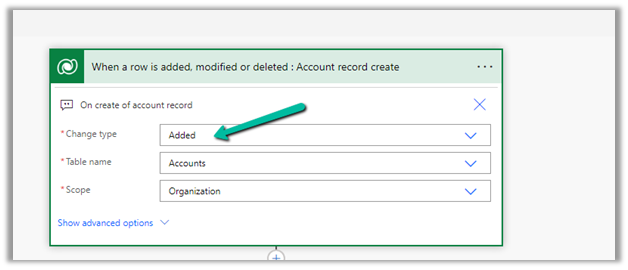
After which we changed it back to Added, the original definition.
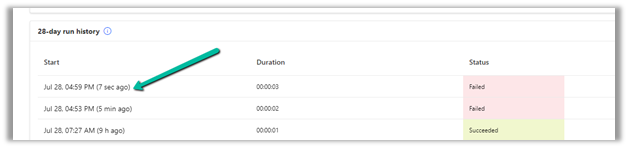
And from that point onwards it was getting triggered as expected.
Select the New Plugin option in the Dataverse Accelerator app to create Automate Plugins.
We get the option to select the table, the event, define the behavior of the plugin using Power FX, specify pre or post-operation, and the solution as shown below.
To keep it simple, we have created a plugin on pre-operation that checks for null, the email address field in the Contact record on Create, and if blank throws an error.
On trying to create a contact record without an email address, we get the exception as specified in the plugin.
That’s all we are done with our plugin.
Now interestingly if we check our solution specified, we will not find our plugin there. We need to add them to the solution manually right now, here we need to look for FxExpression.
Low-code plug-in is a new experimental feature released by Microsoft, for early adopters, not meant to be used in production. As per Microsoft, “the experimental features can change radically or completely disappear at any time“.
There are 2 types of low-code plug-ins we can write – Instant and Automated.
Instant plug-ins are triggered manually and support parameters, whereas automated plug-in as the name suggests, runs when a particular event (create, update, or delete) occurs on a table and they do not support parameters.
As a prerequisite, we need to first install the Dataverse Accelerator
We can install it from Admin Center >> Resources >> Dynamics 365 Apps
Or from the App Source, look for Dataverse Accelerator and click Get in now.
The new modern refreshed look for the Model-driven app can be enabled from Maker Portal >> Model-driven App (Edit) >> Settings >> Upcoming – Try the new look and feel (preview)
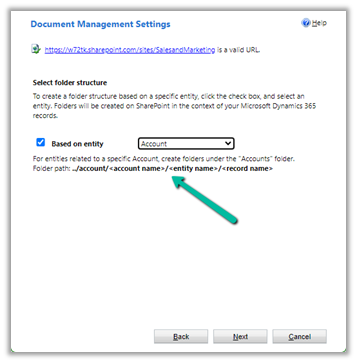
inside Document Management Settings, we can specify folder structure to be based on the entity either Account or Contact.
Here we have opted for Account-based first.
We can see the following folders created on the SharePoint site, that take the table or entity name.
And the records folder for Accounts created with AccountName_GUID format.
And if we open any Contact record >> Files / Documents tab, that will create the account parent folder (if not already created) and the contact folders inside it as shown below.
And if we create the contact record without having an account associated
That will create the folder for the record inside Contact Folder without the Parent Account folder created. (as there was no account associated)
For Case Records, we have the case folders created inside Account folders.
Now let us select the Contact based structure
The contact records are created inside the Contact folder, the account associated is not considered.
For Case also it is same.
For Building, a custom table, which is a child of Contact, we have the Building folder created inside the Contact folder.
Now let us keep Based on entity option unchecked
This creates the corresponding record’s folder inside the table parent folder.
Account –
Contact –
Check some of the interesting articles on SharePoint and Dynamics 365 Integration.
As we know to connect to CDS WEB API from C# application we first need to acquire access token and validity of that is 1 hour. While performing small number of requests this will be sufficient. However when we want to run long running process we will get HTTP 400 error when token expires.
To overcome this issue, The recommended approach is to implement a class derived from DelegatingHandler which will be passed to the constructor of the HttpClient. This handler will allow you to override the HttpClient.SendAsync method so that ADAL will call the AcquireToken method with each request sent by the http client.
Step – 1
Create new class in your project and add below code.
/// <summary> ///Custom HTTP message handler that uses OAuth authentication through ADAL. /// </summary> class OAuthMessageHandler : DelegatingHandler { private UserCredential _credential; private AuthenticationContext _authContext = new AuthenticationContext("https://login.microsoftonline.com/common", false); private string _clientId…