Recently we had to write a plugin that should trigger only when a user has manually associated the record from the form (N-N relationship). This was because we were also doing the same association through another plugin, in which case we didn’t want this new plugin to trigger.
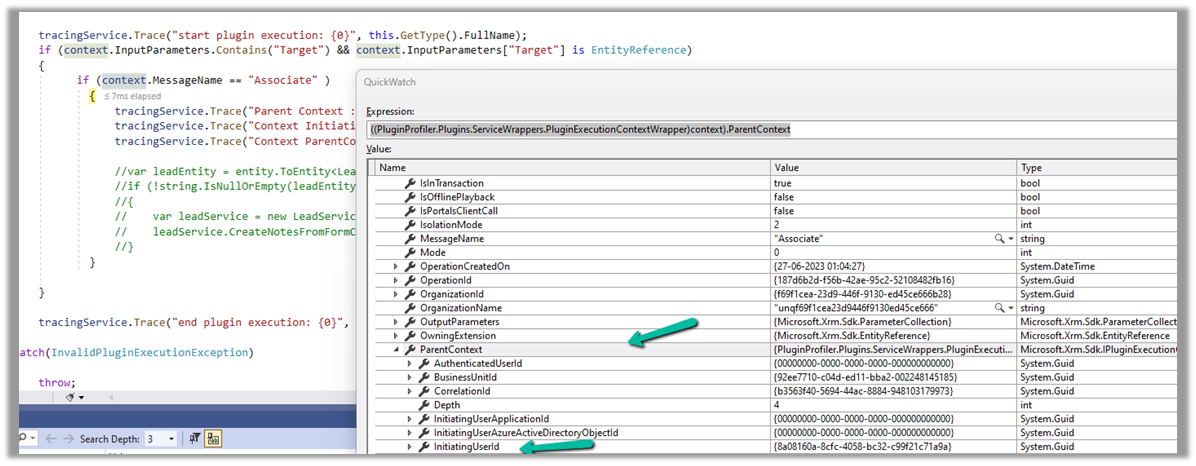
Here we can make use of ParentContext property to identify if the plugin is getting triggered because of another plugin.
Below we can see ParentContext property getting populated and also in the InitiatingUserId property we get the id of the user who triggered the plugin.
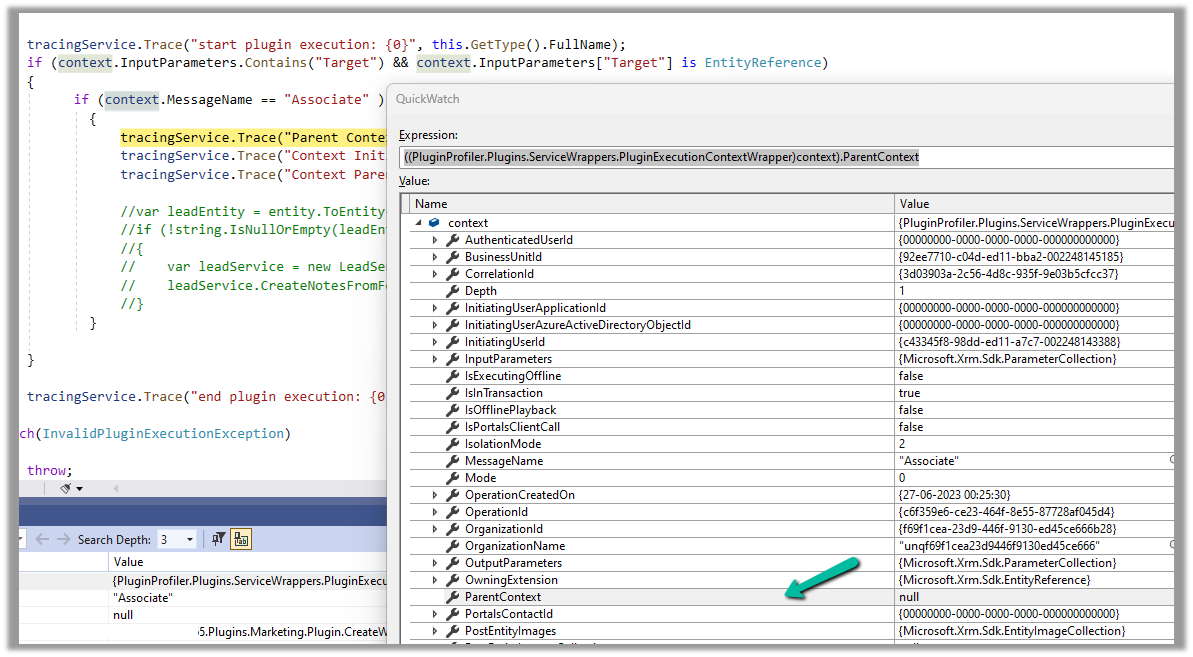
And if the user has manually performed the association from the form, we can see ParentContext being null.
In CRM, the Associate or Disassociate event happens
If you have a N:N relationship between two entities and when you try to associate or disassociate records either from Associated view or Sub grid.
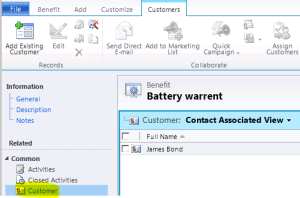
Entity Associate View
In Plugins, the Associate & Disassociate messages behave little different than other messages.
When you register a plugin on Associate message, you have to leave “Primary and Secondary” entities as ‘none’.
Associate Plugin Step
Since we don’t provide entity names, the registered Plug-in step triggers on all “Associate” operations, so we have to check few conditions to let the “Association” trigger happen only between intended entities.
You can use the below code template for Associate or Disassociate plugins
Recently while trying to import one of the solutions we got the below error
Missing dependencies. You’ll need to import the following items to this environment.
It was referring to one of the Managed Solutions – DynamicsMKT_PushNotification, managed by Microsoft, for Microsoft Dynamics 365 Marketing.
We realized that the source environment had a higher version installed than the destination environment.
Source – 1.1.25335.61 and destination environment – 1.1.22667.44
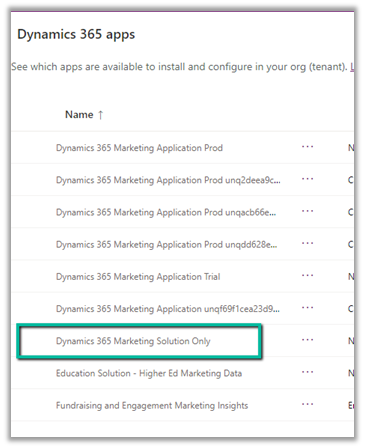
Initially, we thought the error is because the Dev had full marketing app configured i.e. both Solution and Services app configured and the destination had only Dynamics 365 Marketing Solution Only app.
The marketing apps –
After raising the Microsoft Support, we got guidance/advice from the Microsoft Support / Product team that the Dynamics 365 Marketing Solution Only app was not installed in the destination environment and it was a copy of some other environment that had marketing installed. They suggested installing the Dynamics 365 Marketing Solution Only app in the destination environment. After installing the app, we could see the version of the DynamicsMKT_PushNotification solution increased and were able to install our custom solution successfully.
Recently we had to disable plugin steps as part of data migration, below is the sample code we can use, either specify the name of the assembly, plugin, or plugin step as we are using the “begins with” condition or make changes as required.
 class Program
    {
        static void Main(string[] args)
        {

            const string ConnectionString = "AuthType = OAuth; " +
                                            "Username = Nishant.Rana@xyz.com; " +
                                            "Password = testxyz; " +
                                            "Url = https://orgname.crm6.dynamics.com;" +
                                            "AppId=51f81489-12ee-4a9e-aaae-a2591f45987d;" +
                                            "RedirectUri=app://58145B91-0C36-4500-8554-080854F2AC97;" +
                                            "LoginPrompt=Auto";


            CrmServiceClient svc = new CrmServiceClient(ConnectionString);

            if (svc.IsReady)
            {
                try
                {
                    // we can specify step / plugin / assembly name
                    var pluginStepAssemblyName = "MyD365.Plugins.Core.Plugin.AssignOwner";
                    // 0 for active and 1 for inactive
                    var pluginStateCode = 0;

                    var query = new QueryExpression("sdkmessageprocessingstep");
                    query.ColumnSet = new ColumnSet("name", "sdkmessageprocessingstepid");
                    query.Criteria.AddCondition(new ConditionExpression("name", ConditionOperator.BeginsWith, pluginStepAssemblyName));
                    var sdkMsgProcessStepCollection = svc.RetrieveMultiple(query);

                    foreach (var sdkMsgProcessStep in sdkMsgProcessStepCollection.Entities)
                    {
                        var setStateRequest = new SetStateRequest();
                        setStateRequest.EntityMoniker = new EntityReference("sdkmessageprocessingstep", sdkMsgProcessStep.Id);
                        setStateRequest.State = new OptionSetValue(pluginStateCode);
                        setStateRequest.Status = new OptionSetValue(-1);
                        svc.Execute(setStateRequest);
                    }
                }
                catch (Exception ex)
                {
                    Console.WriteLine("Exception Messainge : {0} ", ex.Message);
                }

            }
        }
    }
We were recently getting the below error in one of the views in the Dashboard.
0x90000010 Can not retrieve view’s metadata
The issue occurred because we had converted that Dashboard from a personal to System / Public Dashboard using the below wonderful XrmToolbox Plugin, https://www.xrmtoolbox.com/plugins/Carfup.XTBPlugins.PersonalViewsMigration/, which converted it to System Dashboard successfully, however, this was one of the personal views inside that dashboard.
So we converted that personal view to the system view (using the same tool) and then updated the Dashboard to refer to the converted system view, which fixed the issue.
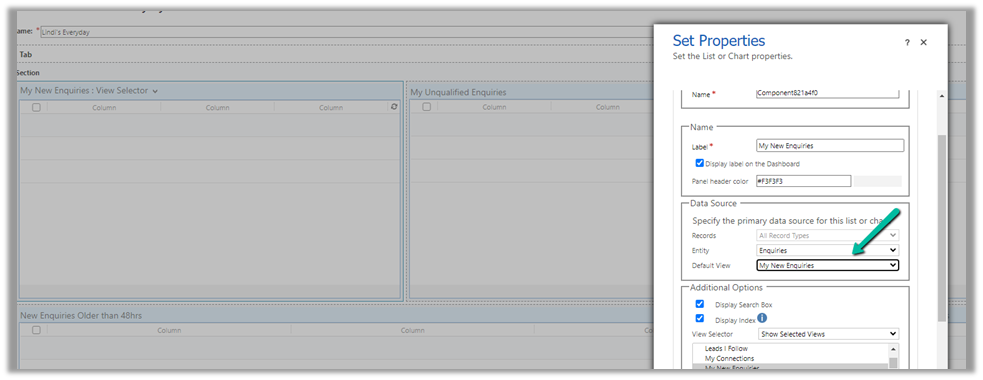
Recently in one of our custom pages, we had to set the default value (DefaultSelectedItems) of the combo box based on one of the lookup fields on the record. We were opening the custom page from the ribbon button on the form.
Below is our function to pass the record’s GUID to the custom page from the button.
    openSearchCustomPage: function (primaryControl, firstPrimaryItemId) {
        var pageInputCustom = {
            pageType: 'custom',
            name: 'custom_searchproduct_570ed',
            entityName: 'lead',
            recordId: firstPrimaryItemId
        };

        var navigationOptions = {
            target: 2,
            position: 1,
            width: 1350
        };

        Xrm.Navigation.navigateTo(pageInputCustom, navigationOptions).then(
            function success(result) {
                console.log(result);
            },
            function error(error) {
                console.log(error);
            }
        );
    }
Next in App’s OnStart, we are setting the GUID of the record to a variable first, and than setting another variable to store the GUID of the Region lookup field on that record.
// text variable passed by the form / webresource/ ribbon
Set(varEnquiryIdWithoutCurlyBraces,GUID(Substitute(Substitute(Param("recordId"),"{",""),"}","")));

// get the Region Of Interest from the Lead / Enquiry ID
// If value present use it for prefiltering the Gallery Items
Set(varRegionOfInterest,LookUp(Enquiries,Lead=varEnquiryIdWithoutCurlyBraces, 'Region of Interest'));
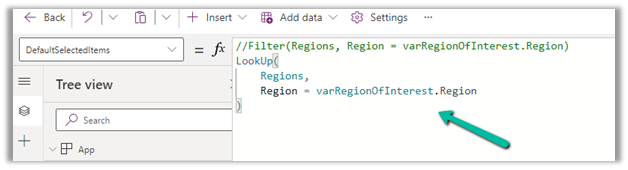
And lastly, for the combo box (Items = Region (custom table)), we are setting the DefaultSelectedItems as follows
LookUp(Regions,Region=varRegionOfInterest.Region)
We also tried using the Filter option, but it was giving incorrect values.
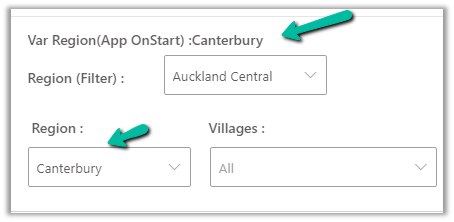
The value on the form –
The value in the Custom Page –
Correct value populated for combo box Region, and incorrect for the one using Filter formula