Update Business Process Flow Stage using Excel Import with Power Automate – Dataverse / Dynamics 365


In some business scenarios, we might need to update the Business Process Flow (BPF) stage of a record during an Excel import — especially during data migration or bulk record manipulation. In this blog post, we’ll walk through how to set a desired BPF stage (based on the stage name) and automatically move the record to that stage using Power Automate.

We’re working with a custom Dataverse table called Test(cr1a7_test) and a Business Process Flow named My Business Process Flow, which includes the following stages:

“select processidname,stagename, processstageid from processstage where processid = [processGUID]”

A screenshot of a computer

AI-generated content may be incorrect.

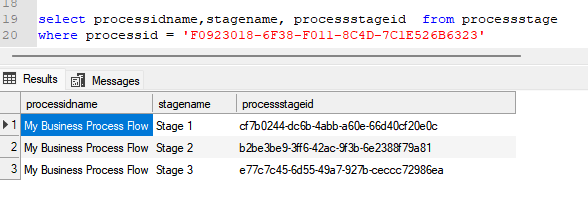
Our goal is to allow users to specify the stage name (e.g., “Stage 2”) through Excel import, and have a Power Automate flow update the record’s BPF instance to the corresponding stage automatically.

For this –

  • We’ll add a field called the Desired BPF Stage choice field on our table to store the desired stage name.
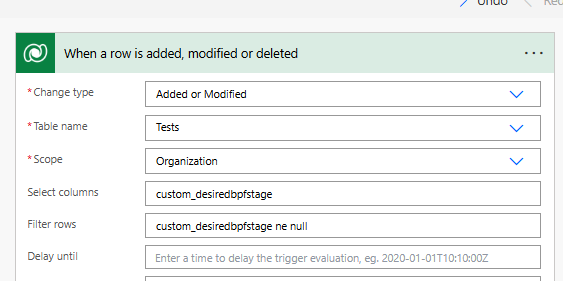
  • We’ll create a Power Automate flow that triggers on create or update.
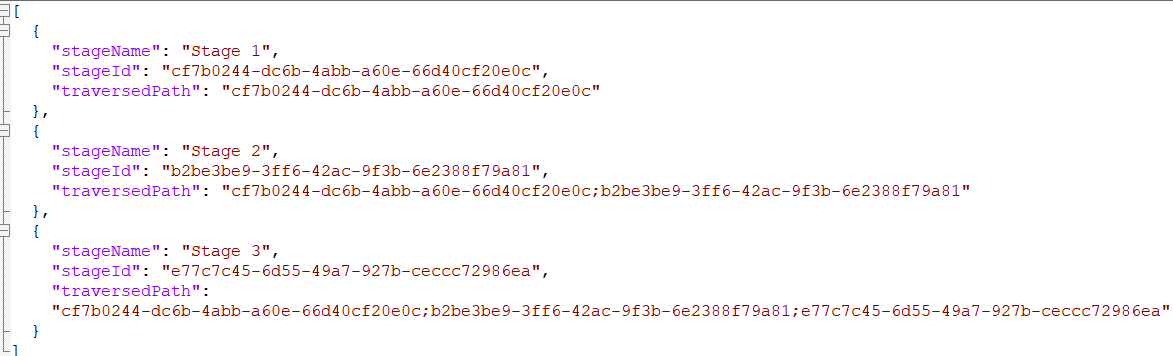
  • We’ll maintain a static JSON mapping of stage names to stage IDs and their traversed paths.
  • We’ll look up the corresponding stage ID and traversed path from the JSON.
  • We’ll fetch the BPF instance for the record.
  • We’ll update the BPF instance with the new active stage and traversed path.

Below is how we can define our JSON structure for mapping, which we will store either in a variable inside Power Automate or save as an environment variable.

A computer code on a white background

AI-generated content may be incorrect.

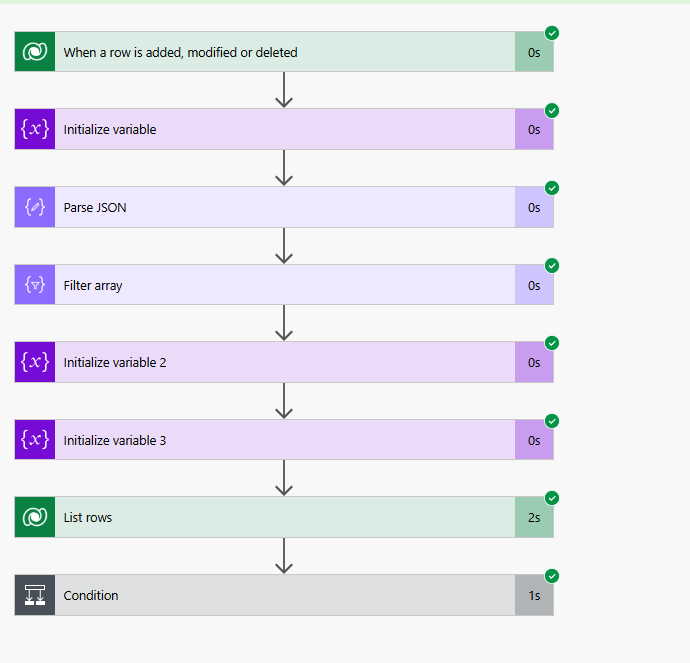
Trigger – When a row is added or modified.

A screenshot of a computer

AI-generated content may be incorrect.

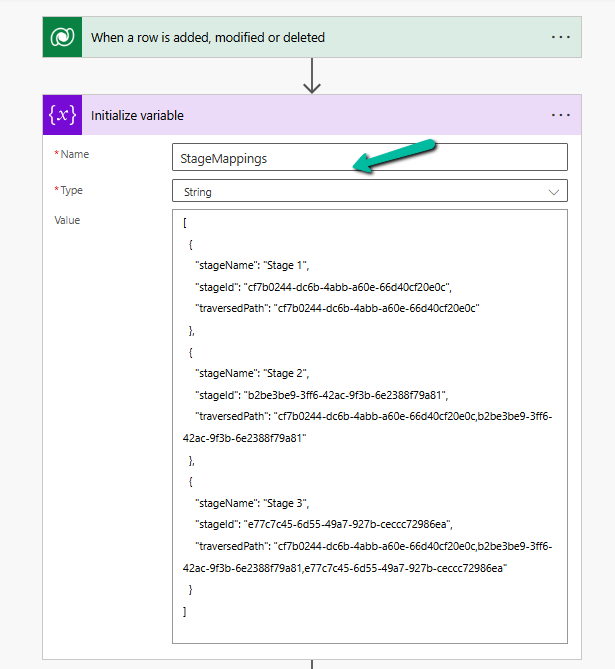
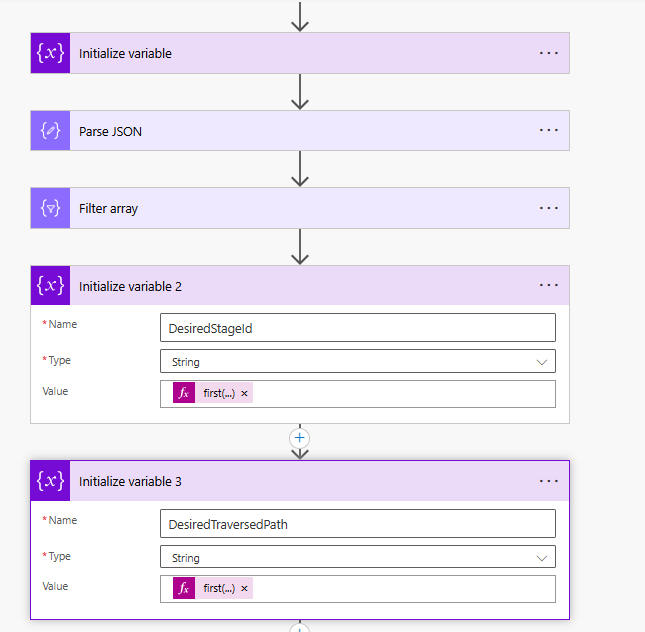
Initialize Variable with JSON mapping

A screenshot of a computer

AI-generated content may be incorrect.

Parse JSON – using the sample data

A screenshot of a computer

AI-generated content may be incorrect.

Use a “Filter array” action to find the object where stageName matches custom_desiredbpfstage.

A screenshot of a computer

AI-generated content may be incorrect.

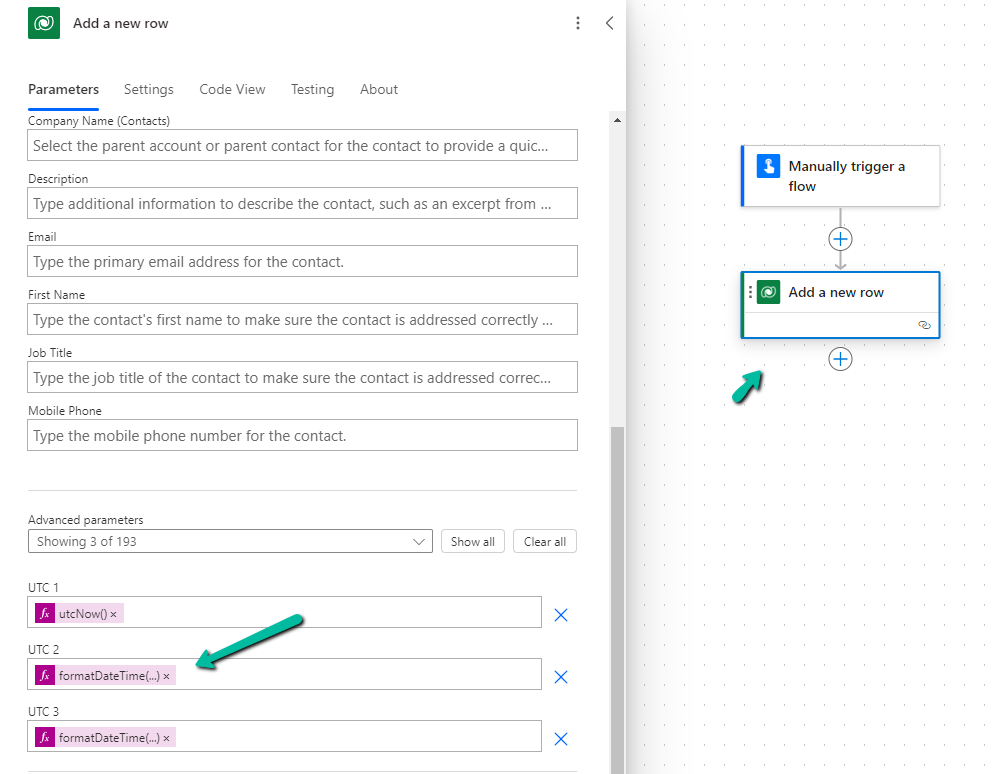
Initialize variables to store the Stage ID and traversed path.

  • first(body(‘Filter_array’))?[‘stageId’]
  • first(body(‘Filter_array’))?[‘traversedPath’]
A screenshot of a computer

AI-generated content may be incorrect.

Use List Rows to check if BPF Instance exists or not, if not we will create it or update it.

  • length(outputs(‘List_rows’)?[‘body/value’]) > 0
A screenshot of a computer

AI-generated content may be incorrect.

Update or Create a new BPF instance associated with the record.

A screenshot of a computer

AI-generated content may be incorrect.

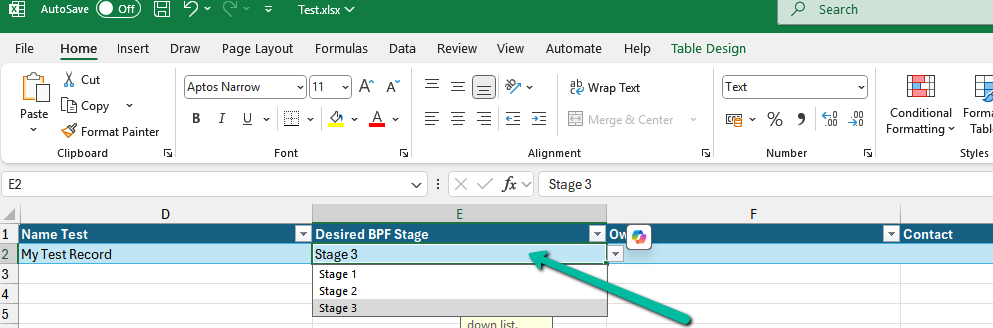
Below we can see the user specifying the Stage 3 value for the Desired BPF Stage column in the Excel to be imported.

A screenshot of a computer

AI-generated content may be incorrect.

We can see the Excel imported successfully.

A screenshot of a computer

AI-generated content may be incorrect.

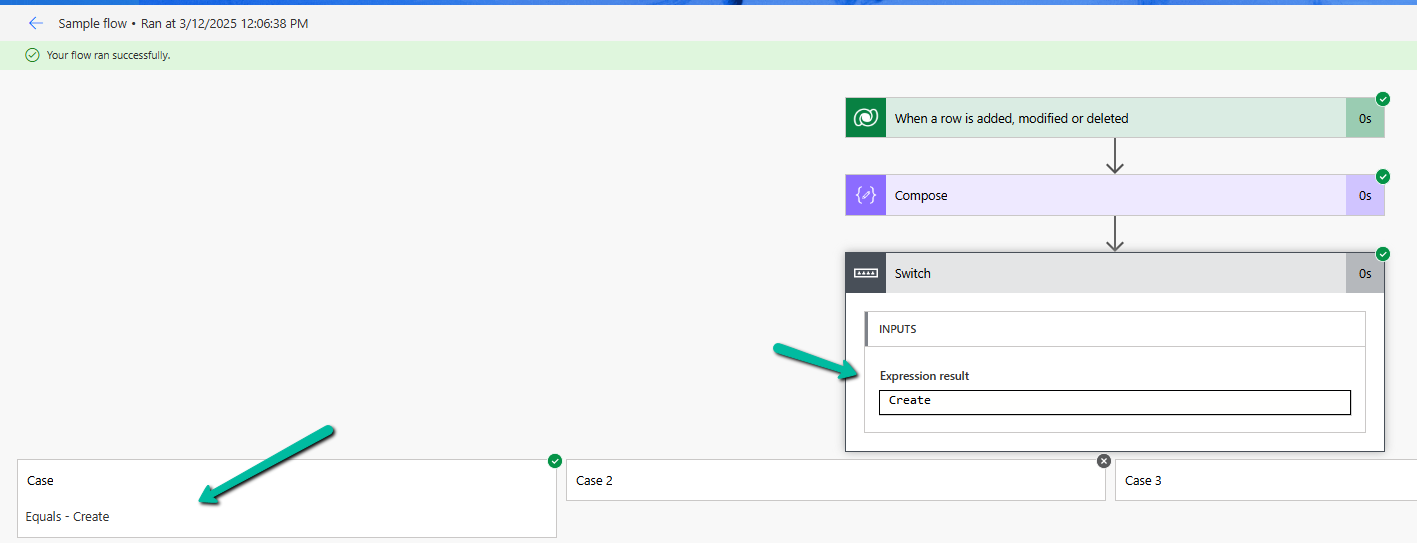
Below we can see our flow running successfully.

A screenshot of a computer

AI-generated content may be incorrect.

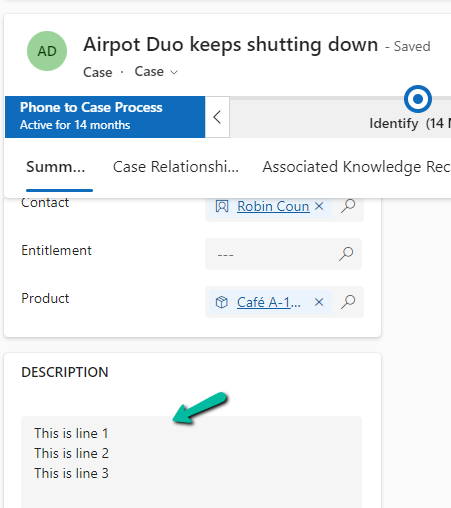
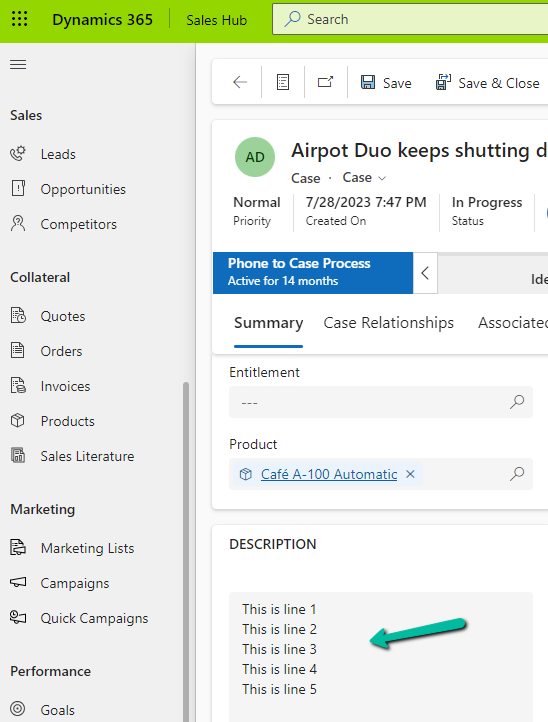
And the record in Stage 3 of the BPF.

A screenshot of a computer

AI-generated content may be incorrect.

Hope it helps..

Advertisements

Identify the Event That Triggered the Flow using the SdkMessage in Dataverse / Power Automate.


When working with Power Automate (Cloud Flows) for Dataverse, a common scenario is handling multiple triggers efficiently. By default, we often create separate flows for different events, such as Create, Update, or Delete. However, using the SdkMessage field, we can identify the event that triggered the flow and handle different scenarios within a single flow. This approach reduces redundancy and simplifies flow management.

When a row change occurs in Dataverse, the SdkMessage value represents the operation that triggered the event e.g. Create, Update, and Delete.

Benefits of using SdkMessage –

Avoid multiple flows: Instead of separate flows for Create, Update, and Delete, use one flow and branch logic accordingly.

Improve maintainability: Less duplication means fewer flows to update when business logic changes.

Enhance performance: Fewer active flows reduce execution overhead and clutter.

Let us see it in action, we have created a flow with the “When a row is added, modified, or deleted” Trigger.

And a switch action on SdkMessage with Case for Create, Update, and Delete.

triggerOutputs()?[‘body/SdkMessage’]

On creating the lead record we can see the corresponding action being triggered.

A screenshot of a computer

AI-generated content may be incorrect.

Same for the update.

A screenshot of a computer

AI-generated content may be incorrect.

Using SdkMessage in a single Dataverse flow allows you to consolidate multiple triggers into one, making your automation cleaner and more efficient.

Additionally, we should use the Select columns and the Filter rows properties to avoid unnecessary flow runs and improve efficiency.

A screenshot of a computer

AI-generated content may be incorrect.

Hope it helps..

Advertisements

Cloud Flows are disabled or turned off after copying a Dataverse Environment ? (Power Automate / Power Platform)


Recently we copied our UAT environment to one of the testing environments. After copying, we saw that all the cloud flows were in Off / Disabled state.

A screenshot of a computer

Description automatically generated

This was because during copy the environment is set in administration mode and background operations are also disabled.

Flows are automatically turned off to prevent –

  • Accidental execution of automation in a copied/test environment
  • Potential integration issues due to different connectors or authentication.
  • Unintended data modifications (e.g., flows interacting with external systems like SharePoint, SQL, or APIs).

If required, we can disable the administration mode or at least enable the background operations.

A screenshot of a computer

Description automatically generated

However, the flows will not automatically switch On even if we enable either the Administration Mode or Background operations.

Here we need to switch them On manually or use PowerShell scripts or API to do so.

Refer to blog posts for details on it –

PowerShell https://www.syskit.com/blog/managing-microsoft-powerapps-and-flow-like-a-pro-part-3-managing-flows/

Console App / APIhttps://nishantrana.me/2024/06/12/enable-disable-turn-on-turn-off-multiple-cloud-flows-using-code-power-automate/

Additional Considerations –

Connection References: If the flows use connection references (like SharePoint, Dataverse, Outlook, etc.), we need to verify them in Solution > Connection References and update them if necessary.

Environment Variables: If the flows depend on environment variables (e.g., API URLs, credentials), we need to update them the new environment.

Reassign Flow Owners: If the original owner of a flow is missing from the copied environment, we need to assign a new owner.

Lastly, if flows are not behaving correctly, check the callback registration records

https://nishantrana.me/2024/06/11/fixed-flow-not-getting-triggered-callback-registration-power-automate-dataverse/

Get more details around copying the environment.

Hope it helps..

Advertisements

Fixed – MisMatchingOAuthClaims – One or more claims either missing or does not match with the open authentication access control policy error – OAuth Authentication for HTTP Request trigger (Power Automate)ismatch


Recently while trying to invoke the HTTP Request trigger, on passing the token we got the below error from the Postman

{
    "error": {
        "code": "MisMatchingOAuthClaims",
        "message": "One or more claims either missing or does not match with the open authentication access control policy."
    }
}

Turned out that we missed the trailing slash for the resource’s value while generating the token.

Audience values as expected in the claim.

A screenshot of a computer

Description automatically generated

https://jwt.io/

On correcting the resource value, and using the new generated token,

fixed the mismatch claim issue

Below is our flow

A screenshot of a computer

Description automatically generated

Refer – https://nishantrana.me/2025/01/28/configure-oauth-authentication-for-http-request-triggers-specific-users-in-my-tenant-power-automate/

Get more details

Hope it helps..

Advertisements

Add line break / new line for description field of Email – Dataverse / Power Automate


In one of our requirements, we wanted to create/send an email on the creation/update of the case with the description of the email same as the description of the case.

In our Case record, for the description, we have the line break (\n) specified.

A screenshot of a computer

Description automatically generated
A screenshot of a computer

Description automatically generated

However, for the email created, we see the line break ignored.

A screenshot of a computer

Description automatically generated

To fix this we might think of applying the below formula by replacing “\n” with “”.

replace(triggerOutputs()?[‘body/description’],’\n’,’
‘)

A screenshot of a computer

Description automatically generated
A screenshot of a computer

Description automatically generated

On triggering our flow after these changes.

A screenshot of a computer

Description automatically generated

We still do not see the line break added in the description of the email.

This is because the ‘/n’ character is ignored by the replace formula.

To fix this we need to first initialize a variable for the new line of type string by hitting/pressing the Enter button for the Value.

A screenshot of a computer

Description automatically generated

Next comes our formula where we will use this variable.

replace(triggerOutputs()?[‘body/description’],variables(‘varNewLine’),’
‘)

A screenshot of a computer

Description automatically generated

Triggering the flow now –

A screenshot of a phone

Description automatically generated

generates the proper email description with line break.

A screenshot of a email form

Description automatically generated

The helpful post – https://tomriha.com/how-to-replace-new-line-n-in-a-power-automate-expression/

Hope it helps..

Advertisements

Few points on UTCNow and FormatDateTime – Power Automate / Dataverse


Recently we wrote a flow that will run daily once and will pick all the tasks due in the last 24 hours i.e. schedule end date less than equal to utcNow() and greater than equal to addDays(UTCNow(),-1)

Interestingly we observed one of the task records not picked.

The scheduled end date on the task record was – 2024-07-22T20:00:00Z

And for the flow the filter condition was –

scheduledend le 2024-07-23T20:00:35.5173871Z and scheduledend ge 2024-07-22T20:00:35.5173943Z

If we look at the date for the greater than equal condition, we can see that the seconds part is 35, the exact time when the List rows step would have run, and in case of that particular task record is 00, so it was not picked.

Then we applied the below formatDateTime function, excluding the time part.

(scheduledend le ‘@{formatDateTime(utcNow(),’yyyy-MM-dd’)}’ and scheduledend ge ‘@{formatDateTime(addDays(utcNow(),-1),’yyyy-MM-dd’)}’ and _regardingobjectid_value ne null and statecode eq 0)

Again we saw few tasks not picked,

The records that were not picked had scheduledenddate as

  • 2024-07-25 18:00:00.000
  • 2024-07-25 19:00:00.000

And as per new condition

scheduledend = ‘2024-07-24’ which essentially was

scheduledend = ‘2024-07-24 00:00:00.0000’

Eventually we updated the flow’s Filter Rows condition to include only the hour and minutes, ignoring the seconds/milliseconds because of which we got the issue in the first place.

(scheduledend le ‘@{formatDateTime(utcNow(),’yyyy-MM-dd HH:mm’)}’ and scheduledend ge ‘@{formatDateTime(addDays(utcNow(),-1),’yyyy-MM-dd HH:mm’)}’ and _regardingobjectid_value ne null and statecode eq 0)

One more example for more clarity –

Below we are creating a contact record and setting values for 3 date time fields, UTC1, UTC2, UTC3.

  • UTC1 = utcNow()
  • UTC2 = formatDateTime(utcNow(),’yyyy-MM-dd’)
  • UTC3 = formatDateTime(utcNow(),’yyyy-MM-dd HH:mm’)

The values for those fields inside CRM’s form –

A screenshot of a computer

Description automatically generated

The corresponding values within the Dataverse/ CRM’s database (UTC) –

A screenshot of a computer

Description automatically generated

Hope it helps..