Sample Code to retrieve instances using Online Management API in Dynamics 365 Customer Engagement


With version 9.0 of Dynamics 365 CE we now have Online Admin API that supports the following operations like Create, Retrieve, Delete, Backup and Restore instances. The user needs to have the Global Administrator or Service Administrator role in the Office 365 tenant to perform these operations.

As a first step we need to register the application with Azure Active Directory.

https://nishantrana.me/2016/11/13/register-a-dynamics-365-app-with-azure-active-directory/

and get the values for

Client Id and Authority.

Get the Service URL here

https://docs.microsoft.com/en-us/dynamics365/customer-engagement/developer/online-management-api/get-started-online-management-api#service-url

Sharing a sample code which can be used to retrieve all the instances in a specific tenant.

The sample code: –


public class MySampleApp
{

private const string Resource = "https://admin.services.crm.dynamics.com/";

// username and password
private const string UserName = "username.onmicrosoft.com";
private const string Password = "password";

// client id and authority of the application registered
private const string ClientId = "b2c5028d-57e6-4df7-9940-3243214948b";
private const string Authority = "https://login.microsoftonline.com/3432432e2-5fbe-4b78-a55a-bcb342d4f859/";

private static AuthenticationResult _authResult;

private static void Main(string[] args)
{
var authContext = new AuthenticationContext(Authority, false);
var credentials = new UserCredential(UserName, Password);

// Get the token
_authResult = authContext.AcquireToken(Resource, ClientId, credentials);

Task.WaitAll(Task.Run(async () => await GetInstances()));
}

private static async Task GetInstances()
{
var httpClient = new HttpClient
{
BaseAddress = new Uri(Resource),
Timeout = new TimeSpan(0, 2, 0)
};

httpClient.DefaultRequestHeaders.Add("OData-MaxVersion", "4.0");
httpClient.DefaultRequestHeaders.Add("OData-Version", "4.0");
httpClient.DefaultRequestHeaders.Accept.Add(new MediaTypeWithQualityHeaderValue("application/json"));
httpClient.DefaultRequestHeaders.Authorization = new AuthenticationHeaderValue("Bearer",
_authResult.AccessToken);

var retrieveResponse =
await httpClient.GetAsync("/api/v1/instances");

if (retrieveResponse.IsSuccessStatusCode)
{
var jRetrieveResponse =
retrieveResponse.Content.ReadAsStringAsync().Result;

var result = JArray.Parse(jRetrieveResponse);
foreach (var data in result)
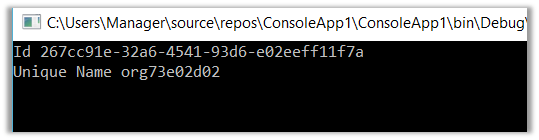
Console.Write("Id " + data["Id"] + "\nUnique Name " + data["UniqueName"]);
}
}
}

Result: –

The other properties: –

SiteMapName in the AppModuleSiteMap is null or empty error while importing V9 Solution in Dynamics 365 Customer Engagement


We recently upgraded our Dev and Test environment to V 9.0.

Dev

Test

While importing a solution from Dev to Test which had SiteMap we got the below issue.

“The SiteMapName in the AppModuleSiteMap is null or empty”

It turns out that the following tags were required and were missing in the Customization.xml

We added that tag and were able to import the solution successfully.

Interestingly if we export the same solution from Test and search for this tag, it is again missing, however, we can see the following XML section added there

This section was not there in dev’s sitemap.

Hope it helps..

How to – Use Plugin on Pre-Validation Stage in Dynamics 365 CE


Recently we had a requirement to delete the Account record without deleting the associated Contact records.

If we try deleting the account record we’d get the following message box

The relationship definition can’t be updated as well to achieve this

So, we wrote a plugin on the pre-validation stage of pre-delete event of Account, which will retrieve and loop through all the child contact records and set its parent customer field as null.

In case of pre-operation the child records were not available.

</p>
<p>public void Execute(IServiceProvider serviceProvider)<br />
{<br />
ITracingService tracingService = (ITracingService)serviceProvider.GetService(typeof(ITracingService));<br />
IPluginExecutionContext pluginContext = (IPluginExecutionContext)serviceProvider.GetService(typeof(IPluginExecutionContext));<br />
IOrganizationServiceFactory serviceFactory = (IOrganizationServiceFactory)serviceProvider.GetService(typeof(IOrganizationServiceFactory));<br />
IOrganizationService organizationService = serviceFactory.CreateOrganizationService(pluginContext.UserId);<br />
EntityReference targetEntity = (EntityReference)pluginContext.InputParameters["Target"];<br />
QueryExpression getContacts = new QueryExpression("contact");<br />
getContacts.Criteria.AddCondition(new ConditionExpression("parentcustomerid", ConditionOperator.Equal, targetEntity.Id));EntityCollection allContacts = organizationService.RetrieveMultiple(getContacts);foreach (Entity contact in allContacts.Entities)<br />
{<br />
Entity contactToBeUpdated = new Entity("contact");<br />
contactToBeUpdated.Id = contact.Id;<br />
contactToBeUpdated.Attributes["parentcustomerid"] = null;<br />
organizationService.Update(contactToBeUpdated);<br />
}}<br />

Another practical scenario

https://www.inogic.com/blog/2017/03/plugin-pre-validation-operation-to-show-an-error-message-as-well-as-log-the-error/

Hope it helps..

Advertisements

Upgrade to new Xrm client API object model (v9) smoothly using XrmToolBox plugins


We are currently in process of upgrading Dynamics from version 8.2 to 9.0. One of the major change is updating our current JavaScript to the new Xrm Client API Object Model.

https://docs.microsoft.com/en-us/dynamics365/get-started/whats-new/customer-engagement/important-changes-coming#some-client-apis-are-deprecated

https://docs.microsoft.com/en-us/dynamics365/customer-engagement/developer/clientapi/understand-clientapi-object-model

Below are the most useful tools à

Install the plugin, connect to your organization and click on Retrieve Jscript Webresources, it will list all the JScript Web resources found.

Click on Scan

It will list down all the issues found.

One common change that we need to do across all our JScript is to pass the ExecutionContext from Form as well as Fields (and Ribbon) events. Script Finder makes it extremely easy to find them out.

Click on Find Scripts usage and it will generate a report with all the details as shown below

Now we can follow the generated report and directly make the change to the form, field, and ribbon instead of searching for it manually.

Happy Upgrading !!

How to – Upgrade from Dynamics CRM 2016 On-Premise to Dynamics 365


First – check if you are eligible for the Fast Track program

https://nishantrana.me/2020/05/15/dynamics-crm-on-premise-to-online-migration-program-microsoft-fasttrack/

Be aware of Version Compatibility –

https://docs.microsoft.com/en-us/previous-versions/dynamicscrm-2016/developers-guide/gg328109%28v%3dcrm.8%29#version-compatibility

https://docs.microsoft.com/en-us/dynamics365/customerengagement/on-premises/developer/introduction-solutions

Upgrade the existing CRM 2016 On-Premise Server to CRM 2016 (8.1) for its solution to be compatible with Dynamics 365 Online using cumulative updates.

https://support.microsoft.com/en-gb/help/3142345/microsoft-dynamics-365-onpremise-cumulative-updates

If upgrading from previous version i.e. prior to CRM 2016, use “Migrate by using a new instance of Microsoft SQL Server” approach

https://technet.microsoft.com/en-us/library/hh699669.aspx

https://technet.microsoft.com/en-us/library/hh699747.aspx

Once updated to compatible CRM 2016 On Premise (8.1), go to settings à customizations and export the existing solutions or create a new solution, add all the required solution components to it as unmanaged which will be imported to the new Dynamics 365 online environment.

Create a new Dynamics 365 Online Environment and synchronize it with your existing Active Directory

https://blogs.msdn.microsoft.com/crm/2013/07/18/how-to-synchronize-crm-online-with-your-active-directory/

With solution ready and imported to new Dynamics 365 Online, next step is migration of data.

Consider using a data migration tool like KingswaySoft.

Check out their Migration Starter Pack.

https://www.kingswaysoft.com/blog/2016/09/16/Announcing-Migration-Starter-Pack-for-CRM-Online-and-CRM-On-Premise

or Scribe

https://www.scribesoft.com/solutions/dynamics-365/

Use following tools to update the JavaScript to Version 9.0 of XrmToolBox.

https://www.xrmtoolbox.com/plugins/XrmToolBox.Dynamics365V9JavascriptValidator/

  • Script Finder (to update the form and fields for passing the executionContext)

https://www.xrmtoolbox.com/plugins/MsCrmTools.ScriptsFinder/

https://community.dynamics.com/crm/b/develop1/archive/2017/11/11/executioncontext-hits-the-big-time

Update JavaScript to use Web API.

https://github.com/jlattimer/CRMRESTBuilder

SQL Based report, if possible, needs to be converted to use Fetch XML. Use the following tool to speed up the process.

http://www.sql2fetchxml.com/

If the reports are too complex, plan to use Power BI reports.

https://technet.microsoft.com/en-us/library/dn708055.aspx

Plugin and Custom workflow needs to be updated to run in an isolated environment i.e. sandbox along with references to the latest SDK assemblies.

https://docs.microsoft.com/en-us/dynamics365/customer-engagement/developer/plugin-isolation-trusts-statistics#web-access

https://www.nuget.org/packages/Microsoft.CrmSdk.CoreAssemblies/

If the existing On-Premise is integrated to other applications, make sure they can still talk with new Dynamics 365 Online.

Recurring jobs if needed, can be deployed to Azure as Azure WebJobs.

https://docs.microsoft.com/en-us/azure/app-service/websites-dotnet-deploy-webjobs

Use Hybrid Connection to talk with On-Prem resources.

https://docs.microsoft.com/en-us/azure/app-service/app-service-hybrid-connections

These were some of the points I could quickly think of. Please share your thoughts and experiences in comments. I’d update this list.

Do check out :

Microsoft Dynamics CRM (on-premises) to Microsoft Dynamics
Online Migration Guide

https://download.microsoft.com/download/6/D/6/6D67BDEA-1D67-42B4-A52A-CF13CD547CB5/OPtoCRMOnlineMigration.pdf

Hope it helps..

Advertisements

Power BI with Dynamics 365 CE – Dynamics 365 Content Pack


In previous posts we covered

Creating a Power BI Report using Dynamics 365 Online Service.

Publishing it and Showing it inside Dynamics 365 and scheduling its Refresh.

Apart from creating our own Power BI Report another way of quickly be up and running is to use the Content Packs provided by Third Party Service, for e.g. here we will be using Sales Analytics for Dynamics 365 content pack provided by Microsoft.

Login to the Power BI service, click on Get Data, select Services.

Select Apps and choose the Sales Analytics for Dynamics 365 from the AppSource.

If we search for Dynamics 365, we can see around 15 Apps provided by Microsoft.

Back into our Sales Analytics for Dynamics 365 App, when we click on Get in now we are presented with the option where we need to Specify the URL of our Dynamics CRM Online Service and Fiscal Year End Month Number for that organization.

In the next screen, we need to select OAuth2 as the authentication method and followed by signing in.

This installs the app which would be available in the Apps section.

Clicking on the installed Sales Analytics App opens the Dashboard

Clicking on Ask a question about your data inside Dashboard allows us to analyze the data by allowing us to choose the criteria

Here we have filtered the accounts by created on by month along with the owner

Also, we can see around 10 different reports created inside that app.

  • Sales Performance
  • Sales Leaderboard
  • Win/Loss Analysis
  • Top Won/Lost Details
  • Sales Pipeline
  • Sales Pipeline Dashboard
  • Sales Activity
  • Open Activities
  • Lead Analysis
  • Account Analysis

Similarly, we can create our own Content Packs to be shared with either specific group or with the entire organization.

Click on settings gear inside Power BI Service and select Create Content Pack

Here we are creating a content pack choosing the Dashboard, Reports and the Dataset that we created earlier in the previous posts.

Once published, the user 2 can click on Get Data and search for and can see the content pack.

Clicking on Connect adds the Dashboard, Report, and the corresponding Dataset to the My Workspace of the user. Only the user who had created the content pack can edit the artifacts that are part of Content Pack, however, the other user of the organization can save a copy of it and can work on it.

More on it

https://docs.microsoft.com/en-us/power-bi/service-organizational-content-pack-manage-update-delete

Hope it helps..