How to use the setIsValid Method in Dataverse / Dynamics 365


We can use the setIsValid method for validating field values in Model-driven apps. This method helps ensure that the data entered by users meets the required criteria before it’s processed or saved.

The setIsValid method is used to set the validity of a column’s value. It can mark a field as valid or invalid based on custom validation logic.

formContext.getAttribute(arg).setIsValid(bool, message);

bool: A Boolean value. Set to false to mark the column value as invalid, and true to mark it as valid.

message: (Optional) A string containing the message to display when the value is invalid.

Below we are using the setIsValid method in the function that ensures that the “End Date” is earlier than or equal to the “Start Date”, else it will mark the “End Date” as invalid.

function validateDates(executionContext) {
    var formContext = executionContext.getFormContext();
    var startDate = formContext.getAttribute("custom_startdate");
    var endDate = formContext.getAttribute("custom_enddate");
  
    if (startDate && endDate && endDate.getValue() <= startDate.getValue()) {
        endDate.setIsValid(false, "End Date must be after Start Date.");
    } else {
        endDate.setIsValid(true);
    }
}

We have it registered in the On Change of the ‘Start Date’ and ‘End Date’ fields.

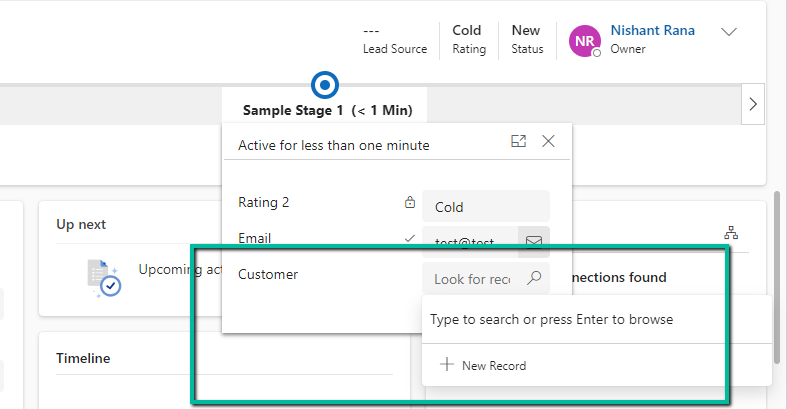
Here if we try saving the record, if the End Date is smaller than the Start Date, we will get the message specified.

Hope it helps..

Advertisements

Using Xrm.Utility.getPageContext().input to identity or get parent record details for the Quick Create form – Dataverse / Dynamics 365


Recently we had a requirement to make different sets of fields mandatory and non-mandatory on the Quick Create form for Contact, based on the parent record type it is opened from.

Quick Create Form

As we cannot have multiple Quick Create Form specified for different forms, we had to use JavaScript to identify the parent record type.

We can use the below properties for that.

Xrm.Utility.getPageContext

  • Xrm.Utility.getPageContext().input.data.parentrecordtype
  • Xrm.Utility.getPageContext().input.createFromEntity.entityType

Below we have the contact’s quick create form opened from a custom table – custom_contract’s contact lookup.

A screen shot of a computer

Description automatically generated

On using the above properties in our form load script for the quick create form, we can see different sets of fields set as required and recommended on the Quick Create Contact form based on the parent record it is opened from.

Parent A :

A screenshot of a computer

Description automatically generated

Parent B :

A screenshot of a phone
Description automatically generated

The helpful post – https://butenko.pro/2020/09/15/js-how-to-get-the-originating-record-reference-in-the-form-script-of-the-quick-create-form/

Hope it helps..

Advertisements

Manage solution dependencies easily through the refreshed look – Dataverse


In Dataverse, solution dependencies are a vital aspect of managing and deploying applications. Dependencies ensure that required components are present for a solution to work seamlessly across environments. However, with complex solutions, understanding and managing these dependencies can become overwhelming.

The updated dependencies page is designed to simplify dependency management by offering a more intuitive, action-driven experience.

Select a particular component in the solution, right-click>> Advanced >> Show dependencies.

We can see 3 different tabs.

Delete Blocked By (tab): Displays any dependencies preventing deletion of a component. Below we can see that for the Age column, it shows Contact’s System Form as the dependency.

A screenshot of a computer

Description automatically generated

Clicking on the Open option takes us to the component page, where we can see all the forms for the contact table.

A screenshot of a computer

Description automatically generated

Used By (tab): Lists other components dependent on the selected component.

Uses (tab): Shows dependencies that the selected component relies upon.

A screenshot of a computer

Description automatically generated

On clicking Open, it opens the Columns page for that table.

A screenshot of a computer

Description automatically generated

The different actions that we can take are Open and inspect the object, Delete the object, Remove dependency, and open the relevant documentation.

Below we have selected the option Remove dependency. As we saw the dependency here refers to the Contact System form in which we have the age field used.

A screenshot of a computer

Description automatically generated
A screenshot of a computer

Description automatically generated

Select Remove.

A screenshot of a computer

Description automatically generated

We get the success message after the successful removal of the dependency.

i.e. we can see the field removed from the blocking Contact’s System form.

Now if we want we can easily delete that particular field with no object blocking the delete.

Lastly, the Delete option for the solution allows the delete (uninstall) the solution that has dependencies on the solution component.

Get all the details here.

Hope it helps..

Advertisements

Using the Smart Paste (Preview) feature to fill the form fast in Dataverse / Dynamics 365


To enable this feature navigate to Power Platform Admin Center > Environment > Features > Enable smart paste (preview)

With the smart paste feature, we can copy the text to the clipboard that has the details we want to fill in for our form and click the smart paste button or use our normal CTRL + V. Copilot will analyze the pasted text and will provide suggestions for the different fields on the form.

Suppose we have copied the below text from an email received–

Below we have selected the Smart paste button.

We can see the notification that the Smart Paste is analyzing the clipboard data.

A screenshot of a computer

Description automatically generated

And can see it populating the suggestions for most of the fields from the text we had copied.

We can click on Accept all suggestions or select it for the individual fields.

A screenshot of a computer

Description automatically generated

On Accept all suggestions we can see the values auto-filled from the copied text in clipboard –

Get more details

Hope it helps..

Advertisements

Maximise Storage usage using Allocate Capacity (preview) in Dataverse / Dynamics 365


The new Allocate Capacity feature allows administrators to manage and optimize storage allocation across different environments. It allows administrators to strategically distribute available storage among the Dataverse environments based on each environment’s unique needs ensuring each has the right amount of storage to maintain performance and avoid service interruptions.

Navigate to Resources >> Capacity >> Dataverse inside the Power Platform Admin Center and select an environment to make the Allocate capacity option visible.

A close up of a pen

Description automatically generated

It shows the available storage, and current usage of the environment selected.

A screenshot of a computer

Description automatically generated

We can allocate Database, Log, and File-specific storage and also configure alerts.

A screenshot of a computer

Description automatically generated

If an environment exceeds, it shows up as “Overage” as shown below

A screenshot of a computer

Description automatically generated

Using this new feature, admins can Allocate Capacity effectively by monitoring the storage usage across environments, setting alerts when the environment nears its capacity limit, and allocating the capacity strategically e.g. production environment will get higher allocation compared to the development environment. Admins can also purchase additional storage and allocate it as required to ensure each environment runs smoothly.

Get more details

Hope it helps..

Advertisements

Disable recent records (Disable most recently used items) for the Lookup field used in the Business Process Flow (Dataverse / Dynamics 365)


Suppose we have the below Customer Lookup in the Sample Stage of a Business Process Flow.

As we can see the lookup shows the Recent records there.

A screenshot of a computer

Description automatically generated

Now say we have applied filtering to the lookup using addPreSearch so we need to disable the recent records options in it.

To do so for the fields in BPF –

Open the corresponding table of the BPF (will have the same name as BPF)

A hand pointing to a computer screen

Description automatically generated

Open the form, select the Customer (lookup) field from the Tree View, and check the Disable most recently used items (save and publish the change)

A screenshot of a computer

Description automatically generated

As expected we can now see the recent records options not appearing for the Customer lookup in the BPF.

A screenshot of a computer

Description automatically generated

Hope it helps..

Advertisements