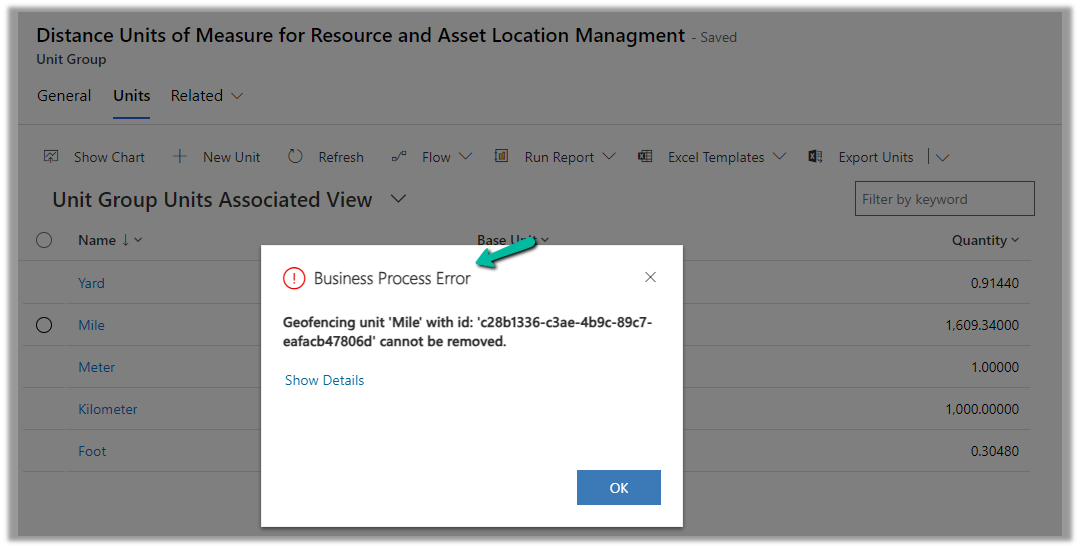
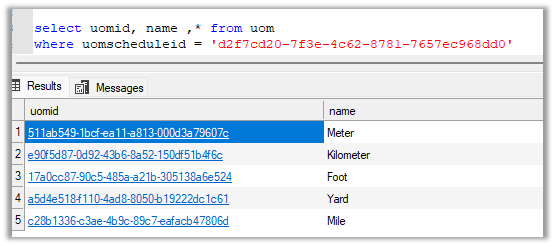
While trying to delete the Unit records related to the “Distance Units of Measure for Resource and Asset Location Management” unit group, we will get the below error
Geofencing unit ‘Mile’ with id: ‘<GUID>’ cannot be removed
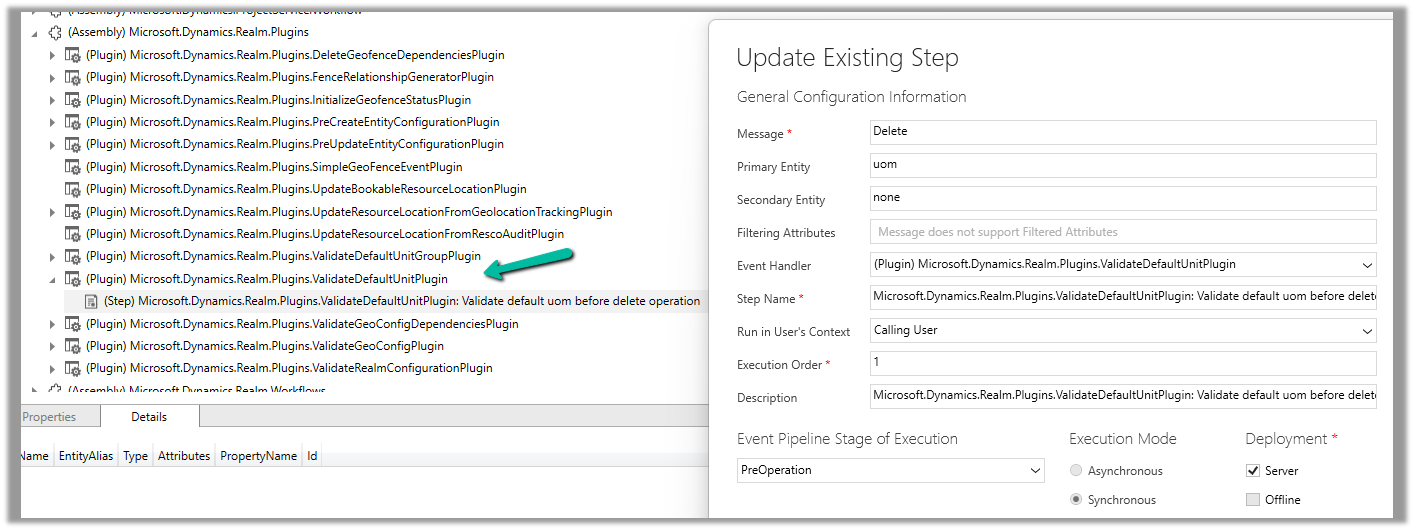
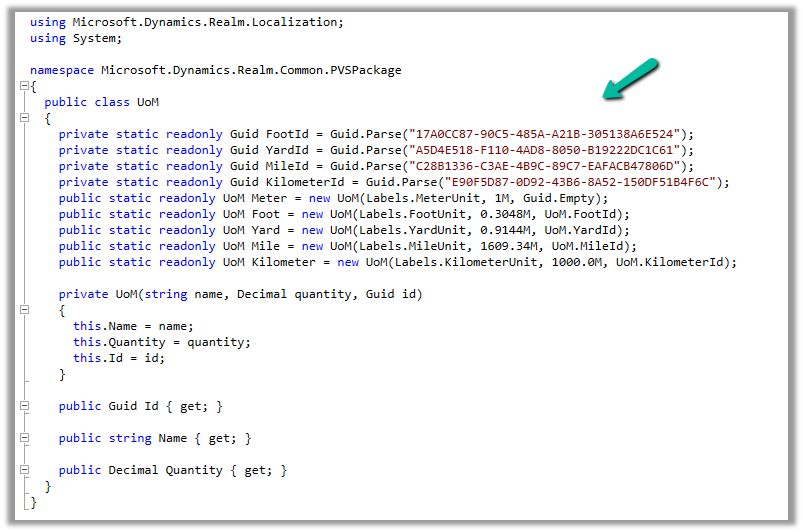
Below is the out of the box plugin that restricts the deletion of the unit
Recently we started getting the below error on the form load of the Work Order Service Task record, that also only in specific environments, and there was no changes made there.
Error Details:
Event Name: onload
Function Name: OnLoad
Web Resource Name: msdyn_/WorkOrderServiceTask/WorkOrderServiceTask.js
Solution Name: msdyn_FieldService_patch_update
Publisher Name: microsoftdynamics
From the error message also it was clear it was the error in the out-of-the-box javascript.
On raising the Microsoft Support Ticket, we were immediately informed that it was because of a change in the function definitions in the .js files along with its associated handlers which was done to prevent object definition collisions in the web resources.
This applied to forms of the below tables
Work Order (msdyn_workorder)
Work Order Service Task (msdyn_workorderservicetask)
Through booking rules, we can specify custom JavaScript methods, that can be used to run validation checks, before creation or update of a bookable resource booking record. Based on the result of the validation checks we can either warn the user or cancel the booking create or update event.
Booking rules are triggered when a resource is booked or a bookable resource booking record is either created or updated using the schedule board, schedule assistant, or booking form.
The booking rules are not triggered if the booking form has business process flow enabled. We can also disable the booking rule to be triggered on the save of the booking form by enabling the setting – msdyn_DisableProcessBookingRulesOnSaveBookingForm
Let us see it in action.
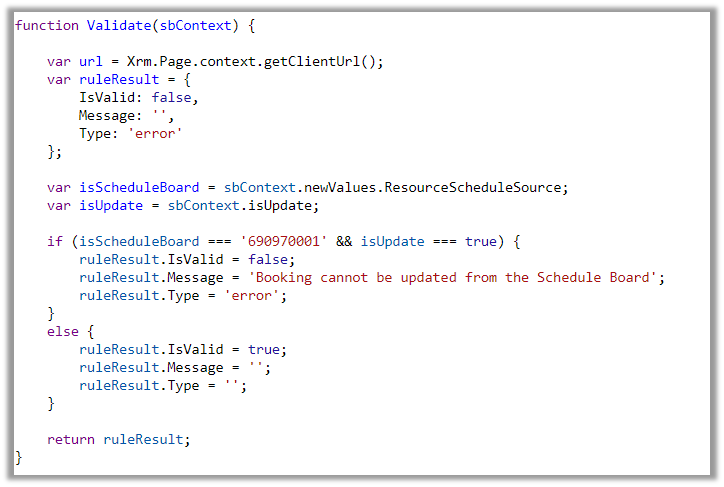
Below is our JavaScript method to be used as a Booking Rule.
function Validate(sbContext) {

    var url = Xrm.Page.context.getClientUrl();
    var ruleResult = {
        IsValid: false,
        Message: '',
        Type: 'error'
    };

    var isScheduleBoard = sbContext.newValues.ResourceScheduleSource;
    var isUpdate = sbContext.isUpdate;

    if (isScheduleBoard === '690970001' && isUpdate === true) {
        ruleResult.IsValid = false;
        ruleResult.Message = 'Booking cannot be updated from the Schedule Board';
        ruleResult.Type = 'error';
    }
    else {
        ruleResult.IsValid = true;
        ruleResult.Message = '';
        ruleResult.Type = '';
    }

    return ruleResult;
}
To create a Booking Rule, navigate to Resources >> Booking Settings >> Booking Rules inside the Dynamics 365 Field Service app and create a new booking rule, specifying the web resource and the method inside it.
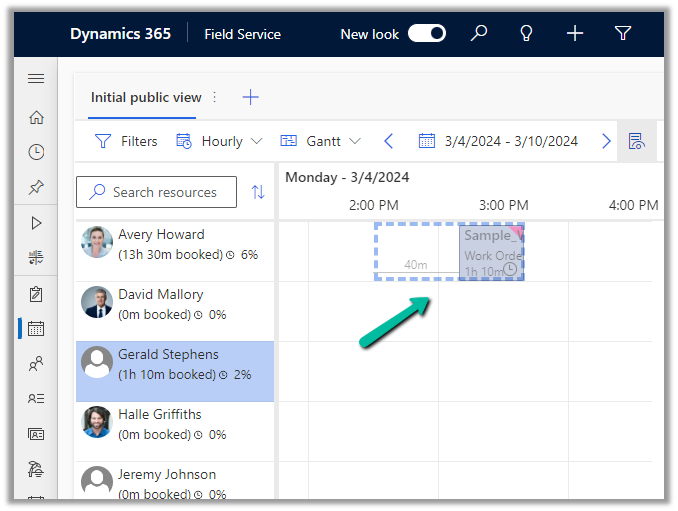
Let us try to update a booking from the schedule board.
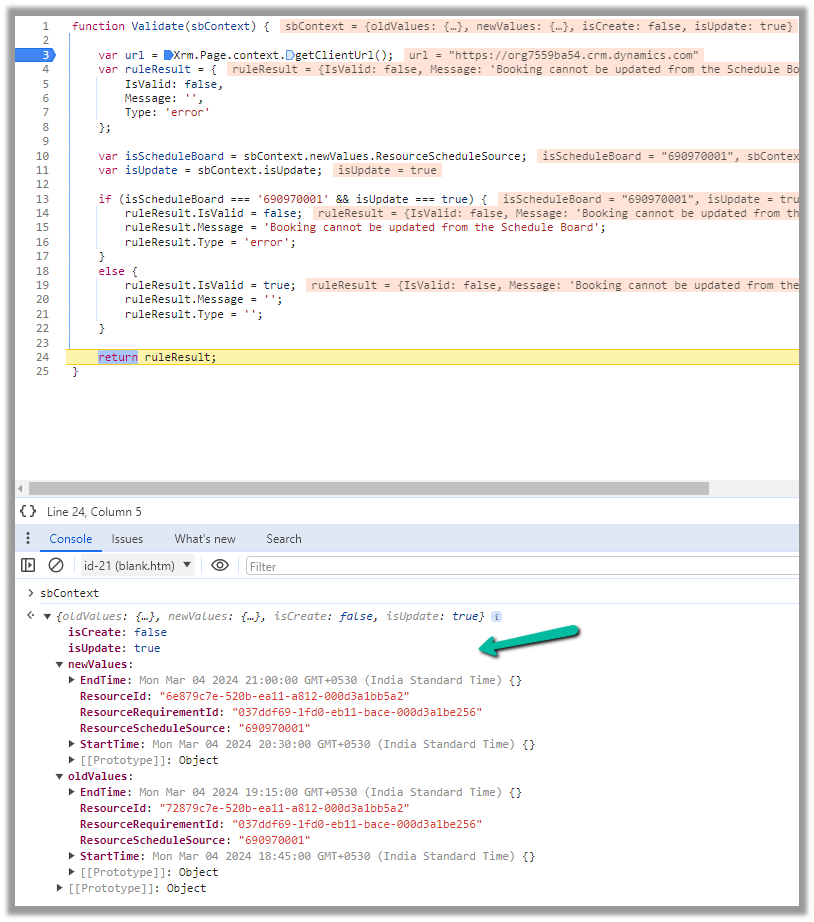
This will trigger our booking rule and will pass the context object, which contains details like whether it is a create or update event, and details around old values and new values for start time, end time, resource details, etc. for that booking.
We can use these values passed in the context, fetch more details about the corresponding resource or work order, have our validation logic defined there, and finally pass the ruleResult object.
If we want to cancel the event, we can set IsValid as false, specify the error message, and set Type as an error in the ruleResult object. Similarly, if it passes the validation, we can set IsValid as true.
This is how the error message shows up, and the event is canceled inside the schedule board.
Below we can see the same booking rule being triggered from the Booking Resource Booking form.
We can deactivate the booking rule record created if we do not want it to trigger.
Recently for one of our plugins, that moves attachments to the Azure Blob Storage, we got the below exception.
BlobFileName: WFU000069107_Inside Install – CFC__2024_03_03_12_24_05_179_temp.jpg Caught Exception: The input is not a valid Base-64 string as it contains a non-base 64 character, more than two padding characters, or an illegal character among the padding characters. System.FormatException: The input is not a valid Base-64 string as it contains a non-base 64 character, more than two padding characters, or an illegal character among the padding characters. at System.Convert.FromBase64_Decode(Char* startInputPtr, Int32 inputLength, Byte* startDestPtr, Int32 destLength) at System.Convert.FromBase64CharPtr(Char* inputPtr, Int32 inputLength)
We were getting errors while trying to use the FromBase64ToString method to decode the Base64 encoded string into its original byte array.
Seemed there were some issues with the image uploaded, even from the browser when trying to download we were getting the below exception.
The solution was to check if it is a valid Base64 encoded string before converting it to a byte array and if not skip it and process other attachments in the plugin.
Recently we got the below exception for one of our plugins.
Message: The plug-in execution failed because the Sandbox Worker process crashed. This is typically due to an error in the plug-in code. Please refer to this document: https://go.microsoft.com/fwlink/?linkid=2189390 Microsoft.Xrm.RemotePlugin.Grpc.ExceptionHandlers.SandboxFabricWorkerCommunicationException: Error communicating with SandboxFabric Worker —> Grpc.Core.RpcException: Status(StatusCode=”DeadlineExceeded”, Detail=”Deadline Exceeded”
If we refer to Microsoft Documentation below seems to be the cause of the issue in our case.
In our scenario, we had a Plugin that was Asynchronous and it was triggered on the Post Update of Work Order Service task. The plugin will fetch all the attachments (to notes associated with inspection attachments > inspection response > work order service task). There were many Service Tasks having more than 20 attachments exceeding 100 mb size total.
We were doing bulk updates which triggered the plugin creating too many requests eventually leading to that error.