Check Out the Natural Language Grid and View search


The new Smart Grid Preview feature allows us to find, filter, and sort data with natural language.

To enable it navigate to Environment >> Settings >> Features inside Power Platform Admin Center and turn on Natural Language Grid and View Search.

A screenshot of a computer

Description automatically generated

After enabling it we will see a search box on the grid page where we can type in questions about our data in plain English.

A screenshot of a computer

Description automatically generated

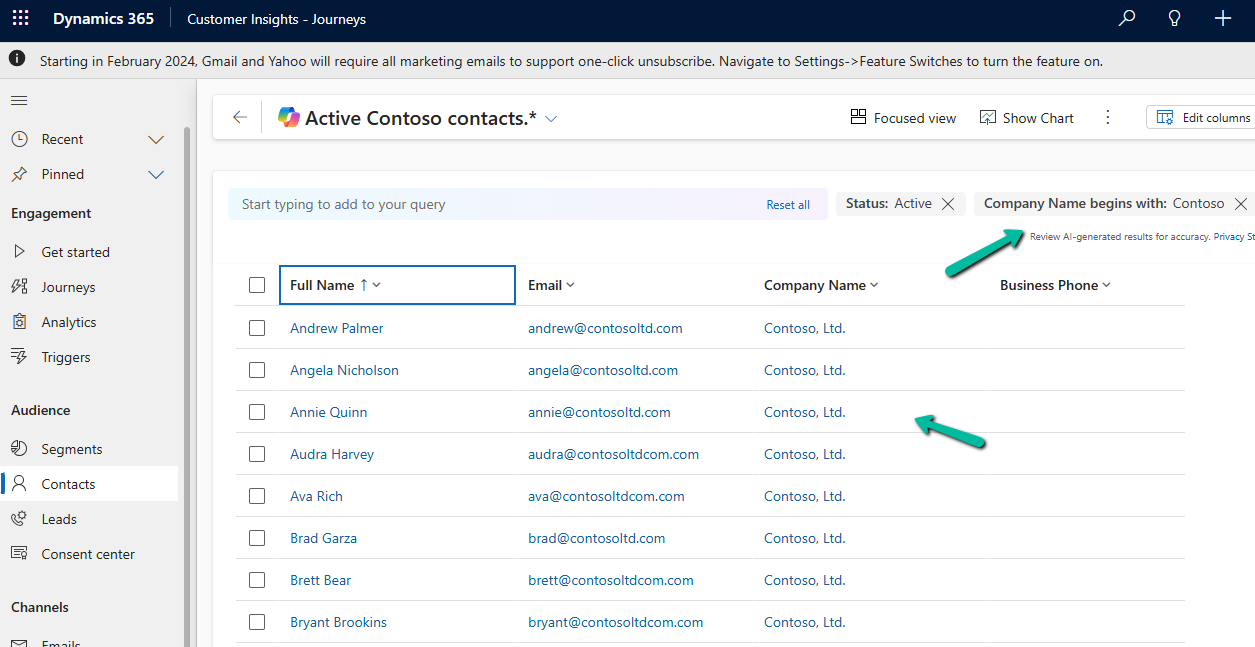
Let’s say we need to find “Contacts from the company Contoso”. Normally, this would mean defining the filters/query. But with the Smart Grid’s natural language search, we just type the request, and the system filters the view accordingly.
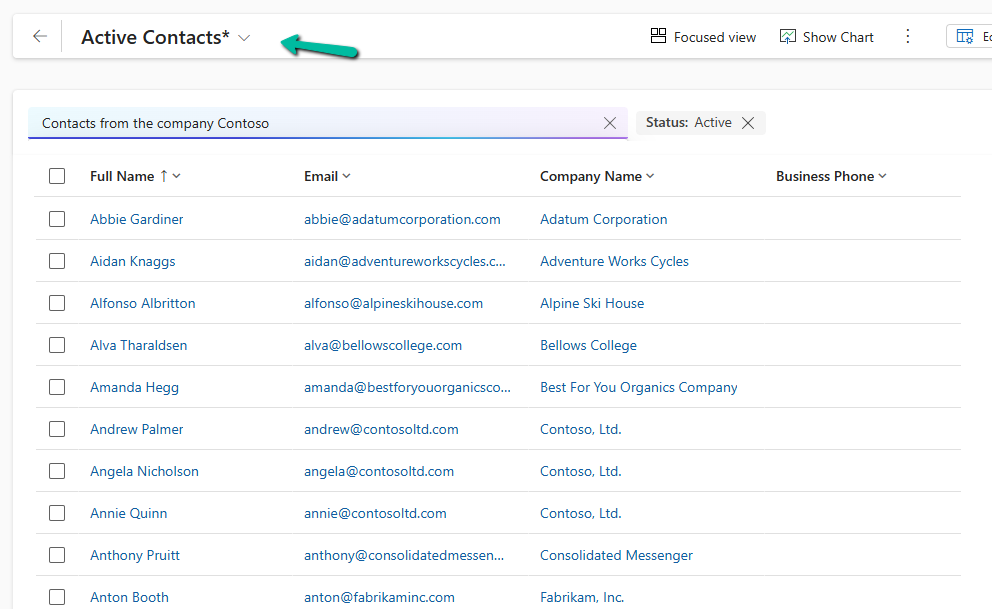
A screenshot of a computer

Description automatically generated

The result –

A screenshot of a computer

Description automatically generated

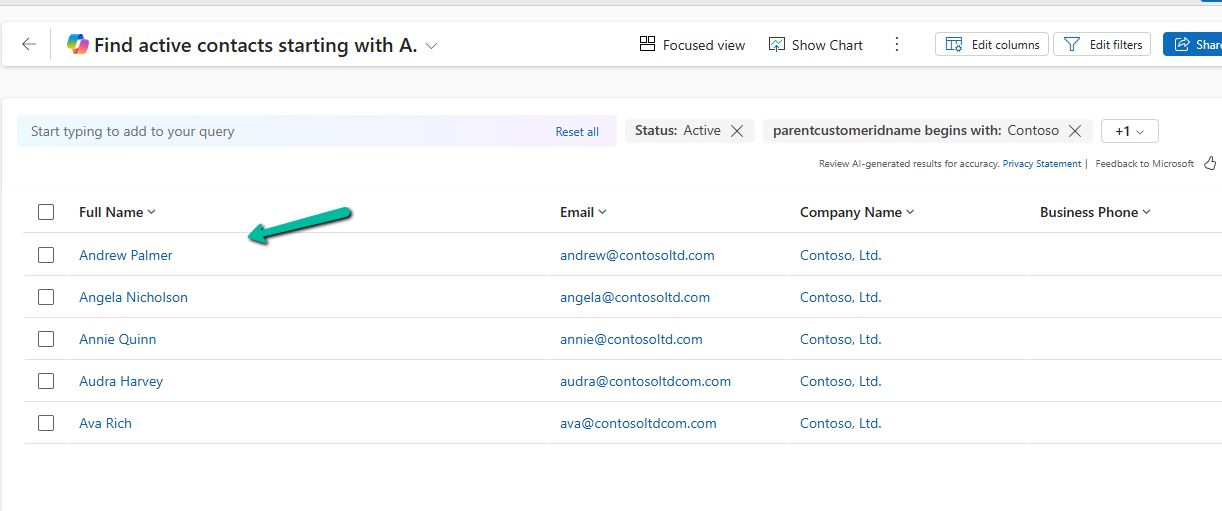
We can also use it to sort data.

A screenshot of a computer

Description automatically generated

Another example

A screenshot of a computer

Description automatically generated

The result –

A screenshot of a computer

Description automatically generated

Using natural language search has loads of benefits:

  • Ease of Use: Do complex searches without needing to be tech-savvy.
  • Speed: Find what you need quickly without navigating through multiple filters.
  • Accessibility: Makes data interaction easy for everyone, even if you’re not a tech pro.

As it’s still in preview, there are a few things the Smart Grid Preview doesn’t support yet:

  • Query Aggregation
  • Query Grouping
  • Adding Columns

Remember, it’s still a work in progress and not ready for full production use.

Get more details here

Hope it helps ..

Advertisements

Fixed – MisMatchingOAuthClaims – One or more claims either missing or does not match with the open authentication access control policy error – OAuth Authentication for HTTP Request trigger (Power Automate)ismatch


Recently while trying to invoke the HTTP Request trigger, on passing the token we got the below error from the Postman

{
    "error": {
        "code": "MisMatchingOAuthClaims",
        "message": "One or more claims either missing or does not match with the open authentication access control policy."
    }
}

Turned out that we missed the trailing slash for the resource’s value while generating the token.

Audience values as expected in the claim.

A screenshot of a computer

Description automatically generated

https://jwt.io/

On correcting the resource value, and using the new generated token,

fixed the mismatch claim issue

Below is our flow

A screenshot of a computer

Description automatically generated

Refer – https://nishantrana.me/2025/01/28/configure-oauth-authentication-for-http-request-triggers-specific-users-in-my-tenant-power-automate/

Get more details

Hope it helps..

Advertisements

Fixed – Delete Plugin on Appointment not firing for operation on Recurring Appointment (Dataverse / Dynamics 365)


Recently we observed that our plugin registered on the Delete message of appointment on the PreValidation stage was not getting triggered when we were deleting or updating the occurrence of the Recurring Appointment.

For both of the below operations, our plugin was not getting triggered. The plugin had the logic to delete a few associated records to the appointment record.

Delete operation – This deletes all the existing appointment.

A screenshot of a computer

Description automatically generated

Recurrence Update –This deletes the existing appointment and creates new appointment records based on the new recurrence.

A screenshot of a computer

Description automatically generated

On trying out different things, we saw that the plugin was getting triggered if registered on the PreOperation.

A screenshot of a computer

Description automatically generated

For testing, we registered a sample plugin that throws the InvalidPluginExecutionException and saw it getting triggered in case of PreOpertaion as shown below.

A screenshot of a computer

Description automatically generated

Hope it helps..

Advertisements

Fixed – The method ‘GroupJoin’ cannot follow the method ‘SelectMany’ or is not supported while using LINQ query (Dataverse / Dynamics 365)


We might get the below error while using LINQ to query Dataverse –

System.NotSupportedException: ‘The method ‘GroupJoin’ cannot follow the method ‘SelectMany’ or is not supported. Try writing the query in terms of supported methods or call the ‘AsEnumerable’ or ‘ToList’ method before calling unsupported methods.’

A screenshot of a computer

Description automatically generated

This error occurs because the GroupJoin method, which is essentially what happens during the into … syntax in LINQ, is not supported in the Dataverse/LINQ provider for Dynamics CRM. The issue is related to how the LINQ provider translates queries into FetchXML or SQL that the Dataverse understands. Specifically, nested joins or SelectMany (used by DefaultIfEmpty() in left joins) are not fully supported by the LINQ provider for Dataverse.

The GroupJoin and DefaultIfEmpty methods (used for left joins) result in queries that cannot be translated directly into FetchXML. The LINQ provider for Dataverse does not support all LINQ-to-Entities features, such as nested joins or advanced grouping logic. When you perform nested joins with DefaultIfEmpty() for left joins, the LINQ provider struggles to translate it into the underlying Dataverse query format, which is why the exception is thrown.

To fix it we can break the query into multiple steps as shown below.

A screenshot of a computer

Description automatically generated

However, here as we are fetching partial data into memory and combining it, it increases transfer and processing overhead and can take a long time to process based on the number of records.

The better alternative from a performance perspective would be to use FetchXML or QueryExpression here.

Also check writing complex LINQ queries

Hope it helps..

Advertisements

Using Xrm.Utility.getPageContext().input to identity or get parent record details for the Quick Create form – Dataverse / Dynamics 365


Recently we had a requirement to make different sets of fields mandatory and non-mandatory on the Quick Create form for Contact, based on the parent record type it is opened from.

Quick Create Form

As we cannot have multiple Quick Create Form specified for different forms, we had to use JavaScript to identify the parent record type.

We can use the below properties for that.

Xrm.Utility.getPageContext

  • Xrm.Utility.getPageContext().input.data.parentrecordtype
  • Xrm.Utility.getPageContext().input.createFromEntity.entityType

Below we have the contact’s quick create form opened from a custom table – custom_contract’s contact lookup.

A screen shot of a computer

Description automatically generated

On using the above properties in our form load script for the quick create form, we can see different sets of fields set as required and recommended on the Quick Create Contact form based on the parent record it is opened from.

Parent A :

A screenshot of a computer

Description automatically generated

Parent B :

A screenshot of a phone
Description automatically generated

The helpful post – https://butenko.pro/2020/09/15/js-how-to-get-the-originating-record-reference-in-the-form-script-of-the-quick-create-form/

Hope it helps..

Advertisements

Manage solution dependencies easily through the refreshed look – Dataverse


In Dataverse, solution dependencies are a vital aspect of managing and deploying applications. Dependencies ensure that required components are present for a solution to work seamlessly across environments. However, with complex solutions, understanding and managing these dependencies can become overwhelming.

The updated dependencies page is designed to simplify dependency management by offering a more intuitive, action-driven experience.

Select a particular component in the solution, right-click>> Advanced >> Show dependencies.

We can see 3 different tabs.

Delete Blocked By (tab): Displays any dependencies preventing deletion of a component. Below we can see that for the Age column, it shows Contact’s System Form as the dependency.

A screenshot of a computer

Description automatically generated

Clicking on the Open option takes us to the component page, where we can see all the forms for the contact table.

A screenshot of a computer

Description automatically generated

Used By (tab): Lists other components dependent on the selected component.

Uses (tab): Shows dependencies that the selected component relies upon.

A screenshot of a computer

Description automatically generated

On clicking Open, it opens the Columns page for that table.

A screenshot of a computer

Description automatically generated

The different actions that we can take are Open and inspect the object, Delete the object, Remove dependency, and open the relevant documentation.

Below we have selected the option Remove dependency. As we saw the dependency here refers to the Contact System form in which we have the age field used.

A screenshot of a computer

Description automatically generated
A screenshot of a computer

Description automatically generated

Select Remove.

A screenshot of a computer

Description automatically generated

We get the success message after the successful removal of the dependency.

i.e. we can see the field removed from the blocking Contact’s System form.

Now if we want we can easily delete that particular field with no object blocking the delete.

Lastly, the Delete option for the solution allows the delete (uninstall) the solution that has dependencies on the solution component.

Get all the details here.

Hope it helps..

Advertisements