Use JavaScript to add onchange event to a field in the Business Process Flow


Let us continue our previous post, here we will update the script to add an onchange event to the Identify Sales Team field in the Business Process Flow. Based on the value selected we will make the Develop Proposal field mandatory.

A screenshot of a computer

Description automatically generated

Below is the code we need to add for it.

A screen shot of a computer program

Description automatically generated
function OnLoad(executionContext)
{
	 var formContext = executionContext.getFormContext();
	 formContext.data.process.addOnStageChange(CheckStageAndToggleFieldBPF);
	 CheckStageAndToggleFieldBPF(executionContext);
}

 function CheckStageAndToggleFieldBPF(executionContext) {

        var formContext = executionContext.getFormContext();     
        var activeStage = formContext.data.process.getActiveStage();
        var activeStageId = activeStage.getId();		
        var stagePropose = "3a275c22-fc45-4e89-97fc-41e5ec578743";
     
        if (activeStageId.toLowerCase() === stagePropose) {          
                formContext.getControl("header_process_identifypursuitteam").setDisabled(false);                 
        }
        else {
            formContext.getControl("header_process_identifypursuitteam").setDisabled(true);
        }    

		formContext.getControl("header_process_identifypursuitteam").getAttribute().addOnChange(function(executionContext) {

                if (formContext.getControl("header_process_identifypursuitteam").getAttribute().getValue()) 
				{
                    formContext.getControl("header_process_developproposal").getAttribute().setRequiredLevel("required");
                }
                else 
				{
                    formContext.getControl("header_process_developproposal").getAttribute().setRequiredLevel("none");
                }
            });
  }


We can add it to the field if it is in the form also, that will also work the same. However, if we do not have the field on the form we need to add it to the field on the BPF.

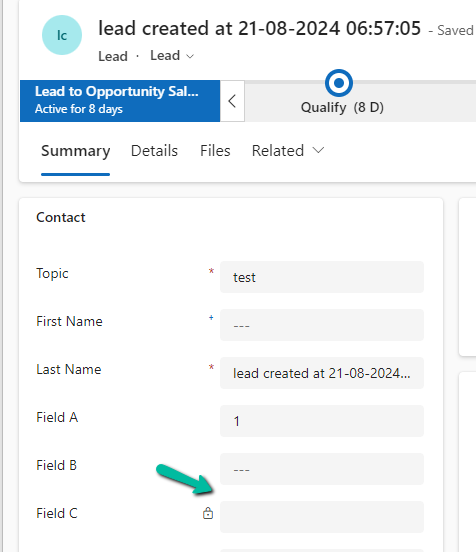
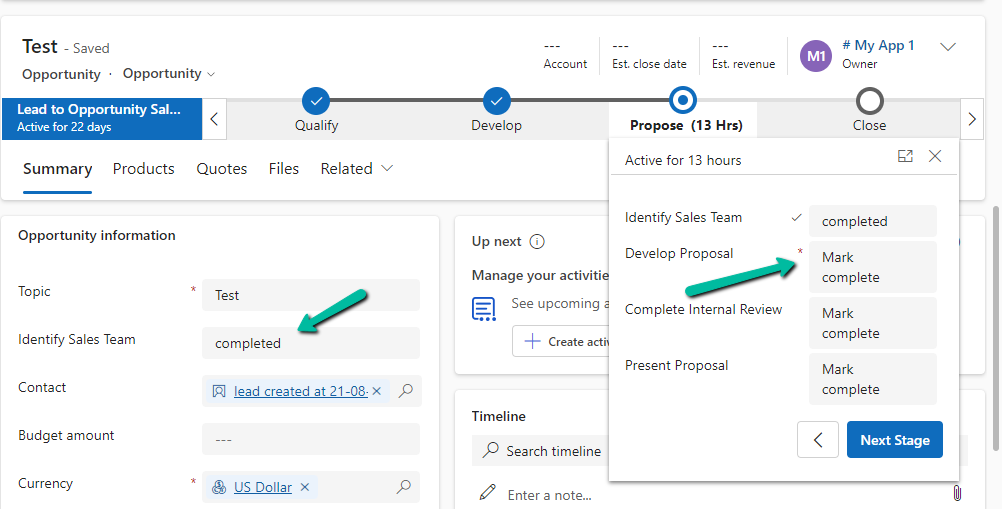
On selecting the value completed for Identify Sales Team, we can see the Develop Proposal field being set as mandatory.

A screenshot of a computer

Description automatically generated
A screenshot of a computer

Description automatically generated

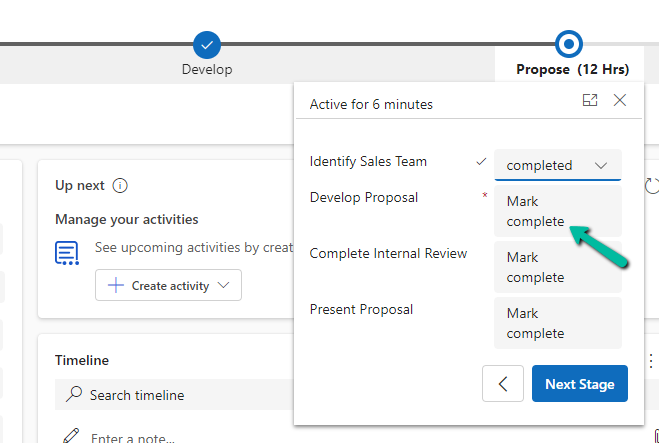
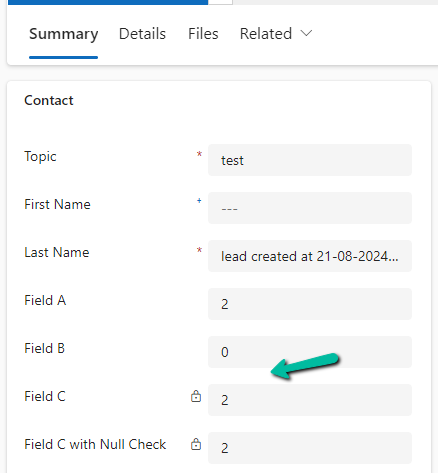
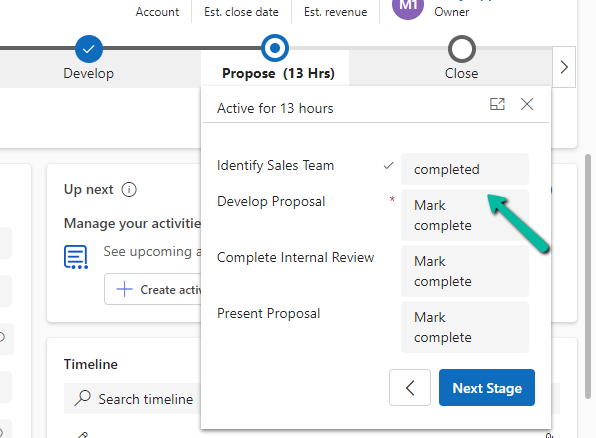
Later if we add the same field on the form, or into another stage of the BPF, the onchange event will apply and work for them.

For the field on the form –

A screenshot of a computer

Description automatically generated

Same field in another stage –

A screenshot of a computer

Description automatically generated
A screenshot of a computer screen

Description automatically generated

Hope it helps..

Advertisements

Use JavaScript to enable / disable a field only if the Stage is Active in Business Process Flow – Dynamics 365 / Dataverse


Recently we had a requirement to set some of the fields in our business process flow to be enabled only if that stage is active.

E.g. We want to Identify Sales Team field to be Enabled only if the Propose stage is active, else we want to set it as read-only.

A screenshot of a computer

Description automatically generated

We can use the below JScript to achieve the same.

A screen shot of a computer program

Description automatically generated

Because the Propose stage is Inactive we have Identify Sales Team as read only.

A screenshot of a computer

Description automatically generated

On moving to the Propose stage, we can see the field being enabled back.

A screenshot of a computer

Description automatically generated

The key steps are –

In the onload of the form associate your function/logic to the OnStage change method of the Process object.

formContext.data.process.addOnStageChange(CheckStageAndToggleFieldBPF);

Next, check for the active stage ID.

Here to get the active stage ID, open the business process flow and get its Guid.

A computer screen with a green arrow pointing to a black box

Description automatically generated

Then using the awesome SQL4CDS XrmToolBox plugin get the Guid of the particular stage.

A screenshot of a computer

Description automatically generated
function OnLoad(executionContext)
{
	 var formContext = executionContext.getFormContext();
	 formContext.data.process.addOnStageChange(CheckStageAndToggleFieldBPF);
	 CheckStageAndToggleFieldBPF(executionContext);
}

 function CheckStageAndToggleFieldBPF(executionContext) {

        var formContext = executionContext.getFormContext();     
        var activeStage = formContext.data.process.getActiveStage();
        var activeStageId = activeStage.getId();		
        var stagePropose = "3a275c22-fc45-4e89-97fc-41e5ec578743";
     
        if (activeStageId.toLowerCase() === stagePropose) {          
                formContext.getControl("header_process_identifypursuitteam").setDisabled(false);                 
        }
        else {
            formContext.getControl("header_process_identifypursuitteam").setDisabled(true);
        }       
  }
select processidname,stagename, processstageid  from processstage 
where processid = '919E14D1-6489-4852-ABD0-A63A6ECAAC5D'

Also if we have the same fields used in multiple places / stages in the Business Process Flow, we will have the suffix added to the fields, so we need to refer the field appropriately in our script.

  • header_process_identifypursuitteam
  • header_process_identifypursuitteam_1
  • header_process_identifypursuitteam_2

Also check – https://www.c-sharpcorner.com/blogs/options-for-locking-field-on-business-process-flow

Hope it helps..

Advertisements

How to deal with the Calculated columns having Null values (Dynamics 365 / Dataverse)


Suppose we have the following whole number fields, where Field C is the calculated column and is the sum of Field A and Field B

A screenshot of a contact form

Description automatically generated

Field C calculated column –

However, if any of the fields used for calculation is null, Field C will also show null.

A screenshot of a computer

Description automatically generated

The way we can resolve it is to put a null check in the formula.

We have created a new calculated column with the below definition.

A screenshot of a computer

Description automatically generated
A screenshot of a computer

Description automatically generated

The other option that we can consider is using JavaScript / Business Rules / Additional Calculated Columns to set the default value to 0 in case of null, for the fields being used for calculation.

In the case of 0 also, the calculated columns will work properly.

A screenshot of a computer

Description automatically generated

Finally, now that we have Fx Formula Columns available we can make use of them instead of Calculated Columns.

The formula columns work properly and we do not have to put the null check.

A screenshot of a computer

Description automatically generated

Get more details on Fx Formula Columns

Hope it helps..

Advertisements

Using Microsoft Copilot Studio to create Copilot for Teams channel with Dataverse as Knowledge source – Copilot / Dataverse


Below are the quick steps to create a copilot with Dataverse as the Knowledge source and Teams as the channel

Open the Microsoft Copilot Studio site https://www.microsoft.com/en-us/microsoft-copilot/microsoft-copilot-studio

Select the Try free option to get started.

Select the appropriate environment and click on New copilot option (Create+)

A screenshot of a computer

Description automatically generated

Select Create

A screenshot of a computer

Description automatically generated

Here we have renamed the Copilot, next click on Add knowledge to add Dataverse as the source.

A screenshot of a computer

Description automatically generated

Add Dataverse

A screenshot of a computer

Description automatically generated

We can select up to 15 tables, and we have specified lead, contact, account, and case for now.

Next, we get the option to review the data for the tables selected.

A screenshot of a computer

Description automatically generated

In the last step, we get the option to review it. Here we can add/ edit the synonyms and glossaries that would make it easier for the copilot to understand and fetch the data. We’d skip it just to see how it works without configuring them.

Our copilot is ready now. The other things that we can do are to add actions, build topics, and publish which we’d leave as it is for now.

Click on the Knowledge tab. In a short time, we’d see the status changed to In Progress

A screenshot of a computer

Description automatically generated

Meanwhile, we can still go ahead and test it.

A screenshot of a chat

Description automatically generated
A screenshot of a computer

Description automatically generated

As we are done with the testing let us try publishing it, before that let us check the authentication for it.

Navigate to Settings >> Security >> Authentication, here we can see Authenticate with Microsoft selected. We’d leave it like that.

Based on the Authentication mode selected, we will have different channels enabled / disabled.

Let us select the Microsoft Teams channel for our copilot.

Select Turn on Teams

A screenshot of a computer

Description automatically generated

Select Edit details

Add / Edit the details and click on Save.

Now time to Publish our copilot.

A screenshot of a computer

Description automatically generated

A screenshot of a computer

Description automatically generated

We can now again open the Microsoft Teams channel and select the Availability options.

Here we can see multiple options, one is to share the link, upload the zip, and show it in the teams store.

We selected the Show to my teammates and shared users option. We can add search and add users to share it with them.

A screenshot of a computer

Description automatically generated

The other option is to Copy link and share the link.

On opening the link, we get the option to add the app.

A screenshot of a computer

Description automatically generated

We can see our app added in the Manage your apps section in Teams.

A screenshot of a computer

Description automatically generated

Finally now we can start interacting with our copilot.

Get all the details –

https://learn.microsoft.com/en-us/microsoft-copilot-studio/

Hope it helps..

Use Copilot to generate knowledge articles from resolved cases – Dynamics 365 Customer Service


To enable the feature of generating knowledge articles through Copilot, navigate to Customer Service Admin Center >> Agent Experience >> Knowledge >> Knowledge Creation

Agree to the terms and select Opt-in

A screenshot of a computer

Description automatically generated

Set it up by checking the options

A screenshot of a computer

Description automatically generated

With this feature enabled, now when we resolve the case, we will get the option to create a new knowledge article, based on the details provided in the resolution.

A screenshot of a computer

Description automatically generated

Clicking on Resolve will open the Propose new knowledge dialog box, with a draft of the proposal.

A screenshot of a computer

Description automatically generated

We can also revise the content with the instructions, here max 5 revisions are allowed.

A screenshot of a computer

Description automatically generated

Click on Create Proposal will create the record and show the notification on the form with the link to it.

A screenshot of a computer

Description automatically generated

Get all the details here

Hope it helps..

Advertisements

How to remove contact and customer validation on Cases– Dynamics 365


By default, we can only specify the contact associated with the customer for the case record. If we try specifying a contact record that is not associated with the Customer selected, we will get the below error message.

Invalid Contact – The specified contact doesn’t belong to the account selected as the customer. Specify a contact that belongs to the selected account, and then try again.

Also, CRM will filter the lookup to show only the associated contact record

A screenshot of a computer

Description automatically generated

However, if we do not want this validation, we can remove it using the environment variable.

Search for Customer Entities Relationship For Incidents / msdyn_IncidentShouldValidatePrimaryContact

A computer screen shot of a computer screen

Description automatically generated

Set the new value as 0.

A screenshot of a computer

Description automatically generated

Now we will be able to save the record using an unassociated contact.

A screenshot of a test case

Description automatically generated

Get all the details here

Hope it helps..

Nishant Rana's Weblog

Everything related to Microsoft .NET Technology

Skip to content ↓