Power Automate |
Azure Logic Apps |
| Power Automate is built on top of Azure Logic Apps | |
| It is a SaaS service for workflow automation across several different apps and SaaS services. | It is a PaaS service for workflow automation across several different apps, SaaS services, and IaaS services for enterprise integration. |
| For more of self-service and simple integration scenarios. | For complex/advanced integration scenarios |
| Targeted for Business User, Citizen Developers, Developers, IT Pros. | Targeted for Developers and IT Pros. |
| Brower based designer and mobile app UI only
|
In-browser as well as Visual Studio |
| Office 365 Service / License / Subscription | Azure Service / License / Subscription |
| Flow specific Connectors | Logic App-specific Connectors – SAP, IBM MQ, IoT, Liquid. |
| Power Automate are specific to an environment | There is no environment concept, each logic app is an independent entity. |
| Pay by run | Pay by action run and by connector run. |
| Button flow | |
| Modern Approvals https://nishantrana.me/2020/08/31/approvals-power-automate-dynamics-365/ |
|
| Flow can be extended as Logic Apps |
|
| Power Automate is supposed to be designed and tested in a non-production environment and then promoted to the production environment. The solution makes it possible with connectors requiring reconfiguration. Connection references can be considered here https://flow.microsoft.com/en-us/blog/move-flows-across-environments-without-resetting-connections/ |
Logic Apps has ALM possibilities. |
| Admin Experience through Power Platform Admin Center. | Admin experience through Azure Portal. |


How to limit the responses in Microsoft Forms or send email on behalf of DL?
Hi All,
Welcome,
Today we will see how to limit the number of responses in Microsoft Forms aka Customer Voice.
We have a survey, and customer can fill and submit this survey.
But, Requirement is to allow only first 5 customer to reply not more than that.
So Before this brand new customer voice product, this feature was not available in Microsoft forms
But now, Microsoft has come up with really good options and helped many organization 🙂
Thank you Microsoft.
View original post 223 more words
Share It -

Azure Architecture and Management – Introduction
Below are few key points on Azure architecture and management
- Check availability of Azure products region-wise
https://azure.microsoft.com/en-us/global-infrastructure/services/
Below we have filtered it to see products available in UAE


We can also filter it further if we are looking for a specific product or service.

- We can refer to the Data residency document to see where the data is being stored
https://azure.microsoft.com/en-us/global-infrastructure/data-residency/

- We can use the Pricing Calculator for estimation.
https://azure.microsoft.com/en-us/pricing/calculator/

- A resource inside Azure can be thought of manageable item in Azure that includes Virtual Machines, Web App, Database, etc.
- A resource group is a container (contains metadata) of the resources.

- It is through ARM – Azure Resource Manager the resources within Azure are managed.
Azure Portal, Azure PowerShell, Azure CLI, REST APIs are different ways of interacting with Azure Resource Manager.
- Azure CLI – https://docs.microsoft.com/en-us/cli/azure/install-azure-cli?view=azure-cli-latest
- Azure PowerShell – https://docs.microsoft.com/en-us/powershell/azure/install-az-ps?view=azps-4.7.0
- Azure REST API – https://docs.microsoft.com/en-us/rest/api/azure/
- Azure SDK (.NET) – https://azure.github.io/azure-sdk/releases/latest/dotnet.html

- Within Azure Portal, we can use Azure Cloud Shell to run PowerShell or CLI commands.
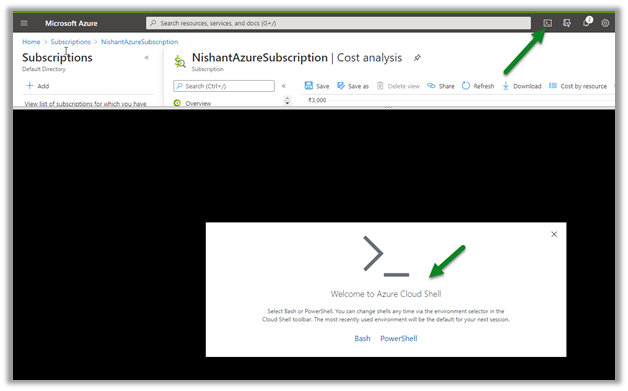
It will ask us to create a storage account if there aren’t any

- To implement Infrastructure-as-Code, Azure has Azure Resource Manager Templates which are written in JSON, that uses a declarative syntax to define infrastructure and configuration for Azure resources for automating deployments.
https://docs.microsoft.com/en-us/azure/azure-resource-manager/templates/overview

- Azure Advisor is a recommendation service that analyzes the configurations and usage of the Azure Resources and provides recommendations / best practices on different categories to optimize the Azure Deployment.

The advisor can be configured to run only on specific resources along with the option to edit the existing rules and set up alerts.


- We can also use Azure Mobile App
https://azure.microsoft.com/en-us/features/azure-portal/mobile-app/
to monitor the health and status of Azure resources, run commands to manage Azure resources, etc.
Reference – Pluralsight Course – Microsoft Azure Services and Concepts
Hope it helps..
Share It -

Sub grid and form tabs improvements in Power Apps Mobile App
There are couple of improvements in user experience for sub grids and form tab in Power Apps Mobile app.
Check other blog posts on Release 2020 Wave 2
- Headers are more protruding for sub grid to separate it from rest of the sections of the form.
- There is also an option (+ New Case – below) to add new record inline for empty sub grids.

- Commands on sub grid opens as a drawer from the bottom of the screen.

- Form tabs can be scrolled horizontally and selecting the tab automatically adjusts the header.
Hope it helps..
Share It -

Displaying SharePoint RichText field as HTML interpreted in SSRS
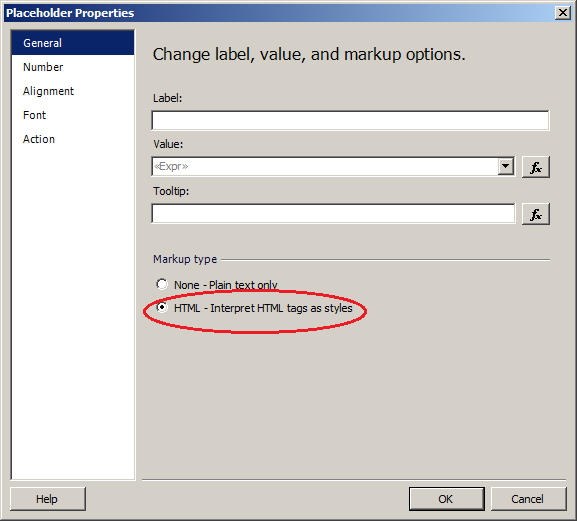
SSRS Reports have a placeholder property HTML – Interpret HTML tags as styles. That property allows you to use HTML tags while displaying report.
We have to face the problem when we want to display SharePoint`s RichText field content is SSRS Report. RichText field may contain some characters that are stored different in SharePoint DB and cannot be interpreted by SSRS as HTML (eg. :, &, {, <, >, list elements, etc.)
View original post 210 more words
Share It -

Microsoft Azure / Cloud Computing – Introduction
Cloud Computing enables companies to consume a complete resource – such as virtual machine, storage, or an application as a utility – just like electricity – rather than having to build and maintain computing infrastructure in-house.
Cloud provider provides the cloud infrastructure which is shared across multiple clients. Clients can select which service to use and only need to pay for that service, which is billed on-demand.
Cloud provider takes care of high availability (disk failure, power supply) and disaster recovery (natural or human disaster like fire, flood, etc.)
Advantages of using cloud computing
Rapid elasticity, only pay for the services used, reliability, economics of scale, etc.
Azure Regions Interactive Map
Types of Cloud Computing Services.
- IaaS – Infrastructure as a service – Azure Virtual Machines, Azure Storage.
- PaaS – Platform as a service – Azure Functions, Logic Apps, Azure Automation.
- SaaS – Software as a service – Dynamics 365, SharePoint, Power Platform.

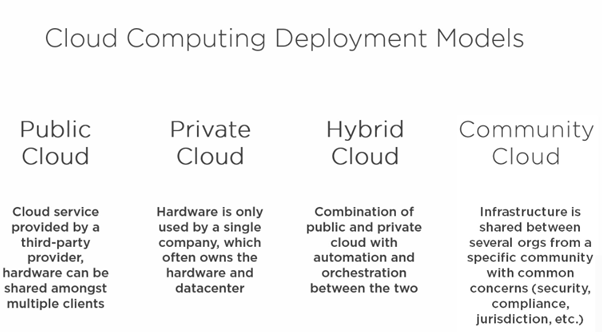
Types of Cloud computing deployment models.
Hope it helps..

