Below is what our existing or current Email Template editor looks like (Sales Hub >> Personal Settings >> Email templates)
Let us now enable the Enhanced Email Template editor for the App / Environment (it is enabled by default for Customer Service workspace and Customer Service Hub apps)
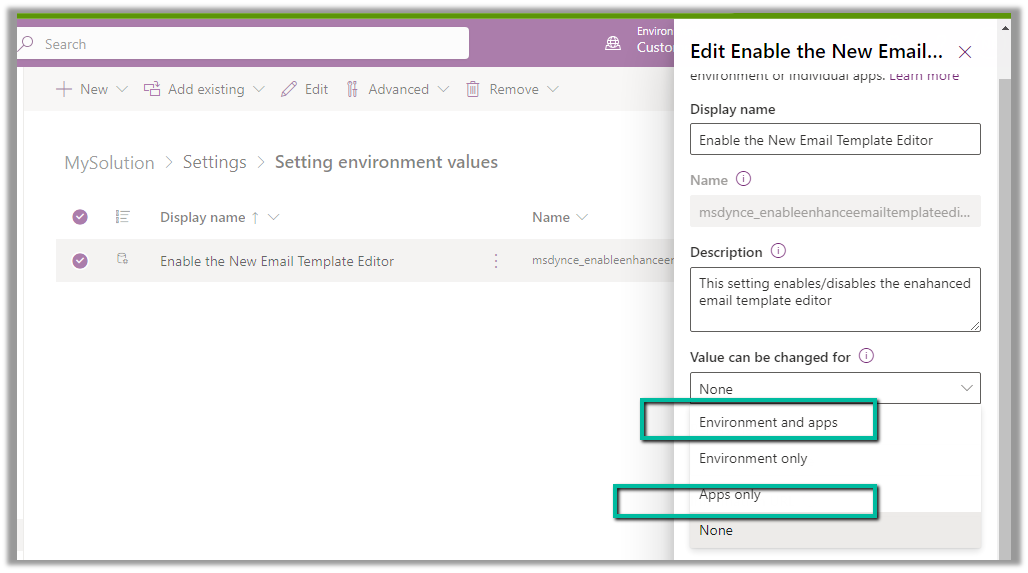
Create or Open an existing solution, Add existing >> Setting >> Enable the New Email Template Editor
We can set the value as Yes for the Setting environment value to apply it for the environment.
To enable it for a specific app, make sure we have the option “Environment and apps” and “Apps Only” selected for Value can be changed for option.
To specify the app(s) for which we want to enable the new email template editor, we need to add that corresponding app to the solution.
On adding the Sales Hub App, we get the option to set the value for the Sales Hub app, which we have set as Yes.
Publish all customization.
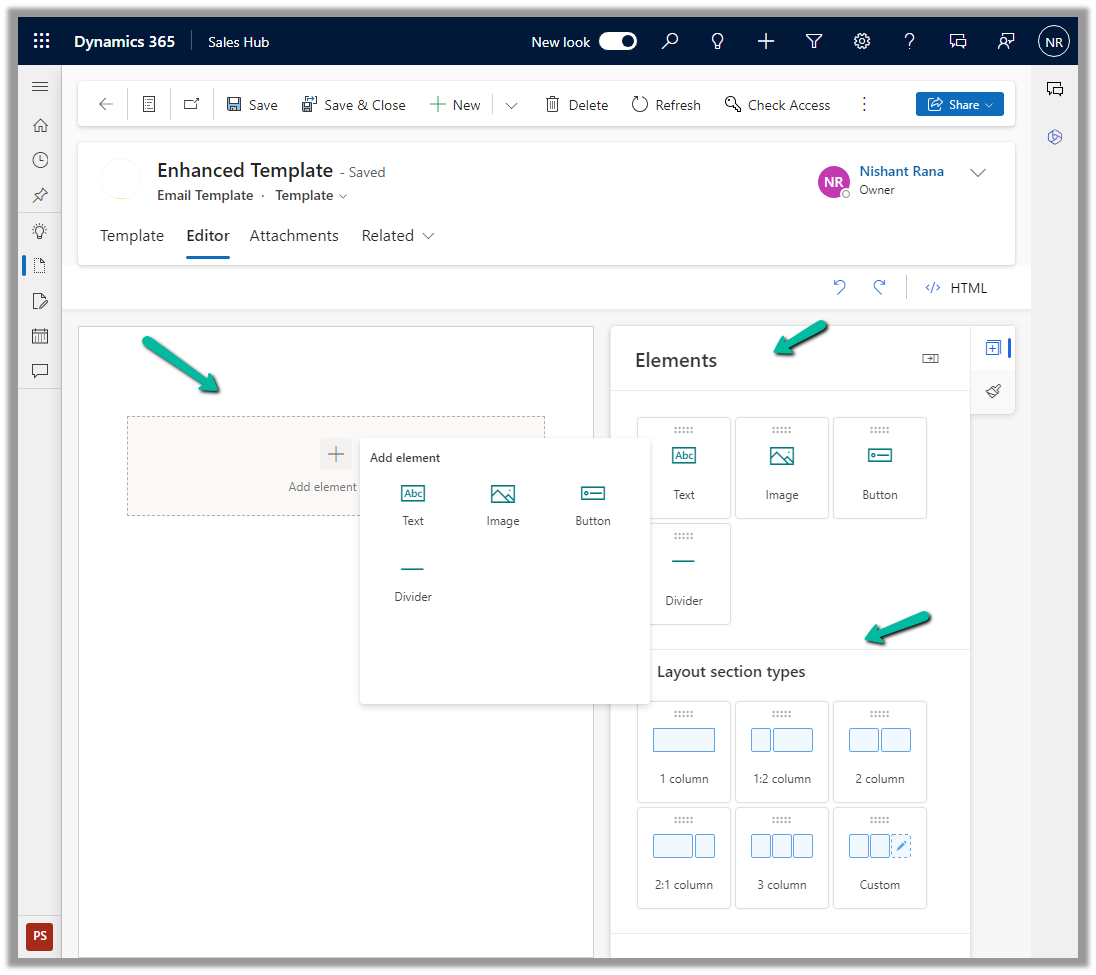
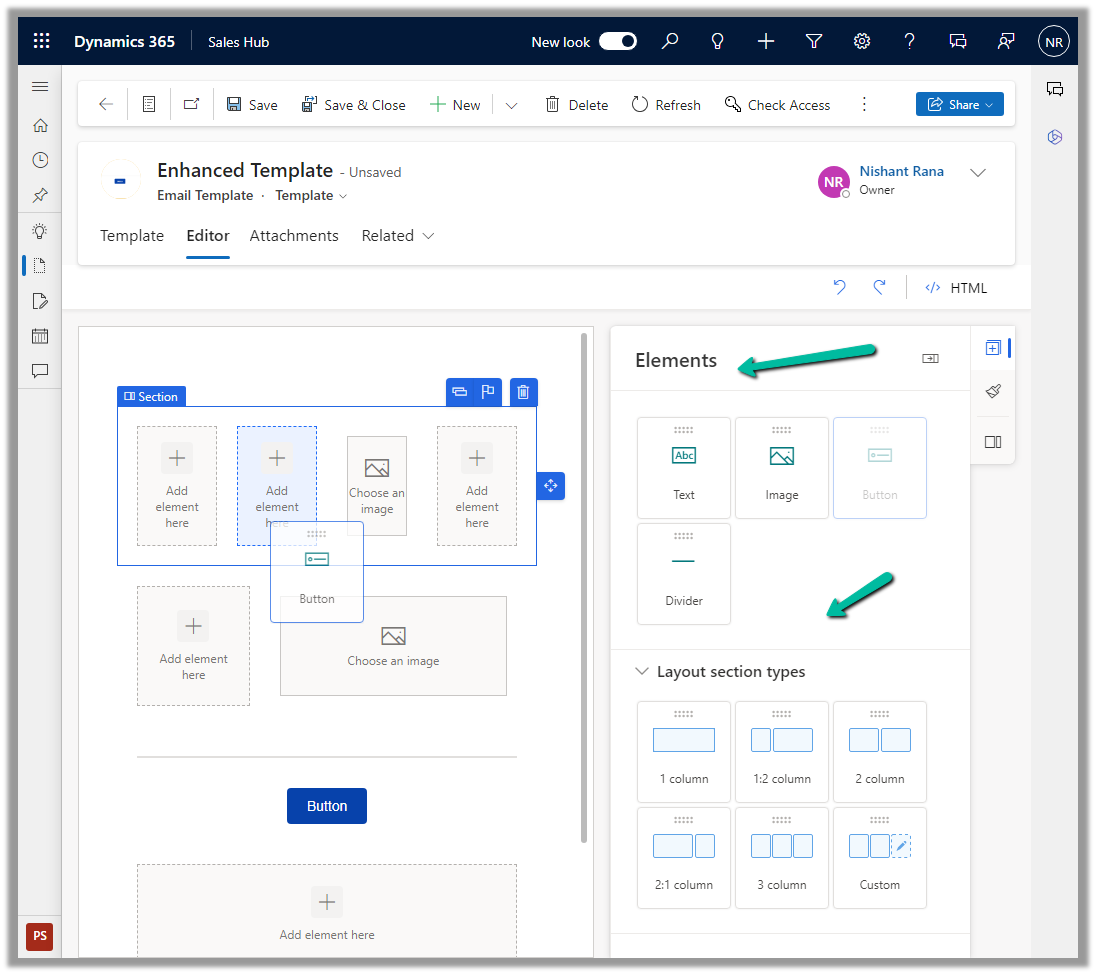
We can now see the new Editor tab added for the new Email Template record inside Sales Hub.
We can drag and drop, and specify properties, of the layout section and elements in the new editor.
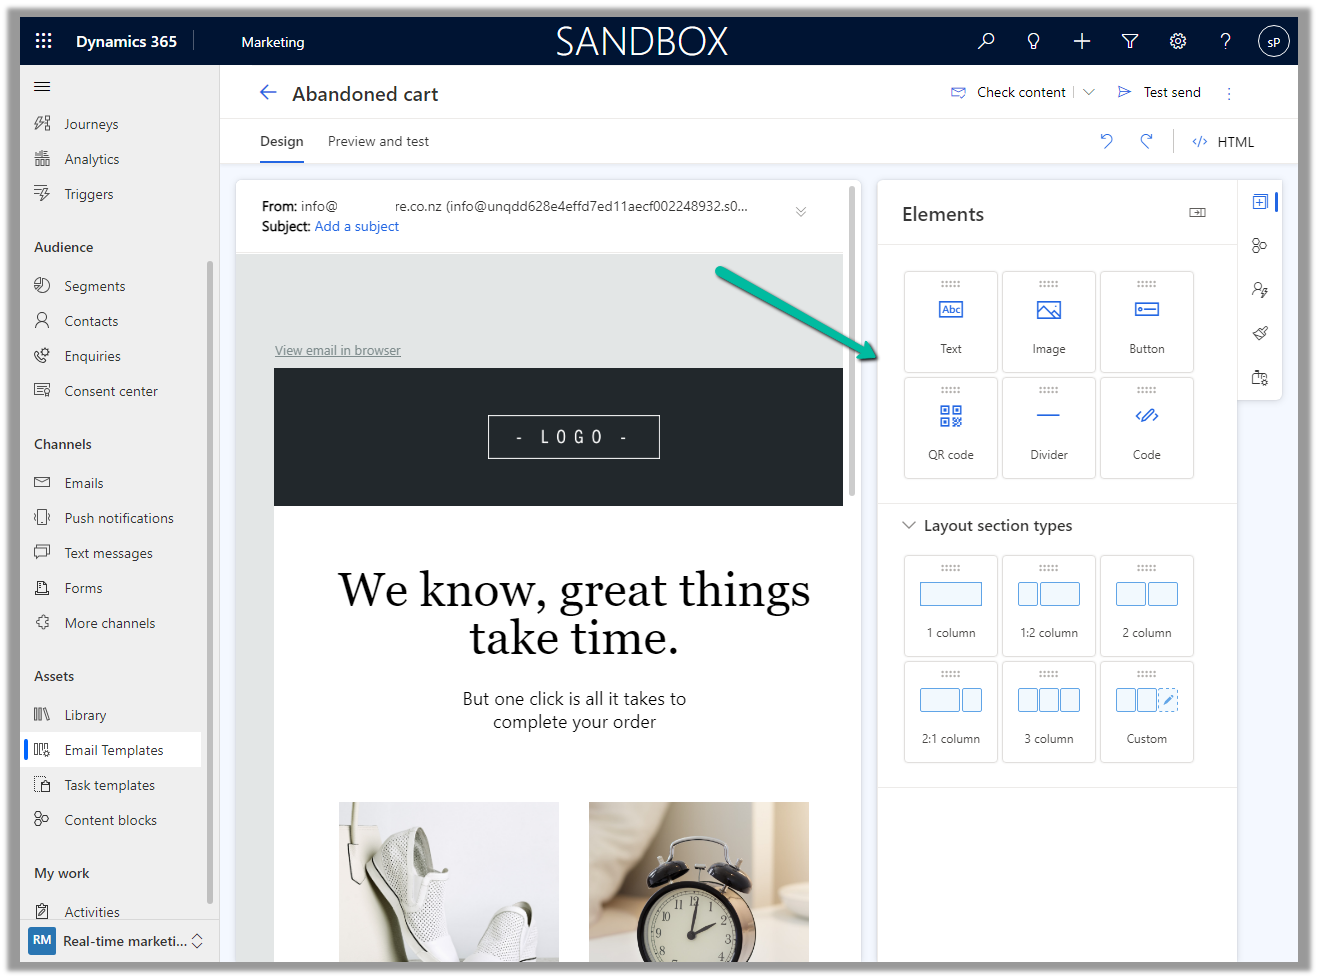
The new email template editor uses the same design as the email editor in Dynamics 365 Marketing, making it more consistent across the different apps in the platform.
We can define the Custom API’s binding type as Global, Entity, or Entity Collection. In this post, we can see how a Global and Entity binding type Custom API can be defined, write a corresponding plugin, and then invoke/test through Postman.
We can create Custom API through Plugin Registration Tool, Power Apps, Code, Solution files, and or can use XrmToolBox Plugin – Custom API Manager.
Below we have defined a Custom API name custom_GlobalAPI, with binding type as Global and one Request (input) parameter and Response (output) Property of type string.
Below is how we define the plugin type for it and can access the input and output parameters through context.
To test it we can use the XrmToolBox Custom API Tester plugin as shown below
And from Postman, once we have the access token, we can call the Custom API as shown below.
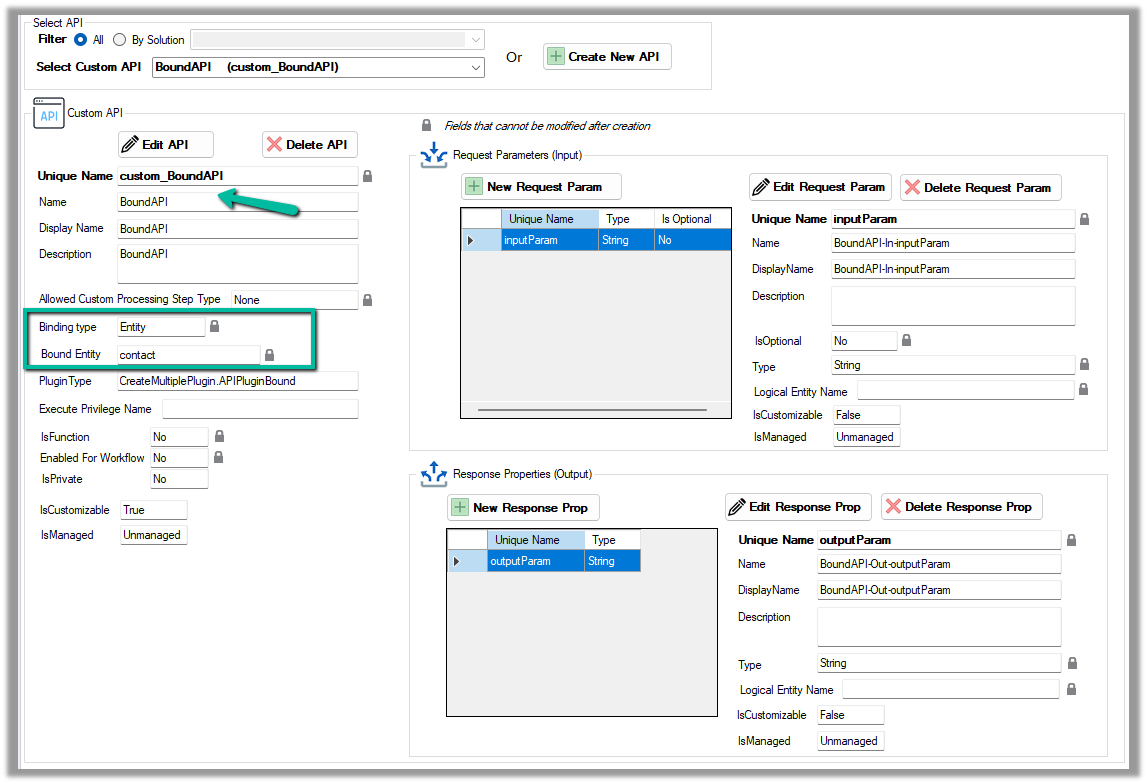
Now for a Bound Custom API, we have the following definition. It is bound to the Contact table and has one input parameter and one output parameter similar to our Global Custom API.
Below is how we define the plugin type for it, and can access the input and output parameters similar to Global Custom API.
However, in the case of binding type Entity, we will have the Request parameter named Target of type Entity Reference for the bound entity added automatically.
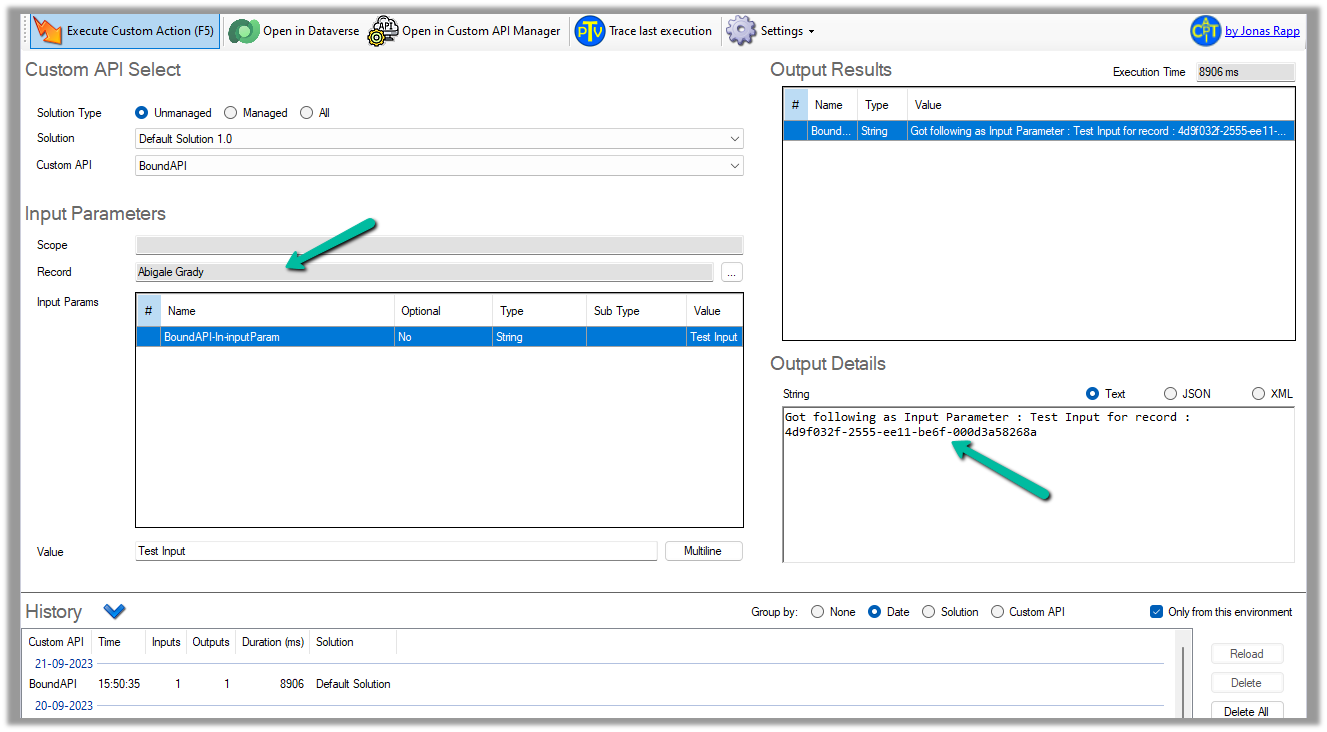
We can test it using the Custom API Tester plugin, however as it is bound type, we need to select/specify the contact record (the table it is bound to), before we can execute it.
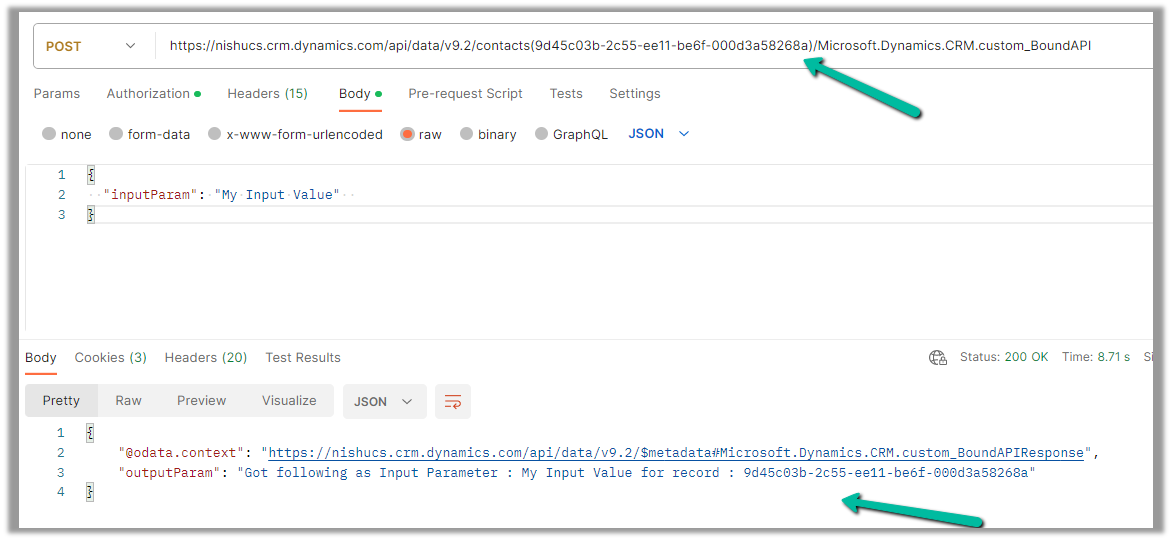
To call it from Postman, we need to use the fully qualified name i.e. Microsoft.Dynamics.CRM.[unique name of the Custom API] unlike Global one.
 public class APIPluginGlobal : IPlugin
    {
        public void Execute(IServiceProvider serviceProvider)
        {
            ITracingService tracingService = (ITracingService)serviceProvider.GetService(typeof(ITracingService));
            IPluginExecutionContext context = (IPluginExecutionContext)serviceProvider.GetService(typeof(IPluginExecutionContext));
            IOrganizationServiceFactory factory = (IOrganizationServiceFactory)serviceProvider.GetService(typeof(IOrganizationServiceFactory));
            IOrganizationService orgService = factory.CreateOrganizationService(context.UserId);

            try
            {
                tracingService.Trace("start plugin execution: {0}", this.GetType().FullName);

                // check for the message name i.e. Unique Name of the Custom API
                if (context.MessageName.Equals("custom_GlobalAPI", StringComparison.OrdinalIgnoreCase))
                {
                    // check for the request parameter in the inputparamters of the context
                    if (context.InputParameters.Contains("inputParam"))
                    {
                        // get the value of the input parameter
                        string inputValue = context.InputParameters["inputParam"].ToString();
                        // set the value of response property through outputparameters
                        context.OutputParameters["outputParam"] = "Got following value as Input : " + inputValue;
                    }
                }

                tracingService.Trace("end plugin execution: {0}", this.GetType().FullName);
            }
            catch (System.ServiceModel.FaultException<OrganizationServiceFault> ex)
            {
                tracingService.Trace(ex.Detail.Message);
                throw;
            }
            catch (Exception ex)
            {
                tracingService.Trace(ex.ToString());
                throw;
            }
        }
    }
public class APIPluginBound : IPlugin
    {
        public void Execute(IServiceProvider serviceProvider)
        {
            ITracingService tracingService = (ITracingService)serviceProvider.GetService(typeof(ITracingService));
            IPluginExecutionContext context = (IPluginExecutionContext)serviceProvider.GetService(typeof(IPluginExecutionContext));
            IOrganizationServiceFactory factory = (IOrganizationServiceFactory)serviceProvider.GetService(typeof(IOrganizationServiceFactory));
            IOrganizationService orgService = factory.CreateOrganizationService(context.UserId);

            try
            {
                tracingService.Trace("start plugin execution: {0}", this.GetType().FullName);

                // unique name of the custom api
                if (context.MessageName.Equals("custom_BoundAPI", StringComparison.OrdinalIgnoreCase))
                {
                    // Target property of type Entity Reference
                    if (context.InputParameters.Contains("Target") &&
                        context.InputParameters["Target"] is EntityReference)
                    {
                        var contact = (EntityReference)context.InputParameters["Target"];
                        // access the input request parameter
                        if (context.InputParameters.Contains("inputParam"))
                        {
                            string inputValue = context.InputParameters["inputParam"].ToString();
                            // set the output parameter value
                            context.OutputParameters["outputParam"] = "Got following as Input Parameter : " + inputValue
                                + " for record : " + contact.Id.ToString();
                        }
                    }
                }

                tracingService.Trace("end plugin execution: {0}", this.GetType().FullName);
            }
            catch (System.ServiceModel.FaultException<OrganizationServiceFault> ex)
            {
                tracingService.Trace(ex.Detail.Message);
                throw;
            }
            catch (Exception ex)
            {
                tracingService.Trace(ex.ToString());
                throw;
            }
        }
    }
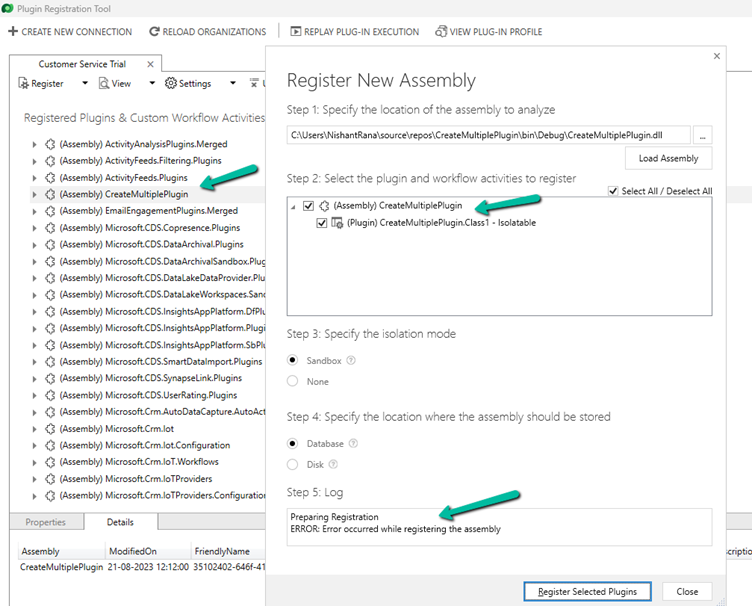
Recently while trying to register the plugin, we got the below error
Microsoft.Crm.CrmException: Plug-in assembly fullnames must be unique (ignoring the version build and revision number). —> Microsoft.Crm.CrmException: Plug-in assembly fullnames must be unique (ignoring the version build and revision number).
It was because we were trying to register the assembly which was already registered in that environment, instead of updating it.
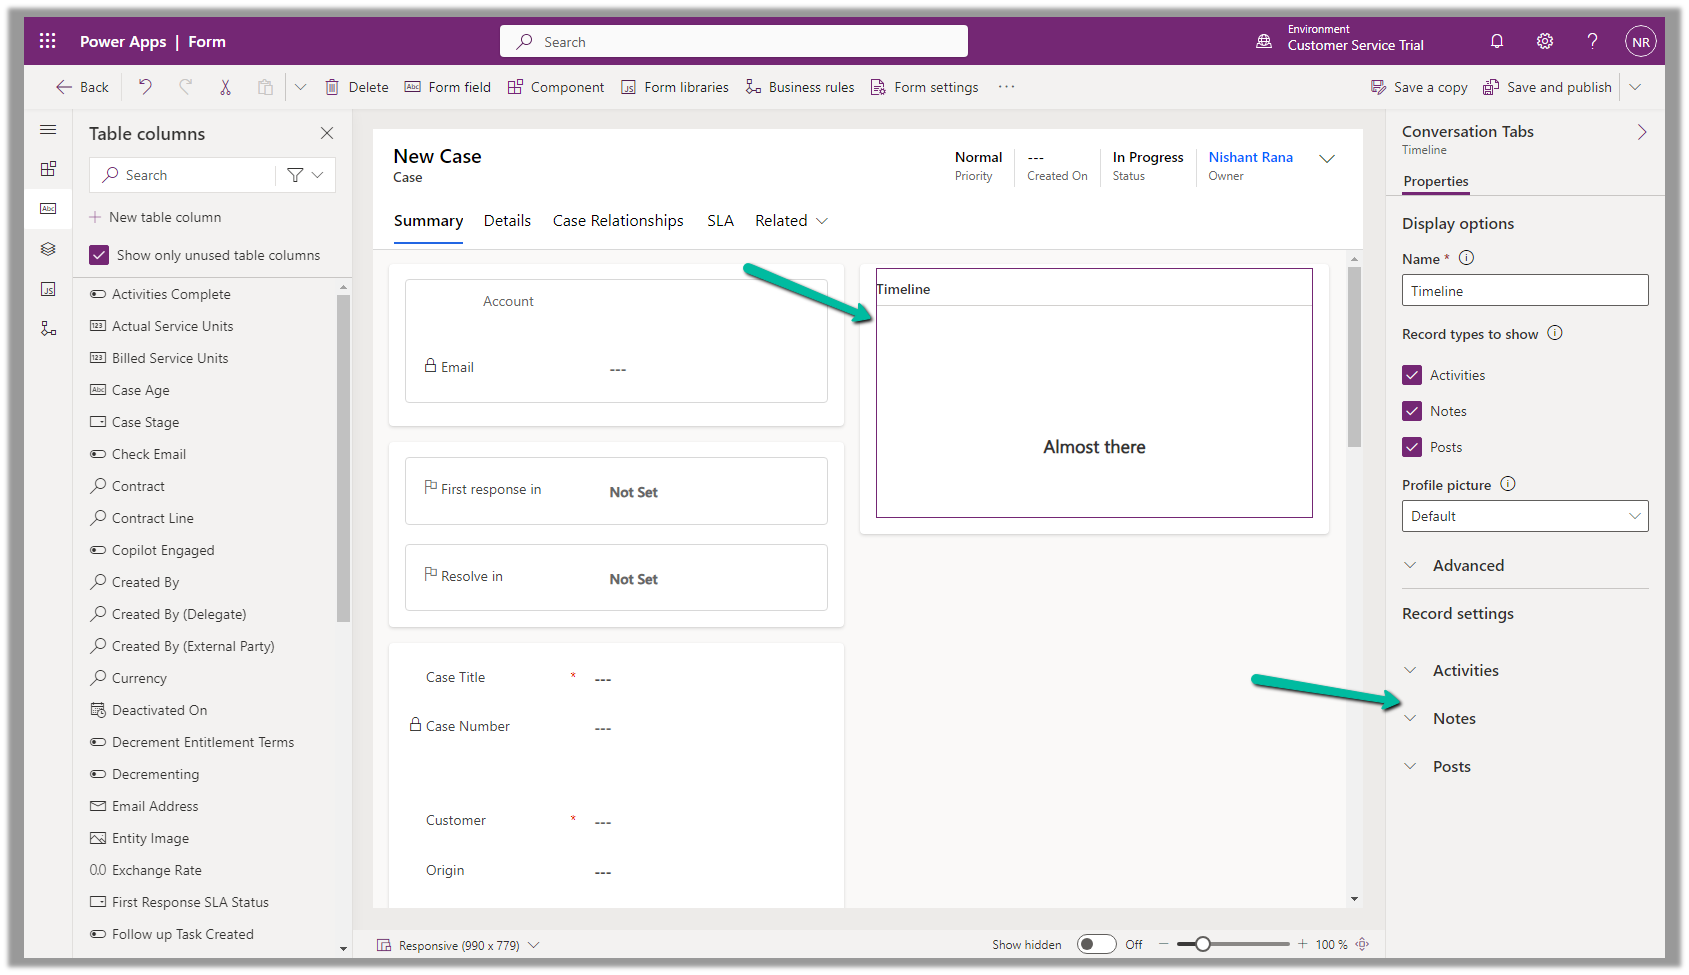
From the notes in the timeline, now we can link an existing note to an existing case, contact, or account record (this will unlink it from the current record) and also create either a new case, contact, or account record.
To configure it, open the Notes property of the Timeline section in the form.
Below we can see the different properties we can configure.
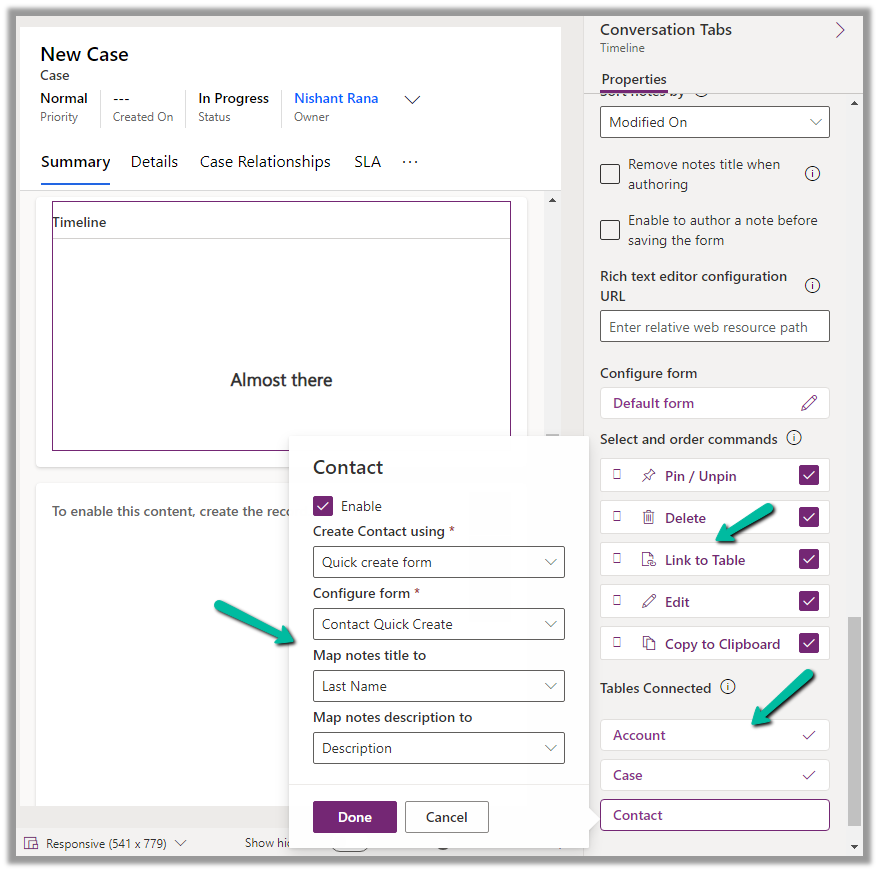
Enable the Link to Table Command
Enable the Tables to be connected.
Here we are enabling the Contact table, and then specfiying the Quick Create Form to be used while creating the new contact record, and also the mapping of the title and description field of the Notes. We have the same configuration for Case and Account.
Save and publish the changes.
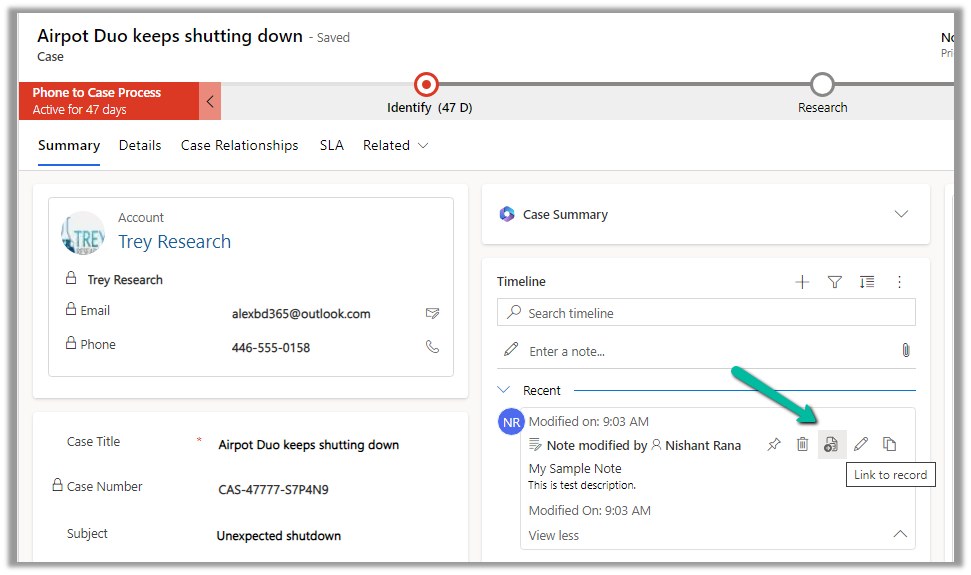
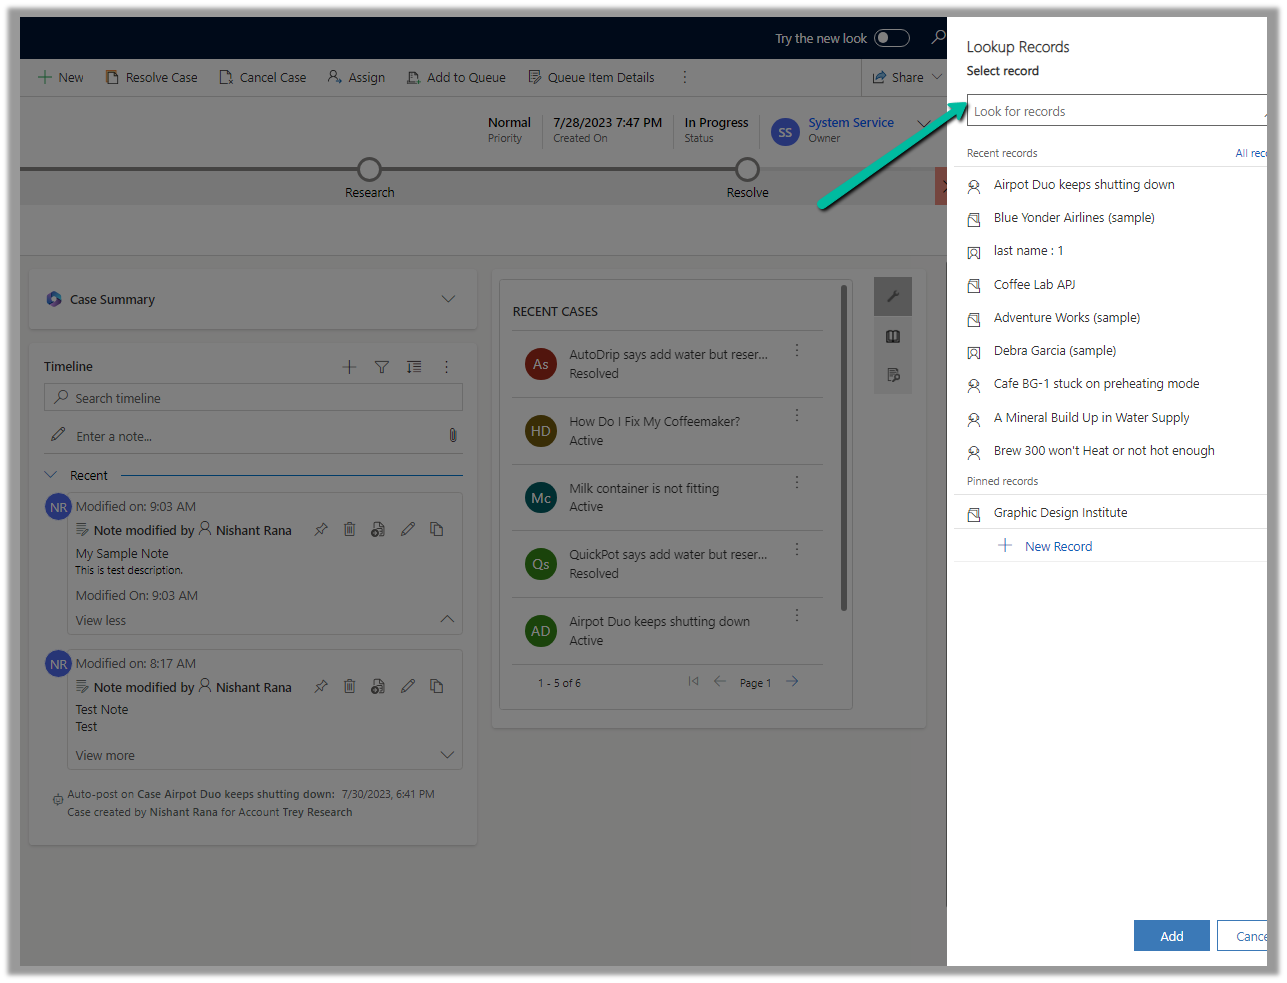
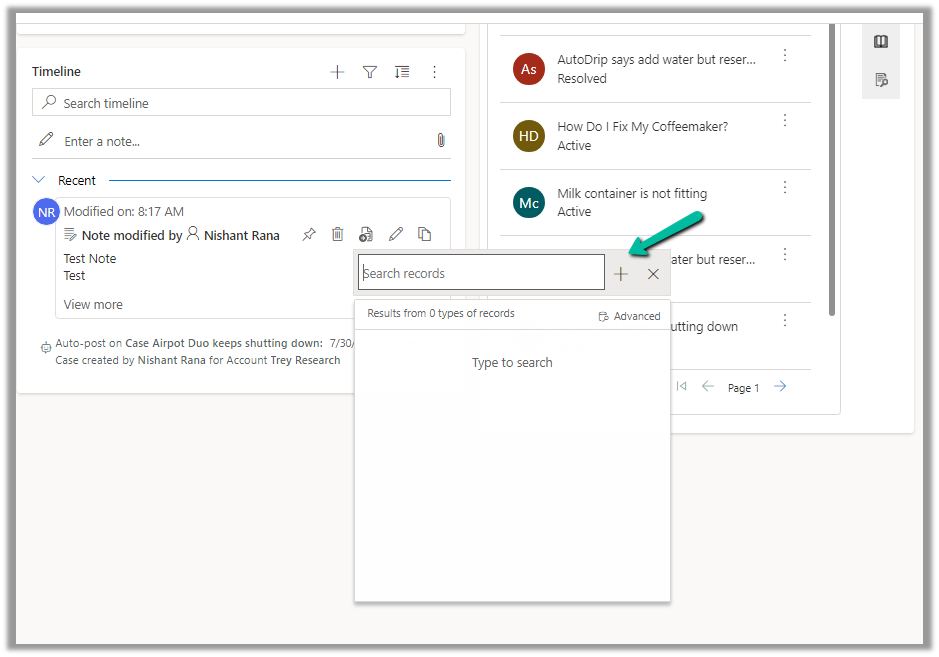
We can now see the option to Link to record for the notes.
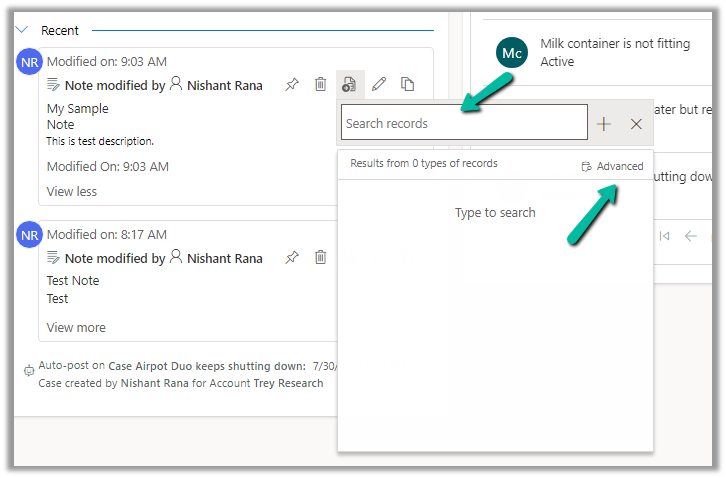
We get the option to search for an existing record (it will show results from tables connected).
Clicking on Advanced opens the lookup dialog.
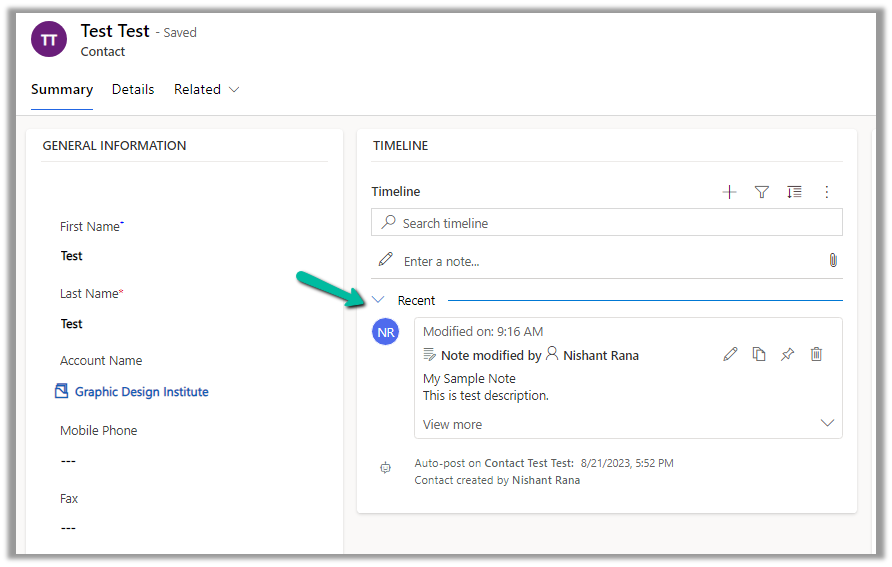
On Associating to an existing record, the notes get linked to the new record and unlinked to the current record.
We can see the notes record associated with the contact record and removed from the existing case record.
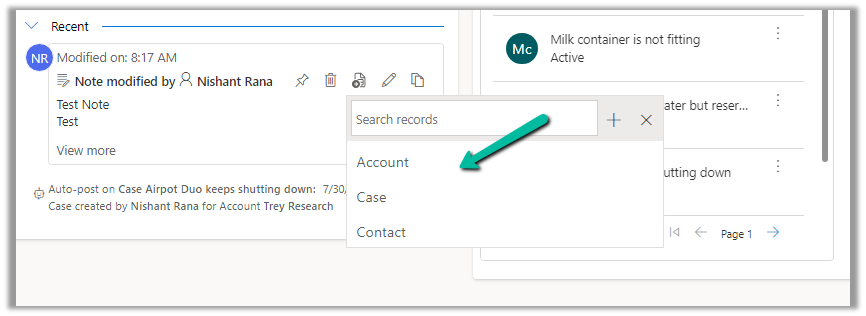
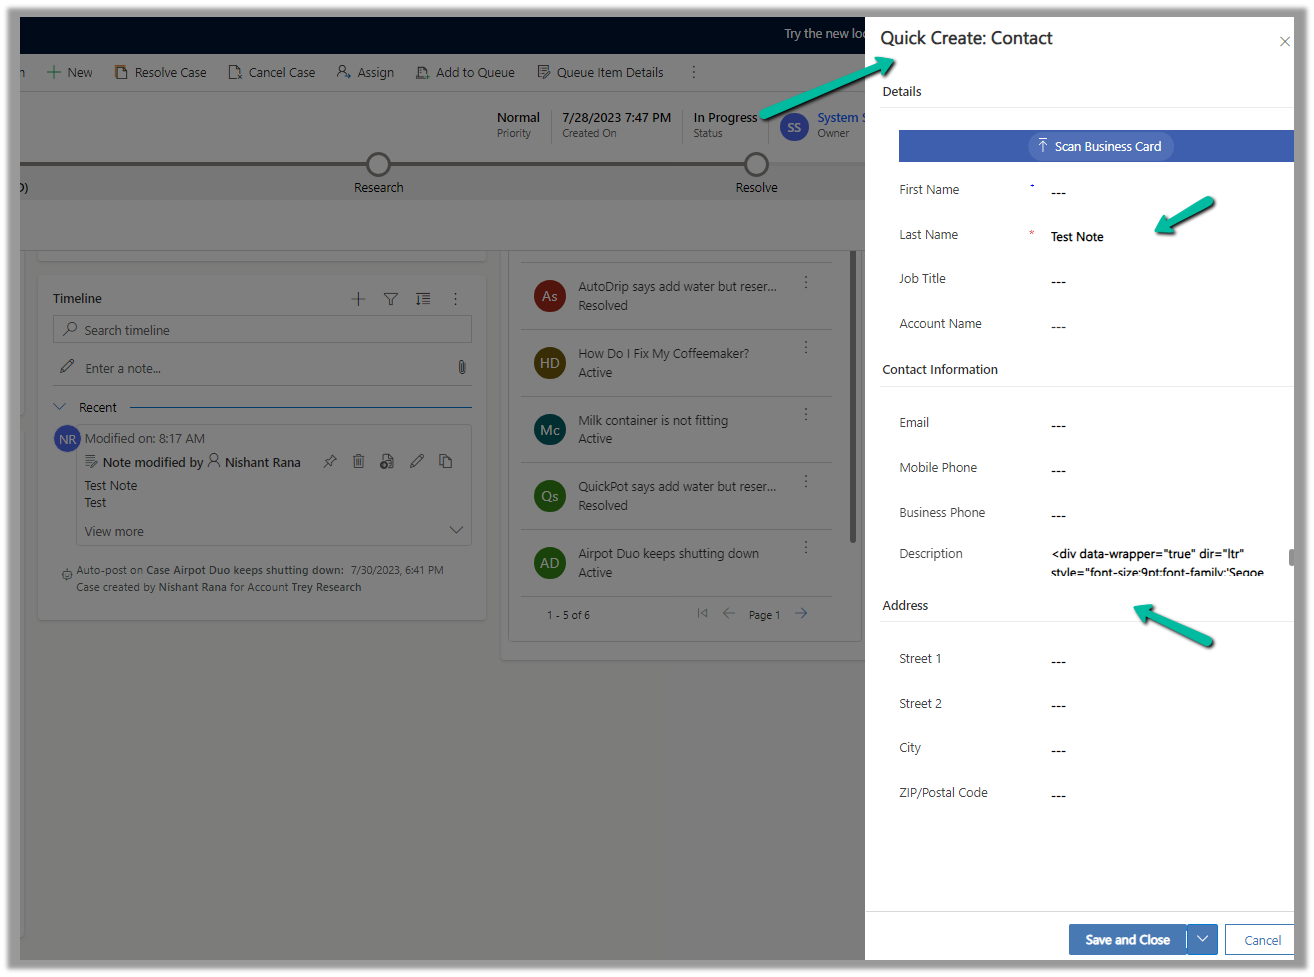
We can also use the plus + sign to create new records of the tables connected from the notes.
Account, Case, and Contact in this case.
This opens the Quick Create form, with the title and description field of the notes mapped.
After the new record gets created, we are again presented with the option to Unlink that existing note from the current record.
Below we can see the new record with the note associated with it.
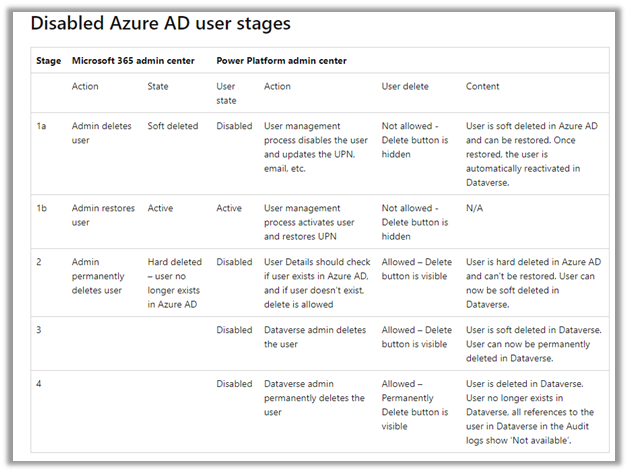
To delete the user from Power Platform, we need to enable the following feature – Delete disabled users.
Before enabling this feature we can see the following Views for the Users.
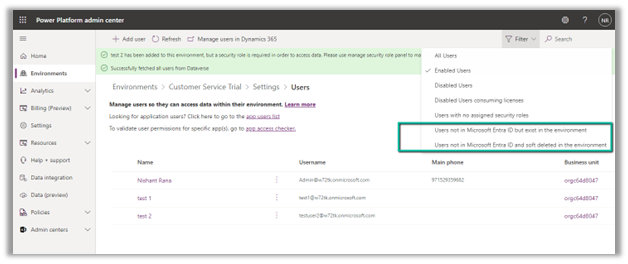
After enabling Delete disabled users, we can see 2 new views added,
Users not in Microsoft Entra ID but exist in the environment.
Users not in Microsoft Entra ID and soft deleted in the environment.
Also currently we can see 3 users (enabled) in the environment.
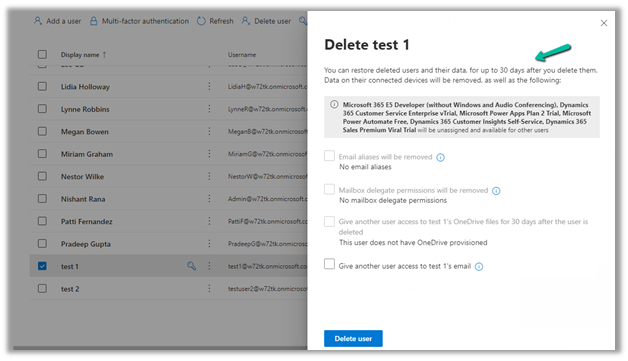
Now let us delete the test 1 user from the Microsoft 365 Admin Center.
The deleted user and its data can be restored up to 30 days (soft delete)
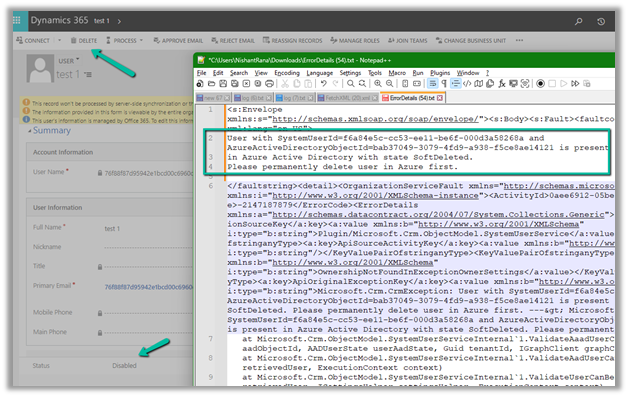
Inside Power Platform Admin Center, we can see the user account being disabled (and soft delete state in AD)
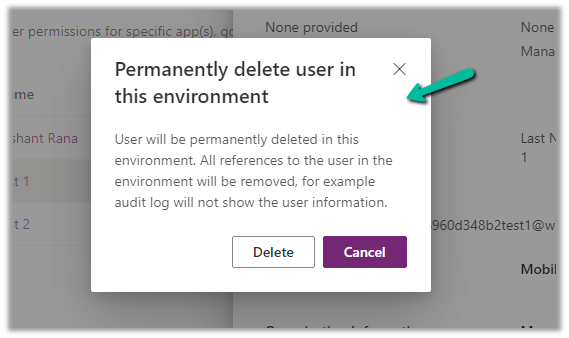
If we try to delete the record, we will get the below error that use is present in AD in the state SoftDeleted. Please permanently delete the user in Azure first.
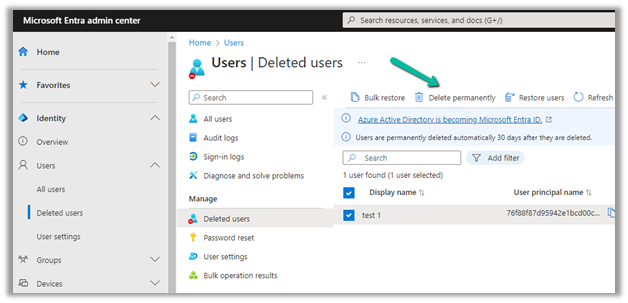
Let us permanently delete the user in Azure AD.
Login to Azure Portal or Microsoft Entra admin center, select Users >> Deleted Users
Select the user (deleted) and click on Delete Permanently.
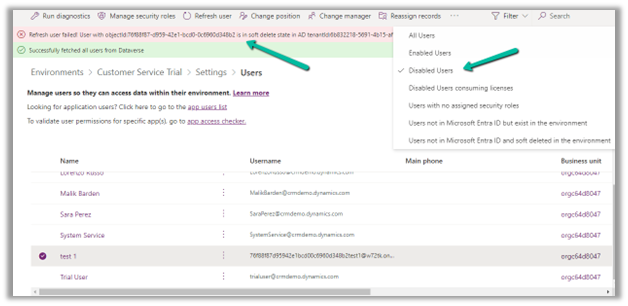
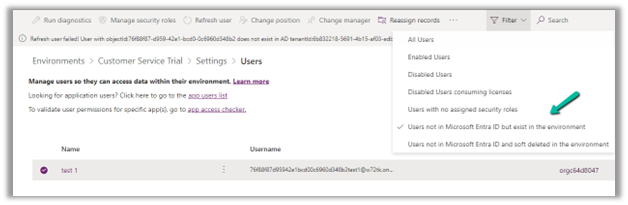
On Refreshing the user, we get the message that the user does not exist in the AD, and also user record is now moved to the “Users not in Microsoft Entra ID but exist in the environment” view.
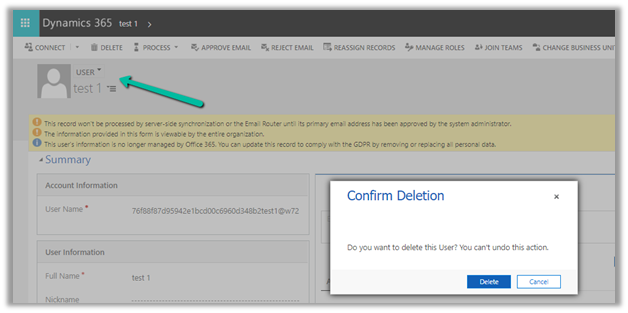
Let us try deleting the user record from CRM now.
This time user records get deleted (soft delete) successfully.
Within the Power Platform Admin Center, we can see the user record moved to “Users not in Microsoft Entra ID and soft deleted in the environment”
Similar to Azure Active Directory or Microsoft Entra, now we get the option to permanently delete users from the Power Platform Admin Center after soft delete.
Here we’d have a quick look at the analytics capabilities of the extension.
To enable it, inside Visual Studio, navigate to Tools >> Options >> Kupp Code Analytics >> General or Extensions >> Kupp Code Analytics >> Analytics >> Configure Analytics
Set “Enable C# Code Analyzer” to “True”. Requires Visual Studio to be restarted on change.
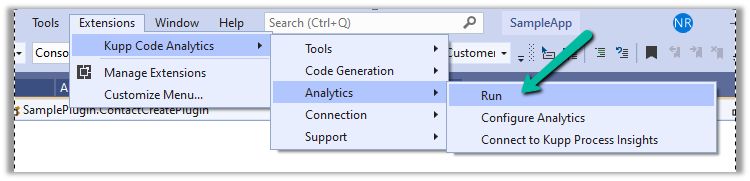
To run the analytics, select Extensions >> Kupp Code Analytics >> Analytics >> Run
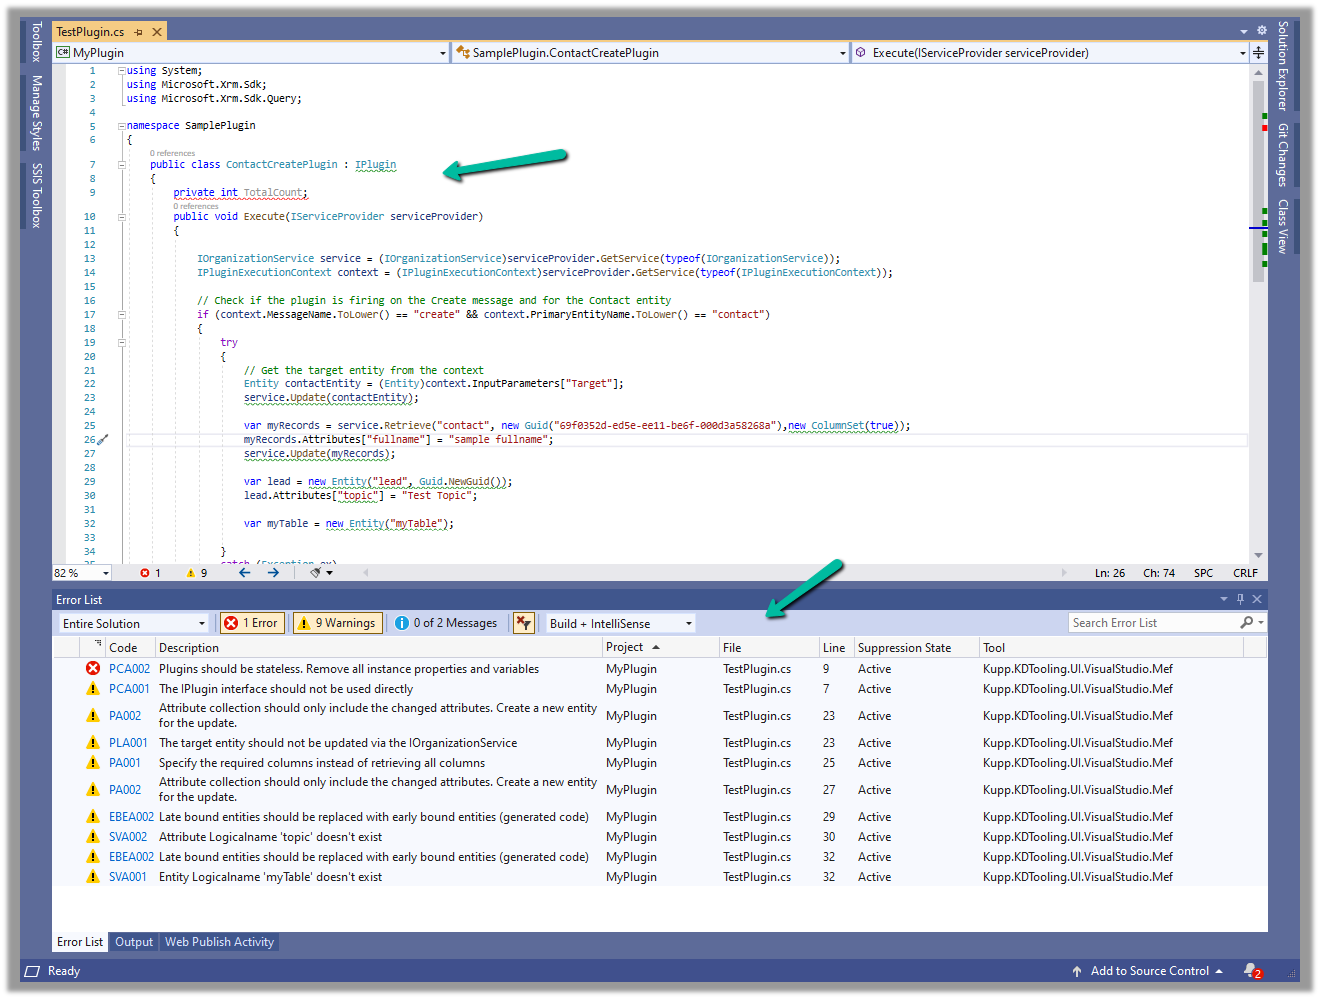
Below we can see the results of running the analytics on our sample plugin class.
Let us see the code analysis rules one be one.
PCA001: The lPlugin interface should not be used directly.
The suggestion is to use a custom base class instead to handle the call delegation, using the context information of the plugin.
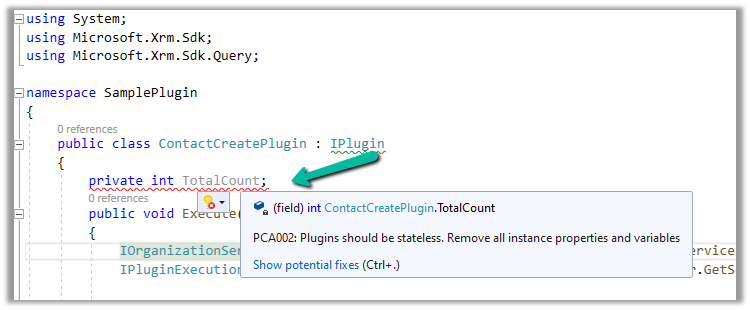
PCA002: Plugins should be stateless. Remove all instances properties and values.
Plugins are instantiated on a per-request basis and handle specific execution contexts. The plugin instances are short-lived and should not be assumed to persist across multiple requests. Also if multiple plugin instances execute especially in the case of bulk operations, it could lead to concurrency issues.
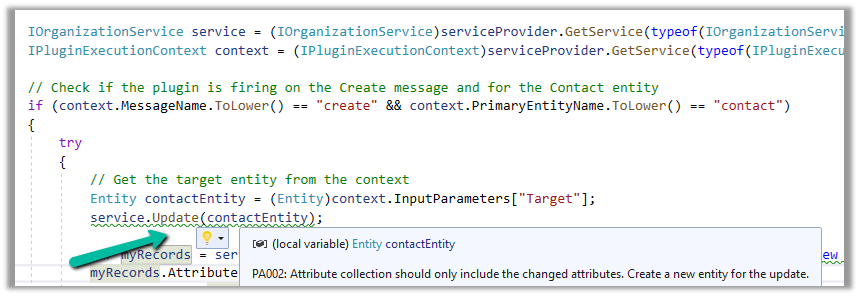
PA002: Attribute collection should only include the changed attributes. Create a new entity for the update
While updating the table or entity, create a new Entity instance and only include those attributes that are changed.
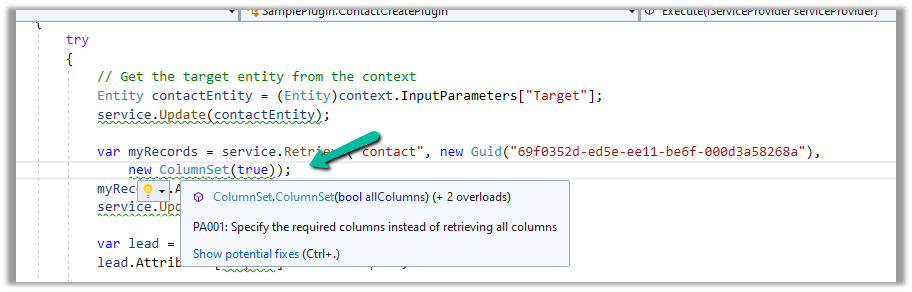
PA001: Specify the required columns instead of retrieving all columns.
Specify the required attributes to be retrieved instead of all columns as this would impact the performance.
EBEA002: Late bound entities should be replaced with early bound entities.
It is suggested to use early bound entities as they provide Type Safety and IntelliSense Support decreasing the likelihood of runtime errors and can enhance productivity through auto-completing and context-aware suggestions.
These were a few of the examples, that show the key capabilities of the extension, for the complete list, please refer to the product documentation