Different Updating Instance status during Dynamics 365 Upgrade


The day has come when we had scheduled the upgrade of our Dynamics 365 instance Test Instance(from 8.2 to 9.0).

We can see the below message during the scheduled time à “The update will being within 24 hours. No rescheduling is available”.

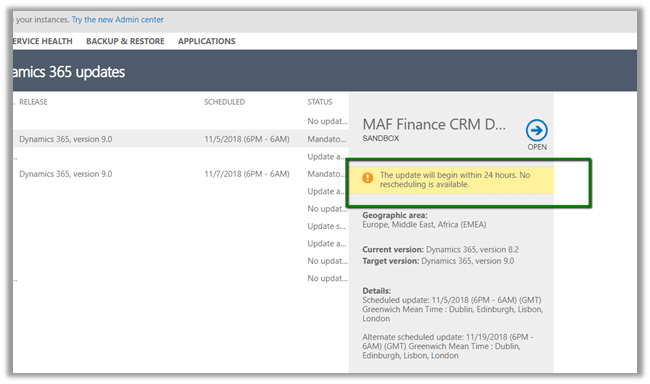
The following Reschedule Update option will go missing during the scheduled time.

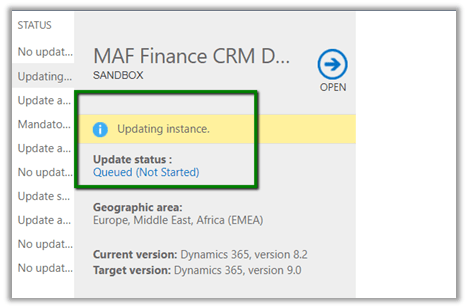
After waiting for few minutes, we see the Update Status as Queue (Not Started)

Followed by the status as “Database Upgrade”

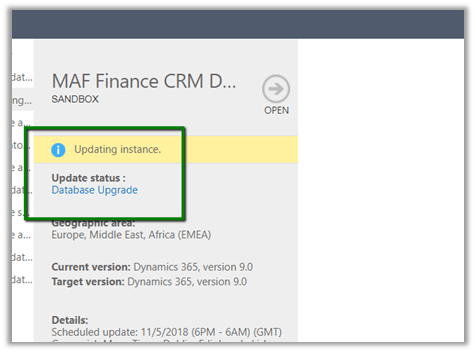
In between the Status message will be Backup and Restore.

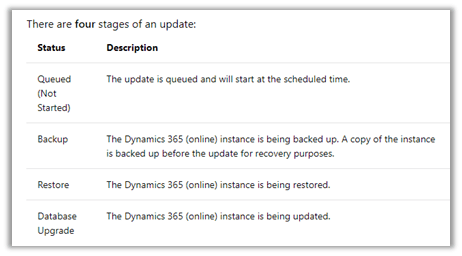
https://docs.microsoft.com/en-in/dynamics365/customer-engagement/admin/manage-updates#update-status

Then it kept interchanging the status from Updating Instance (with no status) to Updating Instance – Database Upgrade for close to 2.5 hours.

Then although the status was Updating Instance the Open link got enabled after 2.5 hours.

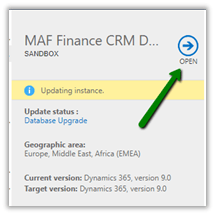
Which opened the following notification

And finally, after 10 minutes or so à

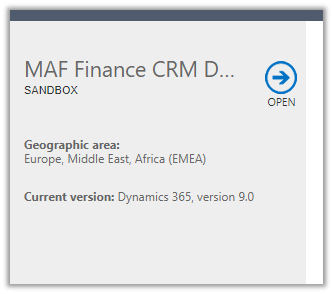
We were all set with version 9.1

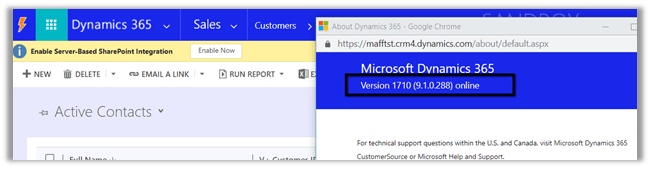
In total it took around 3 hours approximately.

Time to enjoy the successful upgrade and explore the new features ..


How to – Use Plugin on Pre-Validation Stage in Dynamics 365 CE


Recently we had a requirement to delete the Account record without deleting the associated Contact records.

If we try deleting the account record we’d get the following message box

The relationship definition can’t be updated as well to achieve this

So, we wrote a plugin on the pre-validation stage of pre-delete event of Account, which will retrieve and loop through all the child contact records and set its parent customer field as null.

In case of pre-operation the child records were not available.

</p>
<p>public void Execute(IServiceProvider serviceProvider)<br />
{<br />
ITracingService tracingService = (ITracingService)serviceProvider.GetService(typeof(ITracingService));<br />
IPluginExecutionContext pluginContext = (IPluginExecutionContext)serviceProvider.GetService(typeof(IPluginExecutionContext));<br />
IOrganizationServiceFactory serviceFactory = (IOrganizationServiceFactory)serviceProvider.GetService(typeof(IOrganizationServiceFactory));<br />
IOrganizationService organizationService = serviceFactory.CreateOrganizationService(pluginContext.UserId);<br />
EntityReference targetEntity = (EntityReference)pluginContext.InputParameters["Target"];<br />
QueryExpression getContacts = new QueryExpression("contact");<br />
getContacts.Criteria.AddCondition(new ConditionExpression("parentcustomerid", ConditionOperator.Equal, targetEntity.Id));EntityCollection allContacts = organizationService.RetrieveMultiple(getContacts);foreach (Entity contact in allContacts.Entities)<br />
{<br />
Entity contactToBeUpdated = new Entity("contact");<br />
contactToBeUpdated.Id = contact.Id;<br />
contactToBeUpdated.Attributes["parentcustomerid"] = null;<br />
organizationService.Update(contactToBeUpdated);<br />
}}<br />

Another practical scenario

https://www.inogic.com/blog/2017/03/plugin-pre-validation-operation-to-show-an-error-message-as-well-as-log-the-error/

Hope it helps..

Advertisements

Manage CDS Entity Data – Microsoft PowerApps Office Add-In


Nice post on Microsoft PowerApps Office Add-In

Sachin Bansal's avatarBansal Blogs - Dynamics 365, PowerApps, Microsoft Flows, Power BI

PADD1

Microsoft PowerApps Office Add-In enables user to read, modify and insert data in CDS environment. Add-In is available for download here for free, or you will be prompted to install Add-In for first time when you open entity data in excel from PowerApps portal. Add-In establishes connection to PowerApps OData service.

Note: Add-In is compatible with Office 2016 or later versions only.

Using Microsoft PowerApps Office Add-In in excel you can create, update and delete rows. Let’s explore this Add-In.

  • Login to PowerApps web portal. Click on Entities under Data tab on left side menu.
  • Select any entity. In my case its “Company Products”.
  • Click on Open in Excel option on top menu which will export selected entity’s data in excel. Excel will ask you to install Add-In if you are using it for first time or will load Add-In for you.

PADD2

  • Create Rows – To create new rows, click…

View original post 264 more words

Earned “Top 10 in October 2018 Blog Leaderboard” badge in Dynamics 365 Community


This month I was awarded the “Top 10 in October 2018 Blog Leaderboard” badge in Microsoft Dynamics Community.

https://community.dynamics.com/members/nishant-rana/userbadges

Badge2

Thanks to all the readers and the subscribers of the blog.

Check the below post as well.

https://nishantrana.me/2018/10/03/earned-top-10-in-september-2018-blog-leaderboard-badge-in-dynamics-365-community/


Monitoring SSIS package Job Status


Suppose we have scheduled our packages through SQL Server Agent Job and we receive the notification that one of our packages has failed.

To get its details, within SSISDB, we can check the Standard Reports like Integration Services Dashboard report, All Executions etc. to get the details.

This will provide the information about the operation that have run or are currently executing.

We can click on Failed record link to filter the report.

Or we can Filter it through Filter Settings dialog box as shown below

Open up the report for which we want to check the messages and click on View Messages link to get the details.

We can also view these standard reports (All Execution and All Validations) for a specific project as well.

We can also make use of Active Operation Dialog Box to check the status of currently running SSIS packages and stop it if needed.

Hope it helps..

PowerApps – New Functions Introduced – GUID, Concurrent & Notify


Sachin Bansal's avatarBansal Blogs - Dynamics 365, PowerApps, Microsoft Flows, Power BI

PNF1

Microsoft has released many new features and enhancements for PowerApps since June 2018, part of this blog we will cover three new functions introduced which I believe would be mostly used.

GUID Function:

In my blog, I mentioned how to generate unique GUID using Azure function which requires us to create an azure function, a custom connector and connection between two. Microsoft has now introduced a new function GUID() which will generate unique GUID every time it is invoked or convert passed string into GUID.

Syntax:

  • GUID() – will return unique value of GUID type
  • GUID(strGUID) – here strGUID is string value which should be 36 hexadecimal digits with or without hyphens.

For more details, please refer here.

Demo:

  • Add a button and label on form. Set OnSelect property of button with below which will generate unique GUID value using GUID() function, converts it to string and…

View original post 396 more words