Lead Enhancements in Dynamics 365 for Sales – 2019 Release wave 2


Below are some of the capabilities added in Dynamics 365 for Sales with lead management.

It applies to both Unified Client Interface and Classic Web Client 

When creating a new lead, for Qualify sales stage,

on the selection of Existing Contact

First Name, Last Name, Job Title, Business Phone, Mobile Phone, and Email field will be populated

On selection of Existing Account

Company Name will be populated.

Ability to choose which records to create (Account, Contact and / or Opportunity)

To enable go to Sales Tab of Administration à System Settings

Qualify lead dialog box à

The Qualify Lead dialog box was always part of the product which was removed later, and the contact, account and opportunity records were auto-created based on certain conditions which are nicely explained here.

https://www.crminnovation.com/blog/qualify-lead-crm-2011-vs-crm-2015/

https://ledgeviewpartners.com/blog/how-to-qualify-a-lead-in-microsoft-dynamics-365-crm/

This is how the old dialog box looked like.

Notes and attachments associated with the lead are displayed in the opportunity record that is qualified from it.

Lead Record à

Opportunity records created from the lead have the notes associated.

Thus, these capabilities bring faster capture of lead information, more control of which records to be created as part of lead qualification and also quick reference on the opportunity records created through lead qualification.

Hope it helps..

Customize Opportunity Close Dialog Box – Dynamics 365 For Sales


With the 2019 release wave 2 plan, finally, we can customize the opportunity close dialog box (Unified Interface only)

Enable it from the Sales tab of System Settings dialog box.

The default out of the box Close Opportunity Dialog Box à

Now to add or remove fields to the dialog box, we need to customize the Quick Create form of Close Opportunity entity.

Change the ordering of the fields, added a custom field, removed Competitor and Description dialog box.

Updated Close Opportunity Dialog Box

We can use client-side validation on it

We can specify business rules

We can also customize the Main (Information) form.

This form can be used to check the details of closed opportunities.

Entity Relationships cannot be customized.

Great to see the feature available as it was one of the most requested features in the product.

https://experience.dynamics.com/ideas/idea/?ideaid=4792dfee-121a-e611-80e2-c4346badc228

Hope it helps..

No capacity available please check with your administrator error while using business card scanner control in Dynamics 365 Sales


We might get below error while trying to use scan business card feature in Dynamics 365 Sales

This is because as pre requisite it requires AI Builder licensing.

https://docs.microsoft.com/en-us/ai-builder/administer-licensing

For enabling the 30 day

free trial login to PowerApps

https://make.powerapps.com/

For the AI Builder, start the free trial.

Once enable we can see the business card scanner control working properly.

Hope it helps..

Export Dynamics 365 Data to Excel – different options


There are different options available for exporting Dynamics 365 Entity records to excel. The simplest being Export to Excel feature available in the product.

However, we might run into limitations like below

https://nishantrana.me/2018/08/15/maximum-file-size-exceeded-while-using-export-to-excel-in-dynamics-365-ce/

The easiest way of overcoming these limitations is to use the XrmToolBox plugin – Export to Excel

https://dreamingincrm.com/2015/05/30/new-xrmtoolbox-plugin-export-to-excel/

Other options include writing a windows executable that uses Dynamics 365 Web API for exporting data to excel format.

Use Microsoft Flow and export it to CSV file.

Create an SSRS report with required records \ columns and use Export to excel functionality.

Using KingswaySoft SSIS Integration Toolkit for Microsoft Dynamics 365 and other 3rd party data integration tools.

One such 3rd party tool that makes it easy to export the data to excel and also to schedule is Skyvia’s Export package.

Let us see a simple example to understand how it works.

Here we are planning to export a custom entity record that has 1835629 records.

Here we have already created the required Dynamics CRM Connection.

Navigate to the Data Integration section and create a new Export Package.

For target, we have .csv as the file format. For Target, we have various options of either saving it locally, FTP or in cloud services.

Here we can filter the records, specifying an ordering for them, select the columns we want to export.

Click on Save to create the package. Alternatively, we can also specify the schedule for the package to run at.

Click on Run

We can see the package running and its status in the Run History section.

Each of the options for exporting the excel has its own pros and cons. For e.g. OOB Export to Excel feature has a limitation with the number of records that can be exported, with KingswaySoft we need someone skilled in SSIS to write the package and also, we need to buy the license if we need to schedule it. With other 3rd party apps also we would need to buy the license.

Hope it helps..

Synchronize (Bi-Directional) Dynamics 365 CRM Cloud data with SQL Azure using Skyvia’s Synchronization Package


Continuing our previous post where we used the replication package

https://nishantrana.me/2019/11/13/easily-set-up-dynamics-365-ce-crm-replication-incremental-to-azure-sql-sql-on-premise-using-skyvias-data-integration-services/

here we will see how we can use the synchronization service for bi-directional sync.

Below of the prerequisites of synchronization package to perform bi-directional sync –

  • We need to use the created on and modified on fields of the Entity
  • The synchronized tables to have an auto-generated primary key.

So here we need to alter the SQL Azure’s Contact table that was auto-created earlier by the Replication package to have the auto-generated primary key.

Connect to the SQL Azure database using Skyvia’s Query service and perform the alter operation

Or use the Query Editor (preview) of Azure

With necessary changes made, let us create a new Synchronization package

Specify the connection and click on Add Task to create the synchronization task.

We have specified contact entity from Dynamics CRM Source and contact table in SQL Azure which was earlier created for us by the replication package.

It automatically maps all the columns here based on the column name.

We can also manually specify mapping here for both Source To Target and Target to Source fields to be used for sync.

Click on Finish once done with the mapping.

Similarly to replication packages, the synchronization packages can be scheduled.

Click on Save to create the Task.

Click on Run

The run history shows the 220 records synced from Dynamics CRM to SQL Azure.

We can see the 220 records created in our SQL Azure DB

Now let us update a record in SQL Azure and run the package again.

We can see the record updated in Dynamics CRM

Now let us delete a few records from Azure SQL and run the package

We can see the records delete from Dynamics CRM

Similarly, let us delete a couple of records from Dynamics CRM and run the package

We can see the 8 records deleted in the destination SQL Azure

Thus, we saw how easy it is to do bi-directional sync using Skyvia’s Synchronization package.

Hope it helps..

Easily set up Dynamics 365 CE \ CRM replication (incremental) to Azure SQL / SQL On-Premise using Skyvia’s Data Integration services


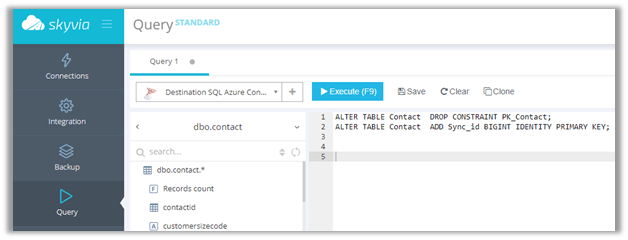
In the earlier post, we saw how we can use Skyvia’s query feature to execute SQL command against our Dynamics 365 CE

https://nishantrana.me/2019/10/25/execute-sql-select-insert-update-and-delete-command-on-dynamics-365-customer-engagement-data-using-skyvia-query/

In this post, we will cover how we can use Skyvia’s replication feature to create a copy of our cloud data i.e. Dynamics 365 Online data in a relational database like SQL Server and most interestingly keep it up to date automatically with basic configuration steps.

Creating replication of cloud data can be useful in different data integration scenarios and most importantly for reporting and data analysis need as with online we are limited with the use of Fetch XML.

The Skyvia’s replication service takes care of syncing Create, Update and Delete operation performed on Dynamics 365 Entity records with the destination SQL Database.

For this we need to Skyvia expects an object’s key as well as modifiedon, createdon fields to be included for replication.

For delete to work it expects, audit history to be enabled on that Entity.

In this post, we will take a simple example of replicating Contact entity records from Dynamics 365 Online to SQL Azure.

Login to Skyvia

https://app.skyvia.com/#/packages

Create the connections

Source Dynamics CRM Connection:

Destination SQL Azure Connection:

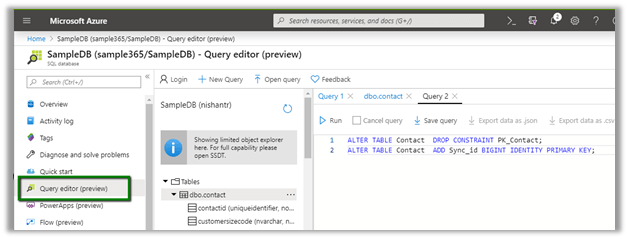
We have a database named SampleDB already created in SQL Azure.

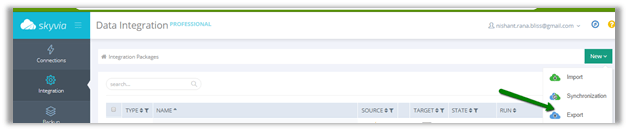
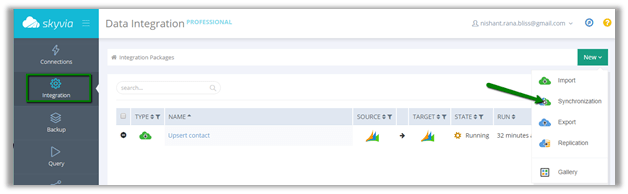
With connections created, now let us create a new package of type replication

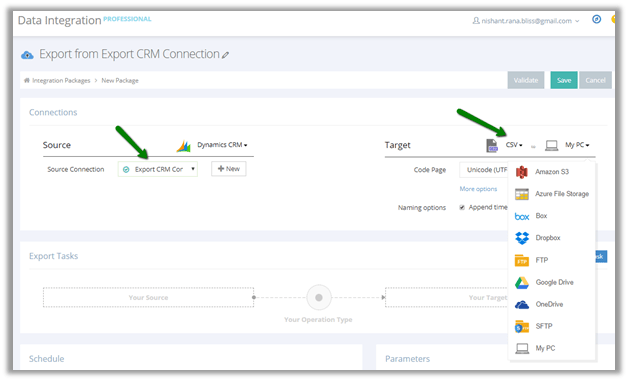
For the replication, we have specified source connection as the CRM connection and destination as the SQL Azure.

We have selected the option of Incremental Updates along with Create Tables and Drop Tables option which will delete if there is an existing table of the same name as the entity and will create a new one.

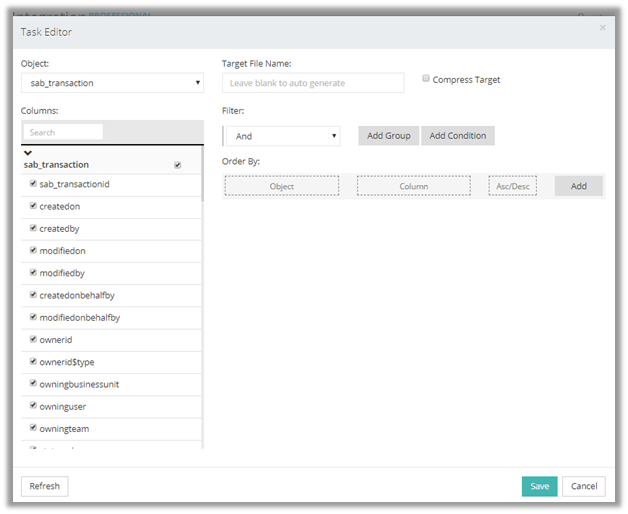
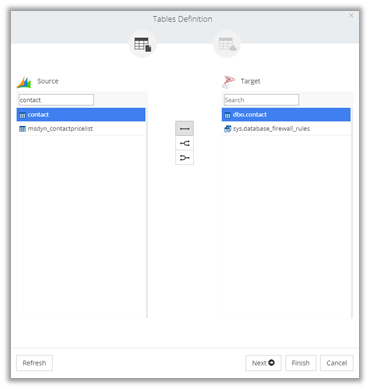
In the Select Objects section, we have a specified Contact entity. We can also select multiple entities for replication.

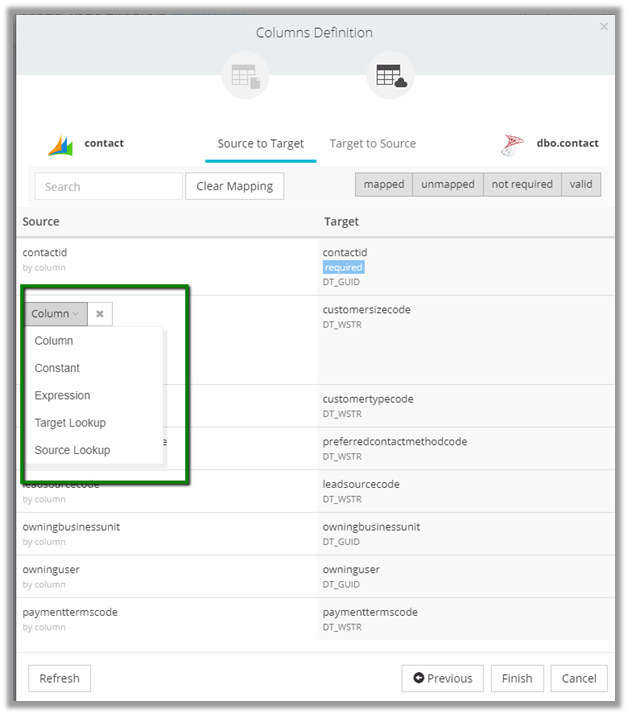
Edit task option in the selected entity let us specify the fields and filter criteria on the source.

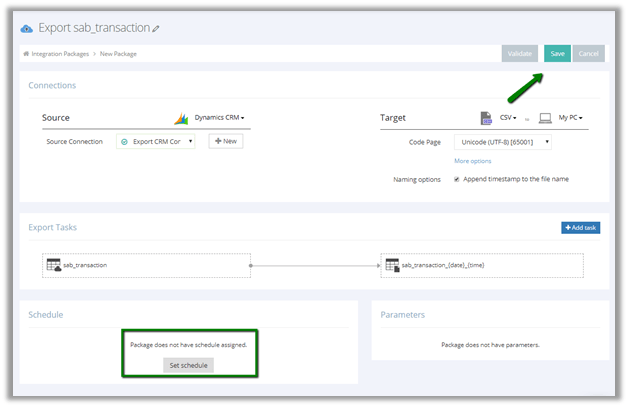
We also have the option of scheduling that we will look at in the end of the post.

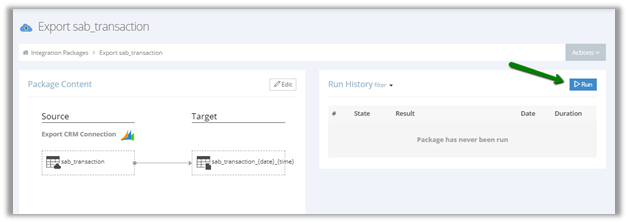
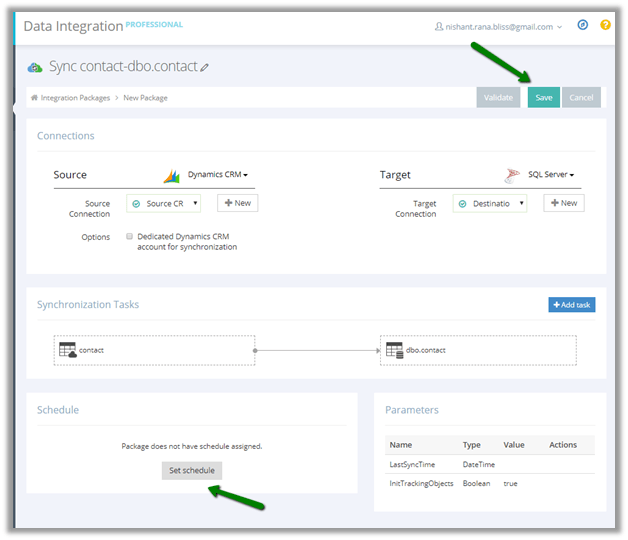
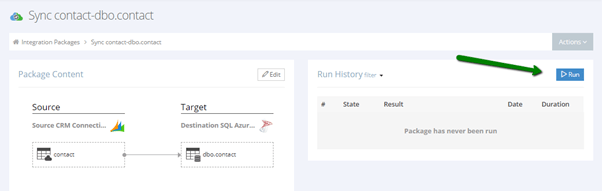
Save the package and click on Run to see it in action.

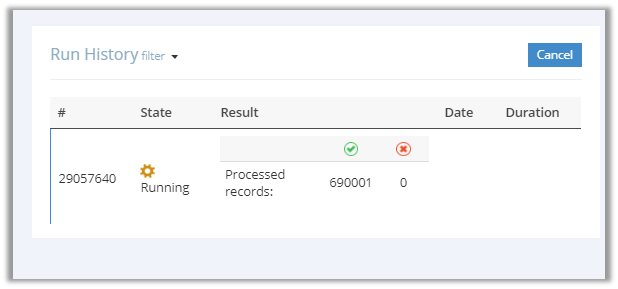
While it is running, the Run History section shows the details

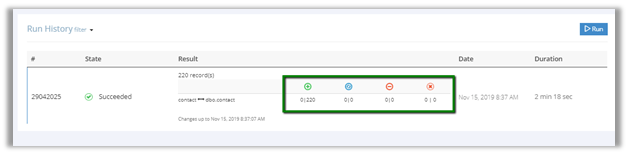
It auto refreshes with all the details.

We can see the 228 records of contact records replicated in SQL Azure.

Now let us create a new contact and run the package again.

Here we have created a contact record as shown below in CRM.

On running the package, we can see that it has added a new record in the Run History

Back in SQL Azure also our count has increased to 229.

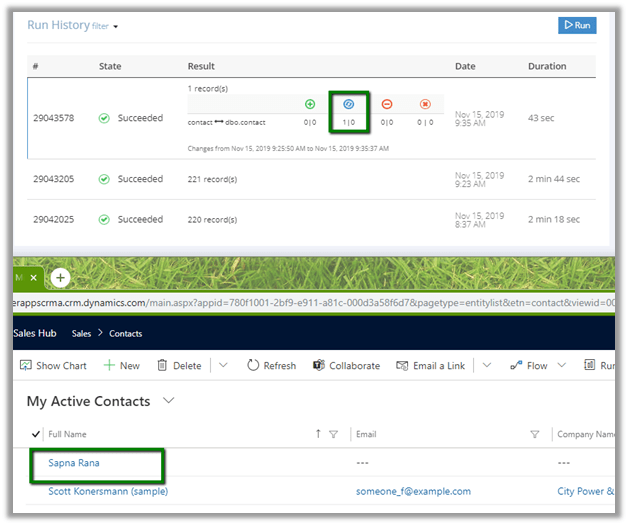
Now let us update one of the records in the source and run the package. The run history shows one of the records being updated.

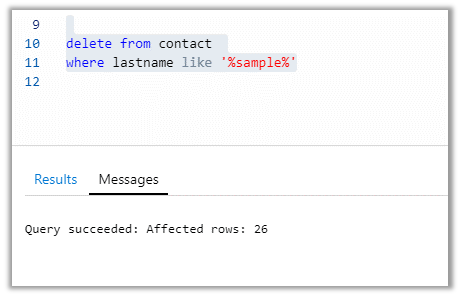
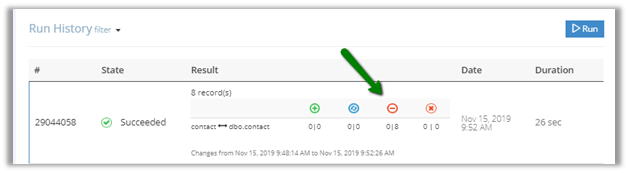
Finally, let us delete a couple of records (9) from the source and run the package. (We need to make sure we have enabled Audit on Contact entity for delete to work)

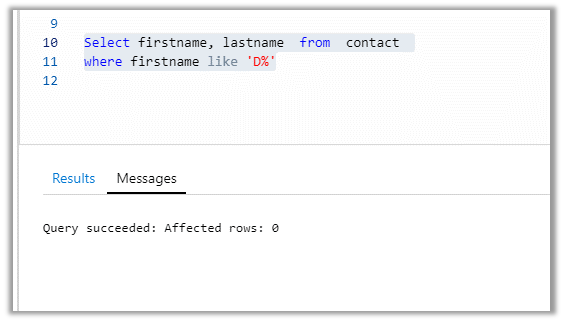
Back in SQL Azure, we can see total record count decreased

Here we were running the package manually, however, in real-world scenarios we would be scheduling it.

For this, we can edit our package and navigate to the Schedule section and click on Set Schedule.

For e.g. we have scheduled here it to run every hour starting from 6 p.m. till 10 a.m.

On save, we can check the run history

Thus, we saw how easy it is to replicate the data from Dynamics 365 CE to our SQL Database using Skyvia’s Integration service.

To achieve the same using Scribe Online Replication Service

https://nishantrana.me/2019/01/09/using-scribe-online-replication-services-rs-to-replicate-dynamics-ce-data/

and KingswaySoft 

http://www.kingswaysoft.com/blog/2017/04/04/How-to-Retrieve-Incremental-Changes-from-CRM-in-your-ETL-Process

Hope it helps..