Had written a post on deleting the elastic table record earlier – How to Delete Elastic Table Records in Dataverse (SDK). We need to pass the partitionid value through an alternate key to delete the elastic table records. We will have the alternate key auto-created by the system when we create an elastic table. Earlier specifying an Alternate Key was not possible for the Delete action in the CDS Destination component. However, with the latest release (Version 25.1 – April 4, 2025), the Manually Specify and Alternate Key matching criteria support has been added when performing the Delete action as shown below. We also need to have the Use Homogeneous Batch Operation Message option checked, this uses DeleteMultiple request in the background.
On running the package, now we can see the elastic table records (having partitionid) getting deleted successfully.
After the successful run (here we are deleting 40K records), we can see the records deleted.
Double Opt-In is a two-step process for email subscription:
The contact fills out a subscription form (initial opt-in).
They receive an email with a confirmation link. Only after clicking that link is their subscription considered confirmed (final opt-in).
This process ensures that the person who signed up wants to hear from us—and that the email address is valid.
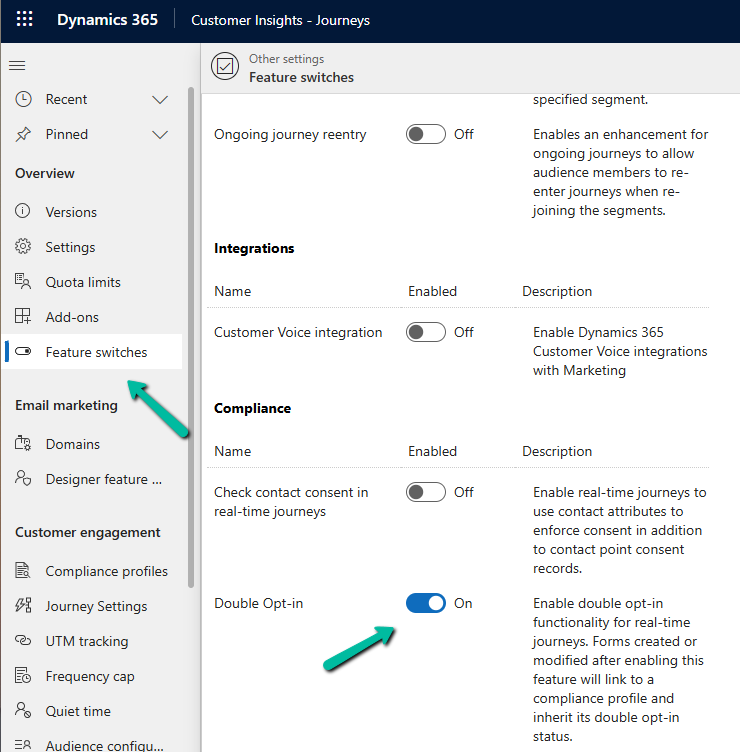
Enable the Double Opt-In Feature
Below is how we can enable it in Dynamics 365 Customer Insights – Journey
Go to Settings > Feature Switches > Compliance (Double Opt-In)
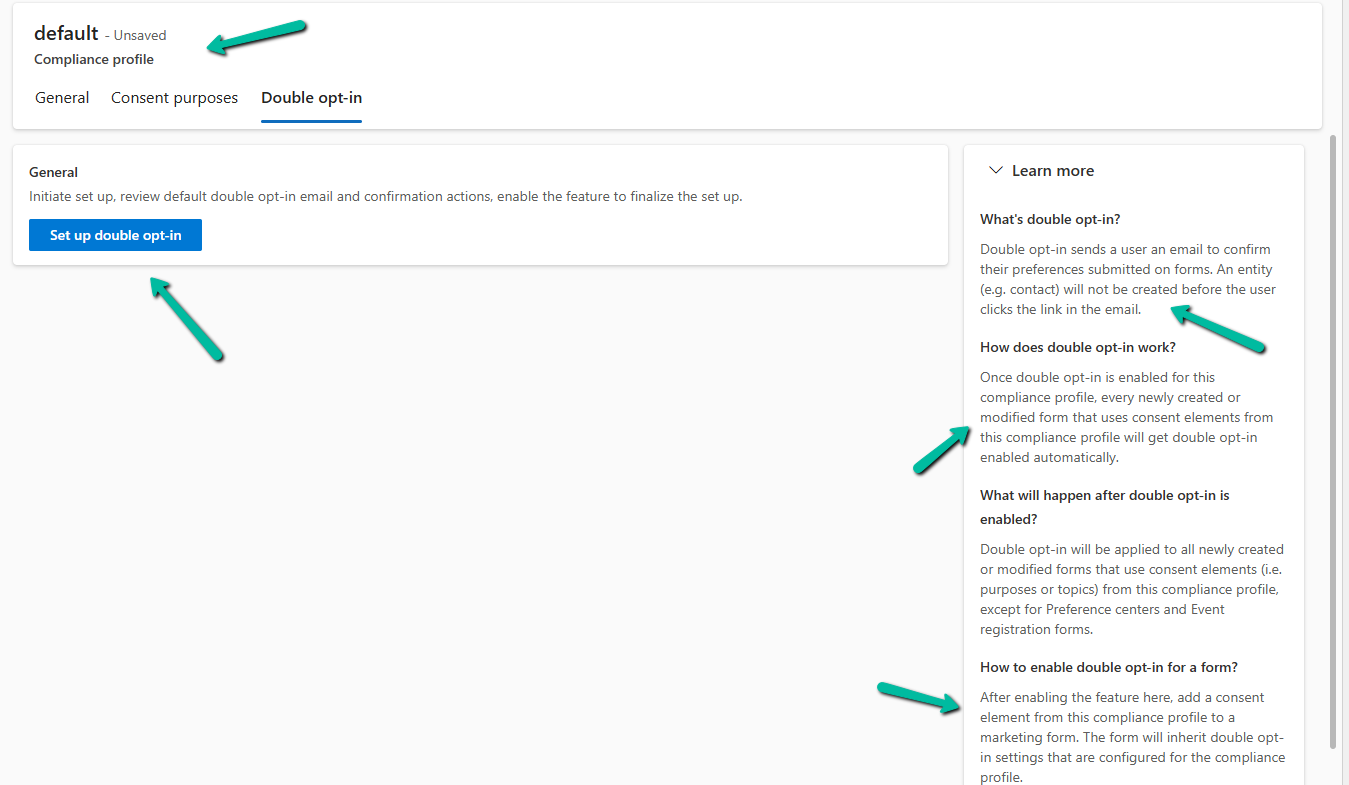
Create or Configure aCompliance Profile
The Compliance Profile is what governs how consent is collected and managed in real-time marketing.
Go to Settings > Customer engagement > Compliance profiles
Here we will enable it in the existing default compliance profile. We can have different compliance profiles for different regions, languages, or purposes.
Navigate to the Double opt-in tab.
As part of the setup, the system creates the Double opt-in email and the journey required as part of the process for that particular compliance profile.
We can see it configured after a few minutes.
Below is the email created by the system that will be used for the journey generated. Notice its state will be Ready to Send.
Similarly, we will have the journey created, with Status = Live.
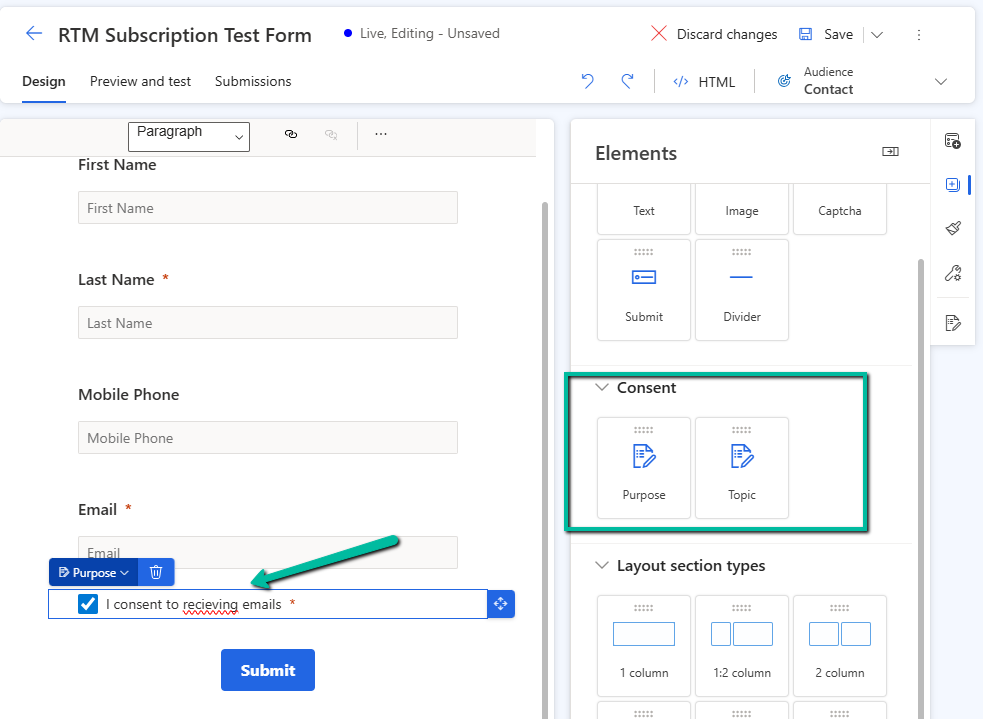
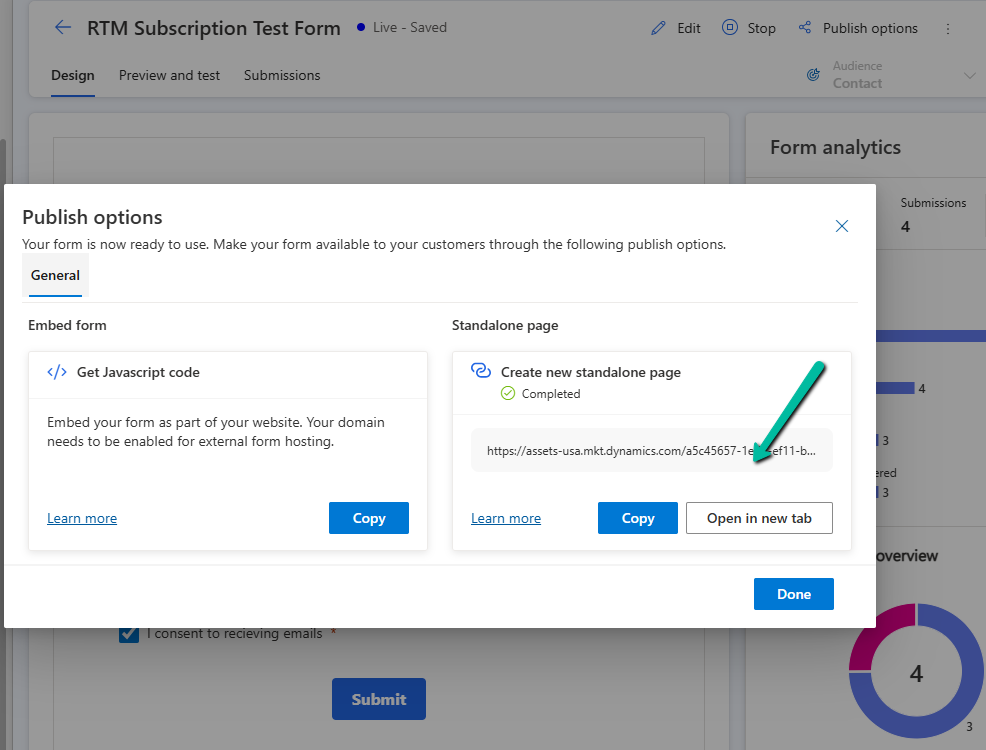
Link Compliance Profile to the Form
Open an existing marketing form or create a new one.
In the form editor, drag a Consent field.
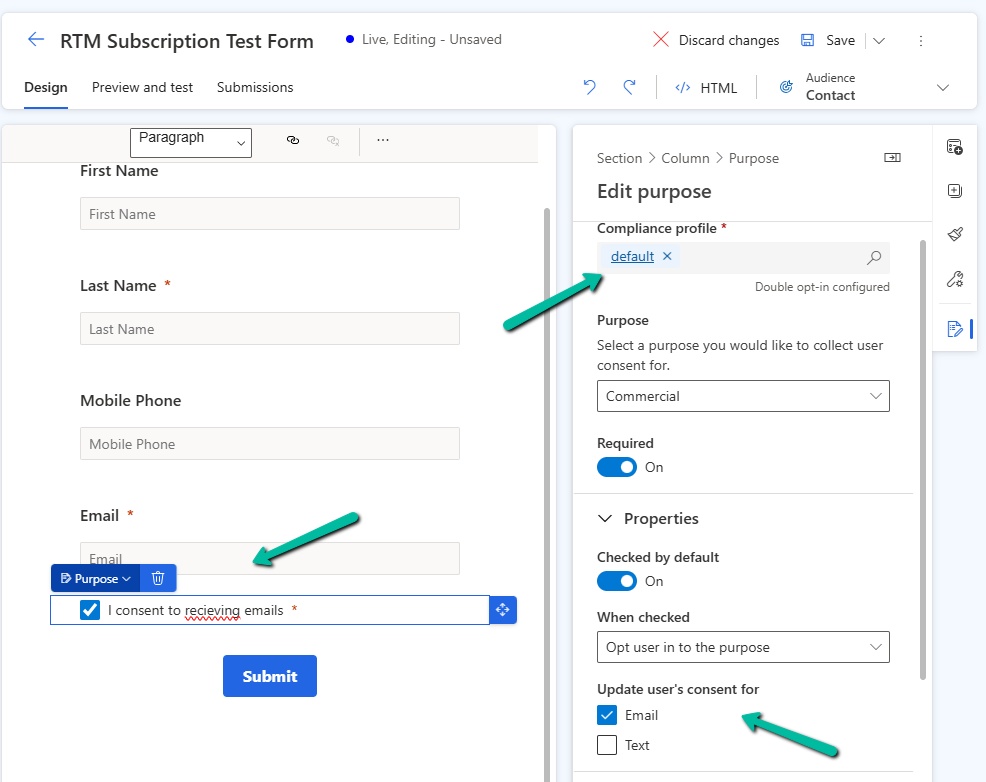
In the property pane for the Consent element, select the compliance profile (default one in our case), specify the purpose, and other required properties.
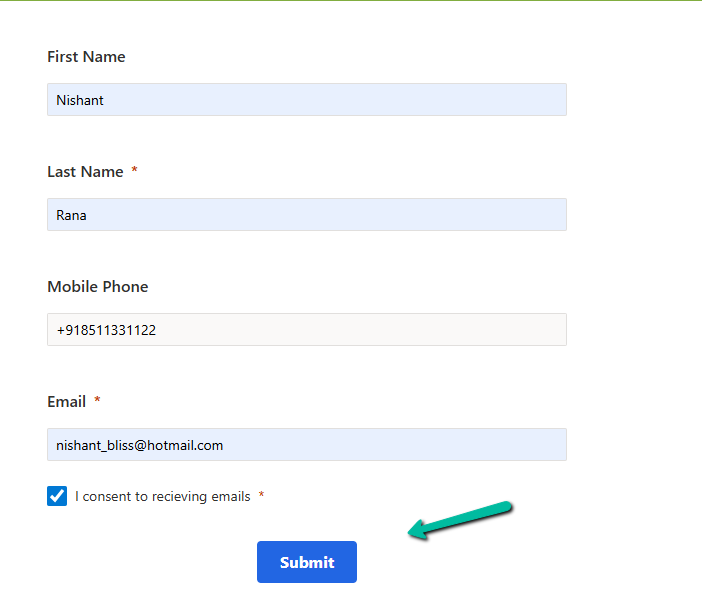
To see it in action let us submit the form using the standalone page.
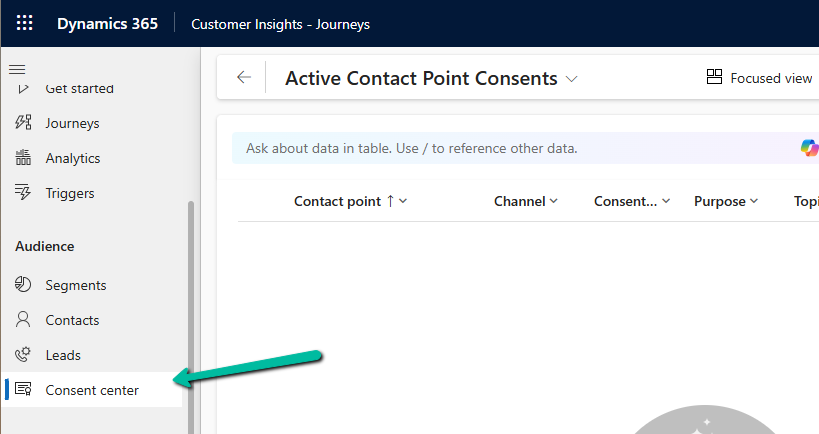
Till this point, we do not see any contact point consent record created.
We can see the confirmation email received in our mailbox. From there we can confirm it.
After confirmation, we can see our consent record created with the appropriate consent status.
Sometimes, we might create a new view for a table, and not everyone in our organization needs to see it — or maybe, only a specific team should have access to the existing views, now we can achieve it through security roles.
This feature is governed by the EnableRoleBasedSystemViews property, which we can manage through the OrganizationSettingsEditor tool.
Before we set the property as true, let us apply security roles to some of our views.
To apply it, select the view in the PowerApps Maker Portal and click on View Settings.
From the View Settings window, we can choose Specific security roles to apply to the views. Here we have selected the Vice President of Sales role for the All Leads Views. Save and publish the change.
Here we have repeated the same steps for the below remaining views.
Now if we open the leads view as System Admin, we can see all the views. This is because we have not yet set the EnableRoleBasedSystemViews to true.
Now let us set the property as true.
As soon as we set the property as true, we can see the views getting filtered for the System Admin user.
Only the below public view is visible. (along with the 2 private views at the top)
Now if we assign the “Vice President of Sales” role to the same user, he can then see the views on which security roles were applied.
The user can still see the remaining views through the “Manage and share views” option.
The records that the user can see in the views are still governed by security privileges.
Although the documentation mentions, that this feature only filters views in the table list view selector and not in associated grids or subgrids, we can see the same filtering applied.
Below is the Lead Associated view in the Competitor table.
When we enable the EnableRoleBasedSystemViews setting using the OrganizationSettingsEditor tool, it takes effect immediately. All table views, except the default one, start getting filtered based on assigned security roles right away. Assigning security roles to a view is also effective immediately after we save and publish the view. However, if we change a view’s access from ‘Specify security roles’ to ‘Everyone’, it might take up to 24 hours for the change to fully apply across the system.
In Dynamics 365 / Dataverse, sometimes we want to show or hide a ribbon button based on a form field value. But when the button is on a subgrid, it does not refresh automatically when a field changes on the form. We can handle this requirement using gridContext.refreshRibbon(). It is a small but very useful method that helps to refresh the subgrid ribbon without saving or reloading the form.
Here we are taking a simple scenario to understand the usage.
We will only show the New Case button on the Case Subgrid if the Preferred Method of Contact = Any else we will hide it.
Below is our JavaScript function to check the field value and return true or false. This function will be used as CustomRule for our Add New button command’s EnableRule on the subgrid. This function checks if the Preferred Method of Contact is ‘Any’. If yes, it returns true. Otherwise, it returns false.
We are passing CRM Parameter = PrimaryControl here.
Depending on where the button lives (Form ribbon or Subgrid ribbon), the correct context is passed.
On a form: PrimaryControl is the formContext.
On a Subgrid: PrimaryControl gives the context of the parent form hosting the subgrid.
Below we have customized the Add New Subgrid button for Case and added a new Enable Rule for its command.
Now on the form load, the Add New button on the subgrid will be hidden on the form load event.
But when we change the value for the Preferred Method of Contact we will not see any effect on the Add New button. For it to work we need to use the refershRibbon method of the grid’s context as shown below.
We added it on the onChange event for the Preferred Method of Contact field so that when a user changes it, the subgrid ribbon refreshes.
Now, when a user changes the Preferred Method of Contact, the subgrid ribbon will refresh and check again if the button should be visible.
As a result, now the Add New button appears on the Case subgrid when the Preferred Method of Contact is ‘Any’.
The ribbon refreshes immediately when the field changes to Email or any other value except Any.No need to save or reload the form.
JavaScript –
function showAddNewButtonOnCaseSubgrid(primaryControl) {
    var formContext = primaryControl;
    var preferredMethod = formContext.getAttribute("preferredcontactmethodcode");
    var preferredMethodValue = preferredMethod.getValue();
    // Check if Preferred Method is 'Any'
    if (preferredMethodValue === 1) {
        return true;
    }
    else {
        return false;
    }
}
function refreshCaseSubgridRibbon(executionContext) {
    var formContext = executionContext.getFormContext();
    var gridContext = formContext.getControl("Subgrid_Cases");
    if (gridContext) {
        gridContext.refreshRibbon();
    }
}
When working with Choice fields (Option Sets) in Dataverse, we mostly use the label and internal numeric value. But there’s also a lesser-known property — External Value — which can be quite handy, especially in integration scenarios.
Below is the Priority column of the case table.
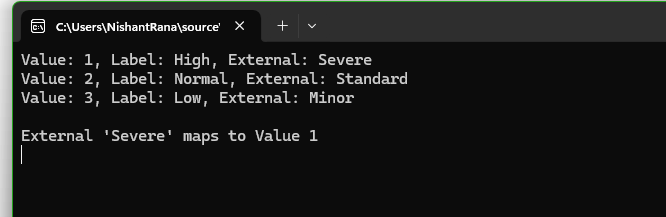
We have Severe, Moderate, and Minor external values specified for High, Normal, and Low choices respectively. These external values could be how the external third-party system is tracking the priority values to which we are integrating.
The external system sends us “priority”:” high” and we map that to the internal value 1 in Dataverse.
While sending data to the external system we convert the internal value to the external code i.e. 1 to. High
Below is how we can read the external values.
     var myServiceClient = new CrmServiceClient(connectionString);

        if (myServiceClient.IsReady)
        {
            var request = new RetrieveAttributeRequest
            {
                EntityLogicalName = "incident",
                LogicalName = "prioritycode",
                RetrieveAsIfPublished = true
            };

            var response = (RetrieveAttributeResponse)myServiceClient.Execute(request);
            var picklistMetadata = (PicklistAttributeMetadata)response.AttributeMetadata;

            foreach (var option in picklistMetadata.OptionSet.Options)
            {
                Console.WriteLine($"Value: {option.Value}, Label: {option.Label?.UserLocalizedLabel?.Label}, External: {option.ExternalValue}");
            }

            string ext = "Severe";
            var match = picklistMetadata.OptionSet.Options.FirstOrDefault(o => o.ExternalValue == ext);
            if (match != null)
            {
                Console.WriteLine($"\nExternal '{ext}' maps to Value {match.Value}");
            }

        }
Using External values, we can decouple integrations from the internal values that we use for our choice column. By using them, we can speak the language of the external system while still maintaining proper structure and metadata within Dataverse.
While working on a LINQ query using early-bound classes in a Dynamics 365 plugin, we encountered a familiar error.
“Could not find an implementation of the query pattern for source type. ‘Where’ not found”
At a glance, everything looked fine. The query was syntactically correct, and the early-bound class was generated properly.
After spending some time, we realized that the error message wasn’t due to the query or the early-bound class itself. It was because we forgot to include the following directive:
using System.Linq;
Without this, C# doesn’t recognize LINQ query methods like Where, Select, or ToList.
Adding this single line at the top of the file resolved the issue immediately, the LINQ query compiled and executed as expected.