Fixed – Access Denied (CryptographicException) on calling SharePoint Online APIs using Azure AD App-Only


While trying to call SharePoint Online APIs using Azure AD App-Only using Certificate Auth we were getting the Access Denied exception.

We were creating the ClientContext using the AuthenticationManager class of PnP the Framework and were using Certificate Auth as shown below.

A screenshot of a computer program
Description automatically generated

This was because the console app was trying to create a key in the machinekeys folder and the user did not have Write access to it.

C:\ProgramData\Microsoft\Crypto\RSA\MachineKeys

A screenshot of a computer

Description automatically generated

We provided the Write access, which fixed the issue.

A screenshot of a computer

Description automatically generated

We can see the keys added to that folder and SharePoint Online APIs called successfully

Hope it helps..

Calling SharePoint Online API using Azure AD App-Only permissions using Certificate Auth


Below are the steps we need to follow to call SharePoint Online API through a Console App (C#).

The first step is to register an Azure AD app.

Provide appropriate SharePoint API Permissions

A screenshot of a computer

Description automatically generated

As the console app would run in the background we opted for Application Permissions.

A screenshot of a computer screen

Description automatically generated

For testing, we opted for Sites.FullControl.All permission.

Also, Grant the admin consent

A screenshot of a computer

Description automatically generated

Next, we need to generate and upload the certificate

Run the below PowerShell script to generate the self-signed certificate

.\Create-SelfSignedCertificate.ps1 -CommonName “MySampleCertificate” -StartDate 2024-01-01 -EndDate 2026-10-01

#Requires -RunAsAdministrator
<#
.SYNOPSIS
Creates a Self Signed Certificate for use in server to server authentication
.DESCRIPTION
.EXAMPLE
.\Create-SelfSignedCertificate.ps1 -CommonName "MyCert" -StartDate 2015-11-21 -EndDate 2017-11-21
This will create a new self signed certificate with the common name "CN=MyCert". During creation you will be asked to provide a password to protect the private key.
.EXAMPLE
.\Create-SelfSignedCertificate.ps1 -CommonName "MyCert" -StartDate 2015-11-21 -EndDate 2017-11-21 -Password (ConvertTo-SecureString -String "MyPassword" -AsPlainText -Force)
This will create a new self signed certificate with the common name "CN=MyCert". The password as specified in the Password parameter will be used to protect the private key
.EXAMPLE
.\Create-SelfSignedCertificate.ps1 -CommonName "MyCert" -StartDate 2015-11-21 -EndDate 2017-11-21 -Force
This will create a new self signed certificate with the common name "CN=MyCert". During creation you will be asked to provide a password to protect the private key. If there is already a certificate with the common name you specified, it will be removed first.
#>
Param(

[Parameter(Mandatory=$true)]
   [string]$CommonName,

[Parameter(Mandatory=$true)]
   [DateTime]$StartDate,

[Parameter(Mandatory=$true)]
   [DateTime]$EndDate,

[Parameter(Mandatory=$false, HelpMessage="Will overwrite existing certificates")]
   [Switch]$Force,

[Parameter(Mandatory=$false)]
   [SecureString]$Password
)

# DO NOT MODIFY BELOW

function CreateSelfSignedCertificate(){

#Remove and existing certificates with the same common name from personal and root stores
    #Need to be very wary of this as could break something
    if($CommonName.ToLower().StartsWith("cn="))
    {
        # Remove CN from common name
        $CommonName = $CommonName.Substring(3)
    }
    $certs = Get-ChildItem -Path Cert:\LocalMachine\my | Where-Object{$_.Subject -eq "CN=$CommonName"}
    if($certs -ne $null -and $certs.Length -gt 0)
    {
        if($Force)
        {

foreach($c in $certs)
            {
                remove-item $c.PSPath
            }
        } else {
            Write-Host -ForegroundColor Red "One or more certificates with the same common name (CN=$CommonName) are already located in the local certificate store. Use -Force to remove them";
            return $false
        }
    }

$name = new-object -com "X509Enrollment.CX500DistinguishedName.1"
    $name.Encode("CN=$CommonName", 0)

$key = new-object -com "X509Enrollment.CX509PrivateKey.1"
    $key.ProviderName = "Microsoft RSA SChannel Cryptographic Provider"
    $key.KeySpec = 1
    $key.Length = 2048
    $key.SecurityDescriptor = "D:PAI(A;;0xd01f01ff;;;SY)(A;;0xd01f01ff;;;BA)(A;;0x80120089;;;NS)"
    $key.MachineContext = 1
    $key.ExportPolicy = 1 # This is required to allow the private key to be exported
    $key.Create()

$serverauthoid = new-object -com "X509Enrollment.CObjectId.1"
    $serverauthoid.InitializeFromValue("1.3.6.1.5.5.7.3.1") # Server Authentication
    $ekuoids = new-object -com "X509Enrollment.CObjectIds.1"
    $ekuoids.add($serverauthoid)
    $ekuext = new-object -com "X509Enrollment.CX509ExtensionEnhancedKeyUsage.1"
    $ekuext.InitializeEncode($ekuoids)

$cert = new-object -com "X509Enrollment.CX509CertificateRequestCertificate.1"
    $cert.InitializeFromPrivateKey(2, $key, "")
    $cert.Subject = $name
    $cert.Issuer = $cert.Subject
    $cert.NotBefore = $StartDate
    $cert.NotAfter = $EndDate
    $cert.X509Extensions.Add($ekuext)
    $cert.Encode()

$enrollment = new-object -com "X509Enrollment.CX509Enrollment.1"
    $enrollment.InitializeFromRequest($cert)
    $certdata = $enrollment.CreateRequest(0)
    $enrollment.InstallResponse(2, $certdata, 0, "")
    return $true
}

function ExportPFXFile()
{
    if($CommonName.ToLower().StartsWith("cn="))
    {
        # Remove CN from common name
        $CommonName = $CommonName.Substring(3)
    }
    if($Password -eq $null)
    {
        $Password = Read-Host -Prompt "Enter Password to protect private key" -AsSecureString
    }
    $cert = Get-ChildItem -Path Cert:\LocalMachine\my | where-object{$_.Subject -eq "CN=$CommonName"}

Export-PfxCertificate -Cert $cert -Password $Password -FilePath "$($CommonName).pfx"
    Export-Certificate -Cert $cert -Type CERT -FilePath "$CommonName.cer"
}

function RemoveCertsFromStore()
{
    # Once the certificates have been been exported we can safely remove them from the store
    if($CommonName.ToLower().StartsWith("cn="))
    {
        # Remove CN from common name
        $CommonName = $CommonName.Substring(3)
    }
    $certs = Get-ChildItem -Path Cert:\LocalMachine\my | Where-Object{$_.Subject -eq "CN=$CommonName"}
    foreach($c in $certs)
    {
        remove-item $c.PSPath
    }
}

if(CreateSelfSignedCertificate)
{
    ExportPFXFile
    RemoveCertsFromStore
}

Specify the password and note it down as it will be used for connection.

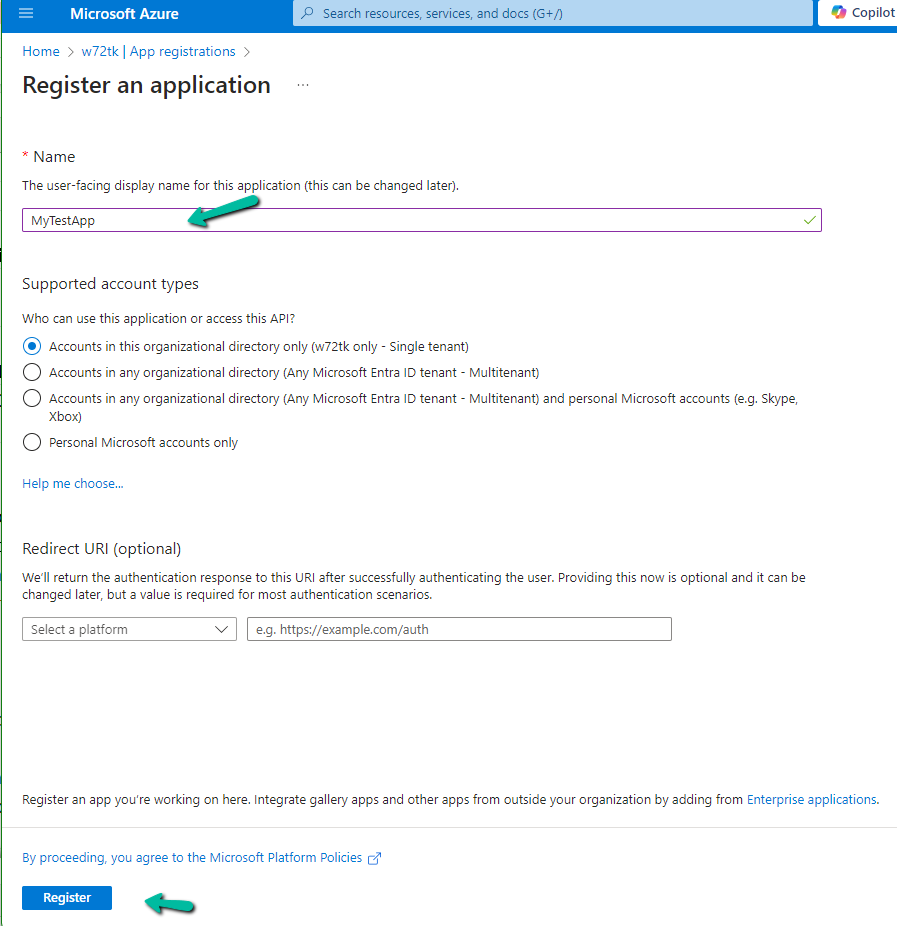
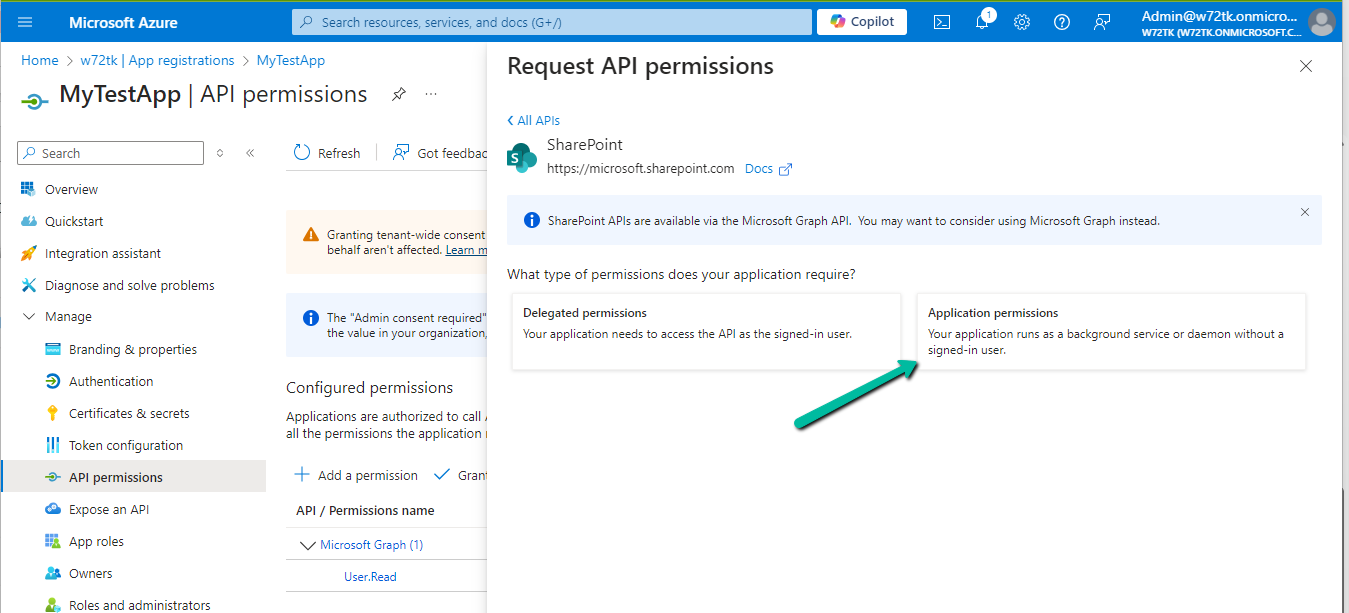
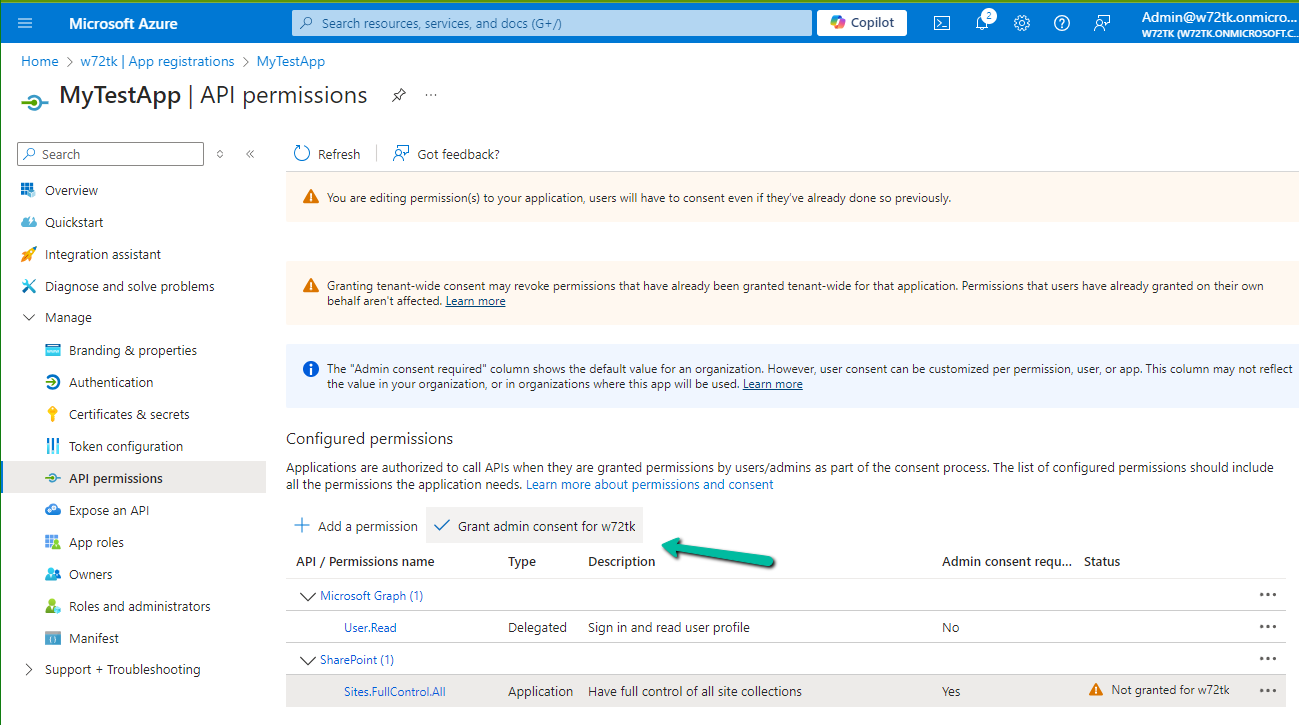
Upload the certificate to the Azure AD App registered.

A screenshot of a computer

Description automatically generated

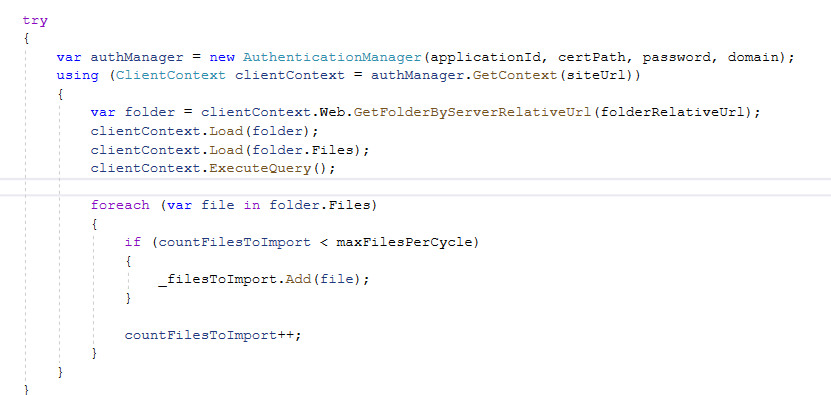
For the console app, we installed the PnP.Framework Nuget Package

A screenshot of a computer

Description automatically generated

The sample code –

           try
            {
                var authManager = new AuthenticationManager(applicationId, certPath, password, domain);
                using (ClientContext clientContext = authManager.GetContext(siteUrl))
                {
                    var folder = clientContext.Web.GetFolderByServerRelativeUrl(folderRelativeUrl);
                    clientContext.Load(folder);
                    clientContext.Load(folder.Files);
                    clientContext.ExecuteQuery();

                    foreach (var file in folder.Files)
                    {
                        if (countFilesToImport < maxFilesPerCycle)
                        {
                            _filesToImport.Add(file);
                        }

                        countFilesToImport++;
                    }
                }
            }
            catch (Exception ex)
            {
                System.Console.WriteLine("Error: " + ex.Message);
                if (ex.InnerException != null)
                {
                    System.Console.WriteLine("Inner Exception: " + ex.InnerException.Message);
                }
            }
        }

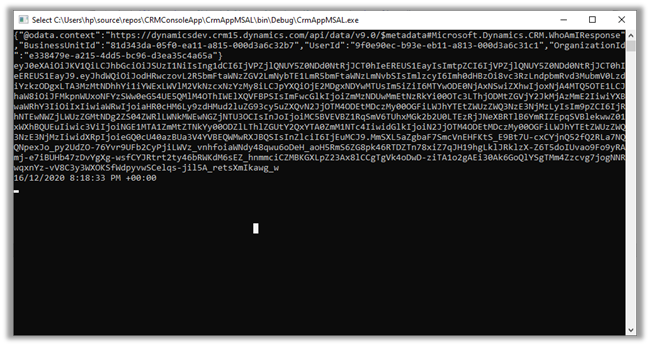
We can see our app is successfully connected.

A computer screen shot of a program

Description automatically generated

The other option is to use the SharePoint app-only, which is not recommended by Microsoft.

We can see the following message for it.

Starting April 2, 2026, Azure Access Control service (ACS) usage will be retired for SharePoint in Microsoft 365 and users will no longer be able to create or use Azure ACS principals to access SharePoint. Learn more about the Access Control retirement

A screenshot of a computer

Description automatically generated

Get all the details here

Hope it helps..

Advertisements

This password does not meet the length, complexity, age, or history requirements of your corporate password policy (Minimum Password Age)


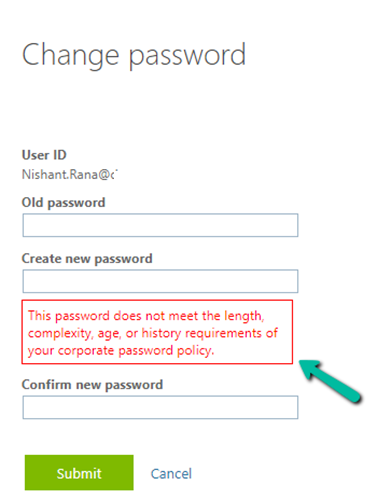
We might get the below error even after specifying a new password having the appropriate length, complexity, age, etc.

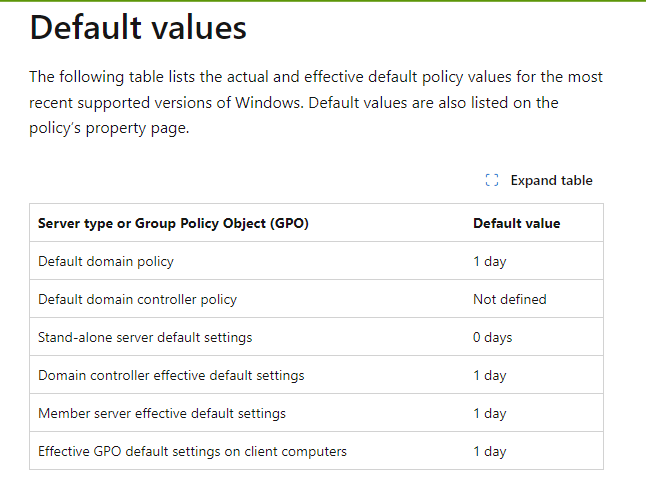
If you are also facing the same, it could be because of the Minimum password age policy setting. It specifies the duration for which the password must be used before it can be changed. It could be a value between 1 and 998 days, also it can be set as 0, which means the password cannot be changed again immediately.

A screenshot of a computer error

Description automatically generated

In our case also, we had changed the password and within a few minutes we again wanted to change it for some testing, that is where we got that issue. Finally, after 24 hours, we were able to do so.

The below article explains in detail about different Password Requirements and how they apply in the case of Azure AD.

https://www.linkedin.com/pulse/what-active-directory-azure-ad-password-requirements-valentin/

Hope it helps..

Advertisements

How to – Consume Dynamics 365 Web API using MSAL.NET


Sharing a sample code to consume Dynamics 365 Web API using MSAL.NET

Create a console application and add the following NuGet Package

  • Microsoft.Identity.Client

More on Microsoft identity platform

https://docs.microsoft.com/en-us/azure/active-directory/develop/

We are using ConfidentialClientApplicationBuilder create method.

https://docs.microsoft.com/en-gb/azure/active-directory/develop/msal-net-initializing-client-applications

The sample code –

using Microsoft.Identity.Client;
using System;
using System.Net.Http;
using System.Net.Http.Headers;
using System.Threading.Tasks;

namespace CrmAppMSAL
{
class Program
{
static async Task Main(string[] args)
{

string clientId = "fc34502a-74db-4977-8c83-***********";
string secret = "5~mByJeQ8dDO2LZP_H_J2**********";
string[] scope = new string[] { "https://orgname.crm15.dynamics.com/.default" };
string webAPI = "https://[org].crm15.dynamics.com//api/data/v9.0/leads";
string authority = "https://login.microsoftonline.com/7bc93881-0733-48ab-baa1-ee3ed7717633";

var clientApp = ConfidentialClientApplicationBuilder.Create(clientId: clientId)
.WithClientSecret(clientSecret: secret)
.WithAuthority(new Uri(authority))
.Build();

try
{
AuthenticationResult authResult = await clientApp.AcquireTokenForClient(scope).ExecuteAsync();

var httpClient = new HttpClient();
httpClient.DefaultRequestHeaders.Add("OData-MaxVersion", "4.0");
httpClient.DefaultRequestHeaders.Add("OData-Version", "4.0");
httpClient.DefaultRequestHeaders.Accept.Add(new MediaTypeWithQualityHeaderValue("application/json"));
httpClient.DefaultRequestHeaders.Authorization = new AuthenticationHeaderValue("Bearer", authResult.AccessToken);

httpClient.BaseAddress = new Uri(webAPI);

var response = httpClient.GetAsync("WhoAmI").Result;

if (response.IsSuccessStatusCode)
{
var userDetails = response.Content.ReadAsStringAsync().Result;
Console.WriteLine(userDetails);
Console.WriteLine(authResult.AccessToken);
Console.WriteLine(authResult.ExpiresOn);
Console.ReadLine();
}

}
catch (Exception ex)
{
string errorMessage = ex.Message;
}
}
}
}

Result –

Reference –

https://medium.com/capgemini-microsoft-team/access-tokens-for-dynamics-365-using-microsoft-authentication-library-2b16c9f794b

Sample Code – Dynamics 365 Web API / Organization Service

Hope it helps..

Advertisements

How to – Read Secret from Azure Key Vault using Key Vault Rest API through Postman


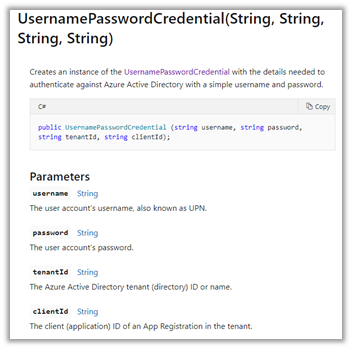
In the previous posts, we saw how to register an Azure AD app and read the secret from Azure Key Vault using SecretClient and UsernamePasswordCredential class

In this post, we’d fetch the secret saved in Key Vault through Postman.

  • Register an Azure AD App
  • Copy its client id and client secret
  • Provide the Get Secret permissions to the application for the Key Vault.

Within Postman we’d first fetch the token

Get the URL from endpoints

Format – https://login.microsoftonline.com/{tenantid}/oauth2/v2.0/token

Scope value – https://vault.azure.net/.default

Send the request which responds with the token.

Copy the token

Create the new Get request and pass the Secret identifier with the API version.

https://mykvcrm.vault.azure.net/secrets/MySecret/f046535ef5644ca5a4b43f2a718776b9?api-version=7.1

For authorization select type as Bearer Token and paste the token generated earlier.

Send the request to get the secret’s value as shown below – “itissecret”

Get more details here –

https://docs.microsoft.com/en-us/rest/api/keyvault/getsecrets/getsecrets

Hope it helps..

Advertisements

Fixed – AADSTS7000218: The request body must contain the following parameter: ‘client_assertion’ or ‘client_secret


While trying to access Azure resources using UsernamePasswordCredential credential we were getting the below error

https://docs.microsoft.com/en-us/dotnet/api/azure.identity.usernamepasswordcredential?view=azure-dotnet

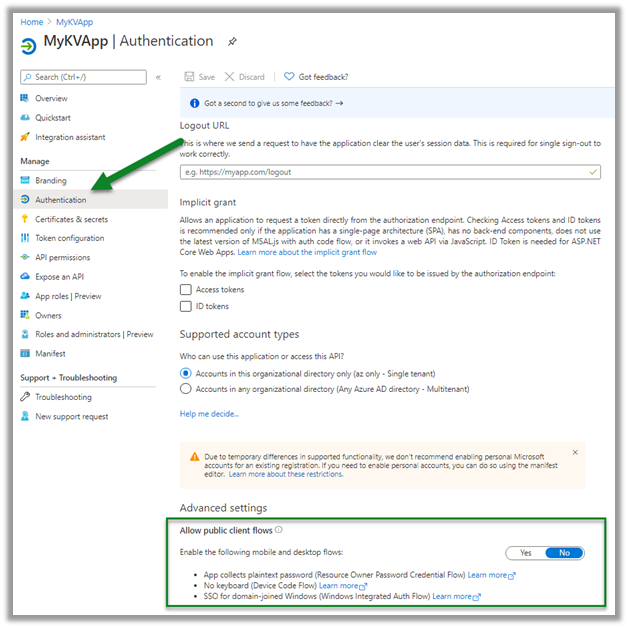
Azure.Identity.AuthenticationFailedException: ‘UsernamePasswordCredential authentication failed: A configuration issue is preventing authentication – check the error message from the server for details.You can modify the configuration in the application registration portal. See https://aka.ms/msal-net-invalid-client for details. Original exception: AADSTS7000218: The request body must contain the following parameter: ‘client_assertion’ or ‘client_secret’.

Trace ID: ef6c9e2b-862a-4a8b-9519-9a9072d23301

Correlation ID: 5f9bae95-e45a-4da5-b27c-ad9704e7334e

Timestamp: 2020-11-28 05:58:05Z’

This was because Allow public client flows was disabled for the application registered in Azure AD.

Enabling it fixed the issues for us.

https://docs.microsoft.com/en-gb/azure/active-directory/develop/scenario-desktop-acquire-token?tabs=dotnet#username-and-password

More on ROPC

https://nishantrana.me/2019/08/23/connect-to-dynamics-365-web-api-using-oauth-2-0-resource-owner-password-credential-ropc/

Hope it helps..

Advertisements