Configure Case Handling Time widget for the Case form – Dynamics 365 Customer Service


The Case Handling Time widget (preview) can be added to the Case Form, giving a focused way to track case resolution efficiency. By using this feature, we can identify patterns, make informed decisions, and continuously refine processes.

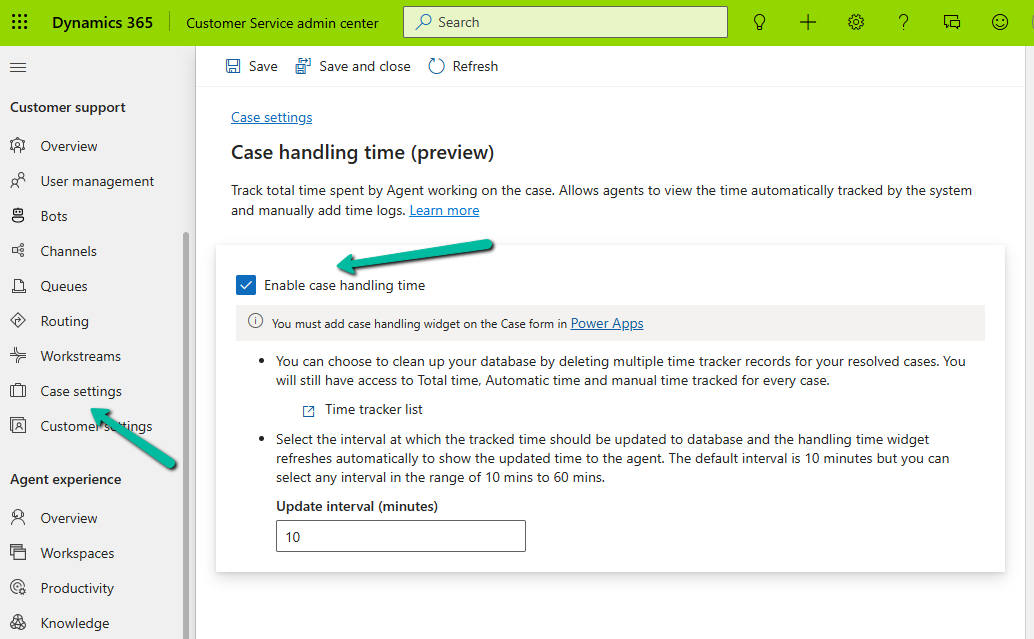
To enable it to navigate to

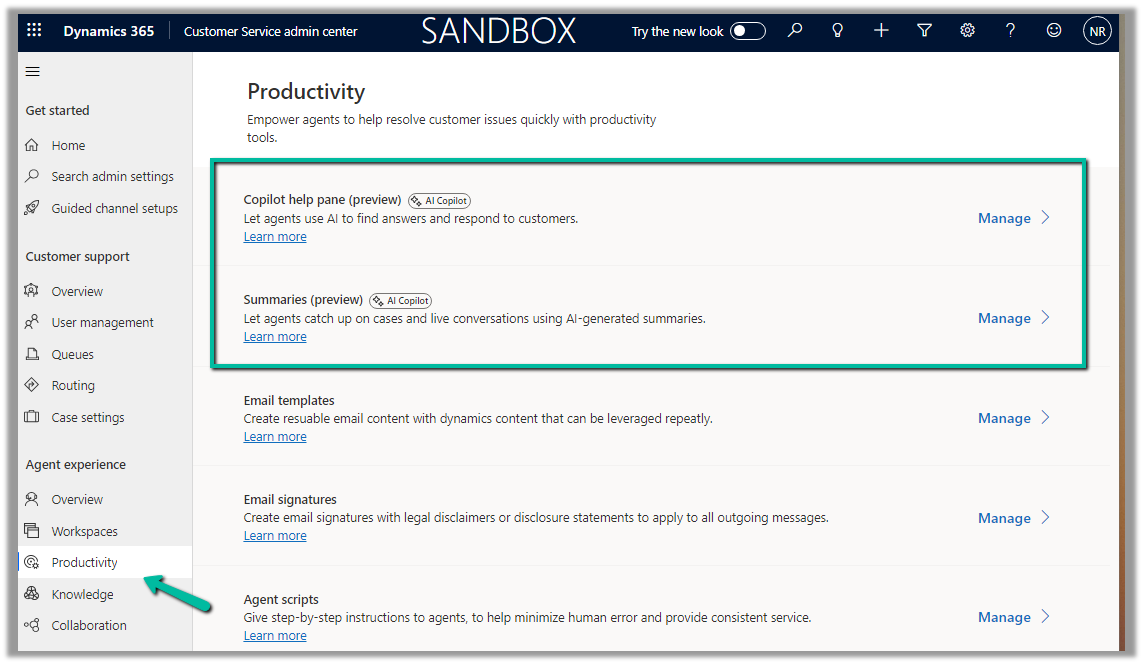
Customer Service Admin Center >> Customer Support >> Case Settings >> Case handling time (preview)

Update Interval specifies how frequently the handling time widget is refreshed (it also updates the database). Can be between 10 to 60 minutes. The interesting point here is if 2 agents open the same case at the same time, the widget will display 20 minutes, after 10 minutes.

A screenshot of a computer

Description automatically generated

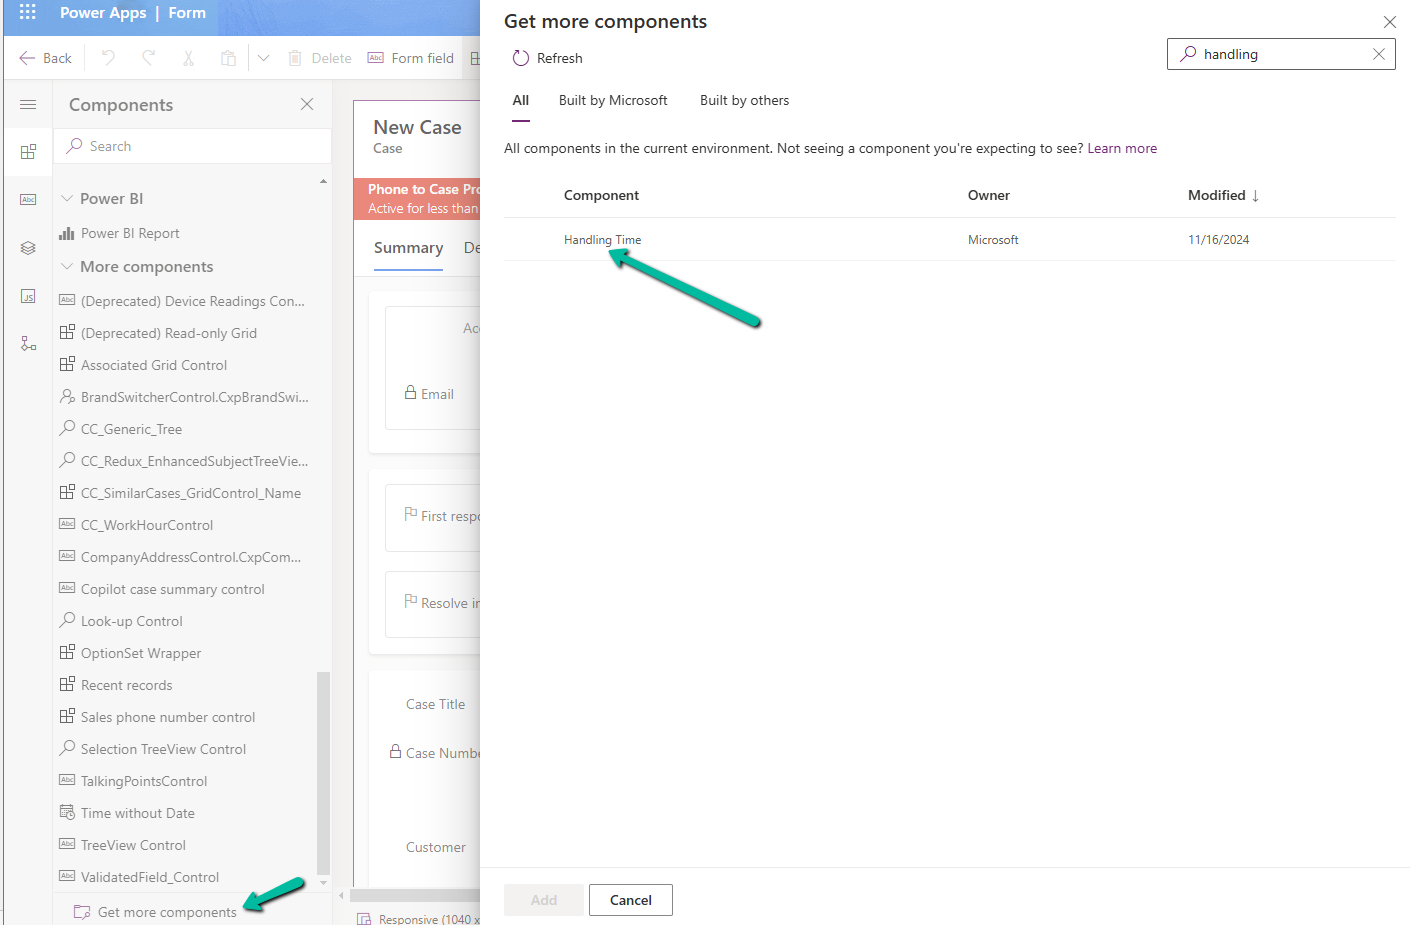
Next, open the form where we want to add the component, click on Get more components, and search for the Handling Time component to add it.

A screenshot of a computer

Description automatically generated

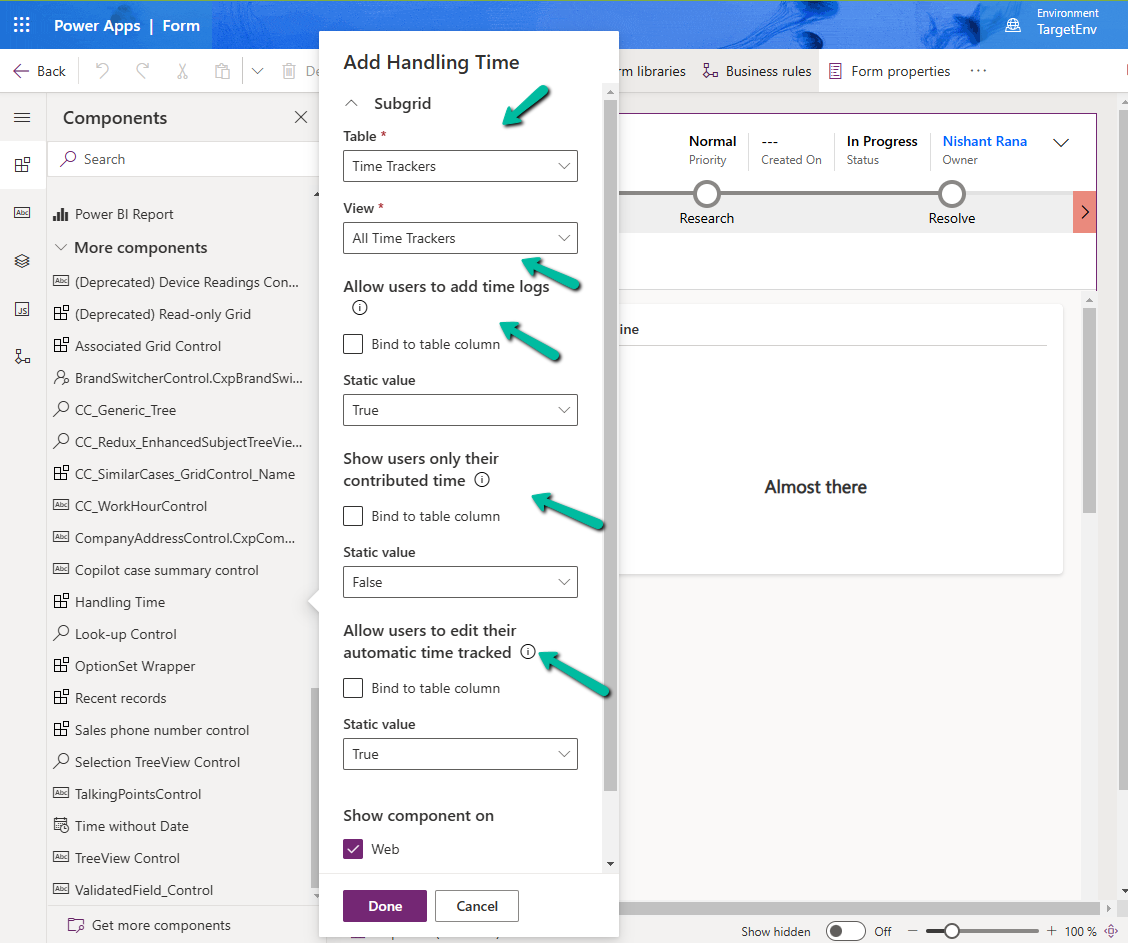
Configure the properties for the component –

Table – Time Trackers

View – All Time Trackers

Allow users to add time logs – True / False (enables agents to log time)

Show users only their contributed time – True / False (specifies whether an agent can only see their time or time entered by other agents also for that case)

Allow users to edit their automatic time tracked – True / False (specifies if an agent can edit automatic time tracked).

A screenshot of a computer

Description automatically generated

Save and publish the changes.

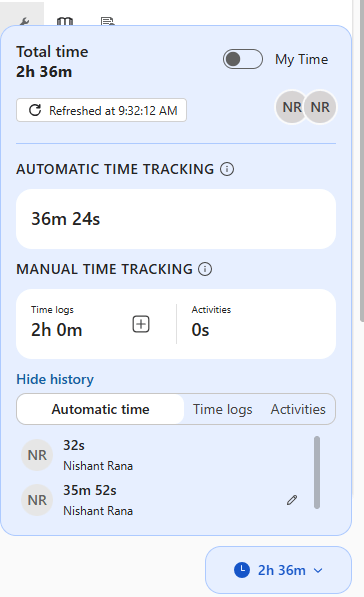
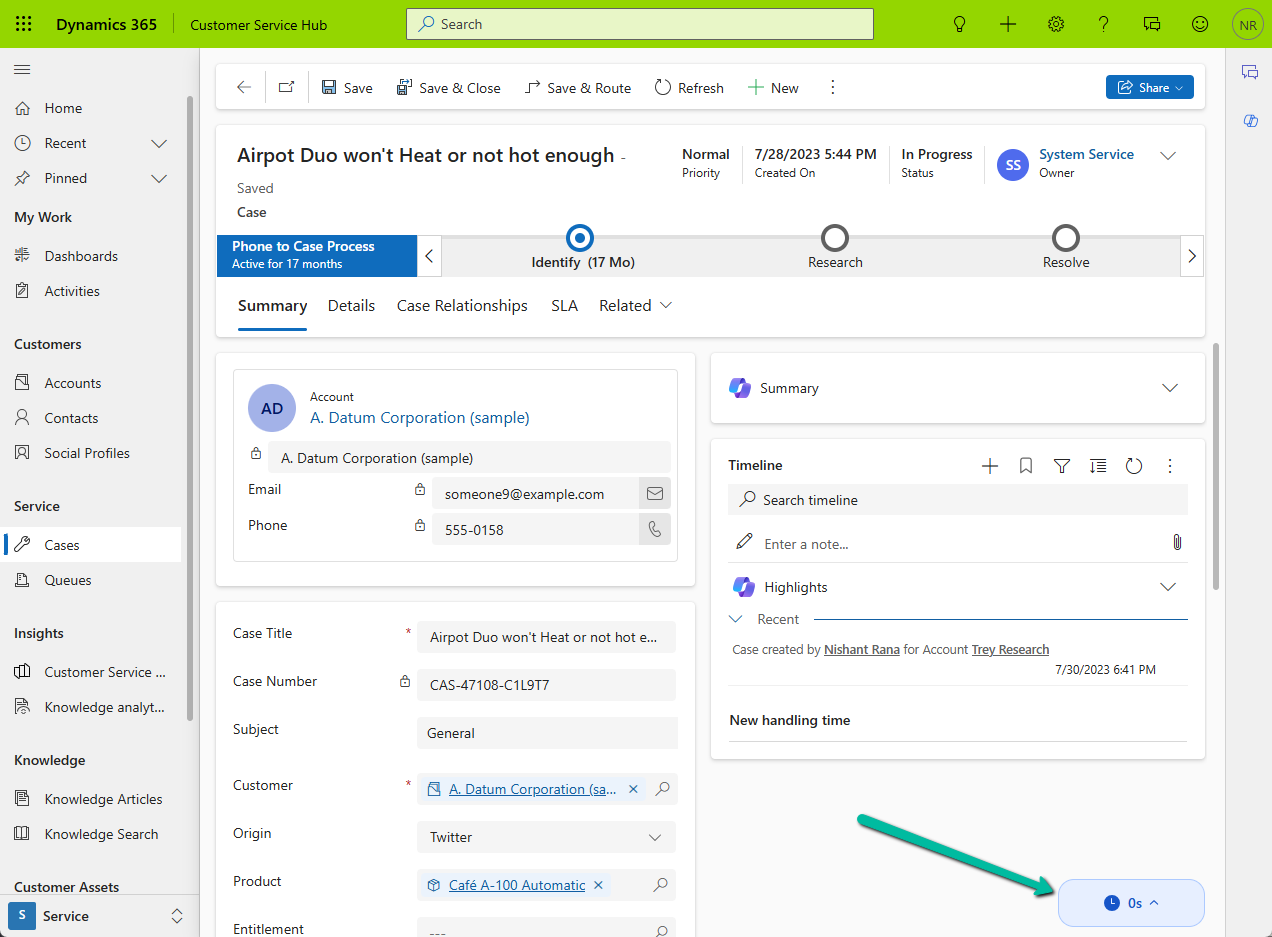
We can see the Handling Time widget at the bottom right corner in the minimized state on the form.

A screenshot of a computer

Description automatically generated

On maximizing it after some time, we can see the following details there.

Automatic Time Tracking, Manual Time Tracking, History section.

A screenshot of a device

Description automatically generated

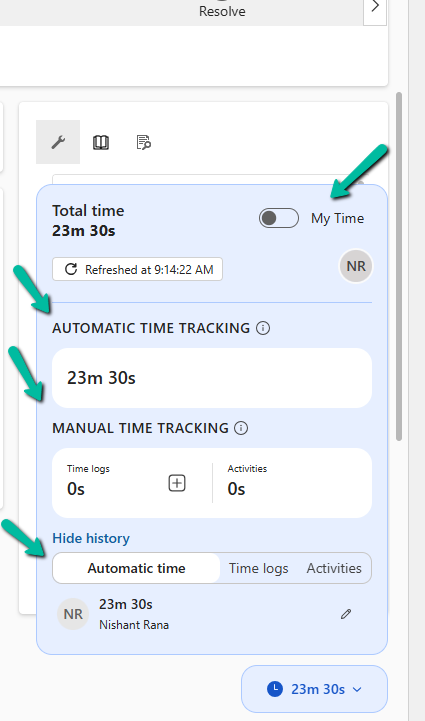
Checking My Time shows the Live time spent by that particular agent.

A screenshot of a computer

Description automatically generated

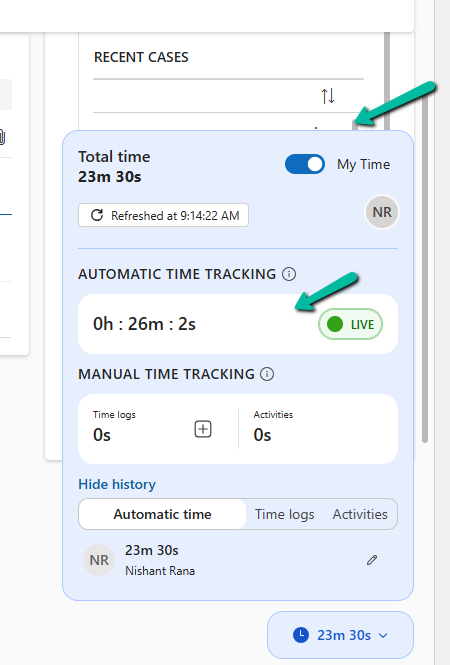
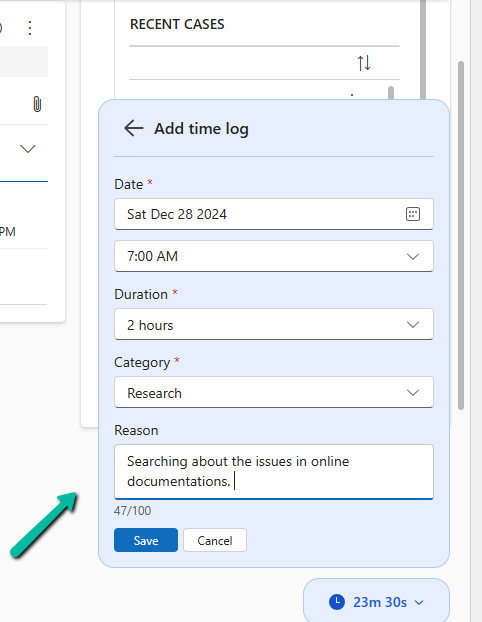
Clicking on the plus button allows us to add manual Time log records.

A screenshot of a computer

Description automatically generated

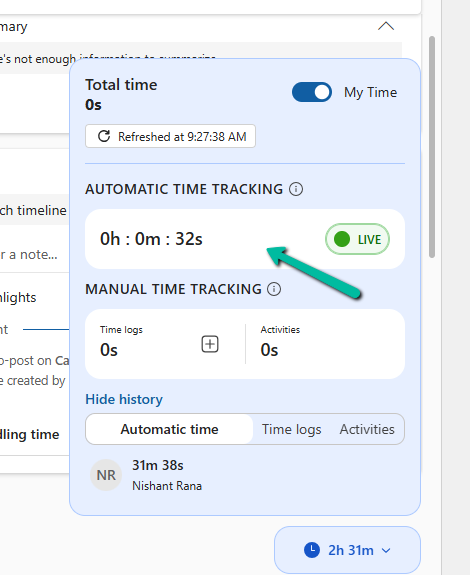
If there is a second user who opens the form, the automatic time tracking shows the values applied to that user.

A screenshot of a computer

Description automatically generated

Get more information

Hope it helps..

Advertisements

Use Solution Health Hub to troubleshoot issues in Dynamics 365 Apps (Sales, Marketing, Field Service, Customer Service..)


Using Solution Health Hub we can validate the environment’s configuration, which might get modified over time, to get an idea about the state of that environment and detect and resolve any issues. Solution Health Hub enables rules-based validations, which we can run periodically or manually if we encounter any issues. The rules also get triggered automatically when solutions are installed or updated by Microsoft. The rules check if some of the required processes are disabled or owned by a disabled user, if some of the required web resources are missing, if certain plugin steps are not active etc.

Let us open the Solution Health Hub app and see it in action.

We can see the Rule Sets created specific to different areas (app) like Sales, Marketing, Customer Service, etc.

For an environment where Field Service is configured, we can see the following rule sets.

Let us open the Field Service Rule Set and see the rules defined for it.

We can see around 31 rules defined for Field Service

For Sales, we can see around 6 rules.

Around 22 rules for Customer Service.

And around 5 rules for Marketing

To run the Rules, we need to create a new Analysis Job record and select the corresponding Rule Set.

A summary of rule-set executions will be shown in a few seconds. (runs asynchronously)

We can see one of the rules failed.

Opening the record, we can see the details.

Back in our solution, we can see the steps in the disabled state.

Back in our Analysis Job, let us select the failed rule and click on Resolve.

We can see the message “Resolution is completed.” and the rule passed.

Back inside our solution, we can also see the status as On for those steps.

Now let us run an analysis job for Field Service

On opening the record, we can see the user for which the roles are missing.

For Field Service, we can see an out-of-the-box cloud flow that runs at midnight on Saturdays to trigger the analysis job for the Field Service Rule Set.

And sends the In-app notifications.

Now if a rule fails, we can get the in-app notifications, e.g. we had set the Service Account field as optional on the Work Order form.

That caused the below rule to fail.

This also sent the notification in the app.

More details on it – https://powerusers.microsoft.com/t5/Power-Apps-Community-Blog/In-App-Notifications-on-concerns-related-to-Solution-Health-and/ba-p/1287680

Also, for each of the rules, we can see a corresponding Action that holds the logic.

Hope it helps..

Advertisements

Write an email (Copilot) in Dynamics 365 Customer Service


Using the Write an email functionality of Copilot in Dynamics 365 Customer Service, the agents can quickly create responses, which they can use for their email.

To enable it navigate to Customer Service admin center >> Agent experience >> Productivity >> Copilot help pane (Manage)

Check the For email option and save.

We can see the Write an email tab added to the Copilot help pane. It gets enabled in the context of an email record.

As soon as we open an email, we get predefined prompts like Suggest a call, Request more information along with the option to describe what exactly we are looking for.

Here we have selected Resolve the customer’s problem prompt.

As we have an Average order shipment time case record associated with the email, the copilot refers to the existing published Knowledge base articles specific to shipment to generate the appropriate response.

The corresponding knowledge article.

The agent can click on Copy to copy the response to an email, can review and edit it further (if required), or can start over and can select a different prompt to generate a different response.

Get more details here

Hope it helps..

Advertisements

Ask a Question (Copilot) in Dynamics 365 Customer Service


Agents can use the “Ask a question” functionality from within the Copilot help pane, to ask questions for quick resolution of the case.

To enable it navigate to Customer Service admin center >> Agent Experience >> Productivity >> Copilot help pane (preview) (Manage)

Check Make Copilot available to agents option and save the settings.

Back in Customer Service Hub (or any other apps where we have Copilot enabled), we can see the Ask a Question tab in the Copilot help pane.

We can then post our questions, specific to the case in hand.

Below we can see we have asked for any policy about defective items and the response we received.

It also mentions the source from which it got the response.

The copilot uses the internal (Published) Knowledge Articles to generate the responses.

If we go back to the setting where we enabled the Copilot help pane, we can see the message at the top about the knowledge base articles being used. Apart from the internal Knowledge base, a maximum of 5 trusted domains can be configured and can be used to produce the result.

Get all the details here

Hope it helps.. 

Advertisements

Use Copilot to summarize cases – Dynamics 365 Customer Service


We can make use of copilot to summarize the cases. It applies to cases that are canceled and resolved also.

To enable it Navigate to the Customer Service admin center >> Agent Experience >> Productivity >> Summaries (Manage)

Check the Make case summaries available to agents option and save the setting.

Now when we open a Case record, we can see the Case Summary card added, collapsed by
default.

We can expand it to see the summary generated.

We can copy it, regenerate it, provide feedback etc.

The case summary considers key Case details like Case Title, Subject, Priority, Case Type, Description, Product, Emails, and Linked Notes as shown below.

The agents can quickly get the required details from the case summary instead of going through all the key fields, emails, and notes associated, thus allowing them to resolve the case quickly.

Hope it helps..

Enable Copilot in Customer Service and Custom Apps (Dynamics 365)


Copilot (preview) for Dynamics 365 Customer Service provides the following features –

  • Case Summary
  • Conversation Summary
  • Ask a question
  • Write an email
  • Draft a chat response.

To enable it, navgiate to Customer Service Admin Center >> Agent Experience >> Productivity >> Manage (Copilot help pane and Summaries)

Check the required Copilot help pane settings and save.

Similarly for Summaries

For geographies outside the United States, to enable the Copilot features for Customer Service, we need to send an email to d365_csaipreview@microsoft.com with the Organization ID to enable the preview.

We can get the Organization ID from the Power Platform admin center for the environment.

As our environment was in the Australia region, we followed the same and within the next day, we got a response from Microsoft that it had been enabled in our Environment.

https://learn.microsoft.com/en-us/dynamics365/customer-service/administer/configure-copilot-features?WT.mc_id=DX-MVP-5002876#enable-public-preview-for-geographies-outside-of-united-states

As per the email, the next step is to Enable copilots and generative AI features outside the US and Switzerland, for this again open the environment in the Power Platform admin center, and select Edit for Generative AI Features.

Check the Move data across regions option and enable it. (We need Global Admin or Power Platform admin role to enable it)

Once we have followed the above steps it adds the Copilot help pane in the Customer Service Hub app.

Similarly, for the Customer Service Workspace app, we can manage it in the corresponding Agent Experience profile.

Navigate to the Agent Experience >> Workspaces >> Manage (Agent Experience profiles)

We can see the Copilot AI features section (below is the out-the-box Customer Service workspace – default profile), we can accordingly update the corresponding agent experience profile(s) records configured/used for the agents.

Below we can see the Copilot help pane in the Customer Service workspace app.

Similarly to enable Copliot for custom model-driven app.

Add the Settings >> Customer Service Copilot Enabled

Set the value as Yes for the corresponding App and save the changes.

Below we can see copilot enabled for our custom Test model-driven app app

Get all the details here

Hope it helps.

Advertisements