Power BI with Dynamics 365 CE – Publishing Power BI Report to the web


In the previous post, we learned how to create a simple Power BI Report using Power BI Desktop

https://nishantrana.me/2018/08/20/power-bi-with-dynamics-365-ce-creating-report/

Now let us publish the report to Power BI Service from within the Power BI Desktop.

To do so, select the Publish button

Publish window will ask us to save the report file (if not saved) before we could publish it.

Here we are publishing it to the default “My Workspace” app workspace within Power BI Service.

Publishing the report from Power BI Desktop publishes both the report and dataset associated to it in the Power BI Service. We can think of DataSet as the Database.

After successful publish we can see the Report and Dataset being added inside the Power BI Service (https://app.powerbi.com)

From with Power BI Service, we have the option of Publishing the report on Web so that it could be accessed by anyone having that URL.

To do so,

Select File
à
Publish to Web to publish it.

The Embed dialog box pops up as shown below with all the information.

Clicking on Create Embed Code will open the confirmation dialog box, that shows the potential risk associated with sharing the information over the internet.

Here, clicking on Publish generates the link for the report and also the HTML code which can be used for embedding it within an IFrame.

Within Dynamics 365 CE, we can use this public URL to show it inside the IFrame component of the Dashboard.

The report within Dynamics 365 CE’s Dashboard.

Next, we will see how to create Dashboard from the reports created and how to share them with other users and how to use the Power BI Dashboard and Power BI Tiles feature of Dynamics 365.

Hope it helps.

Power BI with Dynamics 365 CE – Creating Power BI Report


To begin with, let us first create a Dynamics 365 Trial.

https://trials.dynamics.com/

After our CRM trial is setup up successfully, we will install the OOB Sample Data which we would be using for creating the Power BI report.

Next, we need to create a free trial for the above user to use Power BI Service.

Go to Power BI site, and click on Start Free to get started.

Use the same user account (trial) that was used to set up the Dynamics 365 trial.

https://powerbi.microsoft.com/en-us

Note: If we already have an organization account with Power BI License we can use it to log in to Power BI else can associate a free trial to the same organization account instead of creating a new one. The gmail, hotmail, yahoo etc personal account are not allowed. https://app.powerbi.com/.

Download the Power BI Desktop as well as click on Try Free.

Power BI Desktop is basically a feature rich windows application that allows us to get data from various services online or on-premise and develop Dashboard and Reports efficiently.

The alternate way to download is through Microsoft Downloads siteà

https://www.microsoft.com/en-us/download/details.aspx?id=45331

After installing it and signing in and click on Get Data ribbon button to connect to the Dynamics CRM Online.

Select Dynamics 365 Online as the Online Services to connect to.

Specify the Web API URL of the instance.

Copy it from Customization à Developer Resources

Select the Organization Account and Sign in to the CRM Instance.

In the Navigator window, we have searched Lead entity and clicked on Edit to select the columns that we need for our sample report.

In the Query Editor window, click on “Choose Columns“, we have selected the Revenue, Created On, Subject and Owning
User field to be used for the report.

Now to get the Full Name of the system user for Owning User, expand that column, and select Full Name as the value to be displayed as shown below.

Click on Close and Apply to apply the changes to the query and to go back to the main editor.

Back in the main editor, we can see the fields added.

Now from the Visualizations section pick any of chart type.

Here we have picked a Stacked Bar Chart to start with. We can drag the fields and specify Area, Legend, and Value and also use the Filters section to generate the report as shown below.

The report after adding the fields à

Similarly, we can add our filter in the FILTER section to filter the records further as shown below

We can also add multiple charts in the report by selecting it from the Visualizations section.

For e.g. here we have used a Clustered Column chart to see all the leads based on Owner and Created On Date.

This completes the creation of simple reports which uses Dynamics 365 Online as Data Source.

In the next post, we’d publish this report to Power BI Service and display it within Dynamics 365 CE.

https://nishantrana.me/2018/08/20/power-bi-with-dynamics-365-ce-publishing-power-bi-report-to-the-web/

Hope it helps..

Maximum File Size Exceeded while using Export to Excel in Dynamics 365 CE


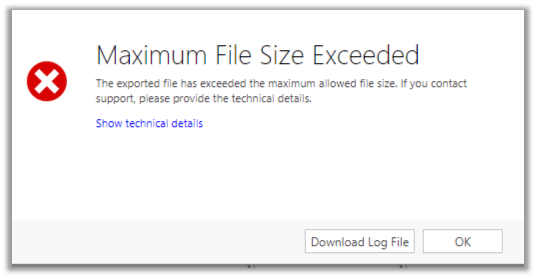
We got this error while trying to export around 70K data through export to excel in Dynamics 365 CE.

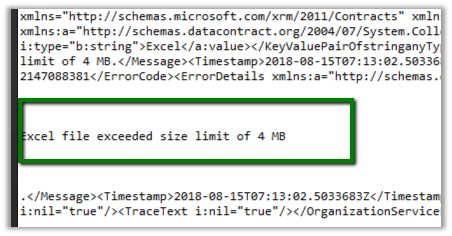
Log file gave us detail of the error i.e. Excel file exceeded size lime of 4 MB.

One workaround is to export small set of data (page wise) by applying some order criteria (either in the Grid or through Advanced Find)

Or better use the wonderful Export to Excel tool in XrmToolBox

https://dreamingincrm.com/2015/05/30/new-xrmtoolbox-plugin-export-to-excel/

It took few mins to export the records in excel and the file size was close to 19 MB.

Hope it helps..

Update/Upsert operation is not supported in non-transaction mode error in Dynamics 365 for Sales Connector of Informatica Cloud


Few weeks back while working on a migration project in which we were using Informatica Cloud’s Dynamics 365 for Sales connector, we used to get the below error while trying to perform the Upsert operation in Batch.

“In CRM WRITER_1_*_1> CCI_WRITER_1000 [ERROR] Update/Upsert operation is not supported in non-transaction mode. “

For this we had raised a support ticket with Informatica. The response we got was that this feature will be available in the new IICS Platform.

So recently we migrated to IICS from ICS and were glad to see this feature available i.e. “performing Upsert operation in Batch“.

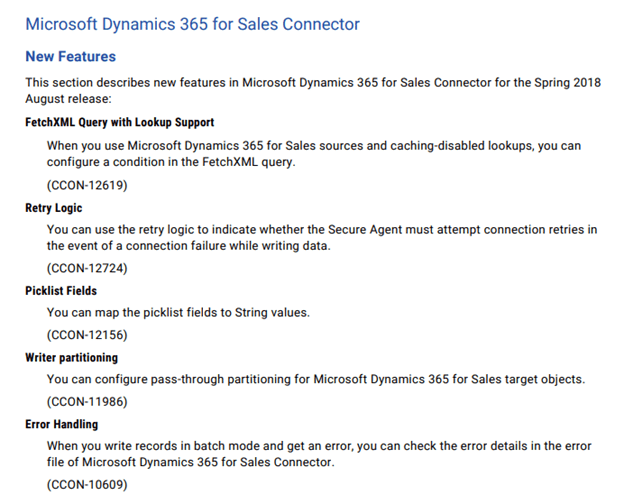
Few other enhancements in the connector includes

Get all the details here

https://kb.informatica.com/proddocs/Product%20Documentation/6/CDI_Spring2018_ConnectorReleaseNotes_en.pdf

Hope it helps..

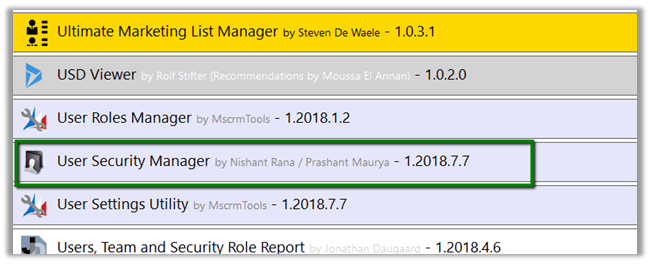
User Security Manager – My first XrmToolBox Plugin


Being one of the biggest fan and the most frequent daily user of XrmToolBox, always had this wish to write a plugin for it.

Thanks to Prashant Maurya  (a dear friend and ex-Microsoft Employee) for making this wish come true. (Who played the major role in developing it).

The tool is called – User Security Manager.

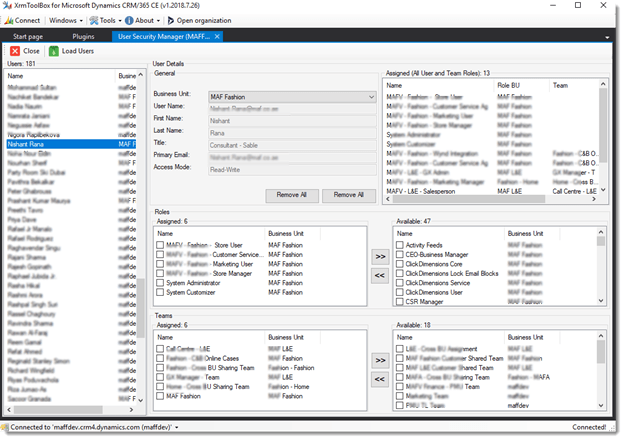
The Plugin make it easy for the administrators to manage all the security related aspects of the system users. The tool also gives 360-degree information of the user in correspondence to business unit, security roles and teams.

In our current project we had around 180 users using the system divided into more than 50 business units, which involved frequent update of their business unit, changes in the security roles assigned, update in team assignment and also during testing we had to assign the same BU and roles to the test users in the org, which wasn’t that easy to do from the user interface.

So, the idea was to come up with a tool that will let an administrator to

  • View all the security roles that assigned to the user either directly or through the team that the user is member of.
  • View all the Teams the selected user is part of.
  • With just a single click, remove all the security roles assigned to the user.
  • With just a single click, remove user from all the teams that he is part of.
  • Easily assign and unassign single or multiple security role to the user.
  • Easily add or remove user from a single or multiple team.
  • Change the Business Unit of the user.

User Guide: –

Load all the users

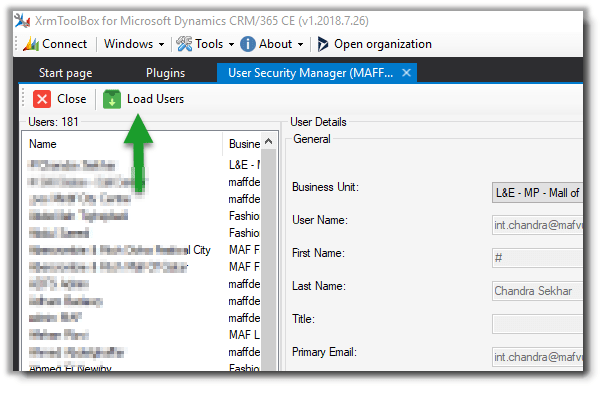
After connecting to the organization, we can click on Load Users to load all the system users of the organization.

List details of the user selected

  • For the selected user, in User Detail Tab’s General section, we can get the general information of the user like First Name, Last Name, Title, Primary Email and Access Mode.
  • Next to the General section, we can see all the security roles assigned to the user either directly or through the teams the user is member of.
  • The Roles tab shows all the Roles assigned to the user and also the roles that are available in the business unit to which user belongs in Assigned and Available section along with their counts.
  • The Teams tab shows all the teams user is member of and also the teams that are available in the organization in Assigned and Available section along with their counts.

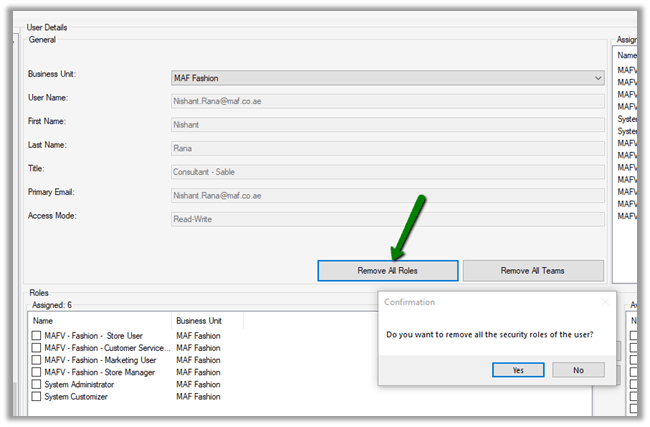
Remove all security roles of the user.

To remove all the security roles of the user, click on Remove All Roles button.

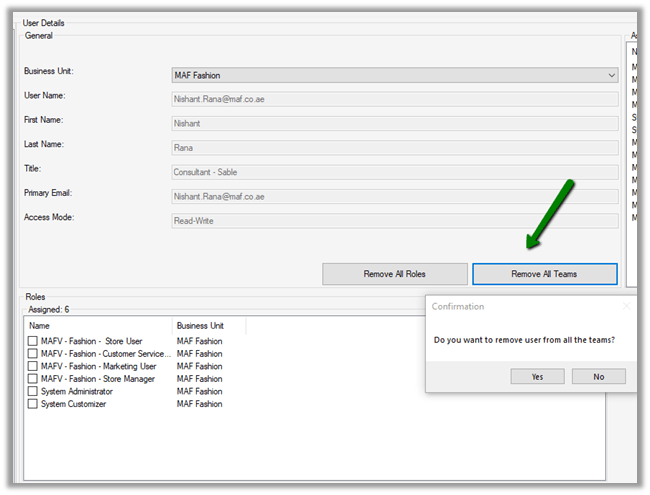
Remove user from all teams.

To remove the user from all the teams, click on Remove All Teams button.

Assign Security role to the user.

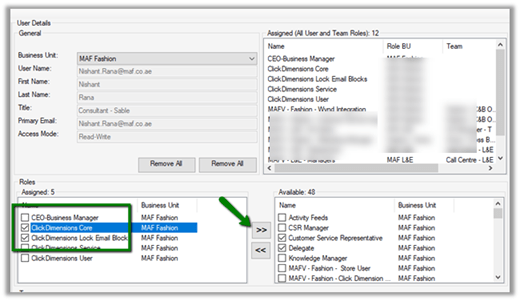
To assign security role to the user, check the security roles from the available security roles section and click on “<<” button.

To remove security role from the user.

To remove security roles from the user, select the roles from the Assigned section and click on “>>” button.

Assign User to Team(s).

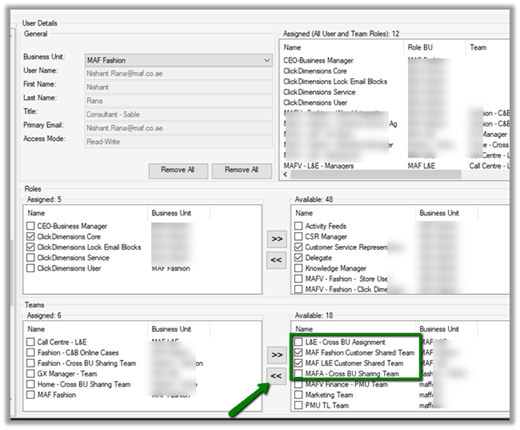
To assign user to team(s), select the teams from the available section and click on “<<” button.

Remove user from Team(s)

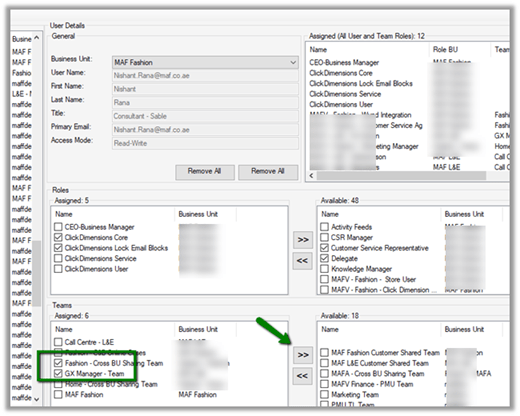
To remove user from Team(s), select the team from the Assigned Section and click on “>>” button.

Change the business unit of the user.

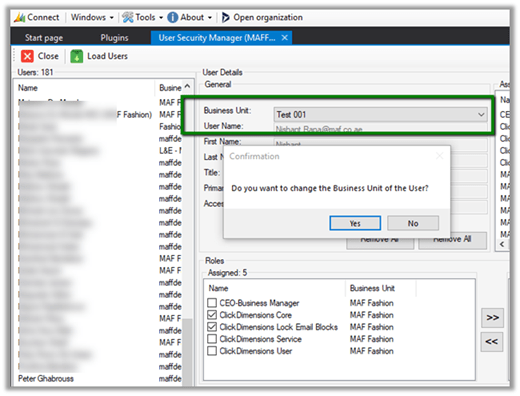
To change the business unit of the user, select the Business Unit from the Business Unit drop down in General Section of User Details.

Please install it, use it and share your feedback which would help us to improve it

https://www.xrmtoolbox.com/releases/

Hope it helps..



When does the Plugin registered on SetState message fires in Dynamics 365?


Hi,

Recently we were writing a plugin that should fire when a record is activated.

In this kind of scenario, it is suggested\recommended to register plugin in both SetState and SetStateDynamicEntity message.

https://community.dynamics.com/crm/f/117/t/184070

https://blogs.msdn.microsoft.com/crm/2008/03/07/developing-plug-ins-for-crm-4-0/

Interestingly we had the following observations

  • The Plugin fires only for SetStateDynamicEntity message.
  • The Plugin fires even if the SetState message step is disabled or not registered.
  • Only SetStateDynamicEntity message is fired when the record is Activated or Deactivated. For incident entity also, it was the only message fired on Reactivating the record. The plugin didn’t trigger in case of Resolve or Cancel Case.
  • Only SetStateDynamicEntity message is fired, even if we are updating the state of the record using SetStateRequest of SDK.
  • As SetStateRequest message is deprecated, if we use UpdateRequest to update the state of the record, the plugin that is registered on SetState and SetStateDynamicEntity will not fire. It will trigger only if registered for Update message.

Plugin Trace log records :-

We are yet to figure out when exactly the SetState will be fired. Please share your thoughts and experience around the same.

Hope it helps..