Step by Step – Calling Flow from PowerApps (Dynamics 365 CE/CRM)


Let us take a simple example of creating lead to understand how we can call Flow from PowerApps.

Log in to PowerApps Studio and create the form as below.

  • TextInput for entering the Last Name, First Name and Email ID.
  • Button to call Flow.
  • The label named GUID which will display the GUID of the created lead record.

Now select the button, go to Action menu and click on Flows to create a new flow.

Click on create a new flow.

Select Instant – from blank option

Select PowerApps as the trigger.

Add a new Step – Create a new Record (Dynamics 365)

To create a new record step, specify the Dynamics 365 Organization Name, select Leads as the entity name.

For the Last Name field, click Ask in PowerApps that will generate the parameter to which we will pass the value from our PowerApps.

The generated parameter.

Repeat the above step for the First Name and Email field.

*for Topic field we have passed a hardcoded value.

Save the create step and add a new step “Respond to a PowerApp or flow

Here we have selected output of type Text

We have added the output parameter as varLeadId and selected leadid as the unique identifier.

Save the Flow and navigate back to PowerApp and select the flow created for our button.

After adding the Flow, the next step is to update the formula to send the field’s value to the flow and also to receive the output from it.

Below will be our formula to pass the text to the flow.

But as we are expecting the GUID in return, we need to update it.

We are using the Set function to set the variable varResponseFromFlow with varleadid output.

Also, we have updated the label field for GUID with the variable

Now let us save the changes and run the PowerApp.

On clicking the button, we can see the GUID updated on the label on the form.

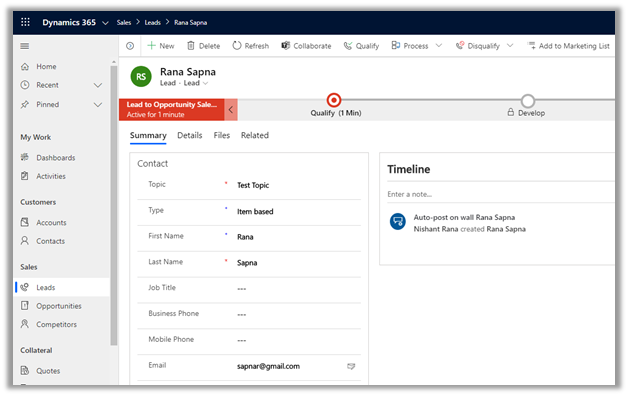
Back in our Dynamics 365 CE, we can see the lead created.

Thus we saw how easy it is to write a PowerApp which interacts with Dynamic 365 CE using Flow. We took a very basic example to understand how things glue, but we can clearly see the potential here to implement complex real-world scenarios with ease.

Hope it helps..

Advertisements

How to – Use PCF Custom Control Builder (XrmToolBox Plugin) to update existing control in Dynamics 365 / PowerApps


A couple of months back I had written my first PCF Control to display GUID of the record, it was more of a hello world kind of thing.

https://pcf.gallery/guid-control/

Well, the code was using Xrm.Page client API which as we know is deprecated.

So, it was time to update it to use context instead.

More on context

So, thought of using the wonderful PCF Custom Control Builder tool to do that by Danish (which got a new update today – 22- Oct-2019)

Connect to the organization, select Edit existing PCF Control option

Specify the Control Location and VS Command Prompt Location (VsDevCmd.bat)

And click on Reload Details which will list down the details of the component and the solution as shown above.

Click on Open in VS Code to open the project in Visual Studio Code and start making the required update.

It opens the project in Visual Studio Code.

i.e.

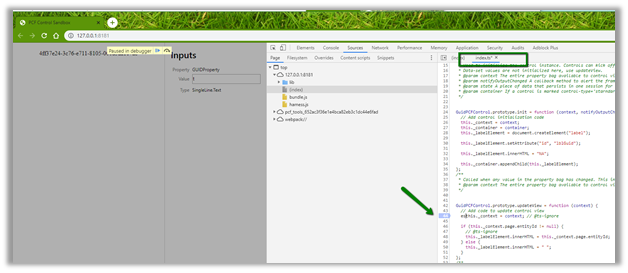
Here let us update the index.ts file to use context to fetch the GUID.

Save the changes. And click on Build

i.e.

Now click on Test to see it in action or to debug.

We can see it populating the GUID

To debug it à we can use the developer tools (F12) and put the breakpoint in the index.ts file.

Now let us deploy it to our organization

Deployment in action

After successful deployment, we can see the solution added to our organization

Now let us use it for the single line of the text control.

Publish the changes.

Create the new lead record and we can see the GUID of the record created in the control

Thus, the wonderful PCF Custom Control Builder plugin of XrmToolBox makes it so easy to update the existing PCF Control and also to create new PCF Control.

Hope it helps..

Advertisements

Out of preview – New Model-Driven form designer (WYSIWYG) in PowerApps


Finally the new model-driven designer is out of preview and available for general use

https://powerapps.microsoft.com/en-us/blog/announcing-the-general-availability-of-the-new-model-driven-form-designer/

Since I wrote about it last the few changes that we can see are

  •  New Field button that allows adding Lookup Fields. However I still don’t see the option of Option Set fields there.

Form

  • Grouping of Components Section

Form

  • Preview for the components

Form

Looking forward to see all the remaining features that are part of our classic Form Designer like addition of Business Rules, Show Dependencies, Enable Security Roles etc. to be part of the new designer.

Below are the previous blog posts that I wrote about the new model driven apps while it was still in preview –

https://nishantrana.me/2019/08/19/subgrid-quickview-linear-gauge-arc-knob-linear-slider-controls-added-in-new-model-driven-form-designer-wysiwyg-in-powerapps/

https://nishantrana.me/2019/08/05/sub-grid-added-to-the-new-model-driven-form-designer-wysisyg-in-powerapps/

https://nishantrana.me/2019/05/27/few-improvements-in-new-model-driven-form-designer-wysisyg-preview-in-powerapps/

https://nishantrana.me/2018/12/24/the-new-model-driven-form-designer-wysisyg-in-powerapps-for-model-driven-apps-dynamics-365-ce-preview/

Hope it helps..

Sub-Grid added to the new model-driven form designer (WYSISYG) in PowerApps


Hi,

Microsoft is steadily adding all the essential features to the new model-driven form designer (preview) making it more and more usable and intuitive.

Latest addition is the support for sub-grid as shown below

The properties window for the sub-grid

`

We can select the view from either the related entities or view from any of the un-related entity (uncheck Related Records check box).

Similarly, we can enable view selectors and can show all the views or selected view as shown below.

We still can’t add new sub-grid to the form in the new form designer, for that we still need to go back to our classic form designer.

Check out below articles for more details –

https://docs.microsoft.com/en-us/powerapps/maker/model-driven-apps/form-designer-overview

The new model-driven form designer WYSISYG Editor

Few improvements in the new model-driven form designer.

Hope it helps..