Finding Dirty / Unsaved Fields on the Form Using JavaScript / Browser Console (Dynamics 365 / Dataverse)


Sometimes while debugging forms in Dynamics 365, we need to know which fields have been modified but not yet saved. These are called dirty fields, and they can be quickly identified by running a small JavaScript snippet directly from the browser console.

We can open the form, press F12 to bring up the developer tools, go to the Console tab, and paste the following code

(function () {
    var dirtyFields = [];
    var attributes = Xrm.Page.data.entity.attributes.get();

    attributes.forEach(function (attribute) {
        if (attribute.getIsDirty()) {
            dirtyFields.push(attribute.getName());
        }
    });

    if (dirtyFields.length) {
        alert("Dirty fields: " + dirtyFields.join(", "));
    } else {
        alert("No dirty fields found.");
    }
})();

This script loops through all the attributes on the form and checks if they are dirty using getIsDirty(). If it finds any, it shows their names in an alert, otherwise it shows a message saying no dirty fields are found.

For example, if we modify First Name and Email on the Contact form without saving, it will pop up an alert showing:

A screenshot of a computer

AI-generated content may be incorrect.

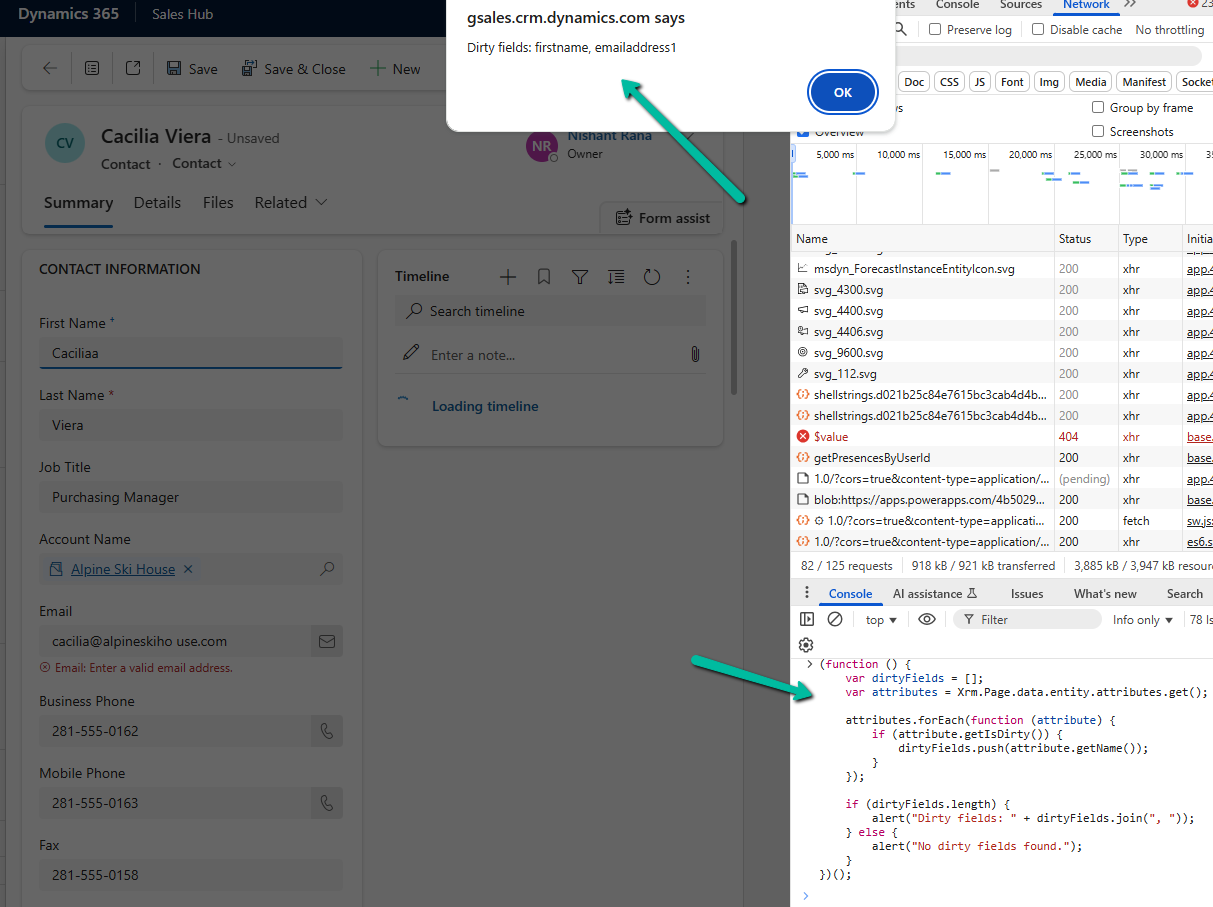
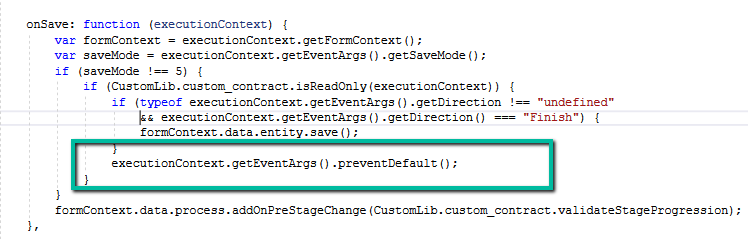
Here we are using Xrm.Page even though it is deprecated, because it is still the quickest way to test such snippets directly from the console for debugging purposes. In actual form scripts, we should always use formContext.

Hope it helps..

Advertisements

Use Security Roles to manage access to views (preview)– Dataverse / Dynamics 365


Sometimes, we might create a new view for a table, and not everyone in our organization needs to see it — or maybe, only a specific team should have access to the existing views, now we can achieve it through security roles.

This feature is governed by the EnableRoleBasedSystemViews property, which we can manage through the OrganizationSettingsEditor tool.

Download and install the managed solution.

https://github.com/seanmcne/OrgDbOrgSettings/releases

A black background with white lines
AI-generated content may be incorrect.

Before we set the property as true, let us apply security roles to some of our views.

To apply it, select the view in the PowerApps Maker Portal and click on View Settings.

A screenshot of a computer

AI-generated content may be incorrect.

From the View Settings window, we can choose Specific security roles to apply to the views. Here we have selected the Vice President of Sales role for the All Leads Views. Save and publish the change.

A screenshot of a computer

AI-generated content may be incorrect.

Here we have repeated the same steps for the below remaining views.

A screenshot of a computer

AI-generated content may be incorrect.

Now if we open the leads view as System Admin, we can see all the views. This is because we have not yet set the EnableRoleBasedSystemViews to true.

Now let us set the property as true.

A screenshot of a computer

AI-generated content may be incorrect.

As soon as we set the property as true, we can see the views getting filtered for the System Admin user.

Only the below public view is visible. (along with the 2 private views at the top)

A screenshot of a computer

AI-generated content may be incorrect.

Now if we assign the “Vice President of Sales” role to the same user, he can then see the views on which security roles were applied.

A screenshot of a computer

AI-generated content may be incorrect.

The user can still see the remaining views through the “Manage and share views” option.

A screenshot of a computer

AI-generated content may be incorrect.
A screenshot of a computer

AI-generated content may be incorrect.

The records that the user can see in the views are still governed by security privileges.

Although the documentation mentions, that this feature only filters views in the table list view selector and not in associated grids or subgrids, we can see the same filtering applied.

Below is the Lead Associated view in the Competitor table.

When we enable the EnableRoleBasedSystemViews setting using the OrganizationSettingsEditor tool, it takes effect immediately. All table views, except the default one, start getting filtered based on assigned security roles right away. Assigning security roles to a view is also effective immediately after we save and publish the view. However, if we change a view’s access from ‘Specify security roles’ to ‘Everyone’, it might take up to 24 hours for the change to fully apply across the system.

Get all the details here – Manage access to public system views (preview)

Hope it helps..

Advertisements

Unable to save. This form can’t be saved due to a custom setting error in Dynamics 365 / Dataverse.


Recently we got the below error while trying to assign the record.

Unable to save. This form can’t be saved due to a custom setting.

A screenshot of a computer error

AI-generated content may be incorrect.

Turned out we had certain conditions in the OnSave event for the form, and if the record satisfies those conditions we were canceling the save event using

executionContext.getEventArgs().preventDefault();

A screen shot of a computer program

AI-generated content may be incorrect.

So it was the expected behaviour, just that the error message was a bit generic.

Hope it helps..

Advertisements

Change Choice / OptionSet value’s text/label using JavaScript    – Dataverse / Dynamics 365


In Dynamics 365, there are instances when we need to dynamically change the labels of option set fields based on specific conditions. For example, we might want to update the label of the “Priority” field option from High to Critical when a case is marked as escalated (Is Escalated = True).

Below is the sample code we can use for it. The code will be registered on the OnLoad for Form and OnChange of Is Escalated field.

	function SetLabel(executionContext)
	{
		 var formContext = executionContext.getFormContext();
		 var isEscalated = formContext.getAttribute("isescalated"); 
		 var optionSetControl = formContext.getControl("prioritycode"); // field is in header and not in form
		 var optionHigh = 1; // high
		 var newLabel = "Critical";
		 
		 if(optionSetControl && isEscalated.getValue() == true)
		 {
			var options = optionSetControl.getOptions();
            for (var i = 0; i < options.length; i++) {
                if (options[i].value === optionHigh) {                   
                    optionSetControl.removeOption(optionHigh);
                    optionSetControl.addOption({
                        text: newLabel,
                        value: optionHigh
                    });
                    break;
                }
            }
		 }		 
	}

On opening the form, we can see the Priority’s value High changed to Critical in case Is Escalated = Yes.

A screenshot of a computer

Description automatically generated

var formContext = executionContext.getFormContext(); = This retrieves the form context from the execution context, which is essential to interact with the form’s attributes and controls.

var isEscalated = formContext.getAttribute(“isescalated”) = The isescalated attribute is used to determine whether the case is escalated.

var optionSetControl = formContext.getControl(“prioritycode”);

  • The current options are retrieved using getOptions().
  • The option with the value 1 (High priority) is removed.
  • A new option with the updated label “Critical” and the same value is added.

However, one interesting thing to note is the Header still shows the old value High, it seems there is no supported way to change the label in case if the field is used in the Header.

Hope it helps..

Advertisements

How to use the setIsValid Method in Dataverse / Dynamics 365


We can use the setIsValid method for validating field values in Model-driven apps. This method helps ensure that the data entered by users meets the required criteria before it’s processed or saved.

The setIsValid method is used to set the validity of a column’s value. It can mark a field as valid or invalid based on custom validation logic.

formContext.getAttribute(arg).setIsValid(bool, message);

bool: A Boolean value. Set to false to mark the column value as invalid, and true to mark it as valid.

message: (Optional) A string containing the message to display when the value is invalid.

Below we are using the setIsValid method in the function that ensures that the “End Date” is earlier than or equal to the “Start Date”, else it will mark the “End Date” as invalid.

function validateDates(executionContext) {
    var formContext = executionContext.getFormContext();
    var startDate = formContext.getAttribute("custom_startdate");
    var endDate = formContext.getAttribute("custom_enddate");
  
    if (startDate && endDate && endDate.getValue() <= startDate.getValue()) {
        endDate.setIsValid(false, "End Date must be after Start Date.");
    } else {
        endDate.setIsValid(true);
    }
}

We have it registered in the On Change of the ‘Start Date’ and ‘End Date’ fields.

Here if we try saving the record, if the End Date is smaller than the Start Date, we will get the message specified.

Hope it helps..

Advertisements

Manage solution dependencies easily through the refreshed look – Dataverse


In Dataverse, solution dependencies are a vital aspect of managing and deploying applications. Dependencies ensure that required components are present for a solution to work seamlessly across environments. However, with complex solutions, understanding and managing these dependencies can become overwhelming.

The updated dependencies page is designed to simplify dependency management by offering a more intuitive, action-driven experience.

Select a particular component in the solution, right-click>> Advanced >> Show dependencies.

We can see 3 different tabs.

Delete Blocked By (tab): Displays any dependencies preventing deletion of a component. Below we can see that for the Age column, it shows Contact’s System Form as the dependency.

A screenshot of a computer

Description automatically generated

Clicking on the Open option takes us to the component page, where we can see all the forms for the contact table.

A screenshot of a computer

Description automatically generated

Used By (tab): Lists other components dependent on the selected component.

Uses (tab): Shows dependencies that the selected component relies upon.

A screenshot of a computer

Description automatically generated

On clicking Open, it opens the Columns page for that table.

A screenshot of a computer

Description automatically generated

The different actions that we can take are Open and inspect the object, Delete the object, Remove dependency, and open the relevant documentation.

Below we have selected the option Remove dependency. As we saw the dependency here refers to the Contact System form in which we have the age field used.

A screenshot of a computer

Description automatically generated
A screenshot of a computer

Description automatically generated

Select Remove.

A screenshot of a computer

Description automatically generated

We get the success message after the successful removal of the dependency.

i.e. we can see the field removed from the blocking Contact’s System form.

Now if we want we can easily delete that particular field with no object blocking the delete.

Lastly, the Delete option for the solution allows the delete (uninstall) the solution that has dependencies on the solution component.

Get all the details here.

Hope it helps..

Advertisements