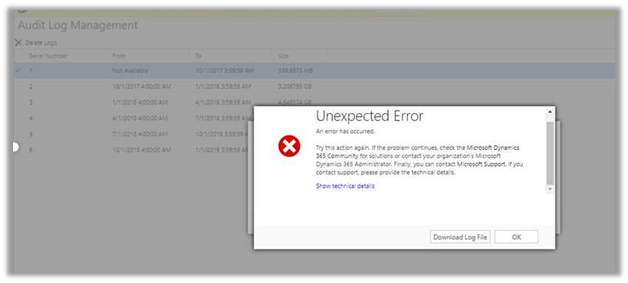
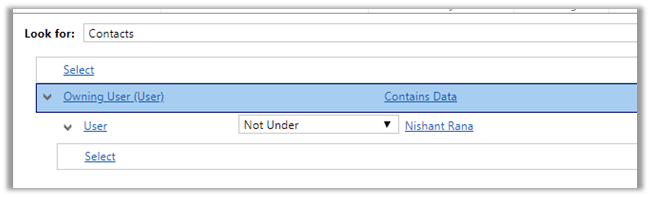
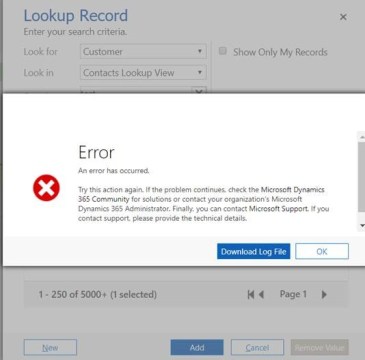
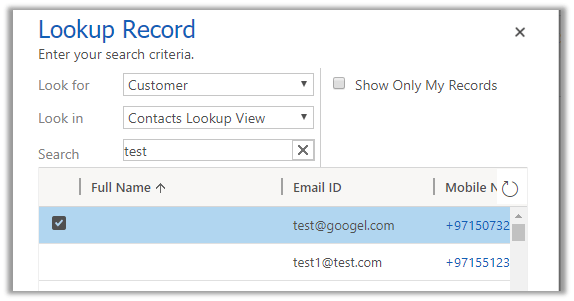
Sample code to delete instance using Online Management API in Dynamics 365 Customer Engagement


Sharing a sample code that can be used to delete the instance in Dynamics 365 CE using Online Admin API.

Read the previous post for more details

We basically need to get the instace id and use the HTTP Delete to achieve this

https://docs.microsoft.com/en-in/rest/api/admin.services.crm.dynamics.com/Instances/DeleteInstance

Production instance needs to be converted to Sandbox before it can be deleted else we’d get the operation not supported error.

The sample code :-

private static void Main(string[] args)
{
var authContext = new AuthenticationContext(Authority, false);
var credentials = new UserCredential(UserName, Password);

// Get the token
_authResult = authContext.AcquireToken(Resource, ClientId, credentials);

Task.WaitAll(Task.Run(async () => await DeleteInstance()));
}
private static async Task DeleteInstance()
{
var httpClient = new HttpClient
{
BaseAddress = new Uri(Resource),
Timeout = new TimeSpan(0, 2, 0)
};

httpClient.DefaultRequestHeaders.Add("OData-MaxVersion", "4.0");
httpClient.DefaultRequestHeaders.Add("OData-Version", "4.0");
httpClient.DefaultRequestHeaders.Accept.Add(new MediaTypeWithQualityHeaderValue("application/json"));
httpClient.DefaultRequestHeaders.Authorization = new AuthenticationHeaderValue("Bearer",
_authResult.AccessToken);

var retrieveResponse =
await httpClient.DeleteAsync("/api/v1.1/Instances/{instanceGuid}/Delete");

if (retrieveResponse.IsSuccessStatusCode)
{
var jRetrieveResponse =
retrieveResponse.Content.ReadAsStringAsync().Result;

}
}

Hope it helps..

Sample Code to retrieve instances using Online Management API in Dynamics 365 Customer Engagement


With version 9.0 of Dynamics 365 CE we now have Online Admin API that supports the following operations like Create, Retrieve, Delete, Backup and Restore instances. The user needs to have the Global Administrator or Service Administrator role in the Office 365 tenant to perform these operations.

As a first step we need to register the application with Azure Active Directory.

https://nishantrana.me/2016/11/13/register-a-dynamics-365-app-with-azure-active-directory/

and get the values for

Client Id and Authority.

Get the Service URL here

https://docs.microsoft.com/en-us/dynamics365/customer-engagement/developer/online-management-api/get-started-online-management-api#service-url

Sharing a sample code which can be used to retrieve all the instances in a specific tenant.

The sample code: –


public class MySampleApp
{

private const string Resource = "https://admin.services.crm.dynamics.com/";

// username and password
private const string UserName = "username.onmicrosoft.com";
private const string Password = "password";

// client id and authority of the application registered
private const string ClientId = "b2c5028d-57e6-4df7-9940-3243214948b";
private const string Authority = "https://login.microsoftonline.com/3432432e2-5fbe-4b78-a55a-bcb342d4f859/";

private static AuthenticationResult _authResult;

private static void Main(string[] args)
{
var authContext = new AuthenticationContext(Authority, false);
var credentials = new UserCredential(UserName, Password);

// Get the token
_authResult = authContext.AcquireToken(Resource, ClientId, credentials);

Task.WaitAll(Task.Run(async () => await GetInstances()));
}

private static async Task GetInstances()
{
var httpClient = new HttpClient
{
BaseAddress = new Uri(Resource),
Timeout = new TimeSpan(0, 2, 0)
};

httpClient.DefaultRequestHeaders.Add("OData-MaxVersion", "4.0");
httpClient.DefaultRequestHeaders.Add("OData-Version", "4.0");
httpClient.DefaultRequestHeaders.Accept.Add(new MediaTypeWithQualityHeaderValue("application/json"));
httpClient.DefaultRequestHeaders.Authorization = new AuthenticationHeaderValue("Bearer",
_authResult.AccessToken);

var retrieveResponse =
await httpClient.GetAsync("/api/v1/instances");

if (retrieveResponse.IsSuccessStatusCode)
{
var jRetrieveResponse =
retrieveResponse.Content.ReadAsStringAsync().Result;

var result = JArray.Parse(jRetrieveResponse);
foreach (var data in result)
Console.Write("Id " + data["Id"] + "\nUnique Name " + data["UniqueName"]);
}
}
}

Result: –

The other properties: –

Microsoft.IdentityModel.Clients.ActiveDirectory.AdalServiceException: ‘AADSTS65001: The user or administrator has not consented to use the application error in Dynamics 365 CE


Suppose, we have just registered an application in Azure Active Directory and trying to acquire the token and get the below error

Microsoft.IdentityModel.Clients.ActiveDirectory.AdalServiceException: ‘AADSTS65001: The user or administrator has not consented to use the application with ID ‘b2c5028d-57e6-4df7-9940-828e6914948b’ named ‘MyApp’. Send an interactive authorization request for this user and resource.

This is because admin consent is required before the application can be used. This could be granted by global administrator.

One of the ways to do so is through the URL with the specific format as shown below

https://login.microsoftonline.com/[tenantid]/oauth2/authorize?client_id=[appId]&response_type=code&redirect_uri=[redirctURL]&resource=[resourceURL]&prompt=admin_consent


Pasting this URL in the browser will prompt for the credential, login will global administrator and we will be presented with the following consent box

Clicking on Accept will grant the required permission to the application registered.

Hope it helps..

Sample code to use RetrievePrincipalAccess Function to get the access rights of the team or user in Dynamics 365 CE


We can use RetrievePrincipalAccess function in Web API to get the access rights of either a user or team on a specific record.

The sample code:


var req = new XMLHttpRequest();

req.open("GET", Xrm.Page.context.getClientUrl() + "/api/data/v9.1/systemusers(D38F5B76-C22E-4256-AF90-CFD14B6589BF)"+
"/Microsoft.Dynamics.CRM.RetrievePrincipalAccess(Target =@Target)?"+ 
"@Target={ 'accountid': '8CB09F67-EB90-E811-A963-000D3AD1CBD6', '@odata.type': 'Microsoft.Dynamics.CRM.account' } ", false);

req.setRequestHeader("OData-MaxVersion", "4.0");
req.setRequestHeader("OData-Version", "4.0");
req.setRequestHeader("Accept", "application/json");
req.setRequestHeader("Content-Type", "application/json; charset=utf-8");
req.onreadystatechange = function () {
if (this.readyState === 4) {
req.onreadystatechange = null;
if (this.status === 200) { 
var results = JSON.parse(this.response);
} else { 
Xrm.Utility.alertDialog(this.statusText);
}
}
};
req.send();

Result:

Hope it helps..

HideCustomAction and Display \ Enable rule in Dynamics 365


Imagine a scenario where we have both the disable rule and HideCustomAction implemented for a ribbon button. Let us see with an example what will happen in this scenario.

First, let us implement the display rule to hide the Delete button from Contact form when it is in a disabled state.

For active record à

We can see the delete button in the command bar.

For disabled record à The delete button is not visible.

Now let us hide the button using HideCustomAction

Interestingly the Delete button is not available in case of the active contact record this time.

The reason for this is because the HideCustomAction button removes the specified node from the ribbon so that it is not rendered instead of hiding it. Therefore any other enable or display rules are not applied to that button.

https://docs.microsoft.com/en-us/dynamics365/customer-engagement/developer/customize-dev/define-custom-actions-modify-ribbon#hide-custom-actions

Hope it helps..

Installation order for Solutions (Patches) in Dynamics 365 Customer Engagement


Let us take see a simple example of how the installation order of solution and patch works in case of Dynamics 365 CE.

Suppose we have a Solution A with only Account Number field with display name renamed to Account Number from Solution A.

Now this solution is exported as managed and imported into the target environment

Now let us create a new solution which renames this field as “Account Number from Solution B” and then import this as managed in the target environment.

So as expected we’d see the display name renamed to Account Number from B as this solution was installed after the solution A.

Now let us create Patch for the first solution, Solution A and rename the field to Account Number from Solution A Patch and import this patch to Target Environment.

After importing the patch solution in Target Environment

We can open the account record and check for the label of the account number field. Interestingly we will see the value to be “Account Number from Solution B”, which was set by the solution B. So installing our patch for solution A didn’t change it.

It is because the platform still gives precedence to the installation order of the solution and not patch. Although we had the patch installed for Solution A after import of Solution B, putting a patch didn’t change the label for the account number as it is belonged to the solution that was imported before Solution B.

Hope it helps..