Sharing some the queries we had used in our projects recently-
1) Get the list of table with audit enabled –
SELECT   logicalname,
         displayname,
         isauditenabled
FROM     metadata.entity
WHERE    isauditenabled = 1
ORDER BY logicalname;
2) Get the list of fields per table with audit enabled –
SELECT   entitylogicalname,
         logicalname AS columnname,
         displayname,
         isauditenabled
FROM     metadata.attribute
WHERE    isauditenabled = 1
         AND entitylogicalname IN (SELECT logicalname
                                   FROM   metadata.entity
                                   WHERE  isauditenabled = 1)
ORDER BY entitylogicalname, columnname;
3) Get the total number of activity records by different activity type
SELECT   activitytypecodename,
         activitytypecode,
         Count(activitytypecode) AS Total
FROM     activitypointer
GROUP BY activitytypecode, activitytypecodename
ORDER BY Total DESC;
4) Get the Time Zone information of all the users –
SELECT   su.fullname,
         su.domainname,
         us.timezonecode,
         tz.userinterfacename,
         tz.standardname
FROM     usersettings AS us
         INNER JOIN
         systemuser AS su
         ON us.systemuserid = su.systemuserid
         LEFT OUTER JOIN
         timezonedefinition AS tz
         ON us.timezonecode = tz.timezonecode
ORDER BY su.fullname;
5) Get the list of cloud flows where a specific field is referred / used –
SELECT wf.name,
       wf.workflowid,
       wf.clientdata
FROM   workflow AS wf
WHERE  wf.category = 5
       AND LOWER(wf.clientdata) LIKE '%custom_actualsettlementdate%';
6) Get the list of Business Rules in the environment –
SELECT   primaryentity,
         primaryentityname,
         workflowid,
         workflow.name AS BusinessRuleName,
         workflow.ismanaged,
         statecode,
         statecodename,
         categoryname
FROM     workflow
         INNER JOIN
         entity
         ON workflow.primaryentity = entity.objecttypecode
WHERE    category = 2
ORDER BY primaryentity;
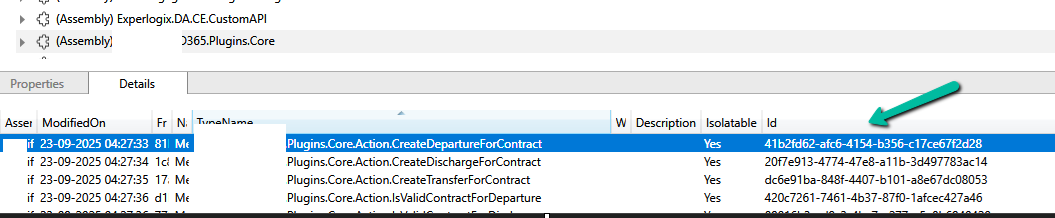
7) Get the list of Plugin Registration Steps where a particular attribute is used in the Image
SELECT
    spi.sdkmessageprocessingstepimageid,
     s.name AS StepName,
    spi.name AS ImageName,
    spi.imagetype,
    spi.attributes,
    s.name AS StepName,
    m.name AS MessageName,
    e.name AS EntityName
FROM
    sdkmessageprocessingstepimage spi
INNER JOIN
    sdkmessageprocessingstep s ON spi.sdkmessageprocessingstepid = s.sdkmessageprocessingstepid
INNER JOIN
    sdkmessagefilter f ON s.sdkmessagefilterid = f.sdkmessagefilterid
INNER JOIN
    sdkmessage m ON f.sdkmessageid = m.sdkmessageid
INNER JOIN
    entity e ON f.primaryobjecttypecode = e.objecttypecode
WHERE
    spi.attributes LIKE '%custom_myfield%'
ORDER BY
    EntityName, MessageName
8) Get the list of Security Role and total number of users assigned that role –
SELECT   r.name AS RoleName,
         COUNT(DISTINCT sur.systemuserid) AS AssignedUsers
FROM     systemuserroles AS sur
         INNER JOIN
         role AS r
         ON sur.roleid = r.roleid
GROUP BY r.name
ORDER BY AssignedUsers DESC;
9) Get number of security roles assigned per user –
SELECT   u.systemuserid,
         u.fullname,
         COUNT(sur.roleid) AS RoleCount
FROM     systemuser AS u
         INNER JOIN
         systemuserroles AS sur
         ON u.systemuserid = sur.systemuserid
GROUP BY u.systemuserid, u.fullname
ORDER BY RoleCount DESC;
10 ) Get the list of security roles assigned to a particular user
SELECT
    su.systemuserid,
    su.fullname AS UserName,
    r.roleid,
    r.name AS RoleName,
    r.businessunitidname AS BusinessUnit
FROM systemuser su
INNER JOIN systemuserroles sur
    ON su.systemuserid = sur.systemuserid
INNER JOIN role r
    ON sur.roleid = r.roleid
where sur.systemuserid = '415a2261-d9b4-ea11-a812-000d3a6aaf70'
11) Get the list of users and security roles assigned to them
SELECT
    u.systemuserid,
    u.fullname AS UserName,
    u.domainname AS UserDomain,
    u.isdisabled AS IsDisabled,
    u.businessunitidname AS BusinessUnit,
    STRING_AGG(r.name, ', ') AS SecurityRoles
FROM systemuser u
INNER JOIN systemuserroles ur
    ON u.systemuserid = ur.systemuserid
INNER JOIN role r
    ON ur.roleid = r.roleid
WHERE u.isdisabled = 0
  AND u.accessmode = 0              -- Only interactive users
  AND u.domainname NOT LIKE '#%'    -- Exclude system/app users
GROUP BY
    u.systemuserid, u.fullname, u.domainname, u.isdisabled, u.businessunitidname, u.accessmode
ORDER BY u.fullname;
12 ) List all custom plugins (non-Microsoft assemblies)
SELECT   pt.plugintypeid,
         pt.name AS className,
         pa.name AS assemblyName,
         pa.version,
         pa.culture,
         pa.publickeytoken
FROM     plugintype AS pt
         INNER JOIN
         pluginassembly AS pa
         ON pt.pluginassemblyid = pa.pluginassemblyid
WHERE    pa.ismanaged = 0 -- custom (not managed solution)
ORDER BY pa.name, pt.name;
13) List of all table, plugin name and steps registered for custom plugins (to be used to compare between different environment)
SELECT   COALESCE (e.name, 'Global') AS entity,
         pa.name AS assemblyName,
         pt.name AS pluginClass,
         COUNT(s.sdkmessageprocessingstepid) AS stepCount
FROM     sdkmessageprocessingstep AS s
         INNER JOIN
         plugintype AS pt
         ON s.eventhandler = pt.plugintypeid
         INNER JOIN
         pluginassembly AS pa
         ON pt.pluginassemblyid = pa.pluginassemblyid
         LEFT OUTER JOIN
         sdkmessagefilter AS f
         ON s.sdkmessagefilterid = f.sdkmessagefilterid
         LEFT OUTER JOIN
         entity AS e
         ON f.primaryobjecttypecode = e.objecttypecode
WHERE    pa.ismanaged = 0   -- only custom plugins
GROUP BY COALESCE (e.name, 'Global'), pa.name, pt.name
ORDER BY entity, pa.name, pt.name;
14) Plugins by Execution Mode (Sync vs Async)
SELECT   COALESCE (e.name, 'Global') AS entity,
         SUM(CASE WHEN s.mode = 0 THEN 1 ELSE 0 END) AS syncCount,
         SUM(CASE WHEN s.mode = 1 THEN 1 ELSE 0 END) AS asyncCount
FROM     sdkmessageprocessingstep AS s
         INNER JOIN
         plugintype AS pt
         ON s.eventhandler = pt.plugintypeid
         INNER JOIN
         pluginassembly AS pa
         ON pt.pluginassemblyid = pa.pluginassemblyid
         LEFT OUTER JOIN
         sdkmessagefilter AS f
         ON s.sdkmessagefilterid = f.sdkmessagefilterid
         LEFT OUTER JOIN
         entity AS e
         ON f.primaryobjecttypecode = e.objecttypecode
WHERE    pa.ismanaged = 0
GROUP BY COALESCE (e.name, 'Global')
ORDER BY syncCount DESC;
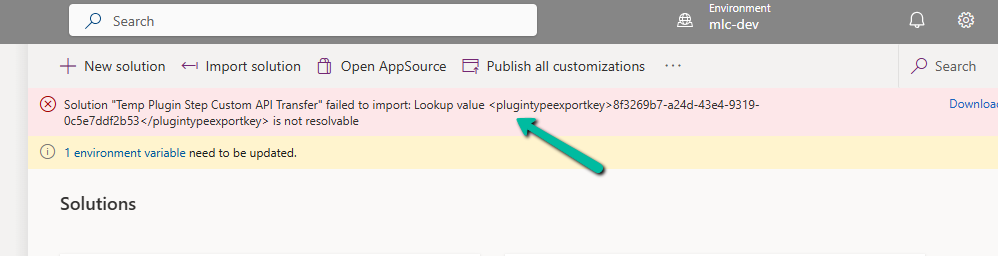
![Fixed –Lookup value plugintypeexportkey [Guid] is not resolvable – Solution Import error (Dynamics 365 / Dataverse)](https://nishantrana.me/wp-content/uploads/2025/09/pexels-photo-4482033.jpeg?w=1200)