With the Timeline highlights (Generative AI) feature, agents can quickly view the critical information (summary) about the different activities in the timelines, without the need for clicking/reading through each of the activities.
We can enable and disable it at both the form level, app level and environment level.
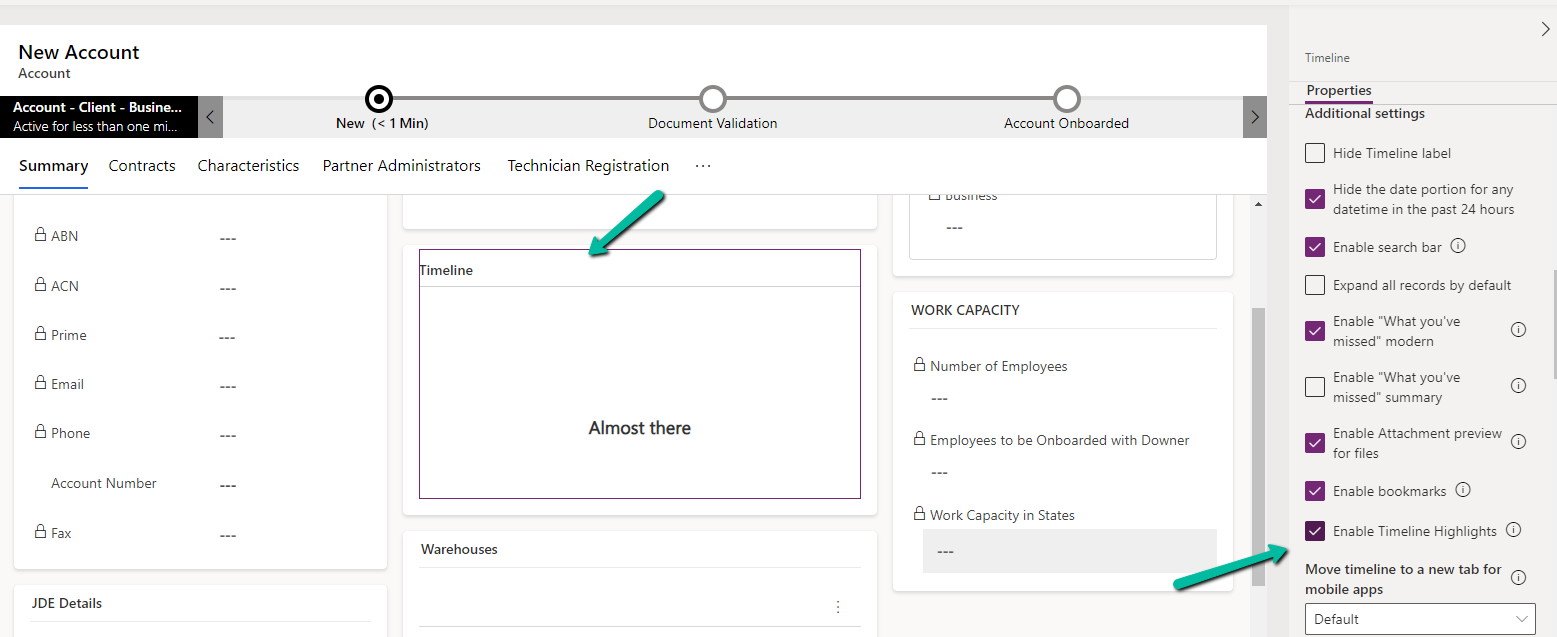
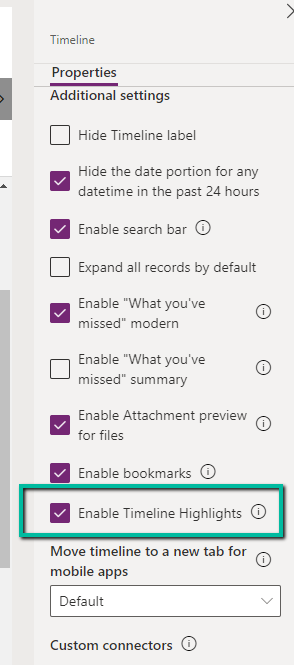
At the form level, we can check/uncheck the Enable Timeline Highlights checkbox for the timeline component.
At the App level, open the Settings >> Features for the corresponding App.
Here if we disable it at the App-level it won’t show up even if it is enabled for that particular form for that particular app.
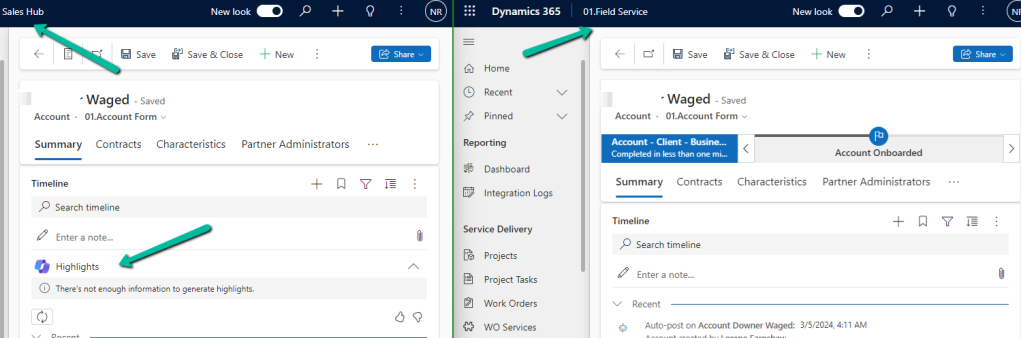
For e.g. we see timeline highlights in the Sales Hub App but not in the Field Service app in which we had it disabled for the account form.
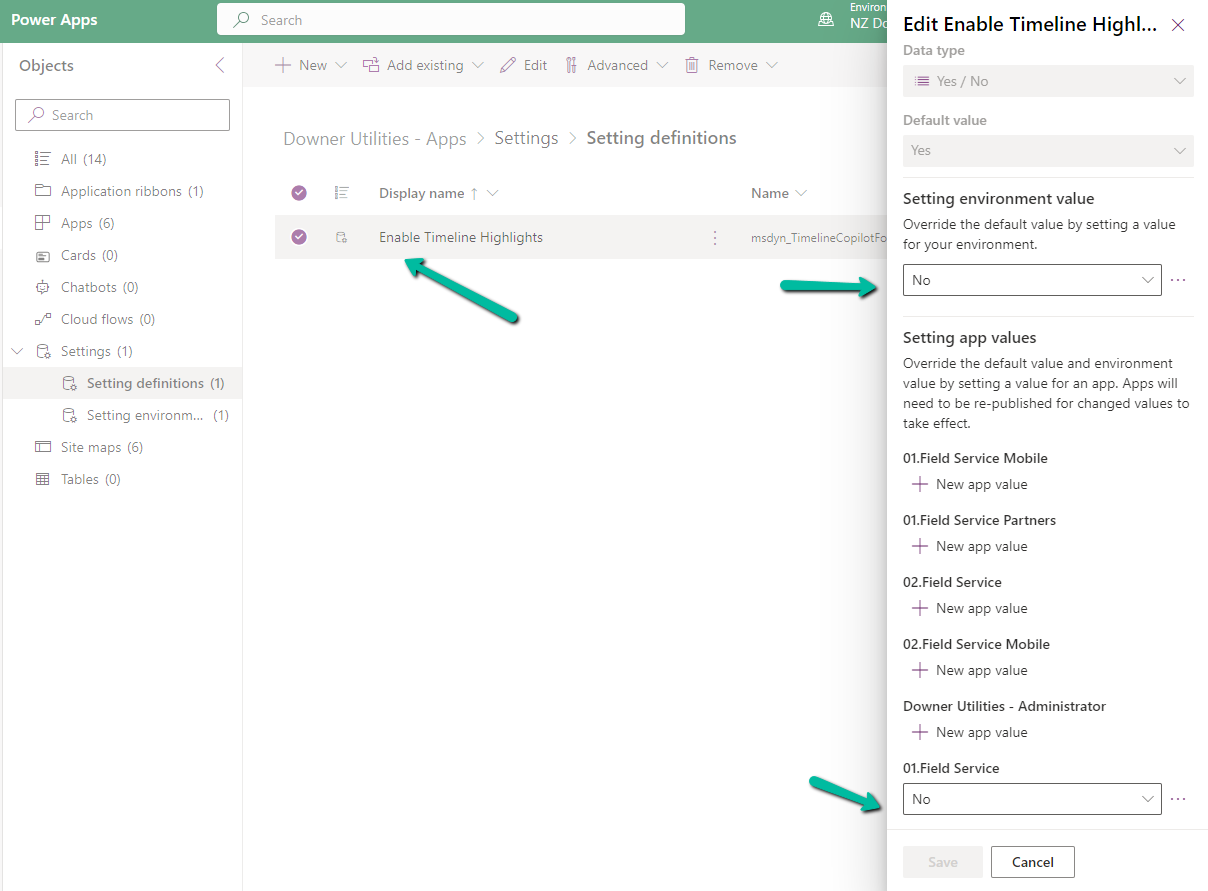
We can also specify it using the Setting Definitions and Environmentvalues as shown below.
Recently in one of our environments, we were getting the below error on trying to create/update a contact or account record.
Exception Message: The user with SystemUserId=xxx-8c8f-ee11-be36-0022489338d1 in OrganizationContext=xxx-8c8d-ee11-8174-0022489425ce is disabled. Disabled users cannot access the system. Consider enabling this user for the action to succeed.. User IsDisabled=True, IsLicensed=True.
As the error message specifies, the system user record SystemUserId=xxxx-8c8f-ee11-be36-0022489338d1 was inactive/disabled.
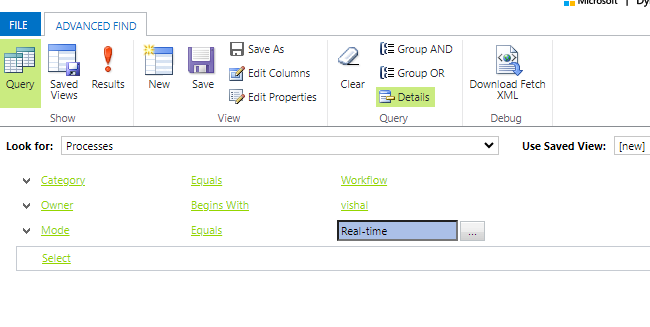
So we can run the below query to check all the real-time workflows owned by that user
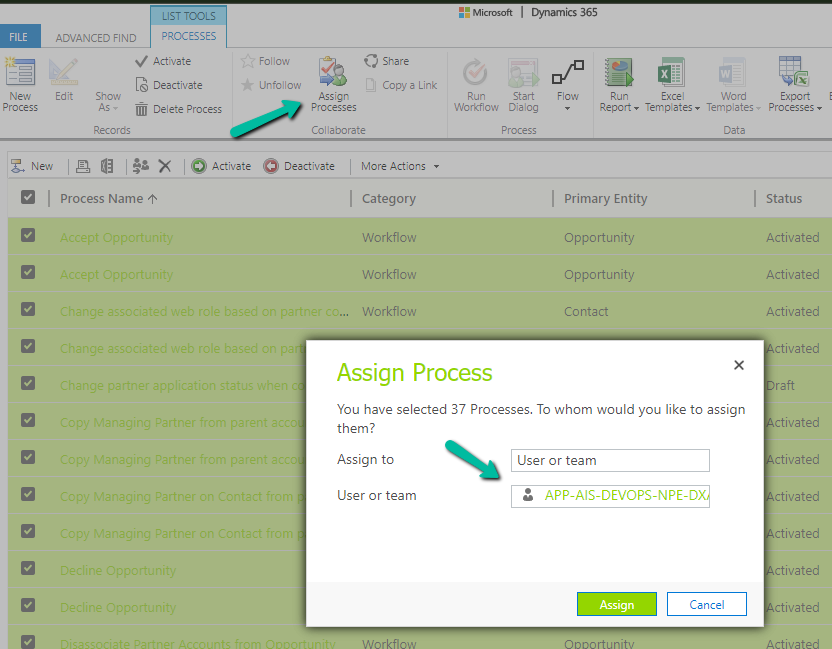
Next, we updated the Owner for all these workflows from Advanced Find.
This then allowed us to save the record.
Next we updated the owner of the remaining processes owned by the disabled user. We can also check and update the remaining components like plugin steps / cloud flows etc.
select workflowid, name, primaryentityname, categoryname, modenameg, owneridname, * from workflow
where
category  = 0
and ownerid = 'abc-8c8f-ee11-be36-0022489338d1'
and mode = 1

Select * from sdkmessageprocessingstep
where impersonatinguserid = 'abc-8c8f-ee11-be36-0022489338d1'
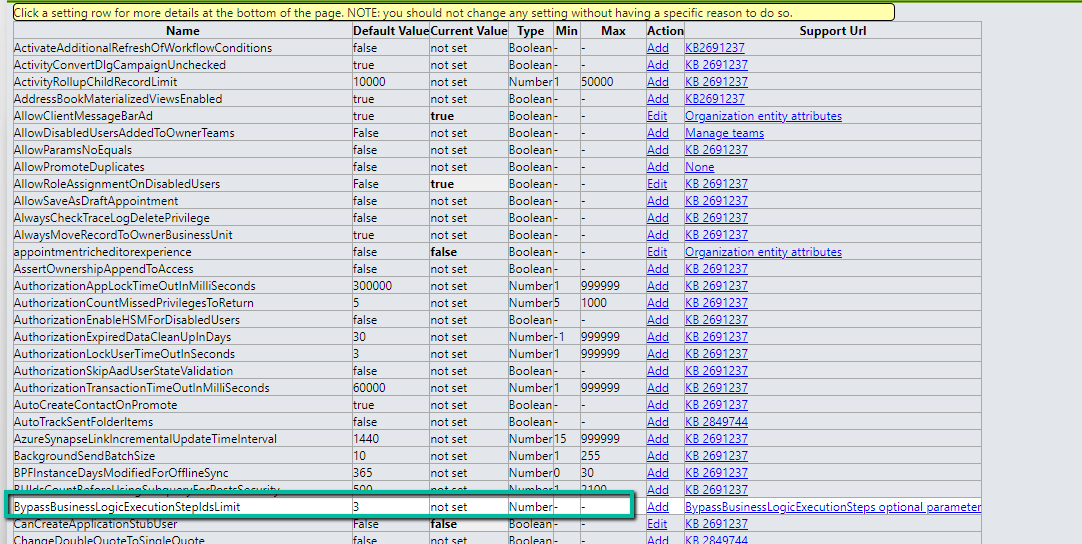
The BypassBusinessLogicExecutionStepIds optional parameter or request header value allows us to bypass a specific plugin step by passing its GUID, irrespective of whether it is synchronous or asynchronous, unlike the other optional parameters – BypassCustomPluginExecution and BypassBusinessLogicExecution that will bypass all the custom synchronous and/ or asynchronous logic (plugins and workflows).
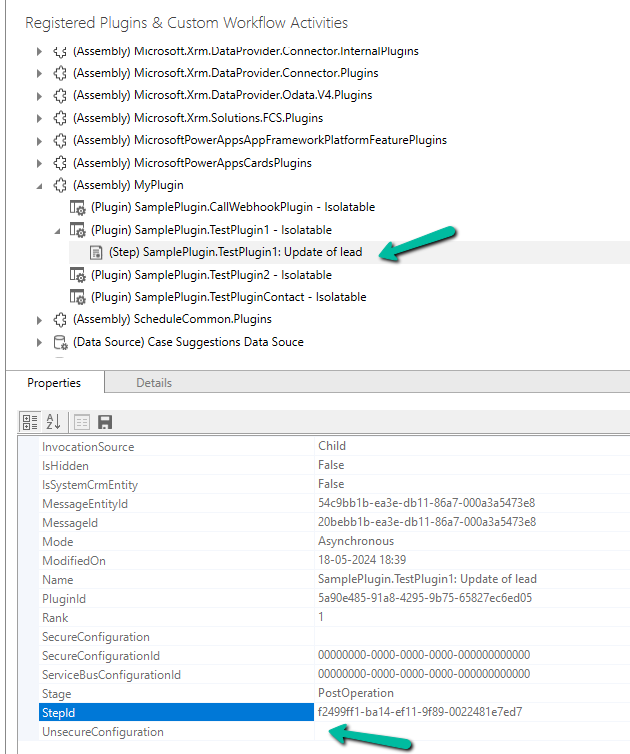
Below we have our plugin registered, that writes to the Plugin Trace log.
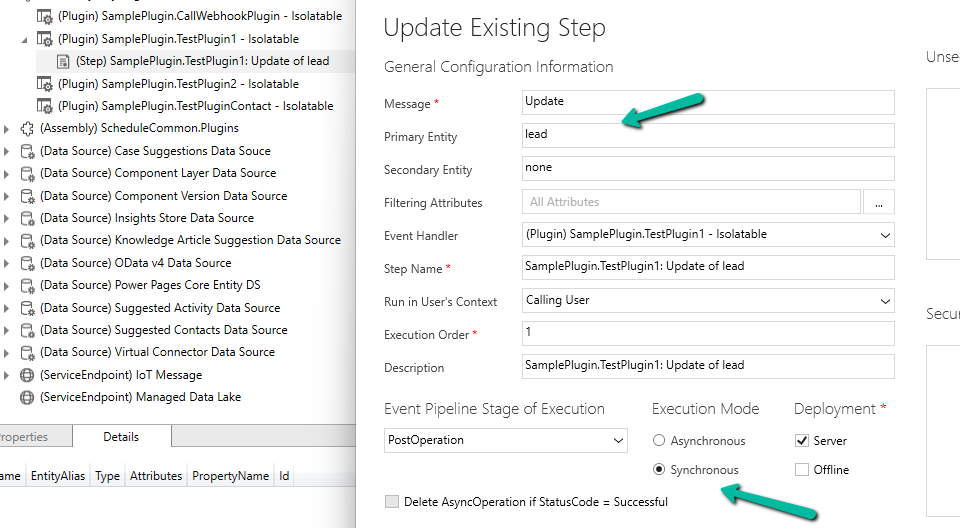
The plugin step is registered on the update of the lead record. We have got the StepId of the plugin step from the Properties window.
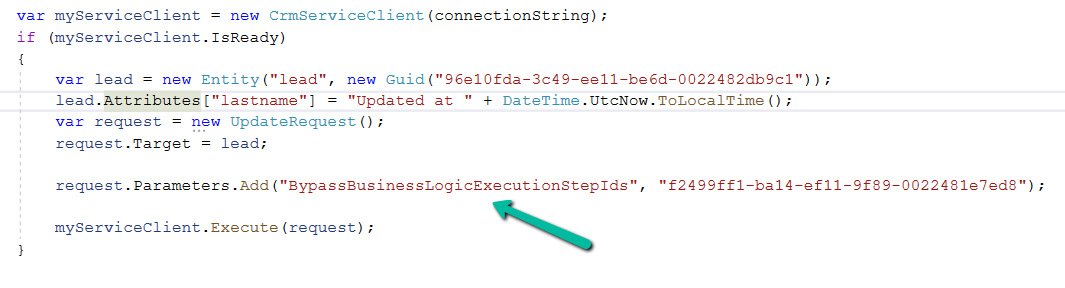
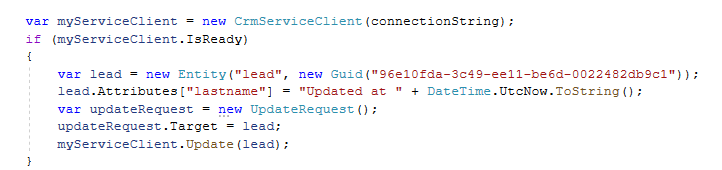
Below is our console app, which updates the lead, triggering the plugin. On running it without the BypassBusinessLogicExecutionStepIds, we can see the trace log parameter record created.
Upon adding the BypassBusinessLogicExecutionStepIds parameter in UpdateRequest, as shown below, the plugin is not triggered and no trace log is created.
Also, we can pass multiple Step’s GUID to it
By default, we can maximum of 3 steps to it, which can be defined through BypassBusinessLogicExecutionStepIdsLimit Organization Settings value.
Using the new BypassBusinessLogicExecution parameter we can bypass both sync as well as asynchronous custom logic (i.e. sync / async custom plugin and custom workflow registered), unlike the BypassCustomPluginExecution parameter which applied to only the synchronous custom logic.
Let us see it in action with a simple example.
We have the following Plugin registered against the lead table that writes to the Plugin Trace Log.
We have the Update step (synchronous) registered for the plugin.
Below is our console app that updates one of the lead records triggering the plugin.
On running it we can see our plugin step triggered and a trace log created.
Now let us use the BypassCustomPluginExecution parameter of Update Request or BypassPluginExecution property of CrmServiceClient.
This time as expected the plugin is not triggered, so no plugin trace log record was created.
However, if our plugin step is registered in Asynchronous mode, we will have our plugin triggered, even if we are using the BypassCustomPluginExection parameter.
For bypassing the Asynchronous plugin only, or Sync Plugin, or both Async or Sync plugin, we can use the new optional parameter BypassBusinessLogicExecution passing the following values to it
CustomSync – to bypass synchronous logic.
CustomAsync – to bypass asynchronous logic.
CustomSync, CustomAsync – to bypass both Sync and Async logic.
On running the below code, our Plugin Step registered Asynchronously earlier is not triggered, in fact, any Synchronous step also, as we have specified both the CustomSync and CustomAsync.
“Also, any Workflow (Asynchronous or Real-time) registered will not trigger.“
In short,
BypassBusinessLogicExecution + CustomAsync parameter = Asynchronous workflow/plugin will be bypassed. We will have our Sync Plugin and Real-time workflow getting triggered.
BypassBusinessLogicExecution + CustomSync parameter or BypassCustomPluginExecution or BypassPluginExecution = Synchronous workflow/plugin will be bypassed. We will have our Asynchronous Plugin and Real-time workflow getting triggered
BypassBusinessLogicExecution + CustomSync + CustomAsync = Both Async / Sync Plugin and Workflow will be bypassed.
A few key points –
The user making the request needs to have the prvBypassCustomPlugins privilege.
These parameters will not apply to Core Plugin and Workflow included in a solution where Microsoft is the publisher.
Power Automate flows are not bypassed using these optional parameters.
Recently while trying to create a new 1-n relationship between 2 newly created custom tables, we got the below error.
“There was error calculation dependencies for this component”
System.ServiceModel.FaultException`1[Microsoft.Xrm.Sdk.OrganizationServiceFault]: The dependent component Attribute (Id=676fb834-d94a-47cc-9bee-2963ef589b83) does not exist. Failure trying to associate it with AttributeMap (Id=92f9f85a-7612-ef11-9f89-000d3a1b6f65) as a dependency. Missing dependency lookup type = PrimaryKeyLookup. (Fault Detail is equal to Exception details:
ErrorCode: 0x8004F036
Message: The dependent component Attribute (Id=676fb834-d94a-47cc-9bee-2963ef589b83) does not exist. Failure trying to associate it with AttributeMap (Id=92f9f85a-7612-ef11-9f89-000d3a1b6f65) as a dependency. Missing dependency lookup type = PrimaryKeyLookup.
).
Instead of spending much time debugging, we thought of just trying and creating relationship from the Power Apps Maker Portal instead of classic UI.
And interestingly it allowed us to create the relationship without any error.
We have the following 2 custom tables having a 1 – N relationship.
Project (1-n) Artefact.
The relationship behavior is Custom with Cascade All for all the actions except Delete.
User 1 is the System Administrator and Test User 1 has the Field Service Admin role but doesn’t have any roles that give him access to the project or artefact table.
We can see the tables are not showing up for Test User 1 in the app unlike User 1 with the System Admin role.
Now let us assign a custom security role – Test Sharing to test user 1 that gives him OrganizationLevel rights on the Project table.
As expected, Test user 1 now has Projects appearing in the app, and as he doesn’t have any rights on the Artefact table, he cannot see it in the form or the app.
Now user 1 shares the Project 1 record with test user 1. Remember we have set Share as Cascade All in the relationship between Project and Artefact.
But still, because the user doesn’t have any privileges on Artefact, it doesn’t appear for Test User 1 on the form as well as the app.
Now let us update the Test Sharing Role and add Read Permissions – User Level for the Artefact table.
Now Test User 1 can see the Artefacts in the related records as well as the App.
We can observe 2 things here –
Although Test User 1 only has User-level Access to the Artefact, he can still see the Artefact records created by User 1, as the parent Project record is shared with Cascade All–Share in the relationship behavior.
And as Test User 1 has only Read access he can only view the artefact records shared.
Here if we update the Test Sharing role to provide Write access at User Level, the user will be able to edit the records.
Also right now if User 1 creates the Project 2 record with the related P2 A2 artefact record, Test User 1 will only have access to the Project 2 record because of Organization Access but not to the P2 A2 artefact record as he has only has the user-level access.
Let us now update the Relationship Behaviour between Project (1-n) Artefact, and set Share to Cascade None.
Let us share the Project 2 record with Test User 1 now through the User 1 account.
As expected even after sharing the Project 2 record, Test User 1 does not have access to the P2 A2 artefact record as we had updated the relationship behavior as Cascade None for Share.
The first check that the user needs to pass is the Privilege Check, which checks if the user has the required privileges for that table before the Shared Access check