Plugin Registration Tool and screen resolution issue


Plugin Registration Tool Resolution Issue

nirman1983's avatarNirman Doshi and his Dynamics Lab

If you are a CRM developer or consultant, you can’t live without Plugin Registration Tool. The tool provided with CRM SDK is MUST in order to register/ uninstall any plugin to a CRM instance, be it online or on-premises.

However, there is one weird issue with the tool (atleast the one provided in SDK 2013, and SDK 2016). That is, except for a few specific screen resolutions, the tool doesn’t show buttons to allow users to complete the actions.

Notice the screenshot below, where are the buttons to “Update Selected Plugins”? There is no scrollbar either.

PluginRegTool-Issue

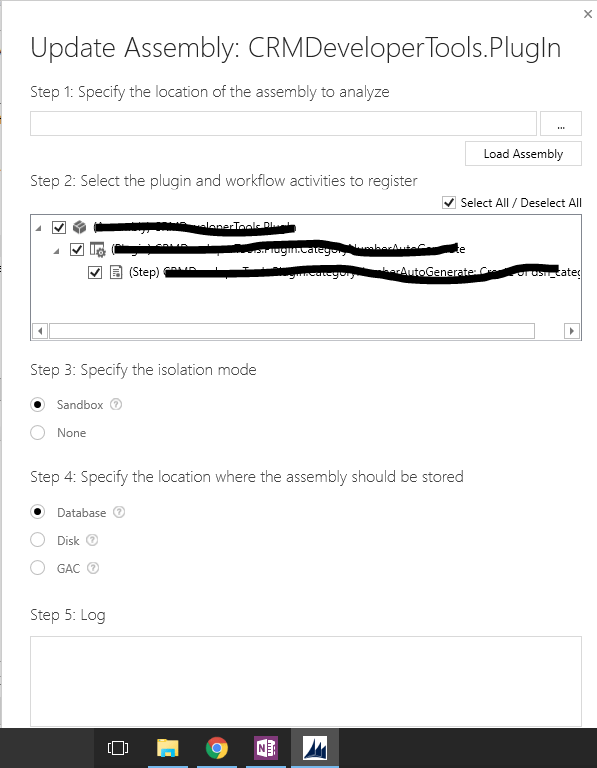
There are few workarounds to get rid of this issue. For example, hitting TAB key for 2 times from the Step 2 control. Or hitting a shortcut key. But, for me the preferred method is to rotate the screen to left or right, this is because at least you can see what button you are hitting.

How…

View original post 73 more words

How t0 – Insert a Chart in Excel Spreadsheet using EPPlus Library.


EPPlus is .NET Library that makes it very easy to manipulate Excel programmatically. It is based on Open XML.

https://epplus.codeplex.com/

Below is the sample code we can use to insert a chart in a excel spreadsheet.

</p>
<p>public void UpdateExcelUsingEPPlus(string fileName)<br />
{<br />
FileInfo fileInfo = new FileInfo(fileName);</p>
<p>ExcelPackage p = new ExcelPackage(fileInfo);</p>
<p>// access the first sheet named Sheet1<br />
ExcelWorksheet myWorksheet = p.Workbook.Worksheets["Sheet1"];</p>
<p>// specify cell values to be used for generating chart.<br />
myWorksheet.Cells["C2"].Value = 10;<br />
myWorksheet.Cells["C3"].Value = 40;<br />
myWorksheet.Cells["C4"].Value = 30;</p>
<p>myWorksheet.Cells["B2"].Value = "Yes";<br />
myWorksheet.Cells["B3"].Value = "No";<br />
myWorksheet.Cells["B4"].Value = "NA";</p>
<p>// add chart of type Pie.<br />
var myChart = myWorksheet.Drawings.AddChart("chart", eChartType.Pie);</p>
<p>// Define series for the chart<br />
var series = myChart.Series.Add("C2: C4", "B2: B4");<br />
myChart.Border.Fill.Color = System.Drawing.Color.Green;<br />
myChart.Title.Text = "My Chart";<br />
myChart.SetSize(400, 400);</p>
<p>// Add to 6th row and to the 6th column<br />
myChart.SetPosition(6, 0, 6, 0);</p>
<p>p.Save();</p>
<p>}</p>
<p>

The output –

If we want to do it using Open XML SDK without using EPPlus Library we can refer to the below article.

https://msdn.microsoft.com/en-us/library/office/cc820055.aspx

Hope it helps..

Advertisements

Insert Formula in Cell using C# (OpenXML and EPPlus Library)


Sharing the sample code, we can use to insert forumala in a particular cell in Excel Spreadsheet.

First using Open XML SDK

</p>
<p>public static void UpdateExcelUsingOpenXMLSDK(string fileName)<br />
{<br />
// Open the document for editing.<br />
using (SpreadsheetDocument spreadSheet = SpreadsheetDocument.Open(fileName, true))<br />
{<br />
// Access the main Workbook part, which contains all references.<br />
WorkbookPart workbookPart = spreadSheet.WorkbookPart;<br />
// get sheet by name<br />
Sheet sheet = workbookPart.Workbook.Descendants&lt;Sheet&gt;().Where(s =&gt; s.Name == "Sheet1").FirstOrDefault();</p>
<p>// get worksheetpart by sheet id<br />
WorksheetPart worksheetPart = workbookPart.GetPartById(sheet.Id.Value) as WorksheetPart;</p>
<p>// The SheetData object will contain all the data.<br />
SheetData sheetData = worksheetPart.Worksheet.GetFirstChild();</p>
<p>Cell formulaCell = InsertCellInWorksheet("B", 10, worksheetPart);<br />
formulaCell.DataType = new EnumValue&lt;CellValues&gt;(CellValues.Number);<br />
formulaCell.CellFormula = new CellFormula("SUM(B2:B7)");</p>
<p>// Save the worksheet.<br />
worksheetPart.Worksheet.Save();</p>
<p>// for recacluation of formula<br />
spreadSheet.WorkbookPart.Workbook.CalculationProperties.ForceFullCalculation = true;<br />
spreadSheet.WorkbookPart.Workbook.CalculationProperties.FullCalculationOnLoad = true;</p>
<p>}<br />
}</p>
<p>private static Cell InsertCellInWorksheet(string columnName, uint rowIndex, WorksheetPart worksheetPart)<br />
{<br />
Worksheet worksheet = worksheetPart.Worksheet;<br />
SheetData sheetData = worksheet.GetFirstChild&lt;SheetData&gt;();<br />
string cellReference = columnName + rowIndex;</p>
<p>// If the worksheet does not contain a row with the specified row index, insert one.<br />
Row row;<br />
if (sheetData.Elements&lt;Row&gt;().Where(r =&gt; r.RowIndex == rowIndex).Count() != 0)<br />
{<br />
row = sheetData.Elements&lt;Row&gt;().Where(r =&gt; r.RowIndex == rowIndex).First();<br />
}<br />
else<br />
{<br />
row = new Row() { RowIndex = rowIndex };<br />
sheetData.Append(row);<br />
}</p>
<p>// If there is not a cell with the specified column name, insert one.<br />
if (row.Elements&lt;Cell&gt;().Where(c =&gt; c.CellReference.Value == columnName + rowIndex).Count() &gt; 0)<br />
{<br />
return row.Elements&lt;Cell&gt;().Where(c =&gt; c.CellReference.Value == cellReference).First();<br />
}<br />
else<br />
{<br />
// Cells must be in sequential order according to CellReference. Determine where to insert the new cell.<br />
Cell refCell = null;<br />
foreach (Cell cell in row.Elements&lt;Cell&gt;())<br />
{<br />
if (cell.CellReference.Value.Length == cellReference.Length)<br />
{<br />
if (string.Compare(cell.CellReference.Value, cellReference, true) &gt; 0)<br />
{<br />
refCell = cell;<br />
break;<br />
}<br />
}<br />
}</p>
<p>Cell newCell = new Cell() { CellReference = cellReference };<br />
row.InsertBefore(newCell, refCell);</p>
<p>worksheet.Save();<br />
return newCell;<br />
}<br />
}</p>
<p>

Using EPPlus

https://www.nuget.org/packages/EPPlus/

</p>
<p>public void UpdateExcelUsingEPPlus(string fileName)<br />
{<br />
FileInfo fileInfo = new FileInfo(fileName);<br />
ExcelPackage p = new ExcelPackage(fileInfo);<br />
ExcelWorksheet myWorksheet = p.Workbook.Worksheets["Sheet1"];</p>
<p>myWorksheet.Cells["B15"].Formula = "SUM(B2:B7)";</p>
<p>p.Save();</p>
<p>}</p>
<p>

Hope it helps..

Advertisements

Configuring Live Assist (Preview) for Dynamics 365.


Let us see how we can configure Live Assist step by step.

First, go to Applications tab of the Dynamics 365 Administration Center.

Select Live Assist for Dynamics 365 and click on Manage.

Click on Accept to give permission to the app.

Select the Dynamics 365 Instance and provide your email id, accept the terms and conditions and click on Submit.

This configures the Live Assist on the specified Dynamics 365 Instance and also sends the email to the email id specified.

Once the configuration is done, we can see the new Live Assist section added in our Settings area.

There we can click on Admin URL of Live Assist for further configuration.

Clicking on it opens the Admin Center.

Click on Confirm and Authorize.

The Dashboard of the admin center.

The Get Started page.

Code Snippet that we can use to enable Live Assist in web site.

Live Assist adds a new panel on the right inside CRM.

To test it we can make use of Demo Site provided along with Live Assist.

The agent within CRM can click on Conversation Icon and “Grab a chat” to start conversation.

Now suppose we want to configure our CRM Portal to use it. For this we need to copy the code snippet provided earlier. Go to the Header web template of our Web Site and paste the JavaScript code to our Header’s source code.

This enables Live Assist in the portal.

Communication between the CRM user and the Portal user.

The helpful links and video

https://neilparkhurst.com/2017/04/09/cafex-live-assist-my-initial-install-with-usd/

https://blogs.technet.microsoft.com/lystavlen/2017/03/16/live-assist-for-dynamics-365-first-look/

Hope it helps..

How to – Update Cell value in Excel Spreadsheet using C# (Open XML and EPPlus library)


Sharing a sample code that updates a particular cell’s value in Excel Spreadsheet.

Here we are updating cell B4

First using Open XML SDK

</p>
<p>public static void UpdateExcelUsingOpenXMLSDK(string fileName)<br />
{<br />
// Open the document for editing.<br />
using (SpreadsheetDocument spreadSheet = SpreadsheetDocument.Open(fileName, true))<br />
{<br />
// Access the main Workbook part, which contains all references.<br />
WorkbookPart workbookPart = spreadSheet.WorkbookPart;<br />
// get sheet by name<br />
Sheet sheet = workbookPart.Workbook.Descendants&lt;Sheet&gt;().Where(s =&gt; s.Name == "Sheet1").FirstOrDefault();</p>
<p>// get worksheetpart by sheet id<br />
WorksheetPart worksheetPart = workbookPart.GetPartById(sheet.Id.Value) as WorksheetPart;</p>
<p>// The SheetData object will contain all the data.<br />
SheetData sheetData = worksheetPart.Worksheet.GetFirstChild();</p>
<p>Cell cell = GetCell(worksheetPart.Worksheet, "B", 4);</p>
<p>cell.CellValue = new CellValue("10");<br />
cell.DataType = new EnumValue&lt;CellValues&gt;(CellValues.Number);</p>
<p>// Save the worksheet.<br />
worksheetPart.Worksheet.Save();</p>
<p>// for recacluation of formula<br />
spreadSheet.WorkbookPart.Workbook.CalculationProperties.ForceFullCalculation = true;<br />
spreadSheet.WorkbookPart.Workbook.CalculationProperties.FullCalculationOnLoad = true;</p>
<p>}<br />
}</p>
<p>private static Cell GetCell(Worksheet worksheet,<br />
string columnName, uint rowIndex)<br />
{<br />
Row row = GetRow(worksheet, rowIndex);</p>
<p>if (row == null) return null;</p>
<p>var FirstRow = row.Elements&lt;Cell&gt;().Where(c =&gt; string.Compare<br />
(c.CellReference.Value, columnName +<br />
rowIndex, true) == 0).FirstOrDefault();</p>
<p>if (FirstRow == null) return null;</p>
<p>return FirstRow;<br />
}</p>
<p>private static Row GetRow(Worksheet worksheet , uint rowIndex)<br />
{<br />
Row row = worksheet.GetFirstChild&lt;SheetData&gt;().<br />
Elements&lt;Row&gt;().FirstOrDefault(r =&gt; r.RowIndex == rowIndex);<br />
if (row == null)<br />
{<br />
throw new ArgumentException(String.Format("No row with index {0} found in spreadsheet", rowIndex));<br />
}<br />
return row;<br />
}</p>
<p>

Now the same code using EPPlus

https://www.nuget.org/packages/EPPlus/

</p>
<p>public void UpdateExcelUsingEPPlus(string fileName)<br />
{<br />
FileInfo fileInfo = new FileInfo(fileName);<br />
ExcelPackage p = new ExcelPackage(fileInfo);<br />
ExcelWorksheet myWorksheet = p.Workbook.Worksheets["Sheet1"];<br />
myWorksheet.Cells[4, 2].Value = 10;<br />
p.Save();</p>
<p>}</p>
<p>

Hope it helps..

Advertisements

Setting Regarding of a record in Automatic Record Creation and Update Rules in Dynamics 365


Hi,

While implementing a scenario i.e. automatic case creation on phone call create using Automatic Record Creation and Updating Rules, we found that whenever we were setting the Regarding Object in the Phone Call activity, the case record was not getting created.

Create Case Rule Item –

Creating a Phone Call record using Case as Regarding object.

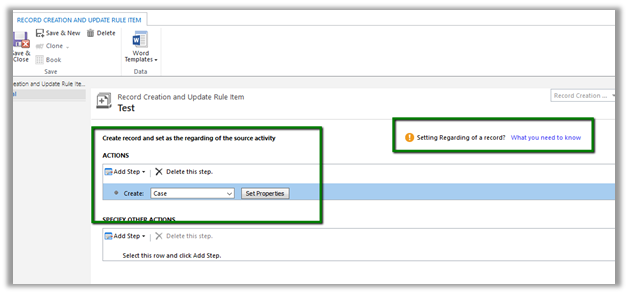
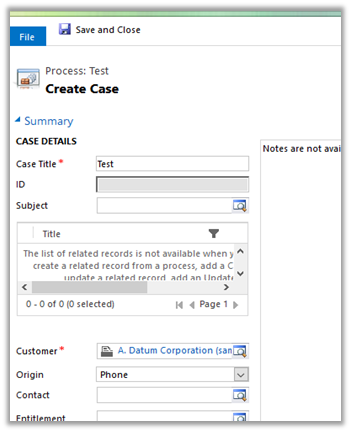
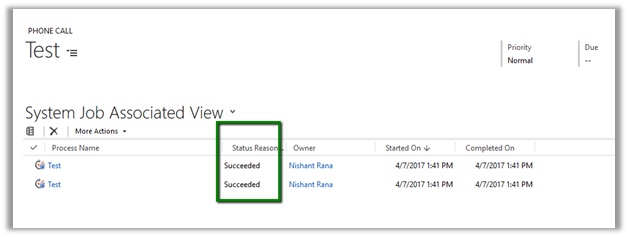
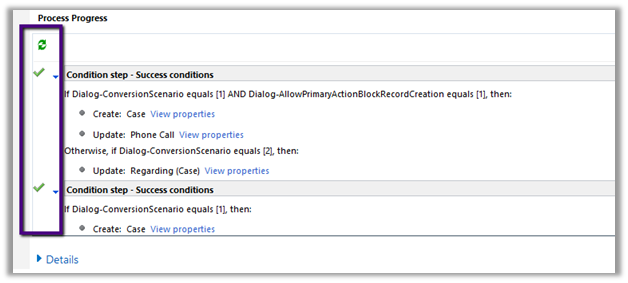
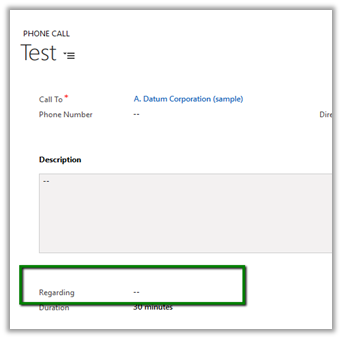
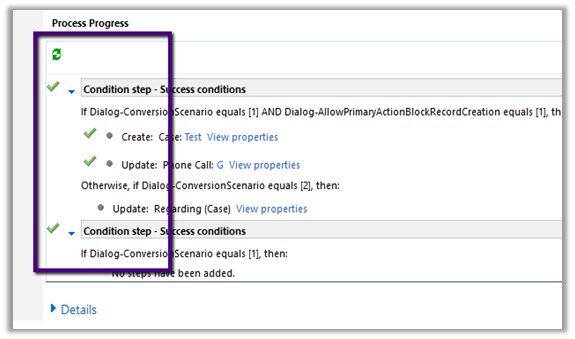
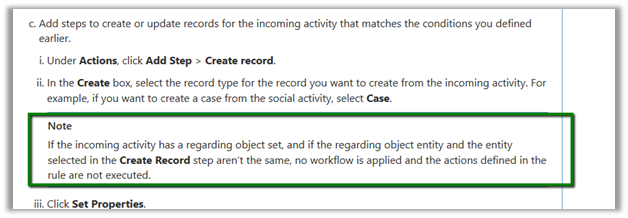
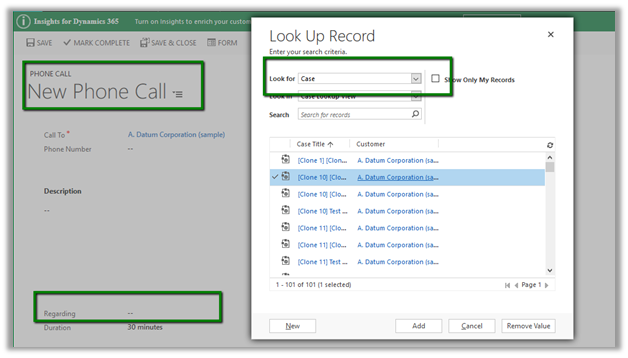
Workflow ran but the case record was not created.

Then we created phone call activity record without setting the regarding object. This time workflow ran and created the case record.

Basically, the workflow creates the case record and updates the Regarding Object in the Phone call record with this newly created case record.

However, if we check the Official documentation

https://www.microsoft.com/en-us/dynamics/crm-customer-center/set-up-rules-to-automatically-create-or-update-records-in-dynamics-365-customer-service.aspx#bkmk_RuleAndQueues

we have this mentioned

However, in our case we created a phone call record with case as regarding object and had case as the entity selected in the Create Record step, in this case also the Action were not executed.

Hope it helps..

Nishant Rana's Weblog

Everything related to Microsoft .NET Technology

Skip to content ↓