While reviewing our Dataverse environment’s storage usage, we noticed something surprising—over 13 GB of our file capacity was being consumed by the WebResourceBase table alone. This table typically stores JavaScript files, HTML web resources, images, and other files tied to customizations in Dynamics 365. However, the volume was unexpectedly high, prompting us to investigate further.
We started by examining the capacity usage charts available under:
Power Platform Admin Center > Resources > Capacity > File Usage
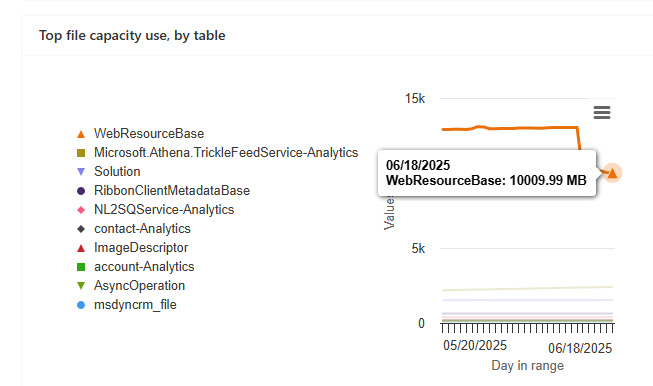
It was evident that the WebResourceBase table was consistently occupying around 13,027 MB (13 GB), far more than any other table.
Realizing that this wasn’t just normal customization data, we raised a support request with Microsoft to understand what was happening behind the scenes.
After a quick investigation, Microsoft Support responded with the following:
“Upon review, we have found that the WebResourceBase table is indeed occupying a significant amount of storage—13.027 GB. There are instances of ‘orphaned’ WebResourceBase records, which can occur due to solution uninstalls or as leftover artifacts from other entities that depend on WebResources. To address this issue, we can run a script to remove these orphaned web resources, which will help in reducing the storage used in your environment.”
These “orphaned” records are essentially detached or unused web resources—files that are no longer tied to any solution or customization but remain in storage. They commonly appear in environments where unmanaged solutions are frequently installed and removed.
Upon our approval, Microsoft executed a backend script to safely identify and remove these orphaned entries.
Post-Cleanup Results –
Before: 13,027 MB
After: 10009MB
Recovered: 3,018 MB (~3 GB)
This led to around a 24 percent reduction in the file capacity used by the WebResourceBase table.
Microsoft also confirmed that no further reduction was possible at this time—the remaining content is either actively referenced or structurally required by the platform.
When working with historical or test data in Dynamics 365 Field Service, we often come across the need to clean up old Work Orders and their related records. While it might seem straightforward to just delete the Work Order, there are quite a few interdependent entities and plugin validations that can make this task tricky.
We wanted to delete all msdyn_workorder records created before a certain date along with their related child records such as:
Work Order Products
Work Order Services
Work Order Incidents
Bookable Resource Bookings
Time Entries, Service Tasks, Resolutions, etc.
The Field Service solution has many plugins that enforce business rules during deletion.
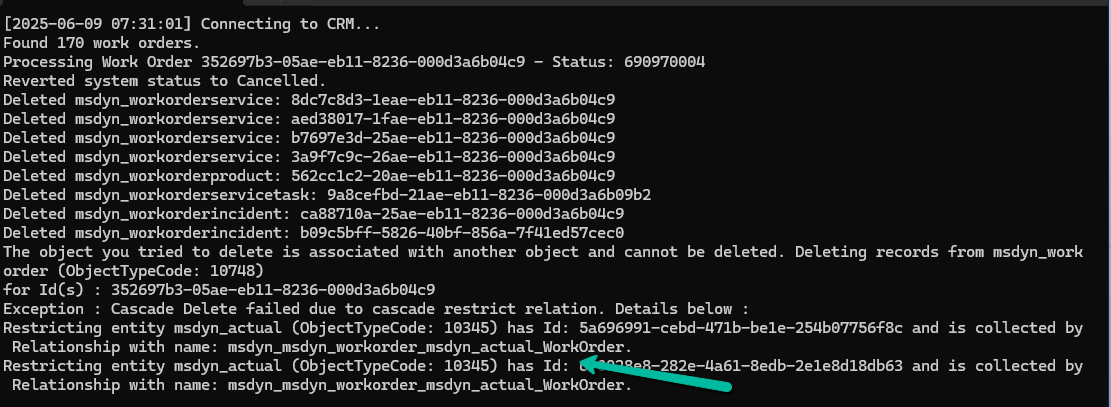
If a Work Order is in a Posted state (msdyn_systemstatus = 690970004), attempting to delete any of its child records will throw errors like:
Failed to delete msdyn_workorderproduct {GUID}: A record can’t be deleted if the work order has been posted.
So to delete the Posted work order, we had to update its status to Cancelled.
If the Work Order has any associated Bookable Resource Booking records, deletion is blocked:
Work order can’t be deleted because there are associated Resource Booking records. Please delete these records first.
And while deleting Bookings, we might hit even deeper integration issues, like this one from a virtual entity plugin
This error originates from the FnO Virtual Entity plugin and usually appears if the user linked to the Booking doesn’t exist in the FnO system — a hard blocker for environments with dual-write enabled.
Also, we had to temporarily change the Delete action to Remove Link from Restrict for the relationship between msdyn_workorder and msdyn_actual_workorder.
Here’s a high-level overview of what we did:
Fetched work orders based on our criteria. Loop through each work order:
Revert the status if it is Posted (so it becomes deletable)
Delete all child records in a proper order
Delete the Work Order itself
Below is the sample code we used for deleting the work orders and its associated records successfully.
   public void DeleteAllWorkOrders()
        {

            QueryExpression query = new QueryExpression("msdyn_workorder");
            query.ColumnSet = new ColumnSet("msdyn_workorderid", "msdyn_name", "createdon", "msdyn_systemstatus");

            query.Criteria = new FilterExpression();
            query.Criteria.Conditions.Add(
                new ConditionExpression("createdon", ConditionOperator.LessThan, new DateTime(2025, 1, 1))
            );
            query.Orders.Add(new OrderExpression("createdon", OrderType.Descending));
            var workOrders = _service.RetrieveMultiple(query).Entities;
            Console.WriteLine($"Found {workOrders.Count} work orders.");

            try
            {
                foreach (var wo in workOrders)
                {
                    var woId = wo.Id;
                    var systemStatusCode = wo.Contains("msdyn_systemstatus") ? ((OptionSetValue)wo["msdyn_systemstatus"]).Value : 0;
                    try
                    {
                        //// 1. If Posted revert status
                        if (systemStatusCode == 690970004) // Posted
                        {
                            var revert = new Entity("msdyn_workorder", woId)
                            {
                                ["msdyn_systemstatus"] = new OptionSetValue(690970005) // Canceled
                            };

                            _service.Update(revert);
                            Console.WriteLine("Reverted system status to Cancelled.");
                        }

                        // 2. Delete dependencies
                        DeleteRelatedRecords("msdyn_workorderservice", "msdyn_workorder", woId);
                        DeleteRelatedRecords("msdyn_workorderproduct", "msdyn_workorder", woId);
                        DeleteRelatedRecords("msdyn_workorderservicetask", "msdyn_workorder", woId);
                        DeleteRelatedRecords("msdyn_workorderincident", "msdyn_workorder", woId);
                        DeleteRelatedRecords("msdyn_workorderresolution", "msdyn_workorder", woId);
                        DeleteRelatedRecords("bookableresourcebooking", "msdyn_workorder", woId);
                        DeleteRelatedRecords("msdyn_timeentry", "msdyn_workorder", woId);

                        // 3. Delete the Work Order
                        _service.Delete("msdyn_workorder", woId);
                        Console.WriteLine($"Deleted Work Order: {woId}\n");
                    }
                    catch (Exception ex)
                    {
                        Console.WriteLine($"Error processing Work Order {woId}: {ex.Message}");
                        Console.WriteLine("Continuing with the next Work Order...\n");
                    }
                }
            }
            catch(Exception ex)
            {
                Console.WriteLine(ex.Message);
            }

            Console.WriteLine("All Work Orders cleaned up.");
            Console.WriteLine("Press any key to continue !");
        }

        private void DeleteRelatedRecords(string entityName, string lookupField, Guid workOrderId)
        {
            var query = new QueryExpression(entityName)
            {
                ColumnSet = new ColumnSet(false),
                Criteria =
            {
                Conditions =
                {
                    new ConditionExpression(lookupField, ConditionOperator.Equal, workOrderId)
                }
            }
            };

            var records = _service.RetrieveMultiple(query).Entities;

            foreach (var record in records)
            {
                try
                {
                    _service.Delete(entityName, record.Id);
                    Console.WriteLine($"Deleted {entityName}: {record.Id}");
                }
                catch (Exception ex)
                {
                    Console.WriteLine($"Failed to delete {entityName} {record.Id}: {ex.Message}");
                }
            }
        }
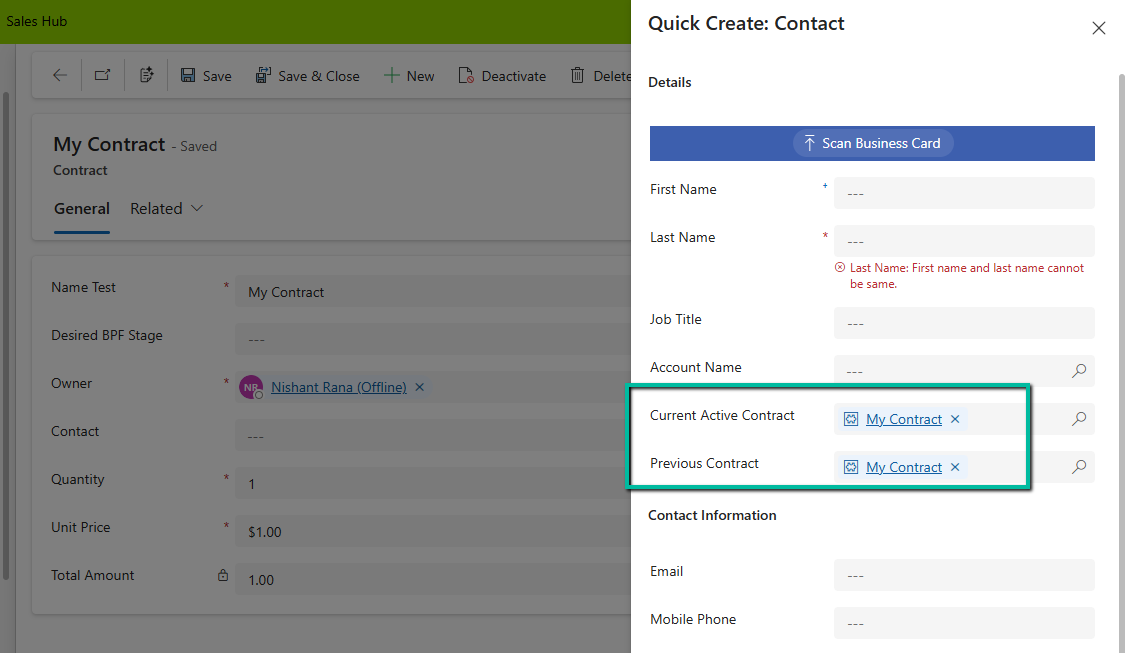
Recently, we had a requirement to track the Current and Previous contracts for a Contact in our Dataverse environment. To achieve this, we created two separate N:1 relationships between the Contact and Contract tables
custom_currentcontractid → Contact’s Current Contract
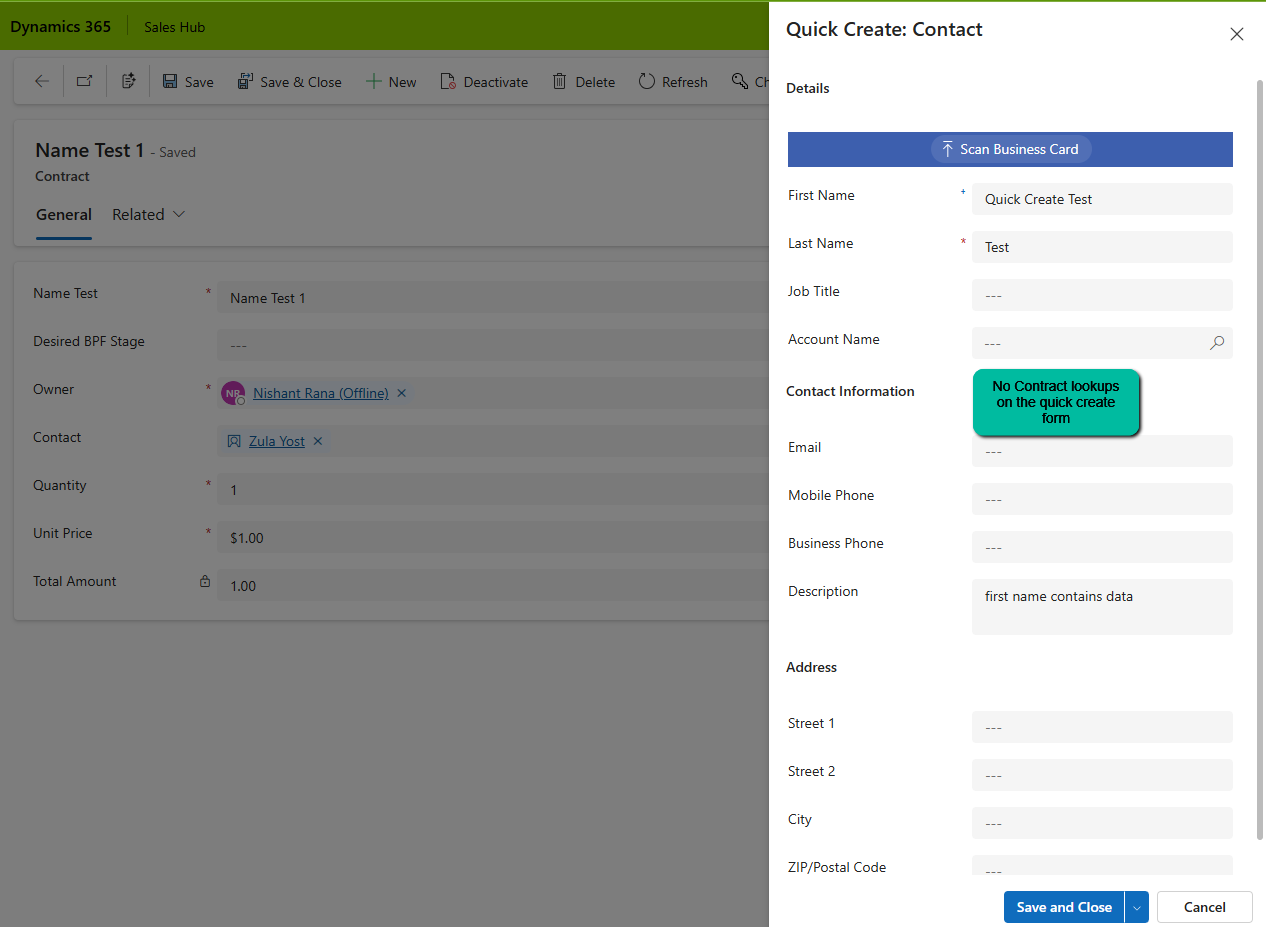
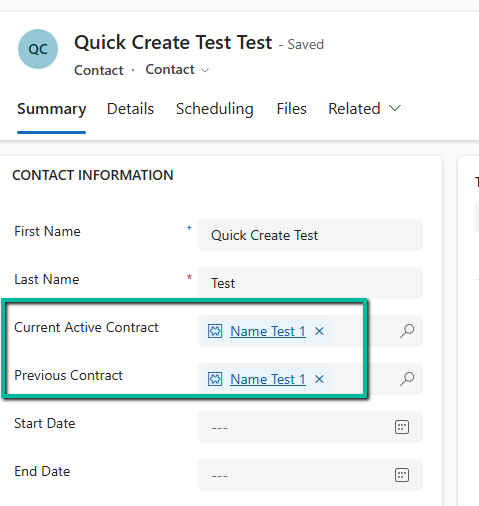
Soon after, we noticed a strange issue: “When creating a Contact from a Contract record (via the Quick Create form), both Current Contract and Previous Contract fields were being automatically populated — with the same Contract record”. This was unexpected, especially since neither field was present on the Quick Create form!
After saving and closing, when we open the record, we can see both the lookup auto-populated with the contract record in context.
On adding these lookups in the Quick Create form, we can see that Dataverse is auto-populating it with the contract in context.
When we open a Quick Create form from a record (in our case, from a Contract), Dataverse passes the entity reference context to the Quick Create form. And here’s the catch, If the target entity (Contact) has multiple lookups to the source entity (Contract), Dataverse tries to populate them all.
This behavior is based on relationship metadata, not on what’s visible on the form. So even though we didn’t include the Current Active Contract or Previous Contract on the Quick Create form, Dataverse filled both with the same value.
If we have the fields on the quick create form we can make use of JavaScript on the onload to clear the values.
function clearBothContractLookups(executionContext) {
    var formContext = executionContext.getFormContext();

    // Check if in Quick Create mode (formType = 1)
    if (formContext.ui.getFormType() === 1) {
        var parentRecord = formContext.data.entity.getEntityReference();

        // If opened from a Contact, clear BOTH lookups
        if (parentRecord && parentRecord.entityType === "contact") {
            // Clear Current Contract
            if (formContext.getAttribute("new_currentcontract")) {
                formContext.getAttribute("new_currentcontract").setValue(null);
            }

            // Clear Previous Contract
            if (formContext.getAttribute("new_previouscontract")) {
                formContext.getAttribute("new_previouscontract").setValue(null);
            }
        }
    }
}
However, like in our case as we did not have these fields on the quick create form, and we didn’t want to have these populated during the creation of the Contract, as these fields were supposed to be populated later, we wrote a Pre-Create Plugin on Pre Operation for it.
public class ClearBothContractLookups : IPlugin
{
    public void Execute(IServiceProvider serviceProvider)
    {
        IPluginExecutionContext context = (IPluginExecutionContext)serviceProvider.GetService(typeof(IPluginExecutionContext));

        if (context.InputParameters.Contains("Target") && context.InputParameters["Target"] is Entity)
        {
            Entity contact = (Entity)context.InputParameters["Target"];

               // Clear BOTH fields if they exist
                if (contact.Contains("new_currentcontract"))
                    contact["new_currentcontract"] = null;

                if (contact.Contains("new_previouscontract"))
                    contact["new_previouscontract"] = null;

              // or remove them from the input parameters
                  contact.Attributes.Remove("new_currentcontract");
                  contact.Attributes.Remove("new_previouscontract");

            }
        }
    }
}
Recently, while testing in UAT, we ran into a plugin-related issue that wasn’t reproducible in Dev. After investigating, we discovered the root cause: one of the plugin step images was missing an attribute in UAT. This wasn’t immediately obvious and not something we’d catch in a standard deployment check. Manually inspecting each plugin step image across environments would be tedious and error-prone. So, we wrote a quick comparison utility using the Dataverse SDK (C#) to help automate this process. Within the tool, we need to specify the schema name of the table. The tool finds all related the sdkmessageprocessingstepimage records, joins them with associated plugin steps (sdkmessageprocessingstep), and then compares the step, image, and the included attributes.
The result –
We can see it listing a missing plugin registration step in UAT and a mismatch in one of the attributes in a step’s image.
The sample code –
 static void Main(string[] args)
        {
            string devConnectionString = "AuthType=OAuth;Url=https://abcdev.crm6.dynamics.com/;Username=abd@xyz.com;AppId=51f81489-12ee-4a9e-aaae-a2591f45987d;LoginPrompt=Auto;RedirectUri=app://58145b91-0c36-4500-8554-080854f2ac97";
            string uatConnectionString = "AuthType=OAuth;Url=https://abcuat.crm6.dynamics.com/;Username=abd@xyz.com;AppId=51f81489-12ee-4a9e-aaae-a2591f45987d;LoginPrompt=Auto;RedirectUri=app://58145b91-0c36-4500-8554-080854f2ac97";
            var devService = new CrmServiceClient(devConnectionString);
            var uatService = new CrmServiceClient(uatConnectionString);
            string entityLogicalName = "custom_contract";
            var devDetails = GetPluginStepImages(devService, GetEntityTypeCode(devService, entityLogicalName));
            var uatDetails = GetPluginStepImages(uatService, GetEntityTypeCode(uatService, entityLogicalName));
            CompareStepsAndImages(devDetails, uatDetails);
            Console.ReadLine();
        }

        static int GetEntityTypeCode(IOrganizationService service, string entityLogicalName)
        {
            var query = new QueryExpression("entity")
            {
                ColumnSet = new ColumnSet("objecttypecode", "logicalname"),
                Criteria = new FilterExpression(LogicalOperator.And)
            };
            query.Criteria.AddCondition("logicalname", ConditionOperator.Equal, entityLogicalName);
            var response = service.RetrieveMultiple(query);
            var entity = response.Entities.FirstOrDefault();
            return (int)entity.Attributes["objecttypecode"];
        }


        static EntityCollection GetPluginStepImages(IOrganizationService service, int objectTypeCode)
        {
            var query = new QueryExpression("sdkmessageprocessingstepimage")
            {
                ColumnSet = new ColumnSet("name", "imagetype", "messagepropertyname", "entityalias", "attributes", "sdkmessageprocessingstepid")
            };

            // Link to sdkmessageprocessingstep
            var stepLink = query.AddLink("sdkmessageprocessingstep", "sdkmessageprocessingstepid", "sdkmessageprocessingstepid");
            stepLink.Columns = new ColumnSet("name", "sdkmessagefilterid");
            stepLink.EntityAlias = "step";

            // Link to sdkmessagefilter
            var filterLink = stepLink.AddLink("sdkmessagefilter", "sdkmessagefilterid", "sdkmessagefilterid");
            filterLink.LinkCriteria.AddCondition("primaryobjecttypecode", ConditionOperator.Equal, objectTypeCode);

            return service.RetrieveMultiple(query);
        }

        static void CompareStepsAndImages(EntityCollection devStepsWithImages, EntityCollection uatStepsWithImages)
        {
            Console.WriteLine("Comparing Plugin Step / Images between Dev and UAT...");

            // Create dictionaries for faster lookup
            var devDict = devStepsWithImages.Entities.GroupBy(e =>
            {
                var stepId = e.GetAttributeValue<EntityReference>("sdkmessageprocessingstepid")?.Id ?? Guid.Empty;
                return stepId;
            }).ToDictionary(g => g.Key, g => g.ToList());

            var uatDict = uatStepsWithImages.Entities.GroupBy(e =>
            {
                var stepId = e.GetAttributeValue<EntityReference>("sdkmessageprocessingstepid")?.Id ?? Guid.Empty;
                return stepId;
            }).ToDictionary(g => g.Key, g => g.ToList());

            foreach (var devStep in devDict)
            {
                var stepId = devStep.Key;
                var devImages = devStep.Value;
                var devStepName = devImages.FirstOrDefault()?.GetAttributeValue<AliasedValue>("step.name")?.Value?.ToString() ?? "(unknown)";

                if (!uatDict.TryGetValue(stepId, out var uatImages))
                {
                    Console.WriteLine($"[MISSING STEP in UAT] Step: {devStepName}, StepId: {stepId}");
                    continue;
                }

                foreach (var devImage in devImages)
                {
                    var devImageName = devImage.GetAttributeValue<string>("name");
                    var devAttrs = devImage.GetAttributeValue<string>("attributes") ?? "";
                    var devType = devImage.GetAttributeValue<OptionSetValue>("imagetype")?.Value;

                    var match = uatImages.FirstOrDefault(u =>
                        u.GetAttributeValue<string>("name") == devImageName);

                    if (match == null)
                    {
                        Console.WriteLine($"[MISSING IMAGE in UAT] Image: {devImageName}, Step: {devStepName}, StepId: {stepId}");
                        continue;
                    }

                    var uatAttrs = match.GetAttributeValue<string>("attributes") ?? "";
                    var uatType = match.GetAttributeValue<OptionSetValue>("imagetype")?.Value;

                    if (devAttrs != uatAttrs || devType != uatType)
                    {
                        Console.WriteLine($"[MISMATCH] Image: {devImageName}, Step: {devStepName}, StepId: {stepId}");
                        Console.WriteLine($"  Dev Attributes: {devAttrs}");
                        Console.WriteLine($"  UAT Attributes: {uatAttrs}");
                        Console.WriteLine($"  Dev ImageType: {ImageTypeToString(devType)}");
                        Console.WriteLine($"  UAT ImageType: {ImageTypeToString(uatType)}");
                    }
                }
            }

            Console.WriteLine("Comparison complete.");
        }

        static string ImageTypeToString(int? type)
        {
            switch (type)
            {
                case 0:
                    return "PreImage";
                case 1:
                    return "PostImage";
                case 2:
                    return "Both";
                default:
                    return "Unknown";
            }
        }
In some business scenarios, we might need to update the Business Process Flow (BPF) stage of a record during an Excel import — especially during data migration or bulk record manipulation. In this blog post, we’ll walk through how to set a desired BPF stage (based on the stage name) and automatically move the record to that stage using Power Automate.
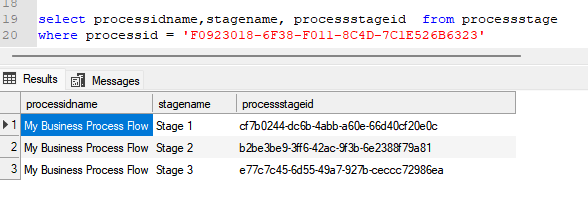
We’re working with a custom Dataverse table called Test(cr1a7_test) and a Business Process Flow named My Business Process Flow, which includes the following stages:
“select processidname,stagename, processstageid from processstage where processid = [processGUID]”
Our goal is to allow users to specify the stage name (e.g., “Stage 2”) through Excel import, and have a Power Automate flow update the record’s BPF instance to the corresponding stage automatically.
For this –
We’ll add a field called the Desired BPF Stage choice field on our table to store the desired stage name.
We’ll create a Power Automate flow that triggers on create or update.
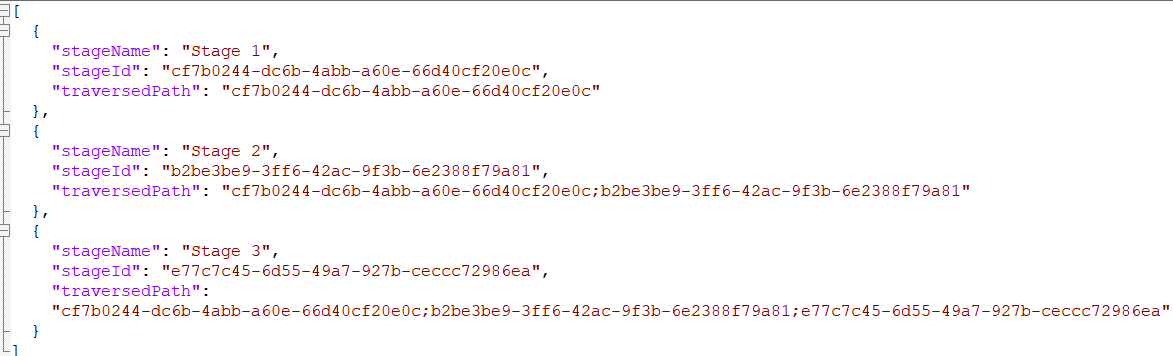
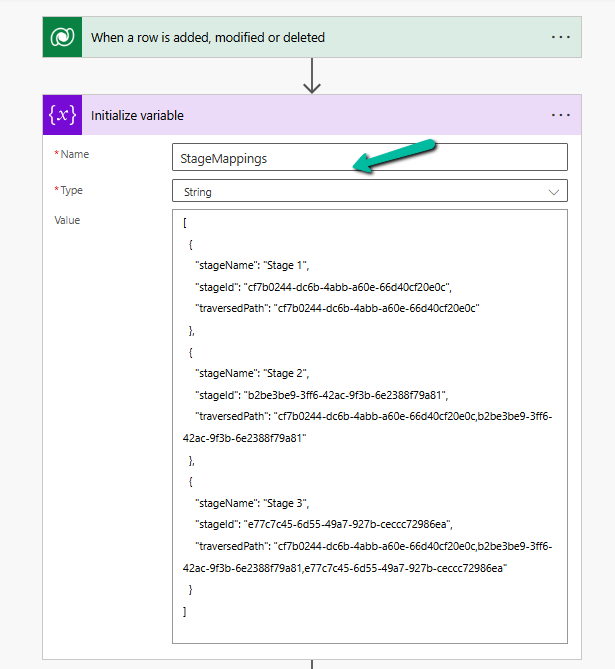
We’ll maintain a static JSON mapping of stage names to stage IDs and their traversed paths.
We’ll look up the corresponding stage ID and traversed path from the JSON.
We’ll fetch the BPF instance for the record.
We’ll update the BPF instance with the new active stage and traversed path.
Below is how we can define our JSON structure for mapping, which we will store either in a variable inside Power Automate or save as an environment variable.
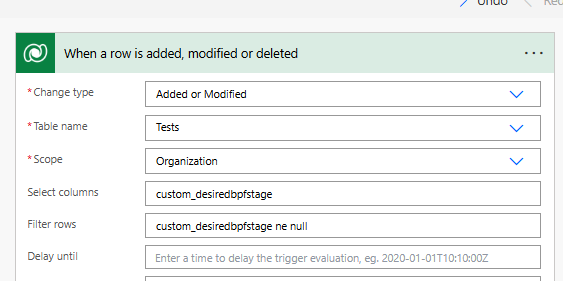
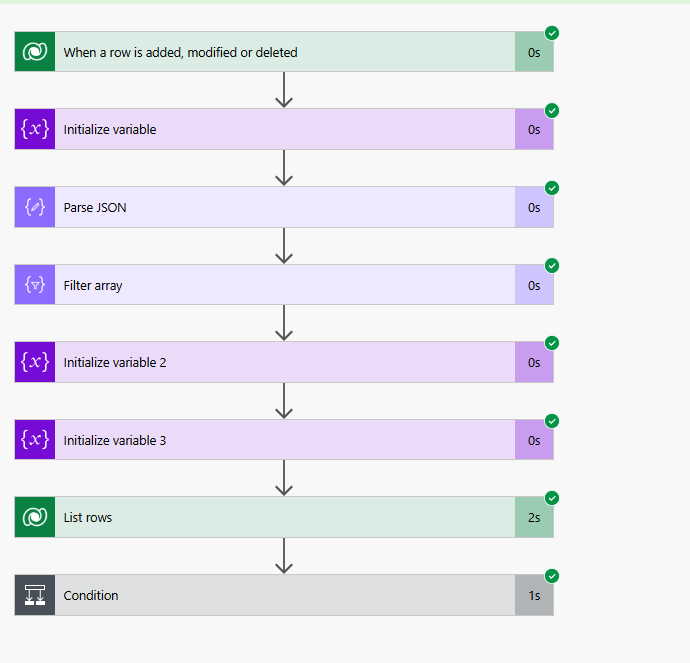
Trigger – When a row is added or modified.
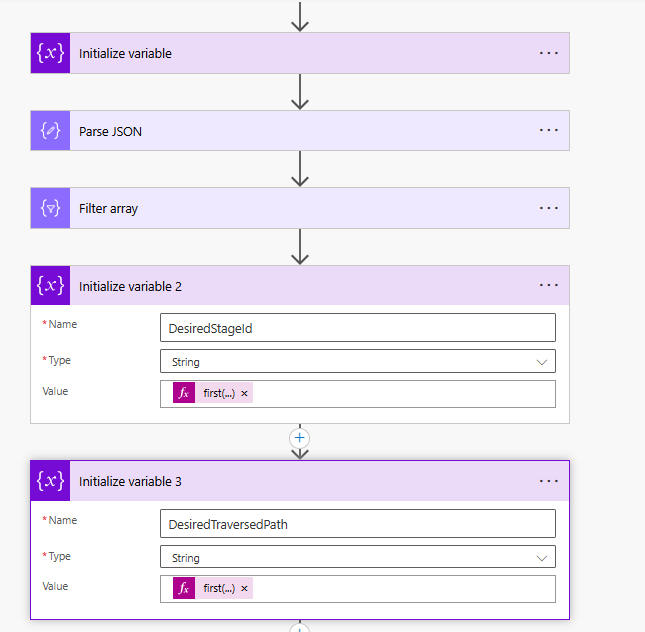
Initialize Variable with JSON mapping
Parse JSON – using the sample data
Use a “Filter array” action to find the object where stageName matches custom_desiredbpfstage.
Initialize variables to store the Stage ID and traversed path.
first(body(‘Filter_array’))?[‘stageId’]
first(body(‘Filter_array’))?[‘traversedPath’]
Use List Rows to check if BPF Instance exists or not, if not we will create it or update it.
length(outputs(‘List_rows’)?[‘body/value’]) > 0
Update or Create a new BPF instance associated with the record.
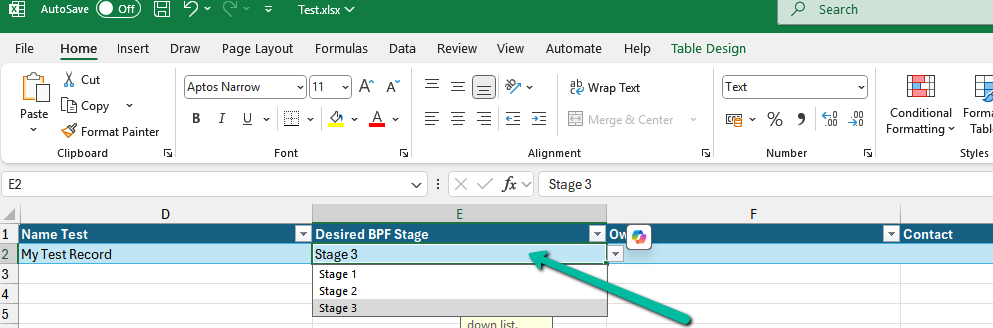
Below we can see the user specifying the Stage 3 value for the Desired BPF Stage column in the Excel to be imported.
Recently while trying to import the product records in our Dynamics 365 Sales, we got the below error – “The Default Unit is not a member of the specified Unit Group”
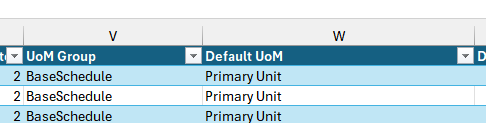
We were providing the correct UoM Group and Default UoM in our Excel file to be imported.
After some troubleshooting, we realized that we had 2 units with the same name “Primary Unit”, because of which the system was not able to identify the correct unit to be used during the import.
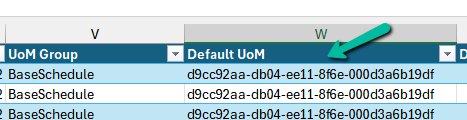
To fix this issue, we replaced the Name with the Guid of the record in our excel file.
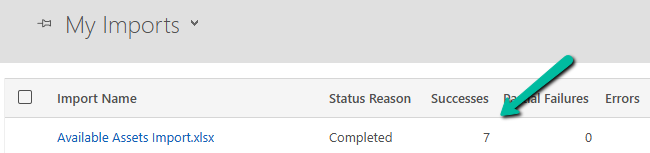
This fixed the issue for us and we were able to import the product records successfully.