How to Identify and Update Power Automate HTTP Request Trigger Flows Before November 2025


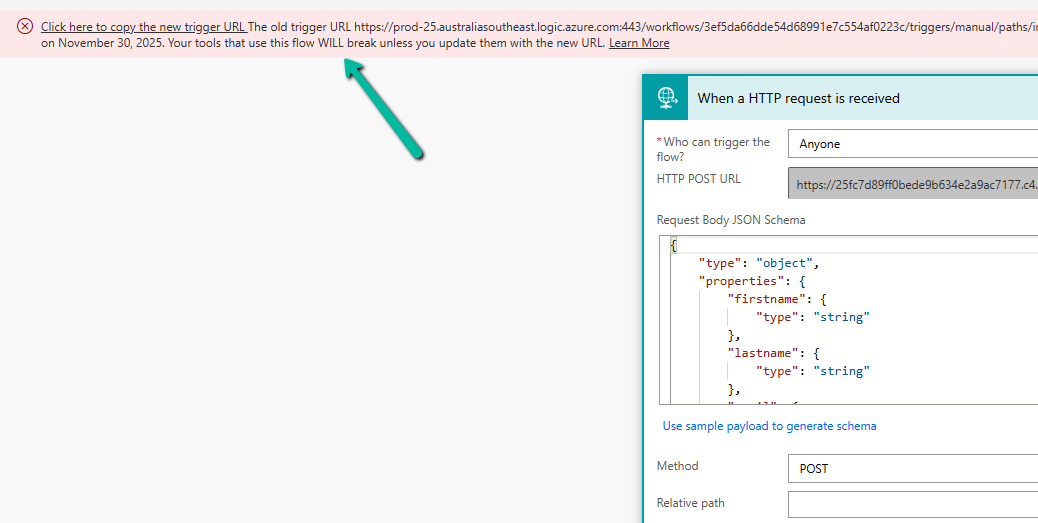
Few weeks back, while working on one of our Power Automate flows, we noticed a banner warning on the HTTP Request trigger step. Microsoft has announced that starting August 2025, all flows using HTTP or Teams Webhook triggers with logic.azure.com URLs will move to a new endpoint under environment.api.powerplatform.com. The old URLs will stop working after November 30, 2025.

The screenshot below shows the banner that appears when the flow is opened in the designer.

A screenshot of a computer

AI-generated content may be incorrect.

When we saw this, we wanted to make sure no other flow across environments was using the old logic.azure.com–based URLs. Instead of checking each flow manually, we used SQL4CDS to quickly identify all such flows.

We ran the following query in SQL4CDS:

SELECT wf.name, wf.workflowid, wf.owneridname, wf.modifiedon
FROM workflow wf
WHERE wf.category = 5
AND LOWER(wf.clientdata) LIKE '%"type":"request","kind":"http"%'
A screenshot of a computer

AI-generated content may be incorrect.

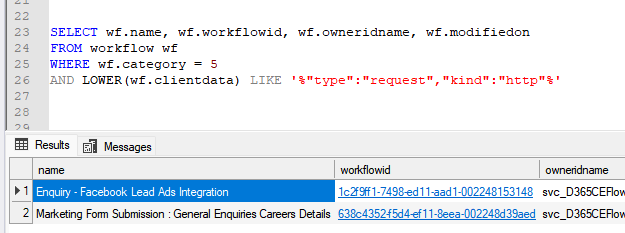
This query returns all flows that have an HTTP Request trigger. It checks the clientdata column in the workflow table where the flow definition is stored as JSON and looks for the trigger type “Request” and kind “Http”.

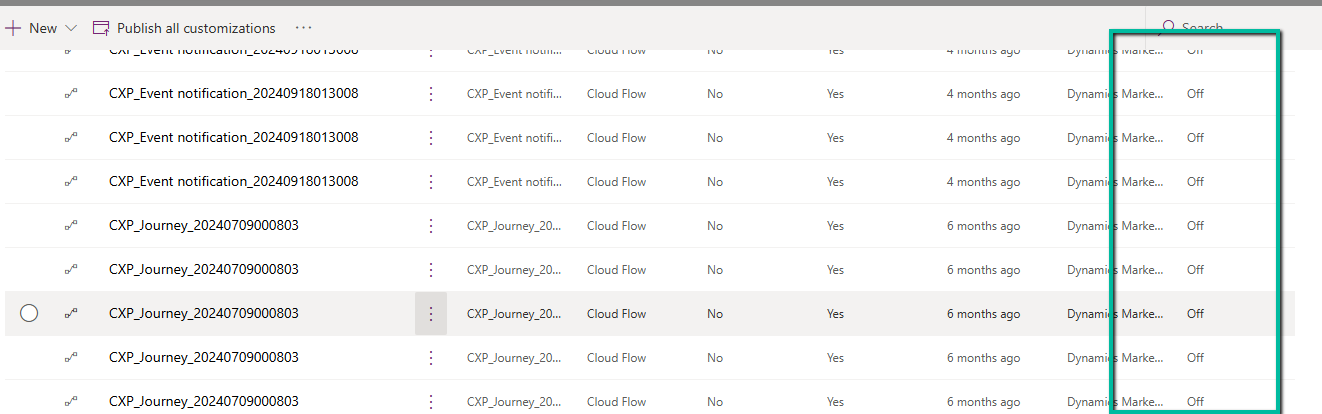
This helped us identify every flow that exposes an HTTP endpoint — typically used for integrations, webhooks, or form submissions from external systems. Once we had this list, we opened each flow and copied the new trigger URL from the message banner.

The same can be achieved using PowerShell with the command: This lists all flows in a given environment that are part of Microsoft’s trigger URL migration.

Get-AdminFlowWithMigratingTriggerUrl -EnvironmentName

A screen shot of a computer

AI-generated content may be incorrect.

After copying the new URL, we updated our calling applications (for example, the website forms and marketing integrations) to replace the old endpoint with the new one. The new URLs are hosted under the Power Platform domain environment.api.powerplatform.com, replacing the older logic.azure.com endpoints.

To confirm that the requests were now reaching the new infrastructure, we captured the request headers after updating the URL.

This header (x-ms-igw-external-uri) is the easiest and most reliable way to confirm that your flow is now routed through the new Power Platform ingress gateway.

A screenshot of a computer

AI-generated content may be incorrect.

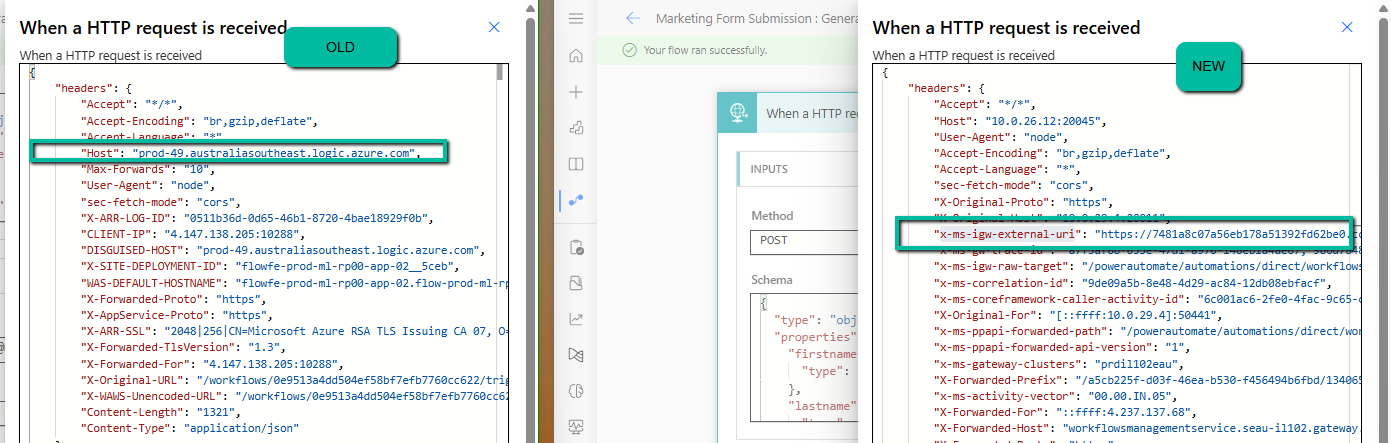
If this header is present and points to environment.api.powerplatform.com, the flow has been successfully migrated. If you still see logic.azure.com under the Host or DISGUISED-HOST headers, that flow or calling application still needs to be updated.

In our case, after replacing the URLs and testing, all flows were confirmed to be running on the new platform, and the integrations worked as expected.

So if we see this warning in your environment, you can either use the SQL4CDS query or the PowerShell command to locate such flows, update the calling systems with the new URL, and then verify by checking for the x-ms-igw-external-uri header in the request. That’s all you need to ensure your integrations continue to work smoothly past November 2025.

Hope it helps..

Advertisements

Cloud Flows are disabled or turned off after copying a Dataverse Environment ? (Power Automate / Power Platform)


Recently we copied our UAT environment to one of the testing environments. After copying, we saw that all the cloud flows were in Off / Disabled state.

A screenshot of a computer

Description automatically generated

This was because during copy the environment is set in administration mode and background operations are also disabled.

Flows are automatically turned off to prevent –

  • Accidental execution of automation in a copied/test environment
  • Potential integration issues due to different connectors or authentication.
  • Unintended data modifications (e.g., flows interacting with external systems like SharePoint, SQL, or APIs).

If required, we can disable the administration mode or at least enable the background operations.

A screenshot of a computer

Description automatically generated

However, the flows will not automatically switch On even if we enable either the Administration Mode or Background operations.

Here we need to switch them On manually or use PowerShell scripts or API to do so.

Refer to blog posts for details on it –

PowerShell https://www.syskit.com/blog/managing-microsoft-powerapps-and-flow-like-a-pro-part-3-managing-flows/

Console App / APIhttps://nishantrana.me/2024/06/12/enable-disable-turn-on-turn-off-multiple-cloud-flows-using-code-power-automate/

Additional Considerations –

Connection References: If the flows use connection references (like SharePoint, Dataverse, Outlook, etc.), we need to verify them in Solution > Connection References and update them if necessary.

Environment Variables: If the flows depend on environment variables (e.g., API URLs, credentials), we need to update them the new environment.

Reassign Flow Owners: If the original owner of a flow is missing from the copied environment, we need to assign a new owner.

Lastly, if flows are not behaving correctly, check the callback registration records

https://nishantrana.me/2024/06/11/fixed-flow-not-getting-triggered-callback-registration-power-automate-dataverse/

Get more details around copying the environment.

Hope it helps..

Advertisements

How to configure Site.Selected API permissions – SharePoint Online / PnP PowerShell


Let us add/ update the API Permissions for the App

More on registering App – https://nishantrana.me/2024/07/30/calling-sharepoint-online-api-using-azure-ad-app-only-permissions-using-certificate-auth/

Here we have selected the Sites.Selected permission.

A screenshot of a computer

Description automatically generated

Also granted the Admin consent.

A screenshot of a computer

Description automatically generated
A screenshot of a computer

Description automatically generated

Now if we run our code we will get the 403 Forbidden error.

This is because we have selected the Sites.Selected permission, but have not specified the site and the permission.

For that, we can use either Graph API or PnP PowerShell.

Let us use PnP PowerShell here.

Grant-PnPAzureADAppSitePermission -AppId “{app-id}” -DisplayName “{app-name}” -Site “https://{tenant}.sharepoint.com/sites/{site-name}” -Permissions “Write”

Grant-PnPAzureADAppSitePermission -AppId “d7eaeeb7-ef0a-474d-9b94-567013576c14” -DisplayName “SharePointApp” -Site “https://w72tk.sharepoint.com/sites/MyTeamSite” -Permissions “Write”

A computer screen with text and arrows

Description automatically generated

This time as expected we do not get the Forbidden error.

The other Permissions that we can specify are – Read, Manage, FullControl.

Get all the details here –https://pnp.github.io/powershell/cmdlets/Grant-PnPAzureADAppSitePermission.html

Hope it helps..

Advertisements

Fixed – The term ‘Connect-PnPOnline’ is not recognized as the name of a cmdlet, function, script file, or operable program – PowerShell


If you are getting the below error even after running the Install-Module PnP.PowerShell command, it could be because of the older version of PowerShell.

The minimum PowerShell version required for PnP.PowerShell is PowerShell 7.2.

Check the current version using the command – $PSVersionTable

A computer screen shot of a program

Description automatically generated

Below are different ways to get the latest version of PowerShell

https://learn.microsoft.com/en-gb/powershell/scripting/install/installing-powershell-on-windows?view=powershell-7.4

Here we have used the Winget (Windows Package Manager) tool to install it.

winget search Microsoft.PowerShell

winget install –id Microsoft.Powershell –source winget

A screenshot of a computer

Description automatically generated

We can see the PowerShell 7 installed.

Now we can install the PnP.PowerShell module and connect to our site successfully.

A computer screen with text

Description automatically generated

https://evolvous.com/learn-from-expert/how-to-install-pnp-powershell-and-connect-with-sharepoint-online/

1–2 minutes

Hope it helps..

Advertisements

How to – Connect to Exchange Online to get mailbox details (PowerShell)


Recently we were trying to figure out a few details about the user’s mailbox.

To get the details –

Open Windows PowerShell with the “Run as Administrator” option.

  • Install the Exchange Online Module – Install-Module -Name ExchangeOnlineManagement
  • Import the Exchange Online Module cmdlets – Import-Module ExchangeOnlineManagement
  • Connect to Exchange Online using the administrator account – Connect-ExchangeOnline

  • To get a summary of the all mailboxes in the organization – Get-Mailbox -ResultSize unlimited

  • To get specific mailbox details – Get-Mailbox -Identity “user1@2022rw1.onmicrosoft.com”

  • To get the complete detail of a mailbox – Get-Mailbox -Identity user1@2022RW1.onmicrosoft.com | Format-List

Get all the details here – https://learn.microsoft.com/en-us/powershell/module/exchange/get-mailbox?view=exchange-ps

Hope it helps..

Advertisements