Create Azure Machine Learning Web Service using Azure Machine Learning Studio


Azure’s Machine Learning Studio makes it easy to create machine leaning based solution.

To try it free, go to Machine Learning Studio’s home page and sign in with the existing Microsoft Account. (or we can make use of existing Azure Account and add Machine Learning to it)

Azure Machine Learning Studio is an IDE for Machine Learning, that allows us to design, develop, test, deploy the solution easily using drag and drop functionality.

Let us understand the interface of Machine Learning Studio

The project is a collection of Experiments, Web Services, Notebooks, DataSets and Trained Models grouped together. Experiments are where we get, process, transform, train, evaluate our data. WebServices are created from our experiment, which makes the predictive model usable from within the other application. Datasets refer to the data that we use for our experiment.

Let us start with our experiment.

Select Experiments and click on New button in the bottom. Let us start with a blank experiment.

It loads a blank experiment with greyed out workflow diagram.

The typical steps within an experiment include

  • Getting the Data
  • Applying the Algorithm
  • Split and Train the model
  • Score the model
  • Evaluate the model

The first step involves specifying the DataSet, here we will be working with the sample dataset i.e. Restaurant Ratings already provided. Select and drag the Restaurant rating dataset in the experiment designer.

We can right click and can either download or visualize the data.

The dataset contains user id, place id, and rating column.

It basically shows different restaurant visited by the user and the rating given by them.

Suppose our dataset includes a large number of columns or duplicate rows and we might not need all of them for our experiment we can make use of “Select columns in Dataset” module or to remove duplicate rows “Remove Duplicate Rows” module etc. by specifying them as the next step in our flow. Or can use any of the modules that is part of Manipulation section based on our requirement and the dataset that we are dealing with.

Here as we have only three columns and no duplicate rows we won’t be using them.

Next let us apply the appropriate algorithm, based on User ID and Place we want the rating to be predicted, so let us select the Multiclass Decision Jungle algorithm here and drag it to the experiment area.

Now let us take a subset of our dataset for training the model, for which we’d use the Split Data module.

Here we have specified our dataset as input to the Split Data module and specified fraction of rows as 0.5 which means that 50 percent of the data will be used for training and the remaining 50 percent will be our test data.

Click on Run to generate the output till the Split Data module. After the successful run, we’d see the green check on the module.

Now to train the model, drag the Train Model module. Specify the algorithm and the split data as the input to that module and click on Launch column selector.

Select the Rating column which is the column we would like to predict.

Click on Run again.

Next, we’d add the Score Model module and Evaluate Model module to see the how the algorithm is performing.

Add the connection line from Train Model and Split Model (second part) as input to the Score Model.

For Evaluate Model specify the connection line from Score Model as input and click on Run.

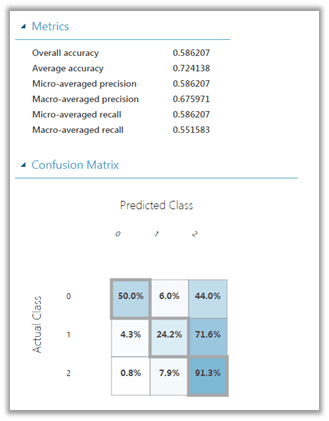
After the successful run, right-click the Evaluate Model and select Visualize to see the result.

Evaluation Results à
This completes our Prediction model.

Now we will create and deploy the web service for our prediction which will allow it to be used within the application.

Select Predictive Web Service for Set Up web service button.

This adds the Web Service Input and Output module to our experiment. Run the experiment again and click on Deploy Web Service to deploy the service to Azure.

The successful deployment will open up the Web Service group and will list down the details of the web service deployed. We can click on “Test Preview” to test our model.

Click on Enable for the sample data inside the Test page, which will generate the sample data to be used as input for the web service.

After generation of Sample Data, click on Test Request-Response button to see the output.

The Scored Labels displays the Predictive Rating based on the data that we have passed in.

Now to use this web service in our application, back in our Web Service dashboard, click on Request/Response to open the documentation page generated for our experiment.

Also note that we have API Key there, which would be required to be passed along with the request.

In the Request-Response API Documentation page, we can see all the details like Request URL, Request Headers, Request Body, Response and also the sample code for calling the web service

Similarly, we can click on Batch Execution link inside the web service Dashboard to access the documentation for Batch API Execution.

This we saw how easy it is to generate a machine learning solution using Azure Machine Learning Studio.

Hope it helps..

D365: JavaScript and Business Rule on the same field


JavaScript executes first and then the Business Rules ….

Ajit Patra's avatarAjit Patra

Recently, on change of value of a field, we had business rule earlier and then we decided to perform the same using JavaScript to avoid hard coding of value in Business rule. The logic was to set value of 2 other fields on the form based on the value selected.

The logic was working fine on DEV as we had deactivated the business rule. However, after deploying to TEST and UAT, it stopped working.

We verified that the JavaScript event handler was enabled for the OnChange event of that field.

bb

While debugging the code as well using browser console, we checked that the break point was hitting the code block where we were setting the value of 2 other fields.

aa

After struggling for few minutes, it came to our mind that Business rule was also written which should have been deactivated.

cc

The business rule was basically clearing the values of…

View original post 82 more words

Solved – Alternate Key not getting created on solution import in Dynamics 365


Recently, we moved our Solution from Development to Test. Then on running one of the SSIS Packages we got the below error

The specified key attributes are not a defined key for the entity [4] CRM service call returned an error:

On opening the Entity for customization, and checking for the key, we saw that it was in the Status Pending.

On opening the system job, there was no detail for the error.

We normally get this error, if there are records already available that have duplicate values for that alternate key field. However, in this case, there we no record as this entity was being moved first time in the Test.

Well to just fix this we thought of manually reactivating the key

However, that threw a new error that “Reactivate entity key is only supported for failed job.”

To fix this go to Settings à System Jobs à search for the failed system job and delete them

Now we will see the status as Failed

This time it will allow running the reactivation.

Finally,

Hope it helps..

Advertisements

Creating Power BI Report using Power Query (M) Builder plugin of XrmToolBox


Power Query(M) Builder XrmToolBox Plugin developed by Ulrik Carlsson and Mohamed Rasheed makes it very easy to develop Power BI Reports targeting Dynamics 365 CE.

Just listing down the basic steps below for quick reference à

Install the Power Query (M) Builder plugin from XrmToolBox

Click on Load Entities and select the Entity against which we want to write the report. Here we will be writing a report against Case entity (for e.g. Cases by Origin), so let us select the Case entity. For selecting the fields either we can make use of view or search and add the corresponding fields in Selected Fields Section.

Here we have selected the following 3 fields

Click on Update FetchXML button.

This opens the FetchXML tab, where we can select the fields (note we have formatted value field added for Origin OptionSet field) and also select to add record URL or to use all the attributes of the entity.

Here we have selected all the fields and also checked the option “Add Record URL”.

Click on Generate FetchXML, to generate the query.

The generated main query

Now back in Power BI Desktop, open the query editor and create a new blank query with following name and value

Dyn365CEBaseURL https://[org].crm.dynamics.com i.e. URL of the CRM Organization.

We can use the Generate Service URLs button to get this URL from within the plugin.

Similarly create a new blank query as

Get the value from the ServiceRoolURL tab from within the plugin.

Create one more Blank Query and click on Advanced Editor and copy the main query generated earlier and paste it.

Click on Done.

We can see the result generated for us in the Query Editor window

Click on Close and Apply

Back in report editor select the fields or any other visualizations to create the report

To format the URL, select the Link field and go to Modelling tab and in Data Category select Web URL to enable the links.

Thus, we are done with our report. Next steps would be to publish them, add them in dashboard, Embed them within Dynamics CE, Refresh them etc..

Hope it helps..
Using KingswaySoft’s CDS/CRM Source component to get Audit information in Dynamics 365 CE (SSIS)


Kingsway’s CDS/CRM Source component and has Source Type property having an AuditLogs value that can be used to get the Audit details from Dynamics 365 CE.

Below we have set the Source Type as AuditLogs in the CDS/CRM Source Component Editor and provided the FetchXML for the entity for which we would like to retrieve the audit information.

To get all the audit records, we can run it against Audit entity.

For AuditLogs source type there are 3 types of output:

  1. Audit Details (Attribute Changes) – Contains field level changes.

  1. Audit Details (Relationship Changes) – Contains relationship changes.

  1. Primary Output – Contains entity level audit information.

Hope it helps..

D365 V9{Upgrade}: Client API Change for openEntityForm


Ajit Patra's avatarAjit Patra

Prior to D365 V9, we were using Xrm.Utility.openEntityForm() to open an existing record or to open a create form of an entity providing some additional parameters. However, in D365 V9 as it has been deprecated, we need to use Xrm.Navigation.openForm() to perform the same operation.

Here’s an example of the change in API along with it’s parameters.
D365 V8:


D365 V9:

While creating a new record, we can pass values to the attributes using an object which is optional. Please see below sample:

Hope it helps!!

View original post