Fixed – Error – “Microsoft SQL: A network-related or instance-specific error occurred while establishing a connection to SQL Server” – while trying to use Dataverse connector in Power BI


While trying to use Dataverse connector inside Power BI Desktop

we got the below error

Details: “Microsoft SQL: A network-related or instance-specific error occurred while establishing a connection to SQL Server. The server was not found or was not accessible. Verify that the instance name is correct and that SQL Server is configured to allow remote connections. (provider: Named Pipes Provider, error: 40 – Could not open a connection to SQL Server)”

Later we realized we were not entering the environment details in the correct format as expected

i.e.

[orgname].[crm].dynamics.com

We were entering it incorrectly  below with the https

Entering URL in correct format fixed the issue for us.

In case if TDS endpoint it not enabled –

we will get the below error

i.e. Microsoft SQL: TDS Protocol endpoint is disabled for this organization.

Check more posts on Power BI

https://nishantrana.me/category/power-bi/

Hope it helps..

Advertisements

Agent scripts in Omnichannel and Customer Service Workspace – Dynamics 365


Agent scripts are available within the Productivity pane in the Customer Service workspace and Omnichannel for the Customer Service app.

Agent scripts contains series of steps that will guide the agents while working, helping them to be more efficient.

More on Customer Service Workspace – https://nishantrana.me/2020/08/13/new-customer-service-workspace-app-preview-in-dynamics-365-2020-release-wave-2/

Omnichannel for Customer Servicehttps://nishantrana.me/category/omnichannel/

Smart Assisthttps://nishantrana.me/2020/08/17/ai-suggestions-for-similar-knowledge-articles-and-cases-in-dynamics-365-2020-release-2020-wave-2/

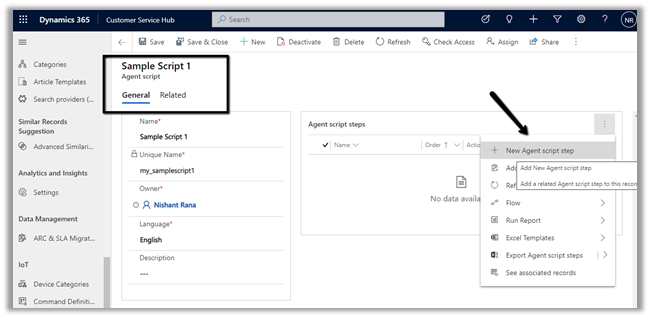
To define Agent Scripts – navigate to Customer Service Hub > Service Management > Agent Scripts or Omnichannel Administration > Agent Experience > Agent Scripts


Create a new Agent script record, and specify steps for the same by creating new agent script step record.


We can define 3 different types of Action – Text, Macro, and Script.


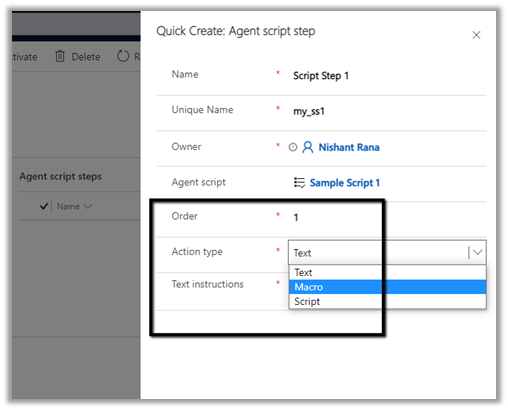
For simplicity, we have selected Text here.


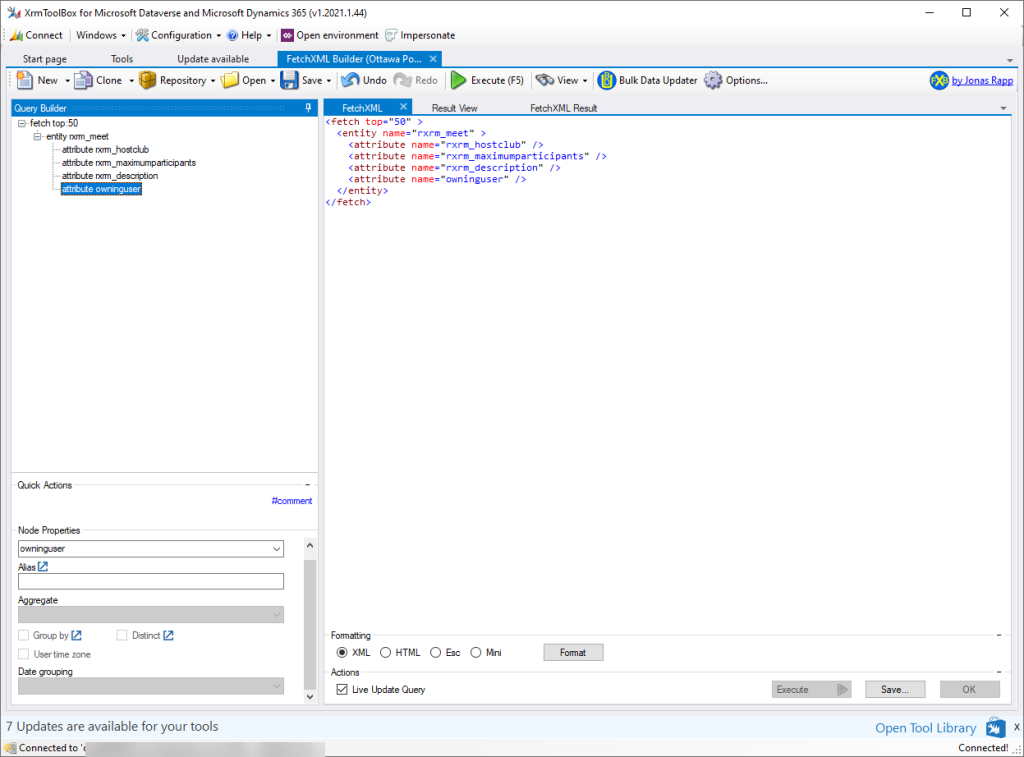
We have defined 2 script steps for the agent script as shown below.


Next, we need to associate the Agent Script with the Session template.

Inside the Omnichannel Administration > Agent Experience > Sessions, select the template we want the script to be associated.

Here let us select the Case entity session – default template

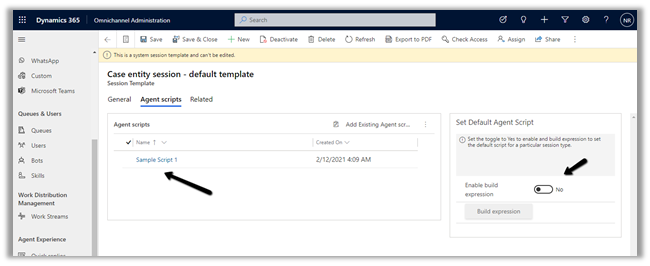
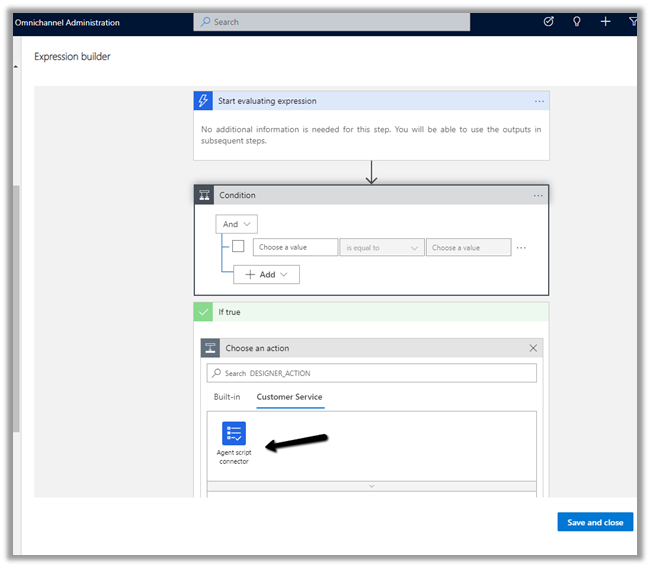
We can also define the conditions for the default agent script to be applied using the Enable Build expression option.

https://docs.microsoft.com/en-us/dynamics365/app-profile-manager/agent-scripts#set-the-default-agent-script-for-agents

For now to make the example simple, we leave it as No (default).

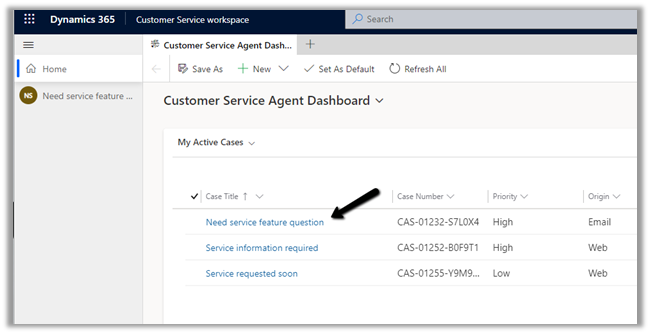
Back in Customer Service Workspace or Omnichannel for Customer Service App– Shift + click the case record to open the new session in the Active Cases grid.

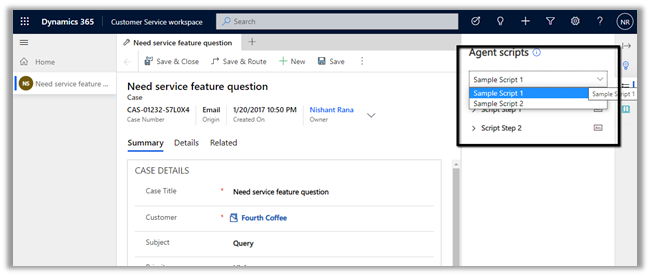
We can see the script populated there for the agent on the case record opened.

If we have multiple scripts associated with the Session template – the agent has the option to select the appropriate script.

Hope it helps..

Advertisements

Do you use FetchXML Builder? Please consider helping a friend out.


Nick Doelman's avatarThe ReadyXRM Blog by Nick Doelman

I use the FetchXML Builder on my Power Platform almost on a daily basis. It saves me so much in building SSRS reports, it allows me to build powerful Power Apps portals web templates and it also helps me building Power Automate flow queries.

What is FetchXML Builder? It is a tool that is part of the XrmToolBox that allows you to quickly point and click choose tables from Dataverse (aka entities from Common Data Service/Dynamics CRM), choose the columns, filtering, sorting, etc and it will generate equivalent FetchXML, OData, JSON formats, etc.

The tool has saved me personally 100s of hours… and world wide I am sure it has saved customers, partners, consultants, developers *millions* of hours… considering standard billable rates, the cost savings are enough to fund research into life saving treatments many times over or to feed thousands of children in developing nations.

Why do I mention…

View original post 218 more words

Activity Logging – Dynamics 365 Apps


Microsoft 365 Security and Compliance Center – provides easy access to the data and the tools to manage the compliance need of an organization, and also can be used to review the different data processing activities within Dynamics 365 Customer Engagement apps.

It required Microsoft 365 E3 or E5 subscription and is only available for Production environments.

The events logged are –

  • CRUD, Export to Excel, SDK Calls.
  • CRUM and backend activities performed by the support engineer.
  • Report – viewed, exported, multimedia assets shown in the Report

For this first Auditing needs to be enabled in the environment.

Navigate to Settings > Administration > System Settings > Auditing Tab

Navigate to Compliance Center

https://protection.office.com/

Search > Audit Search Log and
Turn on auditing.


To try the new experience within the Compliance center

https://compliance.microsoft.com/auditlogsearch?viewid=Search


After around 1 hour or so, the settings got enabled.


As specified Office 365 logs are being prepared, if we try searching we’d get blank results


Below are the list of Dynamics 365 and Power Apps activities that can be tracked


Around after 3 hours or so – we saw the results appearing.

Export has 2 options –

Save loaded results –

Download all results –

At the same time there we 51 records in Audit Summary View.

Apart from searching for an audit log, we can also define an audit retention policy as shown below

Get the sample files here –

https://drive.google.com/file/d/1akifraP1NCV-KgmA-8ROhm8r4h0tAcLi/view?usp=sharing

https://drive.google.com/file/d/1s_EbJ4hraDl6YEVUCMkOe6bQbXCJu_5-/view?usp=sharing

Get all the details here

https://docs.microsoft.com/en-gb/microsoft-365/compliance/search-the-audit-log-in-security-and-compliance?view=o365-worldwide

Hope it helps..

Advertisements

Azure Cheat Sheet


Check access to a record in Dynamics 365


Using the Check Box button in the command bar, the user can now check the privileges he has on the record.

It also provides the details on how he has that particular privileges on the record, either through Security Roles assigned directly or through the team user is part of or through the Hierarchy security.

To see it in action, open a record and select Check Access

E.g. the below user has Read, Write, Create, Delete, Append, Append To, Assign, Share rights on the contact record, assigned directly as he has the system administrator role.

The admin user can also use the User lookup to check the access of the other users.

Here the test user 1 has rights to the record through the security roles assigned to him directly and also through the team he is part of.

Get all the details here –

https://docs.microsoft.com/en-gb/powerapps/user/access-checker

Blog posts on 2021 Release Wave 1 – Dynamics 365

Hope it helps..