CRM Shortcut in CRM 2011 Dialogs


Hi I was just wondering how we can use CRM Shortcut radio button option that appears in Insert Hyperlink dialog box of Dialogs in CRM 2011.

After searching for it, I found the following post which says that we should ignore that button as it won’t be there in the final release.

http://social.microsoft.com/Forums/en/crm2011beta/thread/d012ae9e-4bc5-4bdb-ae6f-c58da16882dc

Hope it helps !

Sample code to add a custom group to lead form in CRM 2011


For adding a custom group to a lead form we can make use of the following sample code.

Just replace the lead with your entity’s schema name to use it

<RibbonDiffXml>

<CustomActions>

<CustomAction
Id=“Sample.lead.form.CustomGroup.MaxSize.CustomAction“
Location=“Mscrm.Form.lead.MainTab.Scaling._children“
Sequence=“120“>

<CommandUIDefinition>

<MaxSize
Id=“Sample.lead.form.CustomGroup.MaxSize“
GroupId=“MyLeadCustomGroup“
Sequence=“21“
Size=“LargeLarge“/>

</CommandUIDefinition>

</CustomAction>

<CustomAction
Id=“MyLeadCustomAction“
Location=“Mscrm.Form.lead.MainTab.Groups._children“
Sequence=“110“>

<CommandUIDefinition>

<Group
Id=“MyLeadCustomGroup“
Title=“My Lead Custom Group“
Sequence=“39“
Template=“Mscrm.Templates.Flexible2“>

<Controls
Id=“MyCustomControls“>

<Button
Id=“MyCustomButton1“
Sequence=“10“
LabelText=“My Custom Button1“
ToolTipTitle=“My Custom Button1“
ToolTipDescription=“My Custom Button1“
TemplateAlias=“o1“/>

</Controls>

</Group>

</CommandUIDefinition>

</CustomAction>

</CustomActions>

<Templates>

<RibbonTemplates
Id=“Mscrm.Templates“/>

</Templates>

<CommandDefinitions>

</CommandDefinitions>

<RuleDefinitions>

<TabDisplayRules/>

<DisplayRules/>

<EnableRules/>

</RuleDefinitions>

<LocLabels/>

</RibbonDiffXml>


Hope it helps!


Showing Custom Button on Update in CRM 2011


Now let us built on our existing example of adding custom button and adding JavaScript to it.

https://nishantrana.wordpress.com/2010/11/04/adding-my-first-custom-button-in-crm-2011/

https://nishantrana.wordpress.com/2010/11/04/using-javascript-in-a-custom-button-in-crm-2011/

Get the solution file here

http://www.box.net/shared/m9q9otkqfg

Now we want our button to appear only in case of Update form, while creating a new record it shouldn’t appear.

For this we need to first define a DisplayRule in RuleDefinitions.

<RuleDefinitions>

<TabDisplayRules/>

<DisplayRules>


<DisplayRule
Id=“MyRule“>

<FormStateRule
State=“Create“
InvertResult=“true“ />

</DisplayRule>

</DisplayRules>

<EnableRules/>

</RuleDefinitions>

This rule we will refer in our CommandDefinition for our button.

<CommandDefinitions>

<CommandDefinition
Id=“Cmd_JavaScript“>

<EnableRules>

<EnableRule
Id=“Mscrm.Enabled“/>

</EnableRules>


<DisplayRules>

<DisplayRule
Id=“MyRule“></DisplayRule>

</DisplayRules>

<Actions>

<JavaScriptFunction
Library=“$webresource:new_MyJavaScript“
FunctionName=“HelloWorld“>

</JavaScriptFunction>

</Actions>

</CommandDefinition>

</CommandDefinitions>

Now after importing and publishing it

The final RibbonDiffXml looks like this

<RibbonDiffXml>

<CustomActions>

<CustomAction
Id=“CA_MyFirstButton“
Location=“Mscrm.Form.account.MainTab.Save.Controls._children“
Sequence=“31“>

<CommandUIDefinition>

<Button
Id=“B_MyFirstButton“
Command=“Cmd_JavaScript“
LabelText=“My First Button“
ToolTipTitle=“My First Button Tool Tip Title“
ToolTipDescription=“My First Button Tool Tip Description“
TemplateAlias=“o1“
Image16by16=“/_imgs/ribbon/saveandclose16.png“
Image32by32=“/_imgs/ribbon/saveandclose32.png“/>

</CommandUIDefinition>

</CustomAction>

</CustomActions>

<Templates>

<RibbonTemplates
Id=“Mscrm.Templates“/>

</Templates>

<CommandDefinitions>

<CommandDefinition
Id=“Cmd_JavaScript“>

<EnableRules>

<EnableRule
Id=“Mscrm.Enabled“/>

</EnableRules>

<DisplayRules>

<DisplayRule
Id=“MyRule“>

</DisplayRule>

</DisplayRules>

<Actions>

<JavaScriptFunction
Library=“$webresource:new_MyJavaScript“
FunctionName=“HelloWorld“>

</JavaScriptFunction>

</Actions>

</CommandDefinition>

</CommandDefinitions>

<RuleDefinitions>

<TabDisplayRules/>

<DisplayRules>

<DisplayRule
Id=“MyRule“>

<FormStateRule
State=“Create”


InvertResult=“true“ />

</DisplayRule>

</DisplayRules>

<EnableRules/>

</RuleDefinitions>

<LocLabels/>

</RibbonDiffXml>

Hope it helps !

Using JavaScript in a custom button in CRM 2011


Now let us built on our existing example of adding custom button.

https://nishantrana.wordpress.com/2010/11/04/adding-my-first-custom-button-in-crm-2011/

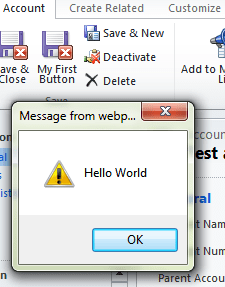
Now on click of the button I want to show alert message “Hello World” i.e. call JavaScript.

This is our existing Button Definition

<Button
Id=“B_MyFirstButton“
LabelText=“My First Button“
ToolTipTitle=“My First Button Tool Tip Title“
ToolTipDescription=“My First Button Tool Tip Description“
TemplateAlias=“o1“
Image16by16=“/_imgs/ribbon/saveandclose16.png“
Image32by32=“/_imgs/ribbon/saveandclose32.png“/>

(Add a new Jscript web resource to the solution named MyJavaScript)

function HelloWorld() {

alert(‘Hello World’);

}

Now add a Command attribute to Button

    <Button Id=”B_MyFirstButton“


Command=”Cmd_JavaScript“


                            LabelText=”My First Button“ ToolTipTitle=”My First Button Tool Tip Title“ ToolTipDescription=”My First Button Tool Tip Description“ TemplateAlias=”o1“ Image16by16=”/_imgs/ribbon/saveandclose16.png“ Image32by32=”/_imgs/ribbon/saveandclose32.png“/>

Now we need to define this Command.

This is how we can define it

<CommandDefinitions>

<CommandDefinition
Id=“Cmd_JavaScript“>

<EnableRules/>

<DisplayRules/>

<Actions>


<JavaScriptFunction
Library=“$webresource:new_MyJavaScript“
FunctionName=“HelloWorld“>

</JavaScriptFunction>

</Actions>

</CommandDefinition>

</CommandDefinitions>

However if we zip and import this solution, the button would appear disabled.

To enable it we need to add EnableRule to it.

<CommandDefinitions>

<CommandDefinition
Id=“Cmd_JavaScript“>


<EnableRules>

<EnableRule
Id=“Mscrm.Enabled“/>

</EnableRules>

<DisplayRules/>

<Actions>

<JavaScriptFunction
Library=“$webresource:new_MyJavaScript“
FunctionName=“HelloWorld“>

</JavaScriptFunction>

</Actions>

</CommandDefinition>

</CommandDefinitions>

Now after importing and publishing it

The final RibbonDiffXml looks like this

<RibbonDiffXml>
<CustomActions>
<CustomAction
Id="CA_MyFirstButton"
Location="Mscrm.Form.account.MainTab.Save.Controls._children"
Sequence="31">
<CommandUIDefinition>
<Button
Id="B_MyFirstButton"
Command="Cmd_JavaScript"
LabelText="My First Button"
ToolTipTitle="My First Button Tool Tip Title"
ToolTipDescription="My First Button Tool Tip Description"
TemplateAlias="o1"
Image16by16="/_imgs/ribbon/saveandclose16.png"
Image32by32="/_imgs/ribbon/saveandclose32.png"/>
</CommandUIDefinition>
</CustomAction>
</CustomActions><Templates>
<RibbonTemplates
Id="Mscrm.Templates"/>
</Templates>
<CommandDefinitions>
<CommandDefinition
Id="Cmd_JavaScript">
<EnableRules>
<EnableRule
Id="Mscrm.Enabled"/>
</EnableRules>
<DisplayRules/>
<Actions>
<JavaScriptFunction
Library="$webresource:new_MyJavaScript"
FunctionName="HelloWorld">
</JavaScriptFunction>
</Actions>
</CommandDefinition>
</CommandDefinitions>
<RuleDefinitions>
<TabDisplayRules/>
<DisplayRules/>
<EnableRules/>
</RuleDefinitions>
<LocLabels/>
</RibbonDiffXml>

Hope it helps!

Adding my first custom button in CRM 2011


Suppose we want to add a button next to “Save & Close” button in Account Entity’s form.

To do that we need to define a CustomAction child element to CustomActions element within RibbonDiffXml.

Export the solution containing the account entity.

Attributes for CustomAction are

ID– Give it any unique id.

Location– For defining location we first need to find out the id for Save group within the MainTab of the form and then append _children to it.

_children needs to be defined to add a custom button to an existing group.

Open the accountribbon.xml file within

.. sdk\samplecode\cs\client\ribbon\exportribbonxml\exportedribbonxml\

There we can find the following info.


<Groups Id=”Mscrm.Form.account.MainTab.Groups“>


<Group Id=”
Mscrm.Form.account.MainTab.Save“ Command=”Mscrm.Enabled“ Sequence=”10“ Title=”$Resources:Ribbon.Form.MainTab.Save“ Image32by32Popup=”/_imgs/ribbon/save32.png“ Template=”Mscrm.Templates.Flexible2“>


<Controls Id=”
Mscrm.Form.account.MainTab.Save.Controls“>


<Button Id=”Mscrm.Form.account.SaveAsComplete“ ToolTipTitle=”$Resources:Ribbon.Form.MainTab.Save.SaveAsComplete“ ToolTipDescription=”$Resources(EntityDisplayName):Ribbon.Tooltip.SaveAsComplete“ Command=”Mscrm.SavePrimaryActivityAsComplete“ Sequence=”10“ LabelText=”$Resources:Ribbon.Form.MainTab.Save.SaveAsComplete“ Alt=”$Resources:Ribbon.Form.MainTab.Save.SaveAsComplete“ Image16by16=”/_imgs/ribbon/SaveAsCompleted_16.png“ Image32by32=”/_imgs/ribbon/SaveAsCompleted_32.png“ TemplateAlias=”o1“
/>

Sequence : For sequence first find out the sequence defined for Save & Close button.

<Button Id=”Mscrm.Form.account.SaveAndClose“ ToolTipTitle=”$Resources:Mscrm_Form_Other_MainTab_Save_SaveAndClose_ToolTipTitle“ ToolTipDescription=”$Resources(EntityDisplayName):Ribbon.Tooltip.SaveAndClose“ Command=”Mscrm.SaveAndClosePrimary“
Sequence=”30″
LabelText=”$Resources:Ribbon.Form.MainTab.Save.SaveAndClose“ Alt=”$Resources:Ribbon.Form.MainTab.Save.SaveAndClose“ Image16by16=”/_imgs/ribbon/saveandclose16.png“ Image32by32=”/_imgs/ribbon/saveandclose32.png“ TemplateAlias=”o1“
/>

So now our CustomAction should look like this

<CustomAction Id=”CA_MyFirstButton“ Location=”Mscrm.Form.account.MainTab.Save.Controls._children“ Sequence=”31“>

Now we next need to define CommandUIDefinition and Button child element to our CustomAction

<CommandUIDefinition>

<Button
Id=“B_MyFirstButton”


LabelText=“My First Button”


ToolTipTitle=“My First Button Tool Tip Title”


ToolTipDescription=“My First Button Tool Tip Description”


TemplateAlias=“o1”


Image16by16=“/_imgs/ribbon/saveandclose16.png”


Image32by32=“/_imgs/ribbon/saveandclose32.png”

/>

</CommandUIDefinition>

Here we are using the existing icon of Save and Close button.

Save the file, zip it as a part of the solution and import and publish it.

Final definition should look something like this. 

<RibbonDiffXml>
<CustomActions>
<CustomAction
 Id="CA_MyFirstButton"
 Location="Mscrm.Form.account.MainTab.Save.Controls._children"
 Sequence="31">
<CommandUIDefinition>
<Button
 Id="B_MyFirstButton"
 LabelText="My First Button"
 ToolTipTitle="My First Button Tool Tip Title"
 ToolTipDescription="My First Button Tool Tip Description"
 TemplateAlias="o1"
 Image16by16="/_imgs/ribbon/saveandclose16.png"
 Image32by32="/_imgs/ribbon/saveandclose32.png"/>
</CommandUIDefinition>
</CustomAction>
</CustomActions>
<Templates>
<RibbonTemplates
 Id="Mscrm.Templates"/>
</Templates>
<CommandDefinitions/>
<RuleDefinitions>
<TabDisplayRules/>
<DisplayRules/>
<EnableRules/>
</RuleDefinitions>
<LocLabels/>
</RibbonDiffXml>

Hope it helps !

New Types in CRM 2011


CRM 4.0 Type CRM 2011 Type
   
CrmBoolean Boolean
DynamicEntity[] EntityCollection
CrmDateTime DateTime
CrmDecimal Decimal
CrmFloat Double
CrmNumber Integer
Lookup, Owner, Customer EntityReference
CrmMoney Money
Activityparty[] ActivityParty[]
Key, UniqueIdentifier Guid
String String
Status ,Picklist OptionSetValue