How to – Deal with OptionSet inside Power BI in Dynamics 365 CE


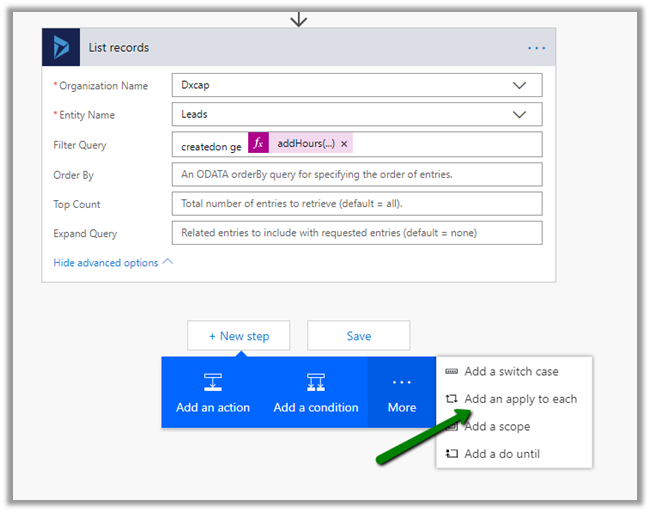
Updated 8-Sep-2018 –> Please check the Power Query Builder tool of XrmToolBox. Thanks Scott Sewell for informing about this wonderful tool.

Suppose, we have created a Power BI Report which makes use of OptionSet field.

It is on incident entity and we have selected priority code and state code option set fields. The problem is that we only get the value for them, so to get the label either we can manually specify it or use the plugin Power BI Option Set Assistant. We’d see both the methods.

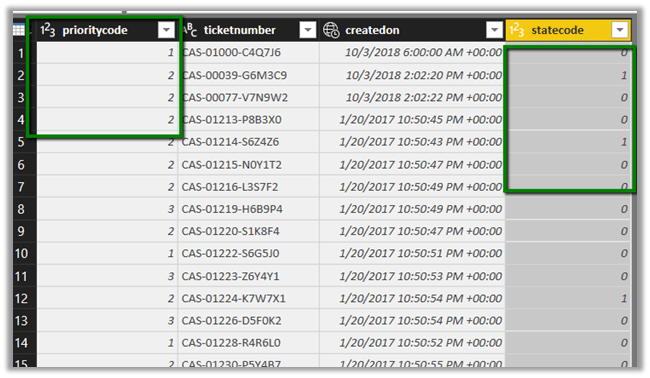
Let us take state code field first and specify label for them manually.

In the Query Editor, select New Query and specify following value and save it.

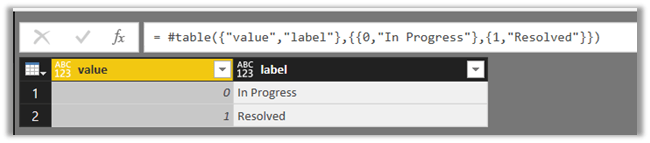
= #table({“value”,”label”},{{0,”In Progress”},{1,”Resolved”}})

Select the main query and click on Merge Queries

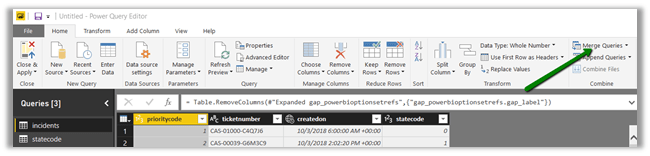
Select statecode and value to map them, specify left outer join for Join Kind as shown below

Select the new column added to the query and check the label.

We now have the label specified added as a new column to our query.

Here, for small set of values we can specify the label manually, however if there are too many values this might not be feasible and also if there are changes in OptionSet inside Dynamics 365 CE, we’d have to do it manually here, which makes it difficult to maintain.

So, let us use the wonderful PowerBI OptionSet Assistant plugin from our favorite XRMToolBox

Install the plugin

Click on Load Entities and select Case Entity.

Select Priority field and click on “Create records for selected option sets

Basically, it will create a new entity named gap_powerbioptionsetrefs entity, which will hold the records corresponding to each of the values of the optionset field selected.

Back in Power BI create a new query and select the gap_powerbioptionsetfrefs entity and save the query.

Now follow the same steps, select the main incidents query and perform merge queries operation as shown below

Expand the column to select the label field

Our final query à

Hope it helps..

How to – Upgrade from Dynamics CRM 2016 On-Premise to Dynamics 365


First – check if you are eligible for the Fast Track program

https://nishantrana.me/2020/05/15/dynamics-crm-on-premise-to-online-migration-program-microsoft-fasttrack/

Be aware of Version Compatibility –

https://docs.microsoft.com/en-us/previous-versions/dynamicscrm-2016/developers-guide/gg328109%28v%3dcrm.8%29#version-compatibility

https://docs.microsoft.com/en-us/dynamics365/customerengagement/on-premises/developer/introduction-solutions

Upgrade the existing CRM 2016 On-Premise Server to CRM 2016 (8.1) for its solution to be compatible with Dynamics 365 Online using cumulative updates.

https://support.microsoft.com/en-gb/help/3142345/microsoft-dynamics-365-onpremise-cumulative-updates

If upgrading from previous version i.e. prior to CRM 2016, use “Migrate by using a new instance of Microsoft SQL Server” approach

https://technet.microsoft.com/en-us/library/hh699669.aspx

https://technet.microsoft.com/en-us/library/hh699747.aspx

Once updated to compatible CRM 2016 On Premise (8.1), go to settings à customizations and export the existing solutions or create a new solution, add all the required solution components to it as unmanaged which will be imported to the new Dynamics 365 online environment.

Create a new Dynamics 365 Online Environment and synchronize it with your existing Active Directory

https://blogs.msdn.microsoft.com/crm/2013/07/18/how-to-synchronize-crm-online-with-your-active-directory/

With solution ready and imported to new Dynamics 365 Online, next step is migration of data.

Consider using a data migration tool like KingswaySoft.

Check out their Migration Starter Pack.

https://www.kingswaysoft.com/blog/2016/09/16/Announcing-Migration-Starter-Pack-for-CRM-Online-and-CRM-On-Premise

or Scribe

https://www.scribesoft.com/solutions/dynamics-365/

Use following tools to update the JavaScript to Version 9.0 of XrmToolBox.

https://www.xrmtoolbox.com/plugins/XrmToolBox.Dynamics365V9JavascriptValidator/

  • Script Finder (to update the form and fields for passing the executionContext)

https://www.xrmtoolbox.com/plugins/MsCrmTools.ScriptsFinder/

https://community.dynamics.com/crm/b/develop1/archive/2017/11/11/executioncontext-hits-the-big-time

Update JavaScript to use Web API.

https://github.com/jlattimer/CRMRESTBuilder

SQL Based report, if possible, needs to be converted to use Fetch XML. Use the following tool to speed up the process.

http://www.sql2fetchxml.com/

If the reports are too complex, plan to use Power BI reports.

https://technet.microsoft.com/en-us/library/dn708055.aspx

Plugin and Custom workflow needs to be updated to run in an isolated environment i.e. sandbox along with references to the latest SDK assemblies.

https://docs.microsoft.com/en-us/dynamics365/customer-engagement/developer/plugin-isolation-trusts-statistics#web-access

https://www.nuget.org/packages/Microsoft.CrmSdk.CoreAssemblies/

If the existing On-Premise is integrated to other applications, make sure they can still talk with new Dynamics 365 Online.

Recurring jobs if needed, can be deployed to Azure as Azure WebJobs.

https://docs.microsoft.com/en-us/azure/app-service/websites-dotnet-deploy-webjobs

Use Hybrid Connection to talk with On-Prem resources.

https://docs.microsoft.com/en-us/azure/app-service/app-service-hybrid-connections

These were some of the points I could quickly think of. Please share your thoughts and experiences in comments. I’d update this list.

Do check out :

Microsoft Dynamics CRM (on-premises) to Microsoft Dynamics
Online Migration Guide

https://download.microsoft.com/download/6/D/6/6D67BDEA-1D67-42B4-A52A-CF13CD547CB5/OPtoCRMOnlineMigration.pdf

Hope it helps..

Advertisements

My notes on Dynamics 365 Data Export Service


Recently we configured Data Export Service in our Production environment. The idea was to export the data to Azure SQL DB that can be used for Power BI report.

https://nishantrana.me/2017/03/19/configuring-data-export-service-in-microsoft-dynamics-365/

Pros:

  • Easy to configure.
  • Takes care of incremental changes.
  • Easy to check the status

Cons:

Issues with the Failed records.

For e.g.

We have around 200K records failed for one entity as shown below.

There is preview feature added for retrying the sync for the failed records.

Clicking on Resync Failed Records didn’t help much here as we didn’t see any change in the count of failed records.

And now we are getting the below message for it.

It has been more than 24 HOURS when we had started the Failed Records Synchronization.

This feature being still in preview, we can expect few things not working.

So how do we deal with failed records, how do we figure out the reason for them failing so that we could correct it and retry our export ?

For this we can use the Failed Records feature of Data Export Service to get the logs of the failed records

It will give us a Blob URL, which is valid for 24 hours, to which we can connect through Azure Storage Explorer and check the logs.

Copy the Blob URL

Download the Azure Storage Explorer

https://azure.microsoft.com/en-us/features/storage-explorer/

Open Azure Storage Explorer, select the Account section and click on Add an Account.

Select “Use a shared access signature URI” option and click on Next.

Paste the copied Blob URL

Click Next to get the connection summary and click Connect.

After connecting we should be able to see the log

However in our scenario, the blog container was always blank. Ideally it should have the following information

One more limitation that we need to be aware of is that Activity type entities are not supported.

https://technet.microsoft.com/en-us/library/mt744592.aspx#Anchor_17

And also if we delete one of the entities from the export profile and plan to add it later to the same profile or to a new profile, we need to delete its table and corresponding user defined type from the Azure SQL DB else we will get the exception.

https://technet.microsoft.com/en-us/library/mt744592.aspx#Anchor_14

Considering how easy it is to configure and takes care of the incremental data, this feature is well worth considering, however it is the failed records things that could prove a challenge, if we don’t have the logs for them or we are not able to fix them as we do not have much control over the things when compared to writing a custom code or using some tool like KingswaySoft Adapter.

Hope this helps..

Earned “Top 10 in September 2018 Blog Leaderboard” badge in Dynamics 365 Community


I have my blog syndicated to Dynamics 365 Community.

We can request our existing blog to be syndicated to Microsoft Dynamics Community which I would strongly recommend all the Dynamics 365 bloggers out there.

Click the below link to get all the details à

https://community.dynamics.com/w/help/136.request-a-new-blog-or-blog-to-syndicate

With blog syndicated, your blog post would also be published to Dynamics community as well and active participation in the community, either through blog post or through answering in forums etc. is rewarded through badges by Microsoft, which I believe is nice way of encouraging and recognizing the community contributors.

Check all the badges here à

https://community.dynamics.com/badges

In fact, there is a badge if you ask your first question in the forum

For last month September 2018, I got the Top 10 in September 2018 Blog Leaderboard badge

We can also check our rank in the leaderboard

https://community.dynamics.com/leaderboards/243

We can also check the leaderboard for the lifetime

https://community.dynamics.com/leaderboards/2

Our Dynamics Community is one of the best out there and so would also request and recommend all the Dynamics 365 Professionals to actively participate and contribute in the community, ask question regarding the issues you are facing, answer few of them or at least read all the answered questions to see what issues one can face during the implementation and the solution to it.

Keep learning..

Error validating profile registration while configuring Microsoft Dynamics 365 Data Export Service


While configuring the Data Export Service we got the below error while validating the profile

It mostly occurs if there is some issue with the connection string specified in the PowerShell Script used for generating the key vault.

Always copy the connection string from the Azure SQL Connection Strings property and double check the username and password provided there. And make sure the user specified has all the required rights.

https://technet.microsoft.com/en-us/library/mt744592.aspx#Anchor_1

Correcting the connection string resulted in successful validation of the export profile.

Hope it helps..

How to – Use Recurrence trigger in Microsoft Flow


Schedule – Recurrence trigger inside Microsoft Flow makes it extremely easy and effective to write a recurring job specially in the context of Dynamics 365, wherein it isn’t straight forward. We can use Workflows with wait and timeout conditions but that isn’t the easiest and efficient way. Each approach has its own pros and cons though.

The scenario we are going to implement is getting basic details of all the leads record created every hour inside Dynamics 365 CE and create a Task in todoist to call that lead.

Login to Microsoft Flow

Navigate to My flows and select Create from blank

Search for recurrence trigger and select it.

Specify interval as 1 and frequency as hour and click on New step and select “Add an action

To get the records from Dynamics 365 CE, we need to use “Dynamics 365 – List records” action. Search for the same and add it.

For List records action, select the organization in the Organization Name, Leads for the Entity Name and for filter query specify “createdon ge addHours(utcNow(), -1)“: i.e. lead records created in last one hour as shown below

Add a new step “Add an apply to each”

Select value (list of items) for “Select an output from previous steps” field of Apply to each and click on Add an action.

Search for todoist and select Create a task action. Login or create a new account in Todoist.

Specify Inbox as the Project Id and for the title use the dynamic value of lead i.e. Last Name, First Name and Mobile Phone.

Save the Flow and click on Test to see it in action.

The run activity will show the status of test run along with any error during the flow execution. In our case it has ran successfully.

Inside Todoist we can see the task created.

Hope it helps..

Advertisements