How to – Use Word Template to combine multiple images attached to notes in a single document in Dynamics 365


Recently in one of our projects, we had proposed Dynamics 365 for Phone / Tablet as the device for our sales user. The user will be capturing the image of the customer’s document and will be attaching it in notes, which will then later be moved to the document management system.

Here, one of the requirements was to merge / combine all the images that are attached to the notes for a particular record into a single document.

Here we can make use of Word Template to achieve the same.

Open the entity’s (e.g. lead) record for which we want to create the word template.

  • Click on Download Template to design the word template.

  • Select Note as the related entity.

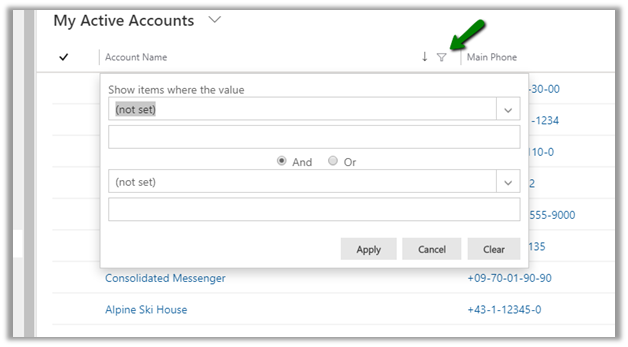
  • In the word document, go to Developer Tab and click on XML Mapping Pane ribbon button.

  • Insert a table and select its row.

  • Select the appropriate XML part from the drop down and navigate to Lead_Annotation child node in the XML Mapping section.

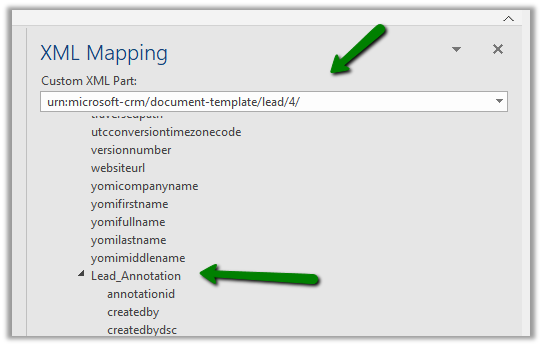
  • And map it to the row selected as shown below.

  • This is how the table would appear

  • Next add the documentbody à Insert Content Control à Picture to one of its columns to display the images.

  • This is how it would appear
  • We can also add additional fields of notes if needed.

  • Save the template.
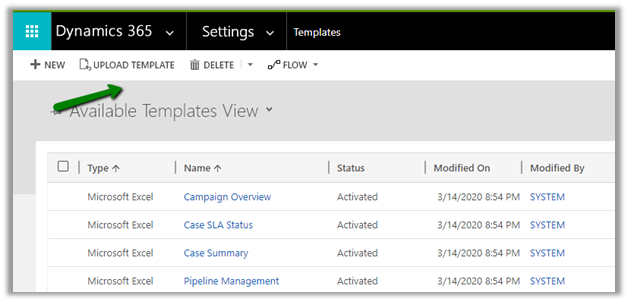
  • Go to Settings à Template and upload the template.

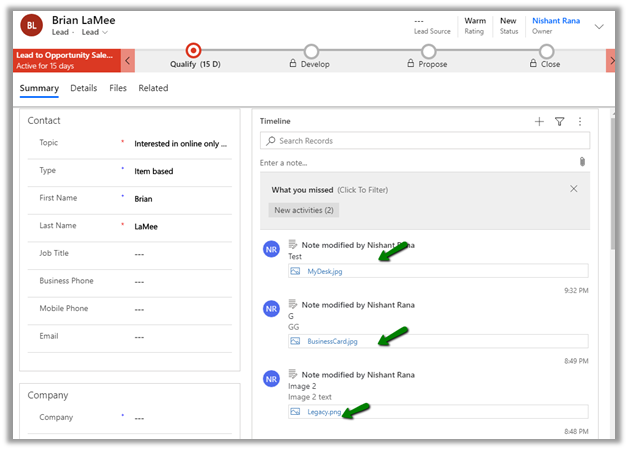
  • To test it, let us go open the lead record which has 3 different notes with image attached as shown below.

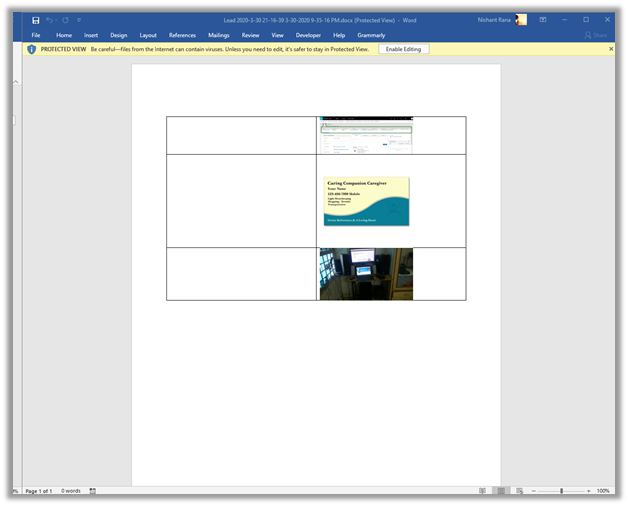
  • Now let us generate the document based on the template uploaded.

  • The document will show all the images attached to the notes.

  • We can increase the size of the picture and remove the border from the table to make it appear better.

From Mobile –

This slideshow requires JavaScript.

Get more detail on attachments here à

https://nishantrana.me/2020/03/30/attachments-to-notes-in-dynamics-365-for-phone-and-tablet-app/

Generate PDFà

https://nishantrana.me/2020/02/13/save-and-email-pdf-options-added-to-dynamics-365-sales-2020-release-wave-1-plan/

Hope it helps..

Advertisements

Attachments to Notes in Dynamics 365 for phone and tablet app


Check the other articles of this series

In one of our recent projects we were analysing the Dynamics 365 for phone and tablet app, for one of the requirements where the user will be uploading the documents through phone or tablet app as an attachment to notes.

Below were some of our findings à

  • For mobile app à

We are limited to attaching images on both iOS and Android. (Windows Phone are no longer supported)

  • For the tablet app à

For iOS and Android, it is the same case where we are limited to attaching images.

iPad à

Samsung Tab S4 à

For windows tablet, here Surface Go for e.g., user can still access files in the local storage.

Earlier users had the same experience for the Android tablets.

https://crmtipoftheday.com/259/upload-files-from-dropbox-or-google-drive-to-crm/

Also, iPad allowed attaching files from the web storage like iCloud, OneDrive etc.

https://crmtipoftheday.com/925/tip-925-mobile-attachments-revisited/

which has changed with in the newer version.

Hope it helps..

Scratching your head over why your custom ribbon buttons are not visible or not working as expected–The wonderful Command checker tool from Microsoft might just save your day.


Command checker – another awesome tool in Dynamics 365.

Debajit's avatarDebajit's Dynamic CRM Blog

If you have ever worked in Dynamics 365 implementation then it is almost certain that you must have played around with ribbons. And more often than not you must have faced scenario where you have multiple enable and display rules on the form and not sure why the ribbon button is showing up on the form when it is supposed not to show up or vice versa.

And what we do to resolve it. Well, we play around with the ribbon customizations which takes much more time than other customizations in Dynamics 365. And if it is some custom rule, we would attach debuggers to our custom code and debug and find what is going wrong.

What if I tell you that Microsoft just released something which shall help you identify which of your ribbon rule is evaluating to what in a matter of few mins so that you can…

View original post 441 more words

How to – add an existing project to GitHub through command line


Sharing for quick reference !

  • Create a new repository in GitHub and copy its URL.

https://github.com/new

  • Go to the project folder and run git init command to initialize the local directory as Git repository. Download Git for Windows

git init

  • Add the files to this new local repository

git add .


  • Commit the files to the local repository


    git commit -m “my first commit”

  • Specify the URL of the remote repository and set the new remote

git remote add origin URL

git remote -v

  • Push the changes to GitHub

git push origin master

Get all the details here

https://git-scm.com/videos

https://git-scm.com/book/en/v2

Hope it helps..

PCF Control for Email Validation using Email Validator API


The control uses the Email Validator API that checks for fake DNS and regex functions to check email for length and accepted characters.

To use the API, Login to RapidAPI and get the API Key.

Use this key for the API property required by the PCF Control to call the API.

The control will check pass on the email address and based on the response received i.e. isValid true or false, will display the appropriate message just below the field.

The Email Validator API needs to be updated as at times it will show valid domains as invalid. So will not suggest to use this in the production environment.

This control is more of an example of how we can call the APIs, get the response and show the result.

Get the source code here

https://github.com/nishantranacrm/PCFEmailValidatorControl

Hope it helps..

Filtering Enhancements to Views in Dynamics 365 – 2020 Release Wave 1


Below are some of the enhancements added to the filtering experience for the views in 2020 Release Wave 1.

Previously to sort the records we had to click on either the sort icon or the header to sort the records.

With the 2020 Release Wave 1 clicking on the header or sort or filter symbol with open the below screen with the option of both sort and filter. Also if we see, the options to sort and filter have moved closer to the header text of the column instead of right-aligned in the previous version.

And for filtering also we had to specifically click on the filter icon earlier.

For the text field below filter options will be displayed earlier

For Wave 1 Release 2020, we need to select Filter By

And below are the filter options available for the text fields.

The most helpful here would be the addition of Contains data and Does not contain data filter.

For the Datetime field prior to Wave 1 Release 2020, we had the below very limited filter options available.

Now in Wave 1 Release 2020, we have the following filter options specific to DateTime field added

along with updated Calendar View for selecting the date

Earlier à

Now à

For Optionset fields

Earlier à

Now à

Instead of having all the options selected now it comes as unselected and to apply the filter we need to select the specific value and then click on Apply.

And select Clear Filter to clear the filtering

For Lookups à

Earlier

Now à

  • For Numeric Field we now have the contains
    data and does not contain data filter options added.

These enhancements specific to filtering will definitely add to more productivity for the users.

Check other blog posts on

Release 2020 Wave 1: https://nishantrana.me/2020-release-wave-1/

Release 2019 Wave 2: https://nishantrana.me/2019/12/31/dynamics-365-2019-release-wave-2-blog-posts/

Hope it helps..