Enhanced email for timeline in Dynamics 365 – 2020 release wave 2


With 2020 release wave 1, we had seen a couple of enhancements in Email experience

https://nishantrana.me/2020/02/24/enhanced-email-experience-for-agents-in-dynamics-365-customer-service-2020-release-wave-1/

now this has been extended to Email within the Timeline section

Enable early access to 2020 release wave 2

Check other posts on Release 2020 Wave 2

Navigate to App Settings in Sales Hub, and click Manage for Enhanced email for timeline

Enable it and save.

Let us now navigate to one of the contact records and try creating a new email from its Timeline control

There we can now compose email in a pop-up and non-blocking window within the context of the record.

We can now work on a maximum of 3 active draft emails at a time.

The same rich edit experience which includes Drag and Drop / Copy and paste of the images is available.

In short, all the email enhancements that were added as part of Release 2020 Wave 1 is now available from within the Timeline control for email, making it a consistent experience for the users.

Hope it helps..

Enable early access 2020 release wave 2 – Dynamics 365


Check other posts on Release 2020 Wave 2

Finally, now we have the opportunity to opt-in for early access to release wave 2, to validate the new features in a non-production environment.

The features will be generally available on October 1, 2020.

Get all the details on the key dates and FAQ here

https://docs.microsoft.com/en-gb/dynamics365/get-started/release-schedule#key-dates-for-the-2020-release-wave-2

To opt-in

  • Log in to the Admin Portal

https://docs.microsoft.com/en-gb/dynamics365/get-started/release-schedule#key-dates-for-the-2020-release-wave-2

  • Select and open the environment to upgrade

  • Click on Manage in the Updates section and click Update Now

  • The upgrade process will start

  • Retry in case if any of the application updates fails using the Retry button, for us Dynamics 365 Core service had failed.
  • After a successful upgrade, the upgraded instance will show the 2020 release wave 2 enabled.

Hope it helps..

Show and hide the Dynamics 365 – custom app


To show and hide the Dynamics 365 – custom app from users other than having a system administrator role, we can use the below option

Navigate to Settings – Apps

and specify either Hide / Show for all roles.


For the end-users, it will hide the app

App not listed for the user.

Users can still access the app through URL.

The same settings can be applied from the General tab of System Settings

For Dynamics 365 On-Premise, we have a similar option in the General tab of System Settings

Hope it helps..

Notes on Claims-based Identify for Windows


Hi,

I was recently reading about claims-based identity, noted down few important points

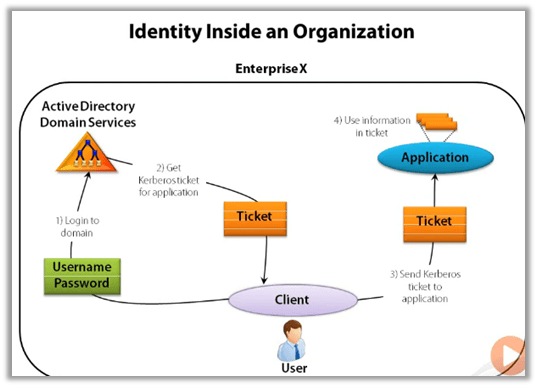
How Identity works inside the organization

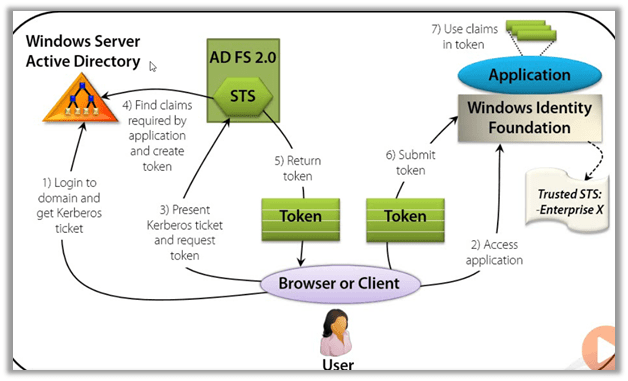
The user enters his username and password to login to the domain. Now to access any application in the domain, the user gets the Kerberos ticket for the application from the AD. The ticket contains basic user information and is digitally signed by AD. The user provides this detail to the application, which checks the signature and makes sure it is issued by AD. Application, as it trusts the AD, uses the information in the ticket to perform the corresponding action.

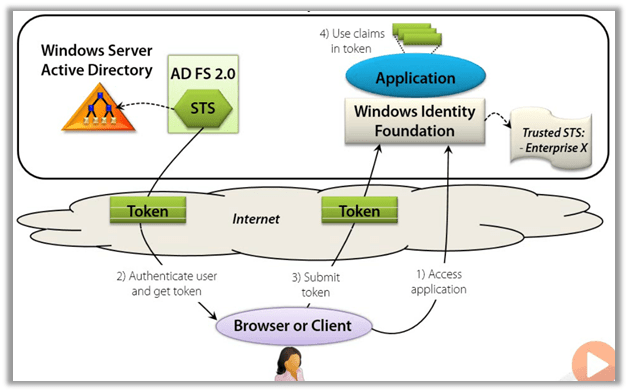
The above authentication works well within an organization boundary, how about if a user wants to access an application from the internet, or belongs to a different domain, to address this we have claims-based authentication, which uses token.

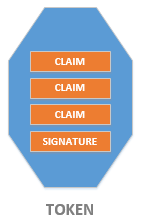
A Token or security token is a set of bytes that expresses information about an entity e.g. a user. Token consists of claims and each claim contain some information about the entity. Token also has a digital signature.

The token is created/issued by STS – secure token service, which is commonly provided by an identity provider.

To get a token, the user will request a token from STS, which will usually ask for the user to provide username and password to authenticate and on successful authentication gets information about the user from the Account / Attribute Store like Active Directory to construct the claims in the token and sends the token back to the user after digitally signing it.

The user submits this token to the application he wants to access. The application uses the identity library to verify the signature of the token and also checks for whether the STS is trusted or not and then can use the claims in the token to define subsequent action that users can perform within the application.

Without claim-based identity, an application either has to authenticates users itself or rely on local 3rd parties to do that and it only gets only simple information directly from the user like the user’s name.

With claims-based identity, application see just see the token, they only need to decide whether they trust this STS, and application gets the exact information it needs, the STS puts it in the token as claims.

A claim can be used to identify the user, convey group membership, grant or deny access to specific methods, put constraints like purchasing limit, etc.

Through claims-based authentication, we can have an application that trusts multiple identity providers e.g. Google, Microsoft, Facebook etc. at the same time.

Microsoft Identity Provider
Identity Provider Federation Provider Identity Library
Cloud Windows Azure Active Directory Windows Azure Active Directory Windows Identity Foundation
On-Premise Windows Server Active Directory with ADFS. Windows Server Active Directory with ADFS Windows Identity Foundation

Windows Server Active Directory Domain Services

  • Provides Identity services for an organization.
  • Relies on Kerberos inside an organization.
  • The application can use LDAP to access the data it contains.

Active Directory Federation Services –

  • Provides an STS for claims-based identity.
  • Supports SAML Security Assertion Mark-up Language and other protocols.

Windows Azure Active Directory –

  • Identity and federation provider STS in the public cloud.
  • Applications can use the Graph API to access the data it contains

Window Identity Foundation is a standard library incorporated in .NET Framework 4.5 and above to work with claims-based authentication. We can build our STS using WIF.

  • Accessing an enterprise application – On-premise (Claims-based Identity)


  • Accessing an enterprise application – Internet (Claims-based Identity)


Check out the white paper / Channel 9 session / Pluralsight by David Chappell course to understand it in-depth

http://www.davidchappell.com/writing/white_papers/Claims-Based_Identity_for_Windows_v2.pdf

https://channel9.msdn.com/Events/TechEd/NorthAmerica/2010/SIA201

https://app.pluralsight.com/library/courses/claims-based-identity-big-picture/table-of-contents

Hope it helps..

Adv Hands On Lab 5: Embedding PowerApps into Power BI


Step by step guide for embedding PowerApps within Power BI.

Key points to consider – https://docs.microsoft.com/en-us/powerapps/maker/canvas-apps/powerapps-custom-visual#limitations-of-the-power-apps-visual

Charles Sterling's avatarSterlings


Power BI Dashboard

In this lab, you will create a Power BI dashboard with an embedded PowerApp. The final product will look like the image below.

Exercise 1: Build Power BI Report

High level tasks

    Task 1: Connect to PowerBI and enable sample data. Build PowerBI report

    Task 2: Import PowerApp visual for use in report

Task 1: Build Report

In this task, you will build the Power BI Report.

  1. Navigate to https://powerbi.microsoft.com and click Sign in.
  2. At the bottom of the left navigation, click Get Data
  3. Select Samples.

  1. Select the Retail Analysis Sample.

  1. Connect.

  1. Your sample dataset will take a moment to load.

  1. Expand My Workspace and click to on the Retail Analysis Sample under the Datasets. If you have completed the prior steps and do not see this sample, refresh your browser.

  1. Go to the Fields pane, expand the Store table, and select the

View original post 924 more words

How to – Use RetrieveTotalRecordCount function to get the total number of records in Dynamics 365


Using RetrieveTotalRecordCount Function we can get the total number of records for an entity (works for more than 50000 records)

For e.g.

https://[orgname].crm.dynamics.com/api/data/v9.1/RetrieveTotalRecordCount(EntityNames=[‘lead’,’contact’,’account’,’incident’])


https://dreamingincrm.com/2019/07/22/getting-entity-record-counts/

https://stackoverflow.com/questions/51543802/counting-all-rows-in-dynamics-crm-online-web-api-odata

https://nishantrana.me/2020/05/27/different-ways-of-getting-record-count-total-in-dynamics-365/

Hope it helps..

Advertisements