Using Diff Detector component for working with incremental data in SSIS (Dynamics 365 CE)


Diff Detector component of KingswaySoft’s SSIS Productivity Pack makes it extremely easy \ efficient to work with incremental data.

Let us take a simple example to understand its usage

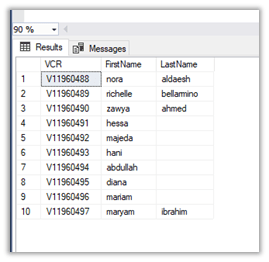
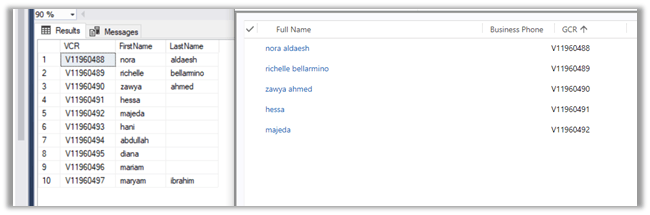
Suppose, we have the following data in our SQL Table (source) that we have already moved to our Dynamics 365 Instance.

Inside CRM à

Now let us delete few records say for e.g. 5 from CRM and now we want only those 5 deleted records to be considered for Create by the SSIS Package from the source.

To begin with, first, download the SSIS Productivity Pack

https://www.kingswaysoft.com/products/ssis-productivity-pack

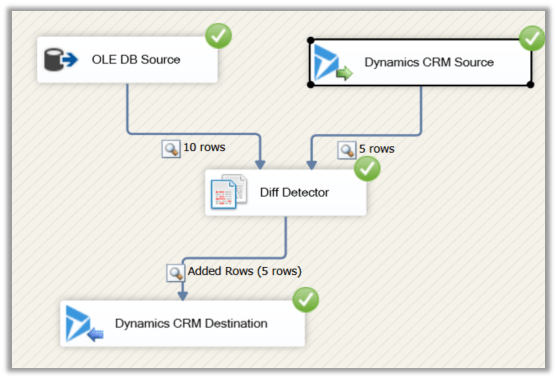
Create the corresponding OLE DB and Dynamics CRM Connection and add the source component for the respective connection, pulling the records from respective sources.

Then drag the Diff Detector component to the Data Flow

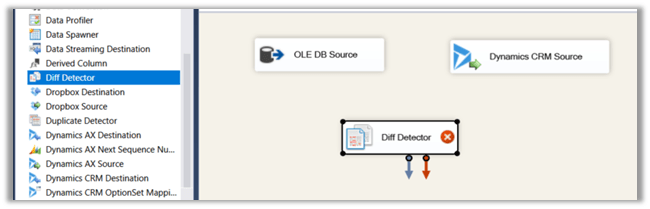
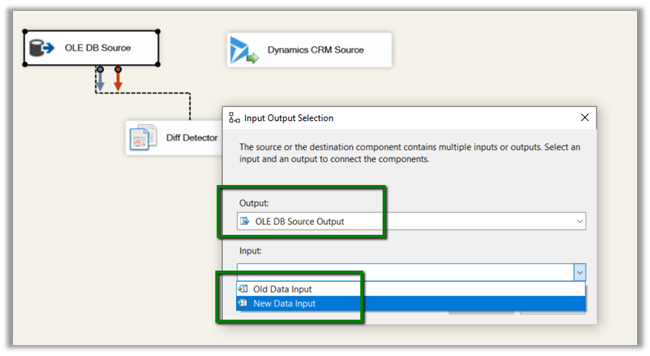
Connect the OLE DB Source to Diff Detector and specify the input as the New Data Input as this is the new data that is being entered, the other option is Old Data. Here the Dynamics CRM Source will be used and set as Old Data that is already existing against which the new data needs to be compared.

Once both the source components are connected to Diff Detector, click on Diff Detector component to edit its properties.

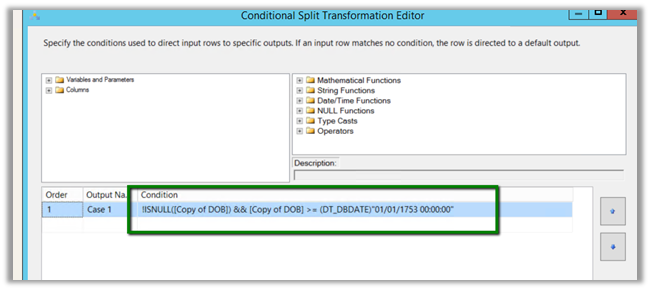
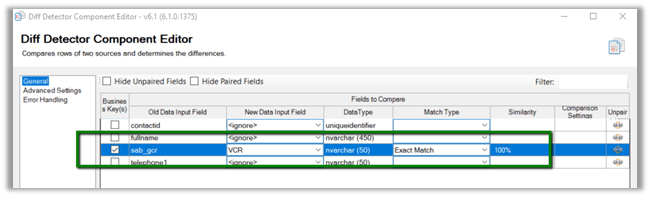
Here we need to define the Key Property, which would be used to compare the data.

Here we have specified one of our alternate keys to be used as Key for comparison with match type Exact Match.

Advanced Settings allows us to define a few more properties

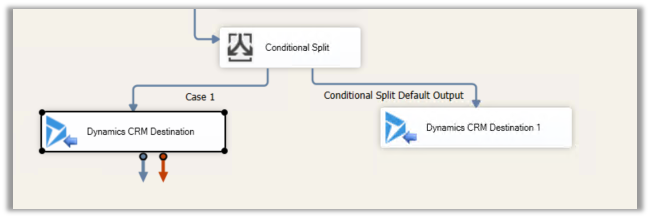
In the end, we have added the CRM Destination Component that will be creating the new records in Dynamics CRM.

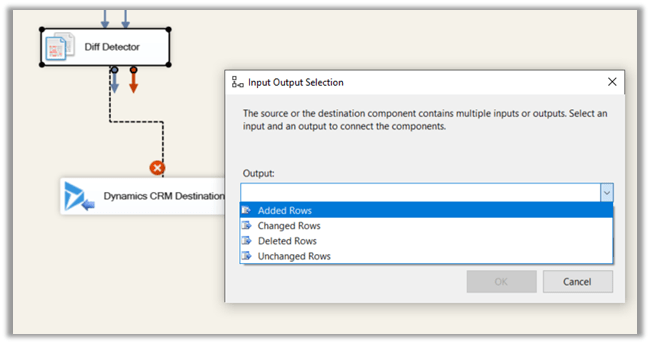
Here we have selected Added Rows i.e. new rows that weren’t found matching with the old existing data inside CRM will be entered or created in CRM. Similarly, we can get the information \ rows that were changed, deleted or are unchanged and use them as per our need.

This is the current state of our source and destination

Now let us run our package which should detect 5 new rows to be inserted and create the corresponding records in Dynamics CRM.

Similarly, if we have deleted few records (say 5) from our source and want them to be deleted in the destination we can add one more destination component that takes as input the deleted rows and deletes them.

Get all the details here

https://www.kingswaysoft.com/products/ssis-productivity-pack/help-manual/data-quality-and-comparison/diff-detector

Hope it helps..

Fixed – CRM service call returned an error: The top attribute can’t be specified with paging attribute page in SSIS Package


We might face this issue while using Dynamics CRM Source Component of SSIS Integration Toolkit

[Dynamics CRM Source] Warning: An exception has occurred while processing the service request, the same request will be attempted again immediately. KingswaySoft.IntegrationToolkit.DynamicsCrm.CrmServiceException: CRM service call returned an error: The top attribute can’t be specified with paging attribute page (Error Code: -2147220989, Detail Message: The top attribute can’t be specified with paging attribute page)

To fix it à

Remove the top attribute from the FetchXML specified and instead use Max Rows Returned property of the Source Component Editor.

https://www.kingswaysoft.com/products/ssis-integration-toolkit-for-microsoft-dynamics-365/help-manual/crm/source

Hope it helps..

Advertisements

Fixed – CRM service call returned an error: Date is less than the minimum value supported by CrmDateTime. Actual value ‘xyz’- Minimum value supported: 01/01/1753 00:00:00 in SSIS (Dynamics 365)


We got the below while trying to UPSERT contact records from a SQL table to Dynamics 365 CE using Kingswaysoft Dynamics 365 Adapter.

The source table had the Date of birth (DOB) as nvarchar type (string) and one of the rows had the following value stored for DOB à

‘0201-01-09 00:00:00’

Which was resulting into exception while creating record inside Dynamics 365 CE with the above date.

The way we fixed it was to make use of

Derived Column
à Converting empty string to null for DOB column. https://nishantrana.me/2018/09/10/cannot-convert-between-unicode-and-non-unicode-string-data-types-error-in-ssis/

Data Conversion
à Converting it to Date data type for comparison.

Conditional Split
à Updating DOB field in CRM for only those records having valid date i.e. greater 01/01/1753 00:00:00 and for records having null or date less than 01/01/1753 00:00:00, removing or not using the DOB field for Upsert.

Derived Column à

Data Conversion à Convert it to Date Type which makes it easy for use in Conditional Split Transformation editor for comparison.

Conditional Split à If the DOB is not null and is greater than 01/01/1753

!ISNULL([Copy of DOB]) && [Copy of DOB] >= (DT_DBDATE)”01/01/1753 00:00:00″

Then update the DOB for the record for Case 1 and in case of the DOB being less than 01/01/1753 and null, do not update the field (don’t map the field for update).

Inside Dynamics CRM Destination component

For Case 1: Map the birthdate field

For default output: Don’t map the field, which will set the field as null as required.

Hope it helps..

Advertisements

Power BI with Dynamics 365 CE – Dynamics 365 Content Pack


In previous posts we covered

Creating a Power BI Report using Dynamics 365 Online Service.

Publishing it and Showing it inside Dynamics 365 and scheduling its Refresh.

Apart from creating our own Power BI Report another way of quickly be up and running is to use the Content Packs provided by Third Party Service, for e.g. here we will be using Sales Analytics for Dynamics 365 content pack provided by Microsoft.

Login to the Power BI service, click on Get Data, select Services.

Select Apps and choose the Sales Analytics for Dynamics 365 from the AppSource.

If we search for Dynamics 365, we can see around 15 Apps provided by Microsoft.

Back into our Sales Analytics for Dynamics 365 App, when we click on Get in now we are presented with the option where we need to Specify the URL of our Dynamics CRM Online Service and Fiscal Year End Month Number for that organization.

In the next screen, we need to select OAuth2 as the authentication method and followed by signing in.

This installs the app which would be available in the Apps section.

Clicking on the installed Sales Analytics App opens the Dashboard

Clicking on Ask a question about your data inside Dashboard allows us to analyze the data by allowing us to choose the criteria

Here we have filtered the accounts by created on by month along with the owner

Also, we can see around 10 different reports created inside that app.

  • Sales Performance
  • Sales Leaderboard
  • Win/Loss Analysis
  • Top Won/Lost Details
  • Sales Pipeline
  • Sales Pipeline Dashboard
  • Sales Activity
  • Open Activities
  • Lead Analysis
  • Account Analysis

Similarly, we can create our own Content Packs to be shared with either specific group or with the entire organization.

Click on settings gear inside Power BI Service and select Create Content Pack

Here we are creating a content pack choosing the Dashboard, Reports and the Dataset that we created earlier in the previous posts.

Once published, the user 2 can click on Get Data and search for and can see the content pack.

Clicking on Connect adds the Dashboard, Report, and the corresponding Dataset to the My Workspace of the user. Only the user who had created the content pack can edit the artifacts that are part of Content Pack, however, the other user of the organization can save a copy of it and can work on it.

More on it

https://docs.microsoft.com/en-us/power-bi/service-organizational-content-pack-manage-update-delete

Hope it helps..

Power BI with Dynamics 365 CE – Refreshing the Dataset


In the previous post, we used Dynamics 365 Dashboard and Power BI Tile to show Power BI Dashboard and report inside Dynamics 365.

https://nishantrana.me/2018/08/20/power-bi-with-dynamics-365-ce-showing-power-bi-dashboard-tile-inside-dynamics-365-ce/

Now as a next step, we want to make sure that the users are looking at the latest data possible inside the Dashboard\Reports.

In case of Online Services like Dynamics 365 (Online), we have the option to manually Refresh the data.

To see it in action, let us create a lead record in Dynamics 365.

This is how our Dashboard looks like for now à

Now back in Power BI Service right, click on ellipsis for the Dataset and select Refresh Now.

We can see the newly created lead in our Power BI Report inside Power BI Service and Dynamics 365 CE.

The other option we have is to Schedule the refresh.

Navigate to the Dataset and select Schedule Refresh

We can select the Refresh Frequency as Daily or Weekly.

And we can set it to refresh up to 8 times per day as shown below.

With Power BI Pro License, we can complete the scheduled refresh 8 times a day whereas the Power BI Premium allows the refresh up to 48 times per day.

https://powerbi.microsoft.com/en-us/power-bi-premium/

Some helpful links

https://docs.microsoft.com/en-us/power-bi/refresh-scheduled-refresh

https://www.powerobjects.com/2018/01/11/power-bi-data-refresh-performance/

https://crmtipoftheday.com/category/power-bi/

Hope it helps..

Power BI with Dynamics 365 CE – Showing Power BI Dashboard / Tile inside Dynamics 365 CE


In the previous post, we created a simple report and published it to the web and used IFrame to display them in Dynamics 365 CE.

https://nishantrana.me/2018/08/20/power-bi-with-dynamics-365-ce-publishing-power-bi-report-to-the-web/

Now let us create a Power BI
Dashboard using that report, which we will then display inside Dynamics 365 CE as a proper native Dynamics 365 CE’s Power BI Dashboard.

Let us take the fastest route to create them, back in Power BI Service, hover over the chart in the report and select the option “Pin Visual

We will be presented with the option of creating a new dashboard or add to an existing one.

Here we have created a dashboard named “My Dynamics 365 Dashboard

Similarly, we can pin or add the other chart in our Report to this Dashboard.

Apart from pinning the chart from the report into the Dashboard we also have the option to configure the Phone View for the Dashboard by clicking on Create phone view.

Phone view lets us specify how the report should look within the mobile device by dragging the reports in the designer surface.

This is how our Dashboard looks now inside Power BI service.

Now suppose we want to share this Dashboard with other users and also want to display this Dashboard inside Dynamics 365 CE, for this, we need to Share them.

However, as soon as we click on Share button we would get the below message.

To share and collaborate we need to have Power BI Pro license.

With Power BI Pro license, we can share it the with other users in the organization having the Power BI Pro License and also use the Reports \ Dashboard within Dynamics 365 CE.

Click on Try Pro for free and Start Trial which assigns the user 60-day free trial

After successfully assigning the license click on Share and select the user to grant access to.

Here we have selected user2 here.

If you remember from the previous posts, the Dashboards and Reports reside inside My Workspace.

Alternatively, we create a workspace and add the members (user 2 in our case) to it with edit access.

Note: We can publish the report that we created earlier from Power BI Desktop to this new app workspace.

While creating the new workspace we can also define the Access to it for the other users.

Here we have already assigned Dynamics 365 CE Enterprise Edition Plan and Power BI free license to User 2.

User 2 can see the report in Shared with me section inside Power BI service.

As we had mentioned earlier, when the user2 tries to open the report he is prompted with the message that Power BI Pro license is required to see the reports shared,

Click on Try Pro for free to start the trial for the User 2.

After successful activation user will be able to see the report inside Power BI Service. Here we are done with Sharing and assigning license part, now let us display it within our Dynamics 365.

Before we can do so we need to enable Power BI Visualization Embedding inside Dynamics 365 CE.

Navigate to Settings à Administration à System Settings and enable Power BI integration.

Open CRM, and select New to create a new Personal Dashboard and select Power BI Dashboard

It will load the all the Workspaces and the corresponding Dashboard inside it to which the user has access to.

Enable for mobile will make the dashboard available on Dynamics 365 for Tablets and Phones.

Select the Dashboard and click Save.

The Dashboard inside Dynamics 365 à

Similarly, User 2 can create a personal Power BI Dashboard inside Dynamics 365 CE and select the dashboard that is shared.

Apart from adding the Dashboard, we can also add the Power BI Tile to the Dashboard.

Create a new Dynamics 365 Dashboard, click on add a Power BI tile option to add the tile as shown below.

The CRM Dashboard showing Power BI tile à

This completes the sharing and displaying the power bi dashboard and reports part inside Dynamics 365 CE, next we will cover how the data can be refreshed so that users are looking at the most up to date data possible.

Hope it helps..