Upgrade to new Xrm client API object model (v9) smoothly using XrmToolBox plugins


We are currently in process of upgrading Dynamics from version 8.2 to 9.0. One of the major change is updating our current JavaScript to the new Xrm Client API Object Model.

https://docs.microsoft.com/en-us/dynamics365/get-started/whats-new/customer-engagement/important-changes-coming#some-client-apis-are-deprecated

https://docs.microsoft.com/en-us/dynamics365/customer-engagement/developer/clientapi/understand-clientapi-object-model

Below are the most useful tools à

Install the plugin, connect to your organization and click on Retrieve Jscript Webresources, it will list all the JScript Web resources found.

Click on Scan

It will list down all the issues found.

One common change that we need to do across all our JScript is to pass the ExecutionContext from Form as well as Fields (and Ribbon) events. Script Finder makes it extremely easy to find them out.

Click on Find Scripts usage and it will generate a report with all the details as shown below

Now we can follow the generated report and directly make the change to the form, field, and ribbon instead of searching for it manually.

Happy Upgrading !!

How to – Deal with OptionSet inside Power BI in Dynamics 365 CE


Updated 8-Sep-2018 –> Please check the Power Query Builder tool of XrmToolBox. Thanks Scott Sewell for informing about this wonderful tool.

Suppose, we have created a Power BI Report which makes use of OptionSet field.

It is on incident entity and we have selected priority code and state code option set fields. The problem is that we only get the value for them, so to get the label either we can manually specify it or use the plugin Power BI Option Set Assistant. We’d see both the methods.

Let us take state code field first and specify label for them manually.

In the Query Editor, select New Query and specify following value and save it.

= #table({“value”,”label”},{{0,”In Progress”},{1,”Resolved”}})

Select the main query and click on Merge Queries

Select statecode and value to map them, specify left outer join for Join Kind as shown below

Select the new column added to the query and check the label.

We now have the label specified added as a new column to our query.

Here, for small set of values we can specify the label manually, however if there are too many values this might not be feasible and also if there are changes in OptionSet inside Dynamics 365 CE, we’d have to do it manually here, which makes it difficult to maintain.

So, let us use the wonderful PowerBI OptionSet Assistant plugin from our favorite XRMToolBox

Install the plugin

Click on Load Entities and select Case Entity.

Select Priority field and click on “Create records for selected option sets

Basically, it will create a new entity named gap_powerbioptionsetrefs entity, which will hold the records corresponding to each of the values of the optionset field selected.

Back in Power BI create a new query and select the gap_powerbioptionsetfrefs entity and save the query.

Now follow the same steps, select the main incidents query and perform merge queries operation as shown below

Expand the column to select the label field

Our final query à

Hope it helps..

How to – Upgrade from Dynamics CRM 2016 On-Premise to Dynamics 365


First – check if you are eligible for the Fast Track program

https://nishantrana.me/2020/05/15/dynamics-crm-on-premise-to-online-migration-program-microsoft-fasttrack/

Be aware of Version Compatibility –

https://docs.microsoft.com/en-us/previous-versions/dynamicscrm-2016/developers-guide/gg328109%28v%3dcrm.8%29#version-compatibility

https://docs.microsoft.com/en-us/dynamics365/customerengagement/on-premises/developer/introduction-solutions

Upgrade the existing CRM 2016 On-Premise Server to CRM 2016 (8.1) for its solution to be compatible with Dynamics 365 Online using cumulative updates.

https://support.microsoft.com/en-gb/help/3142345/microsoft-dynamics-365-onpremise-cumulative-updates

If upgrading from previous version i.e. prior to CRM 2016, use “Migrate by using a new instance of Microsoft SQL Server” approach

https://technet.microsoft.com/en-us/library/hh699669.aspx

https://technet.microsoft.com/en-us/library/hh699747.aspx

Once updated to compatible CRM 2016 On Premise (8.1), go to settings à customizations and export the existing solutions or create a new solution, add all the required solution components to it as unmanaged which will be imported to the new Dynamics 365 online environment.

Create a new Dynamics 365 Online Environment and synchronize it with your existing Active Directory

https://blogs.msdn.microsoft.com/crm/2013/07/18/how-to-synchronize-crm-online-with-your-active-directory/

With solution ready and imported to new Dynamics 365 Online, next step is migration of data.

Consider using a data migration tool like KingswaySoft.

Check out their Migration Starter Pack.

https://www.kingswaysoft.com/blog/2016/09/16/Announcing-Migration-Starter-Pack-for-CRM-Online-and-CRM-On-Premise

or Scribe

https://www.scribesoft.com/solutions/dynamics-365/

Use following tools to update the JavaScript to Version 9.0 of XrmToolBox.

https://www.xrmtoolbox.com/plugins/XrmToolBox.Dynamics365V9JavascriptValidator/

  • Script Finder (to update the form and fields for passing the executionContext)

https://www.xrmtoolbox.com/plugins/MsCrmTools.ScriptsFinder/

https://community.dynamics.com/crm/b/develop1/archive/2017/11/11/executioncontext-hits-the-big-time

Update JavaScript to use Web API.

https://github.com/jlattimer/CRMRESTBuilder

SQL Based report, if possible, needs to be converted to use Fetch XML. Use the following tool to speed up the process.

http://www.sql2fetchxml.com/

If the reports are too complex, plan to use Power BI reports.

https://technet.microsoft.com/en-us/library/dn708055.aspx

Plugin and Custom workflow needs to be updated to run in an isolated environment i.e. sandbox along with references to the latest SDK assemblies.

https://docs.microsoft.com/en-us/dynamics365/customer-engagement/developer/plugin-isolation-trusts-statistics#web-access

https://www.nuget.org/packages/Microsoft.CrmSdk.CoreAssemblies/

If the existing On-Premise is integrated to other applications, make sure they can still talk with new Dynamics 365 Online.

Recurring jobs if needed, can be deployed to Azure as Azure WebJobs.

https://docs.microsoft.com/en-us/azure/app-service/websites-dotnet-deploy-webjobs

Use Hybrid Connection to talk with On-Prem resources.

https://docs.microsoft.com/en-us/azure/app-service/app-service-hybrid-connections

These were some of the points I could quickly think of. Please share your thoughts and experiences in comments. I’d update this list.

Do check out :

Microsoft Dynamics CRM (on-premises) to Microsoft Dynamics
Online Migration Guide

https://download.microsoft.com/download/6/D/6/6D67BDEA-1D67-42B4-A52A-CF13CD547CB5/OPtoCRMOnlineMigration.pdf

Hope it helps..

Advertisements

LookupRecordNotAvailable error while using Configuration Migration Tool in Dynamics 365 Customer Engagement


While trying to migrate the record using the Configuration Migration Tool, we were getting error like below in the log

ImportEntity – Result: True – Entity: transactioncurrency – Adding transactioncurrency to the reprocess List as field createdonbehalfby with value 05d52058-eb35-41e8-8af7-dfb7120c4599 – LookupEntity systemuser and Record Id 2655712b-e13b-e711-80fb-5065f38b5691 (SYSTEM) – (action:Update) failed validation for reason code: LookupRecordNotAvailable

As we do not want to migrate the createdonbehalfby field, the easiest fix for this is to remove the field from the schema.

Ideally instead of adding the entire Entity, we should select only those fields whose value we want to migrate in the Schema file.

Hope it helps..

Power BI with Dynamics 365 CE – Dynamics 365 Content Pack


In previous posts we covered

Creating a Power BI Report using Dynamics 365 Online Service.

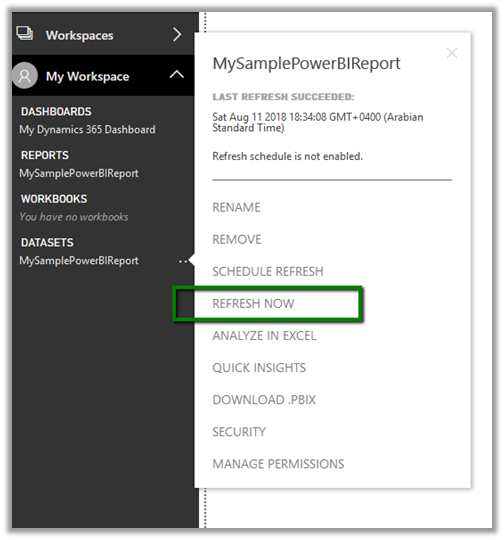
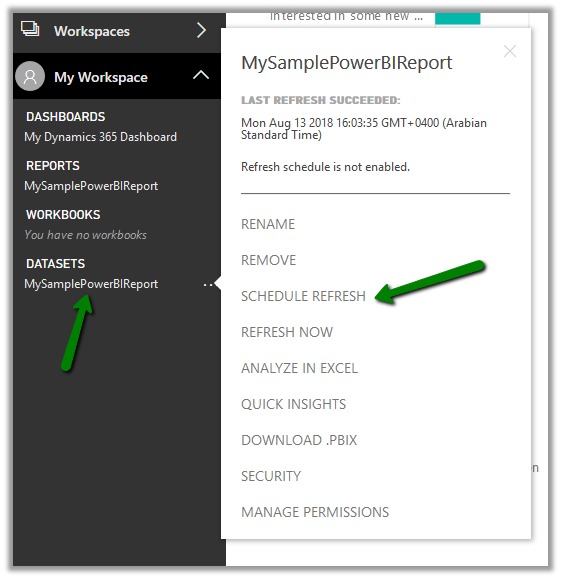
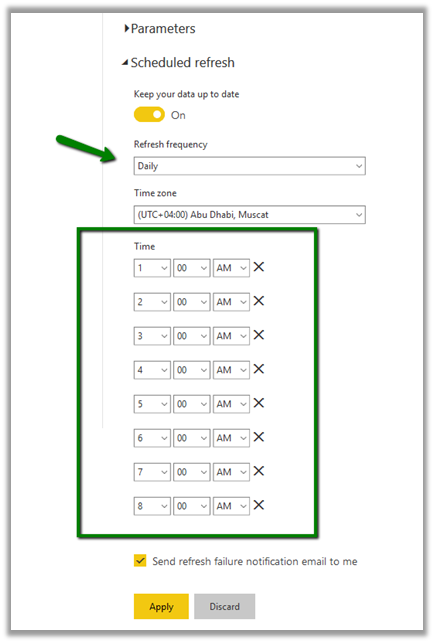
Publishing it and Showing it inside Dynamics 365 and scheduling its Refresh.

Apart from creating our own Power BI Report another way of quickly be up and running is to use the Content Packs provided by Third Party Service, for e.g. here we will be using Sales Analytics for Dynamics 365 content pack provided by Microsoft.

Login to the Power BI service, click on Get Data, select Services.

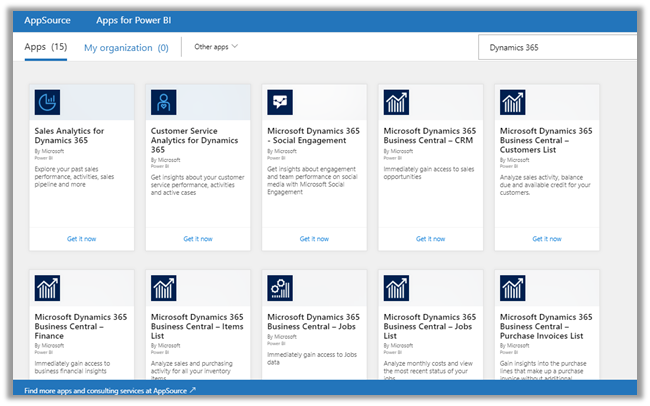
Select Apps and choose the Sales Analytics for Dynamics 365 from the AppSource.

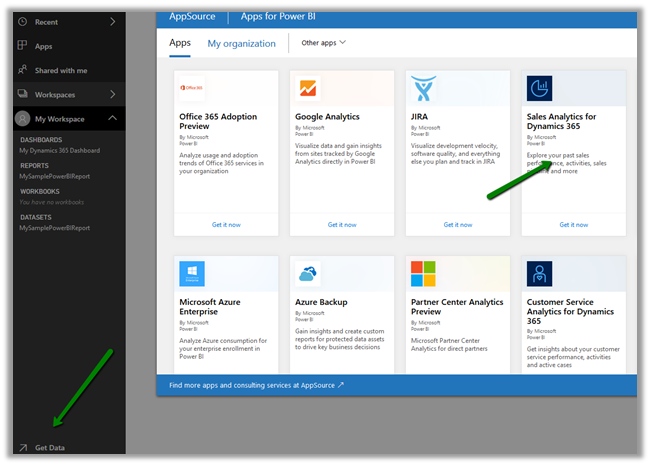
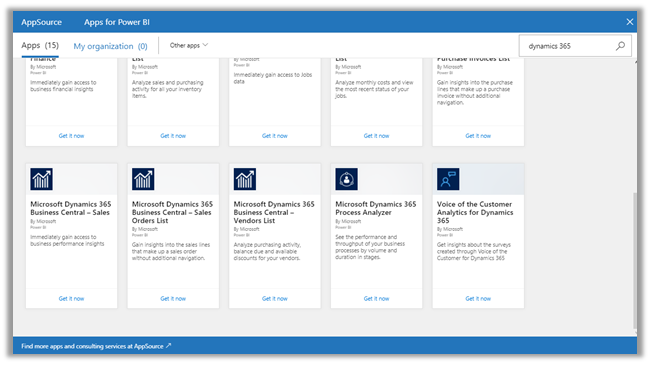
If we search for Dynamics 365, we can see around 15 Apps provided by Microsoft.

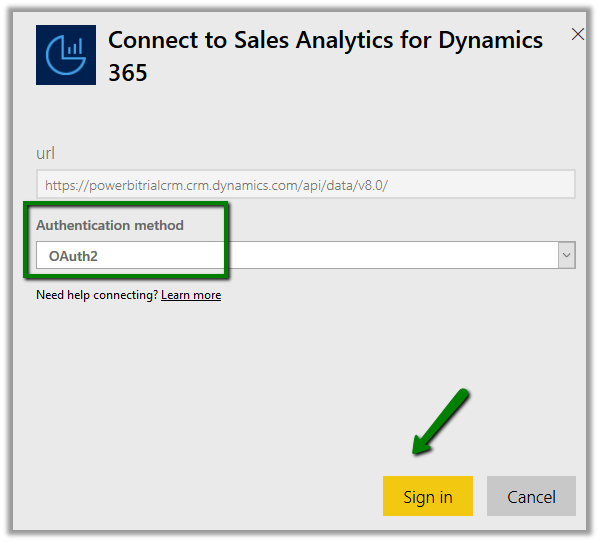
Back into our Sales Analytics for Dynamics 365 App, when we click on Get in now we are presented with the option where we need to Specify the URL of our Dynamics CRM Online Service and Fiscal Year End Month Number for that organization.

In the next screen, we need to select OAuth2 as the authentication method and followed by signing in.

This installs the app which would be available in the Apps section.

Clicking on the installed Sales Analytics App opens the Dashboard

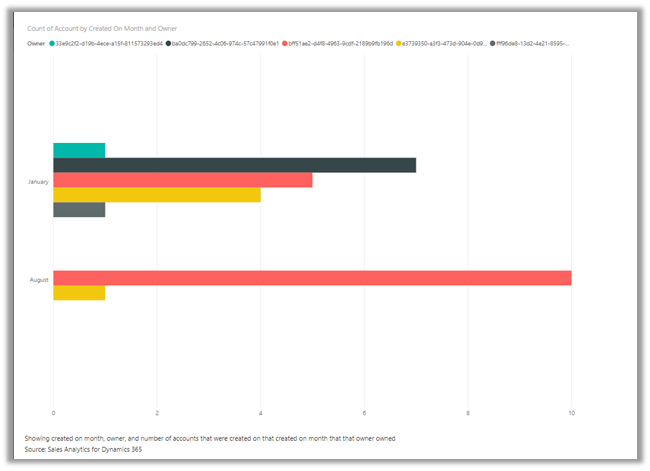
Clicking on Ask a question about your data inside Dashboard allows us to analyze the data by allowing us to choose the criteria

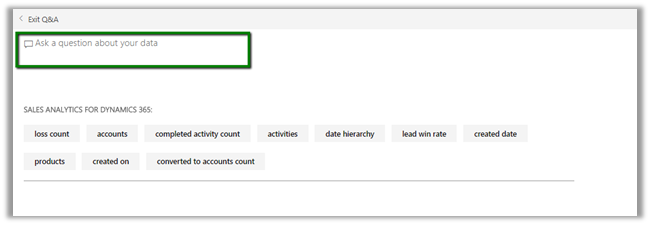
Here we have filtered the accounts by created on by month along with the owner

Also, we can see around 10 different reports created inside that app.
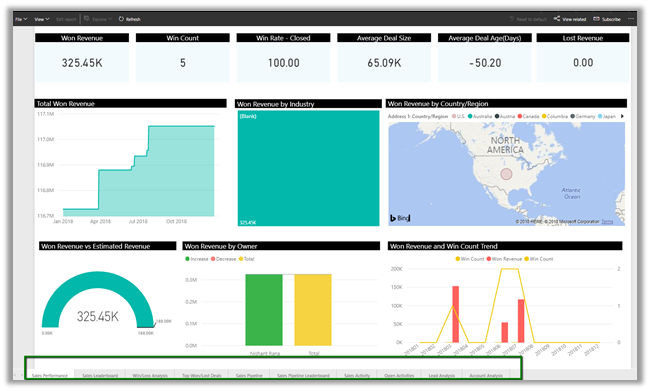
  • Sales Performance
  • Sales Leaderboard
  • Win/Loss Analysis
  • Top Won/Lost Details
  • Sales Pipeline
  • Sales Pipeline Dashboard
  • Sales Activity
  • Open Activities
  • Lead Analysis
  • Account Analysis

Similarly, we can create our own Content Packs to be shared with either specific group or with the entire organization.

Click on settings gear inside Power BI Service and select Create Content Pack

Here we are creating a content pack choosing the Dashboard, Reports and the Dataset that we created earlier in the previous posts.

Once published, the user 2 can click on Get Data and search for and can see the content pack.

Clicking on Connect adds the Dashboard, Report, and the corresponding Dataset to the My Workspace of the user. Only the user who had created the content pack can edit the artifacts that are part of Content Pack, however, the other user of the organization can save a copy of it and can work on it.

More on it

https://docs.microsoft.com/en-us/power-bi/service-organizational-content-pack-manage-update-delete

Hope it helps..

Power BI with Dynamics 365 CE – Refreshing the Dataset


In the previous post, we used Dynamics 365 Dashboard and Power BI Tile to show Power BI Dashboard and report inside Dynamics 365.

https://nishantrana.me/2018/08/20/power-bi-with-dynamics-365-ce-showing-power-bi-dashboard-tile-inside-dynamics-365-ce/

Now as a next step, we want to make sure that the users are looking at the latest data possible inside the Dashboard\Reports.

In case of Online Services like Dynamics 365 (Online), we have the option to manually Refresh the data.

To see it in action, let us create a lead record in Dynamics 365.

This is how our Dashboard looks like for now à

Now back in Power BI Service right, click on ellipsis for the Dataset and select Refresh Now.

We can see the newly created lead in our Power BI Report inside Power BI Service and Dynamics 365 CE.

The other option we have is to Schedule the refresh.

Navigate to the Dataset and select Schedule Refresh

We can select the Refresh Frequency as Daily or Weekly.

And we can set it to refresh up to 8 times per day as shown below.

With Power BI Pro License, we can complete the scheduled refresh 8 times a day whereas the Power BI Premium allows the refresh up to 48 times per day.

https://powerbi.microsoft.com/en-us/power-bi-premium/

Some helpful links

https://docs.microsoft.com/en-us/power-bi/refresh-scheduled-refresh

https://www.powerobjects.com/2018/01/11/power-bi-data-refresh-performance/

https://crmtipoftheday.com/category/power-bi/

Hope it helps..