Sharing the sample code that we can use for checking if a particular folder exists and if not then create it in SharePoint Online. It uses PnP Framework and Azure Ad App only permissions.
We will be checking for and creating the folder at the below location.
On a successful run, we can see the folder named “MyFolder” created the document library.
Below is the sample code
static void Main(string[] args)
        {
            var siteUrl = "https://w72tk.sharepoint.com/sites/MyTeamSite";
            var applicationId = "d7eaeeb7-ef0a-474d-9b94-567013576c14";
            var password = "xyz";
            var domain = "w72tk.onmicrosoft.com";
            var certPath = @"C:\SharePointApp\MyTestCertificate.pfx";

            var authManager = new AuthenticationManager(applicationId, certPath, password, domain);
            var foldertoCheck = "MyFolder";
            using (var clientContext = authManager.GetContext(siteUrl))
            {
                var currentWeb = clientContext.Web;
                var folderExists = currentWeb.DoesFolderExists(foldertoCheck);
                if (!folderExists)
                {
                    var list = clientContext.Web.Lists.GetByTitle("Documents");
                    list.RootFolder.Folders.Add(foldertoCheck);
                    clientContext.ExecuteQuery();
                }
            }
        }
#Requires -RunAsAdministrator
<#
.SYNOPSIS
Creates a Self Signed Certificate for use in server to server authentication
.DESCRIPTION
.EXAMPLE
.\Create-SelfSignedCertificate.ps1 -CommonName "MyCert" -StartDate 2015-11-21 -EndDate 2017-11-21
This will create a new self signed certificate with the common name "CN=MyCert". During creation you will be asked to provide a password to protect the private key.
.EXAMPLE
.\Create-SelfSignedCertificate.ps1 -CommonName "MyCert" -StartDate 2015-11-21 -EndDate 2017-11-21 -Password (ConvertTo-SecureString -String "MyPassword" -AsPlainText -Force)
This will create a new self signed certificate with the common name "CN=MyCert". The password as specified in the Password parameter will be used to protect the private key
.EXAMPLE
.\Create-SelfSignedCertificate.ps1 -CommonName "MyCert" -StartDate 2015-11-21 -EndDate 2017-11-21 -Force
This will create a new self signed certificate with the common name "CN=MyCert". During creation you will be asked to provide a password to protect the private key. If there is already a certificate with the common name you specified, it will be removed first.
#>
Param(

[Parameter(Mandatory=$true)]
   [string]$CommonName,

[Parameter(Mandatory=$true)]
   [DateTime]$StartDate,

[Parameter(Mandatory=$true)]
   [DateTime]$EndDate,

[Parameter(Mandatory=$false, HelpMessage="Will overwrite existing certificates")]
   [Switch]$Force,

[Parameter(Mandatory=$false)]
   [SecureString]$Password
)

# DO NOT MODIFY BELOW

function CreateSelfSignedCertificate(){

#Remove and existing certificates with the same common name from personal and root stores
    #Need to be very wary of this as could break something
    if($CommonName.ToLower().StartsWith("cn="))
    {
        # Remove CN from common name
        $CommonName = $CommonName.Substring(3)
    }
    $certs = Get-ChildItem -Path Cert:\LocalMachine\my | Where-Object{$_.Subject -eq "CN=$CommonName"}
    if($certs -ne $null -and $certs.Length -gt 0)
    {
        if($Force)
        {

foreach($c in $certs)
            {
                remove-item $c.PSPath
            }
        } else {
            Write-Host -ForegroundColor Red "One or more certificates with the same common name (CN=$CommonName) are already located in the local certificate store. Use -Force to remove them";
            return $false
        }
    }

$name = new-object -com "X509Enrollment.CX500DistinguishedName.1"
    $name.Encode("CN=$CommonName", 0)

$key = new-object -com "X509Enrollment.CX509PrivateKey.1"
    $key.ProviderName = "Microsoft RSA SChannel Cryptographic Provider"
    $key.KeySpec = 1
    $key.Length = 2048
    $key.SecurityDescriptor = "D:PAI(A;;0xd01f01ff;;;SY)(A;;0xd01f01ff;;;BA)(A;;0x80120089;;;NS)"
    $key.MachineContext = 1
    $key.ExportPolicy = 1 # This is required to allow the private key to be exported
    $key.Create()

$serverauthoid = new-object -com "X509Enrollment.CObjectId.1"
    $serverauthoid.InitializeFromValue("1.3.6.1.5.5.7.3.1") # Server Authentication
    $ekuoids = new-object -com "X509Enrollment.CObjectIds.1"
    $ekuoids.add($serverauthoid)
    $ekuext = new-object -com "X509Enrollment.CX509ExtensionEnhancedKeyUsage.1"
    $ekuext.InitializeEncode($ekuoids)

$cert = new-object -com "X509Enrollment.CX509CertificateRequestCertificate.1"
    $cert.InitializeFromPrivateKey(2, $key, "")
    $cert.Subject = $name
    $cert.Issuer = $cert.Subject
    $cert.NotBefore = $StartDate
    $cert.NotAfter = $EndDate
    $cert.X509Extensions.Add($ekuext)
    $cert.Encode()

$enrollment = new-object -com "X509Enrollment.CX509Enrollment.1"
    $enrollment.InitializeFromRequest($cert)
    $certdata = $enrollment.CreateRequest(0)
    $enrollment.InstallResponse(2, $certdata, 0, "")
    return $true
}

function ExportPFXFile()
{
    if($CommonName.ToLower().StartsWith("cn="))
    {
        # Remove CN from common name
        $CommonName = $CommonName.Substring(3)
    }
    if($Password -eq $null)
    {
        $Password = Read-Host -Prompt "Enter Password to protect private key" -AsSecureString
    }
    $cert = Get-ChildItem -Path Cert:\LocalMachine\my | where-object{$_.Subject -eq "CN=$CommonName"}

Export-PfxCertificate -Cert $cert -Password $Password -FilePath "$($CommonName).pfx"
    Export-Certificate -Cert $cert -Type CERT -FilePath "$CommonName.cer"
}

function RemoveCertsFromStore()
{
    # Once the certificates have been been exported we can safely remove them from the store
    if($CommonName.ToLower().StartsWith("cn="))
    {
        # Remove CN from common name
        $CommonName = $CommonName.Substring(3)
    }
    $certs = Get-ChildItem -Path Cert:\LocalMachine\my | Where-Object{$_.Subject -eq "CN=$CommonName"}
    foreach($c in $certs)
    {
        remove-item $c.PSPath
    }
}

if(CreateSelfSignedCertificate)
{
    ExportPFXFile
    RemoveCertsFromStore
}
Specify the password and note it down as it will be used for connection.
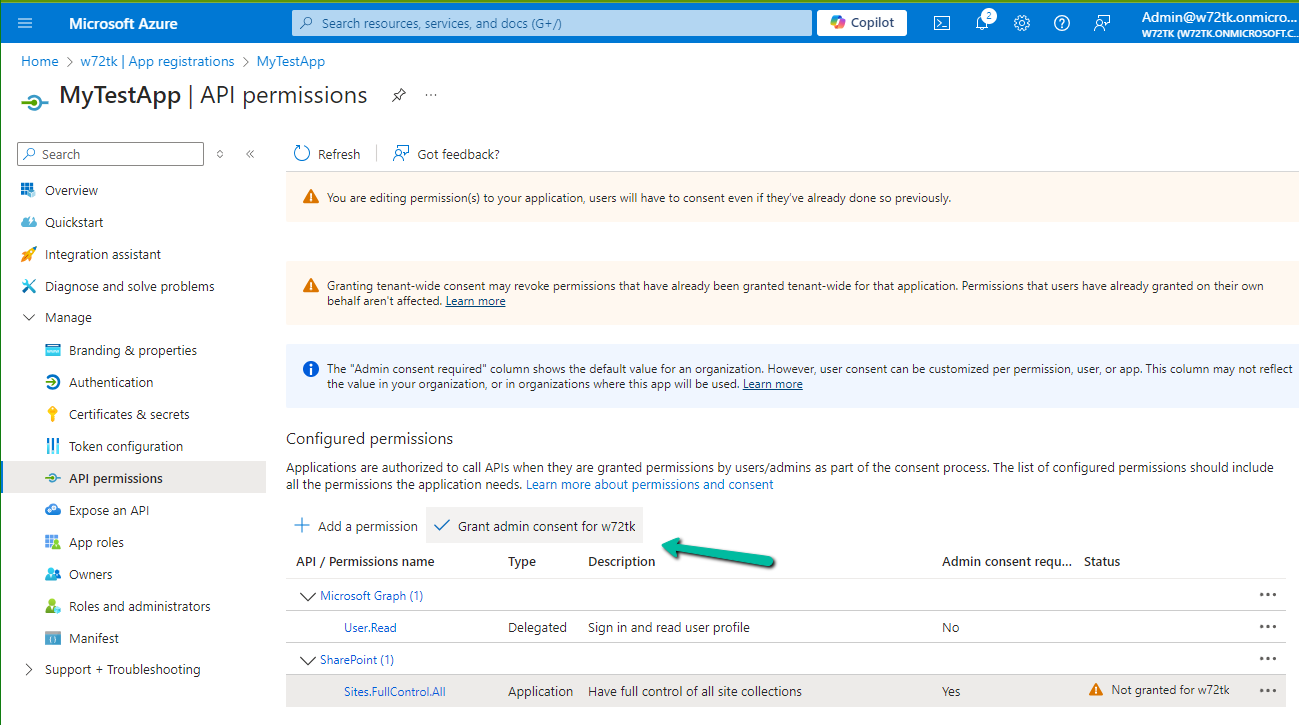
Upload the certificate to the Azure AD App registered.
For the console app, we installed the PnP.Framework Nuget Package
The sample code –
           try
            {
                var authManager = new AuthenticationManager(applicationId, certPath, password, domain);
                using (ClientContext clientContext = authManager.GetContext(siteUrl))
                {
                    var folder = clientContext.Web.GetFolderByServerRelativeUrl(folderRelativeUrl);
                    clientContext.Load(folder);
                    clientContext.Load(folder.Files);
                    clientContext.ExecuteQuery();

                    foreach (var file in folder.Files)
                    {
                        if (countFilesToImport < maxFilesPerCycle)
                        {
                            _filesToImport.Add(file);
                        }

                        countFilesToImport++;
                    }
                }
            }
            catch (Exception ex)
            {
                System.Console.WriteLine("Error: " + ex.Message);
                if (ex.InnerException != null)
                {
                    System.Console.WriteLine("Inner Exception: " + ex.InnerException.Message);
                }
            }
        }
We can see our app is successfully connected.
The other option is to use the SharePoint app-only, which is not recommended by Microsoft.
We can see the following message for it.
Starting April 2, 2026, Azure Access Control service (ACS) usage will be retired for SharePoint in Microsoft 365 and users will no longer be able to create or use Azure ACS principals to access SharePoint. Learn more about the Access Control retirement
We recently had a requirement to create the SharePoint folder automatically on the Account records creation, instead of having the users click on the Documents tab to create it.
We could write a Power Automate flow to achieve this.
Here we have enabled the Share Point server-based integration. Also, the SharePoint Site and the main or parent folder for the Account are already created/configured.
Below is the corresponding Document location record for the parent Account folder.
So basically, we will create a new folder inside the Account folder in the SharePoint site configured in CRM.
Then create a new SharePoint Document Location record specifying the Account document location as a parent.
And then Associate / Relate the new account record created with this new document location record.
Below is how our Flow will look like –
Triggers on Account record creation.
2. Create a new folder inside Account Folder, here for the name of the folder we are using the format “AccountName_AccountNumber“
3. Create a new Document Location record, associating the Account document location with the parent location record. Here we are specifying the same folder name in the relative URL.
We can also fetch the GUID of the Account document location and/or use a variable to store the GUID.
4. Lastly, we are associating these 2 new records.
Below is our newly created account record.
Below we can see our flow ran successfully.
We can see the new folder created and associated.
Here if we click the Documents tab immediately after creating the account record, before our flow runs, we might have the OOB folder also getting created along with our custom folder (flow being asynchronous). If our custom folder is already created and associated before the user clicks on the documents tab, then CRM will not be creating a new folder.
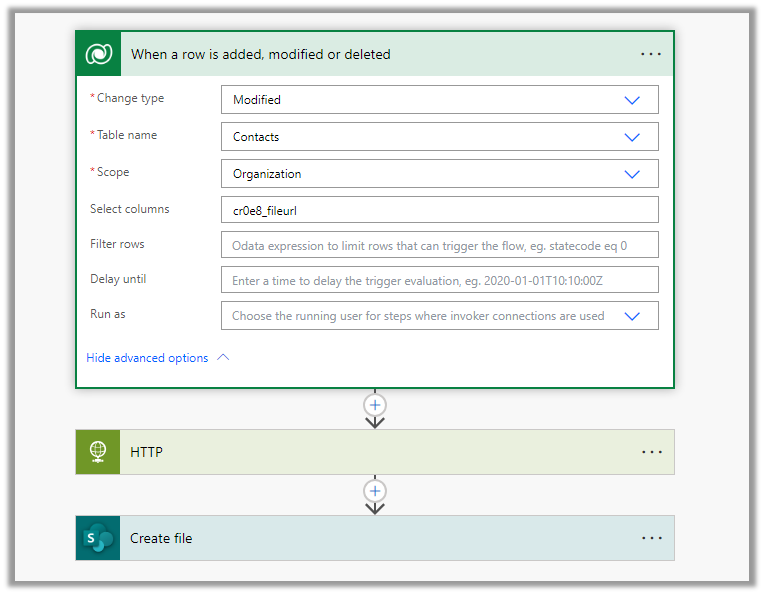
The flow triggers when there is an update in the File URL field of the contact record.
Next, we are using HTTP action to use the GET method to get the content of the file. As it is a public URL we haven’t specified any Authentication.
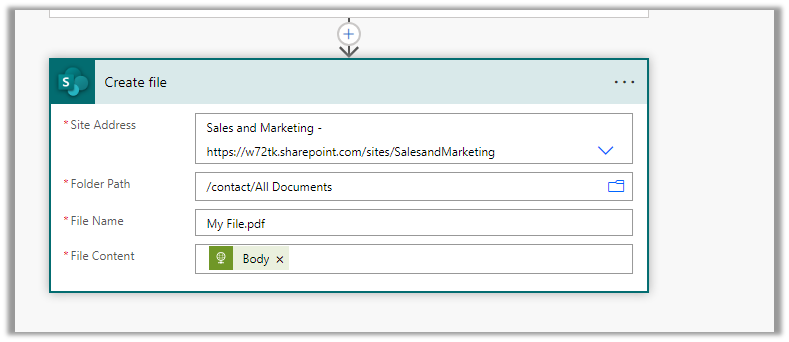
Next, we are using Create File action of SharePoint, we have specified the Site Address, Folder Path, File Name, and most importantly the Body of the HTTP action to the File Content property.
On the successful run of the flow,
we can see the document (pdf) uploaded in the SharePoint folder.
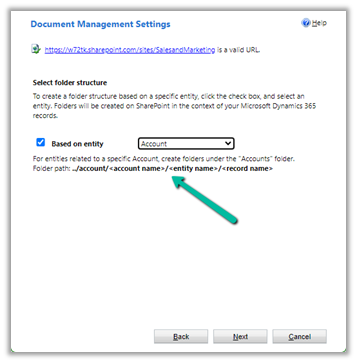
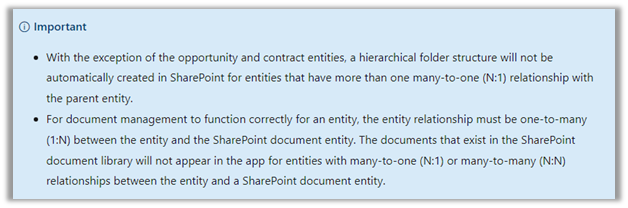
inside Document Management Settings, we can specify folder structure to be based on the entity either Account or Contact.
Here we have opted for Account-based first.
We can see the following folders created on the SharePoint site, that take the table or entity name.
And the records folder for Accounts created with AccountName_GUID format.
And if we open any Contact record >> Files / Documents tab, that will create the account parent folder (if not already created) and the contact folders inside it as shown below.
And if we create the contact record without having an account associated
That will create the folder for the record inside Contact Folder without the Parent Account folder created. (as there was no account associated)
For Case Records, we have the case folders created inside Account folders.
Now let us select the Contact based structure
The contact records are created inside the Contact folder, the account associated is not considered.
For Case also it is same.
For Building, a custom table, which is a child of Contact, we have the Building folder created inside the Contact folder.
Now let us keep Based on entity option unchecked
This creates the corresponding record’s folder inside the table parent folder.
Account –
Contact –
Check some of the interesting articles on SharePoint and Dynamics 365 Integration.
Recently we had a requirement to implement an approval workflow when a document is added to a SharePoint library.
Below is how we can implement it.
Details –
Trigger – When a file is created (properties only)
Specify the Site Address, Library Name, and the Folder on which the flow should run.
Initialize Variable
Initialize a variable VarComments to save all the responses.
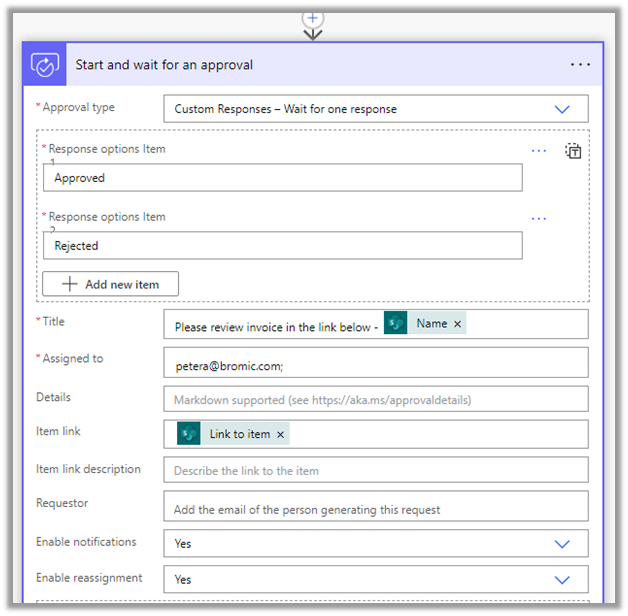
Start and wait for an approval
Here we have used the Approval type as Custom Response – Wait for one response, we could also Approve / Reject – First to respond or any approval type based on the requirements.
The Assigned to field contains the name of the user who needs to review it.
The item link contains the link to the item.
Enable reassignment as Yes will allow the approver to reassign the approval to another user from the Approval Center.
Apply to each
Append the approval response to the variable VarComments.
Condition
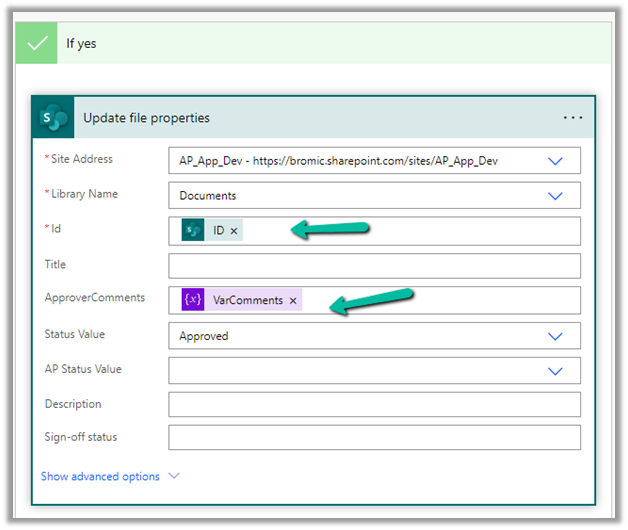
If Outcome is Approved
If Yes – Update File Properties
Update the properties of the file using the ID.
Update the Approval Comments property with the variable.


 3. Create a new Document Location record, associating the Account document location with the parent location record. Here we are specifying the same folder name in the relative URL.
 4. Lastly, we are associating these 2 new records.