Enable Copilot for the Rich Text Control – Dataverse / Dynamics 365


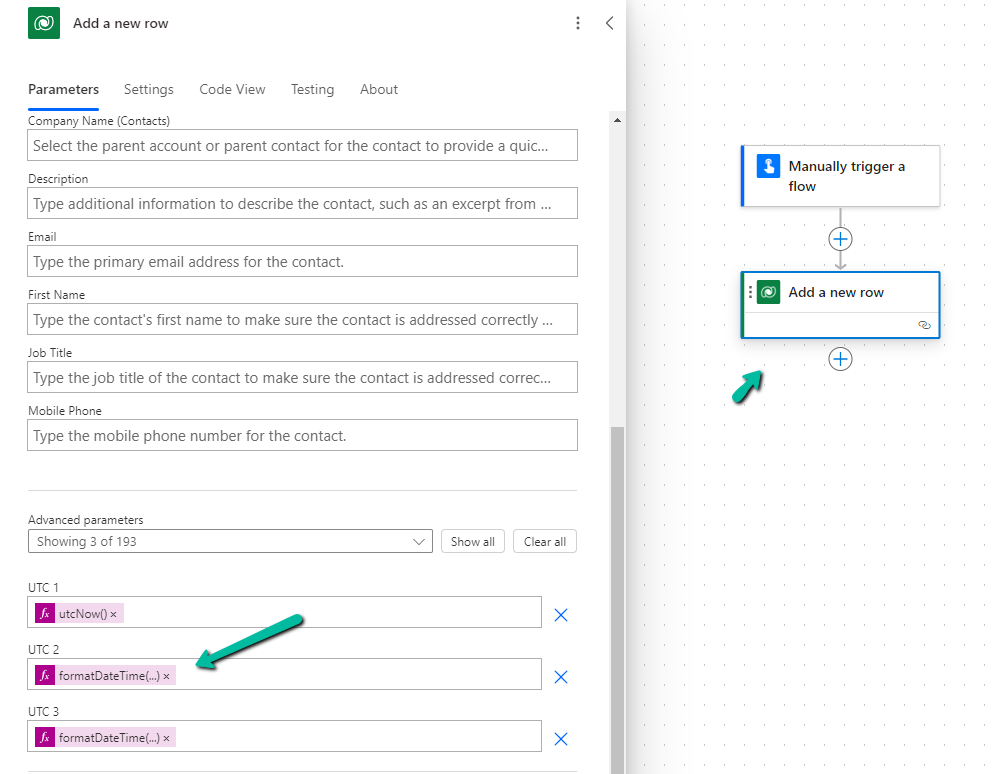
To enable Copilot for a specific instance of a Rich Text editor field, we first need to create a Web Resource where we need to specify the property we want to update/override as specified in the RTEGlobalConfiguration_Readonly.json, the base read-only configuration file for the Rich Text editor control.

We have created a JavaScript Web Resource file named rtecustom.js.

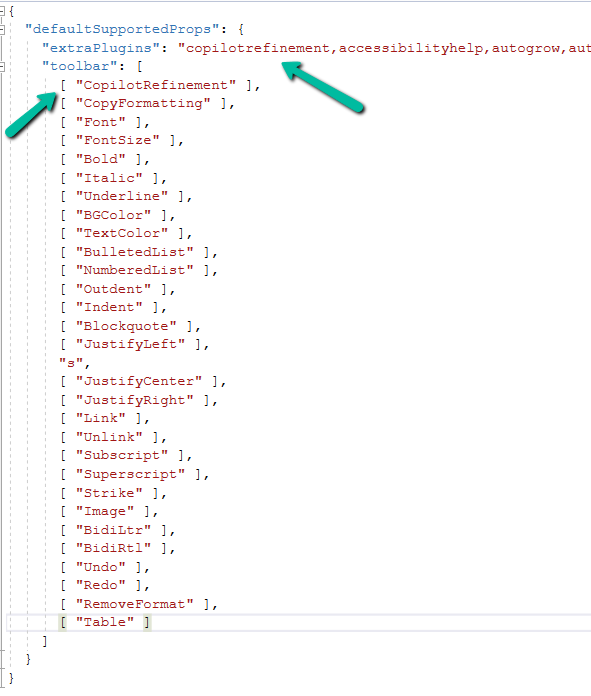
Added the copilitrefinement and CopilotRefinement values to the extraPlugins and toolbar properties existing values as shown to enable copilot.

Refer to the sample configuration file for all the properties and their corresponding values.

A screenshot of a computer program

Description automatically generated
{
  "defaultSupportedProps": {
    "extraPlugins": "copilotrefinement,accessibilityhelp,autogrow,autolink,basicstyles,bidi,blockquote,button,collapser,colorbutton,colordialog,confighelper,contextmenu,copyformatting,dialog,editorplaceholder,filebrowser,filetools,find,floatpanel,font,iframerestrictor,indentblock,justify,notification,panel,panelbutton,pastefromword,quicktable,selectall,stickystyles,superimage,tableresize,tableselection,tabletools,uploadfile,uploadimage,uploadwidget",
    "toolbar": [
      [ "CopilotRefinement" ],
      [ "CopyFormatting" ],
      [ "Font" ],
      [ "FontSize" ],
      [ "Bold" ],
      [ "Italic" ],
      [ "Underline" ],
      [ "BGColor" ],
      [ "TextColor" ],
      [ "BulletedList" ],
      [ "NumberedList" ],
      [ "Outdent" ],
      [ "Indent" ],
      [ "Blockquote" ],
      [ "JustifyLeft" ],
      [ "JustifyCenter" ],
      [ "JustifyRight" ],
      [ "Link" ],
      [ "Unlink" ],
      [ "Subscript" ],
      [ "Superscript" ],
      [ "Strike" ],
      [ "Image" ],
      [ "BidiLtr" ],
      [ "BidiRtl" ],
      [ "Undo" ],
      [ "Redo" ],
      [ "RemoveFormat" ],
      [ "Table" ]
    ]
  }
}

Note down the URL of the Web Resource created.

A screenshot of a computer

Description automatically generated

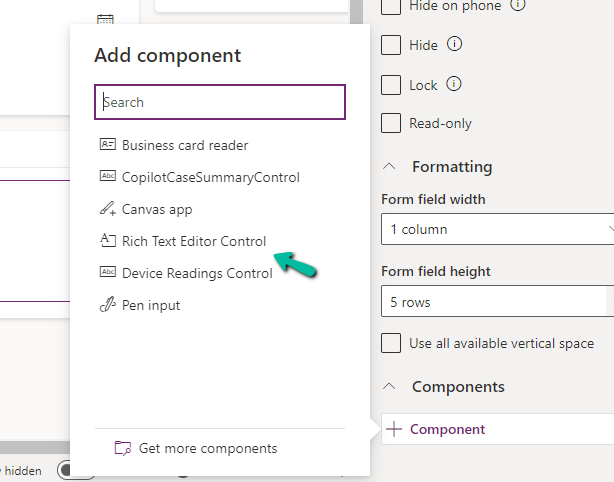
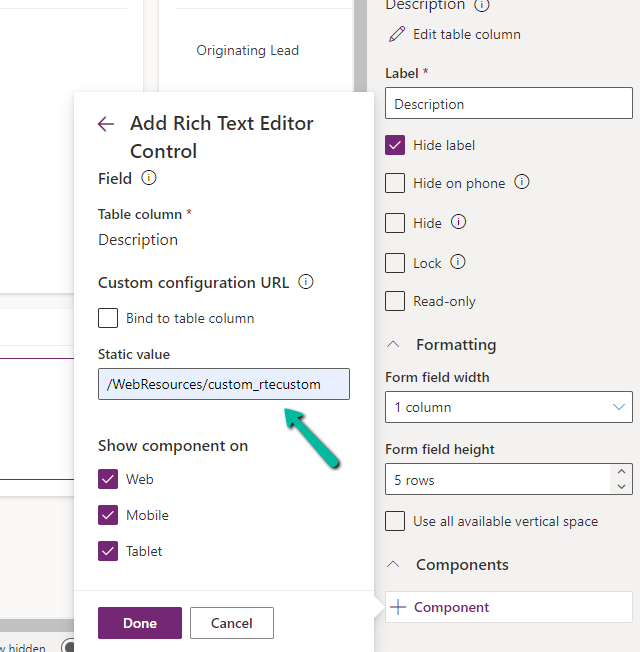
Next, we opened one of the Contact’s forms for Customization, selected the description field, and added the component – “Rich Text Editor Control” to it.

A screenshot of a computer

Description automatically generated
A screenshot of a computer

Description automatically generated

In the Static value property, we specified the relative URL of the Web Resource file. We can also specify the full path but then we would need to update it each time we move it to other environments.

A screenshot of a computer

Description automatically generated

Save and publish the changes.

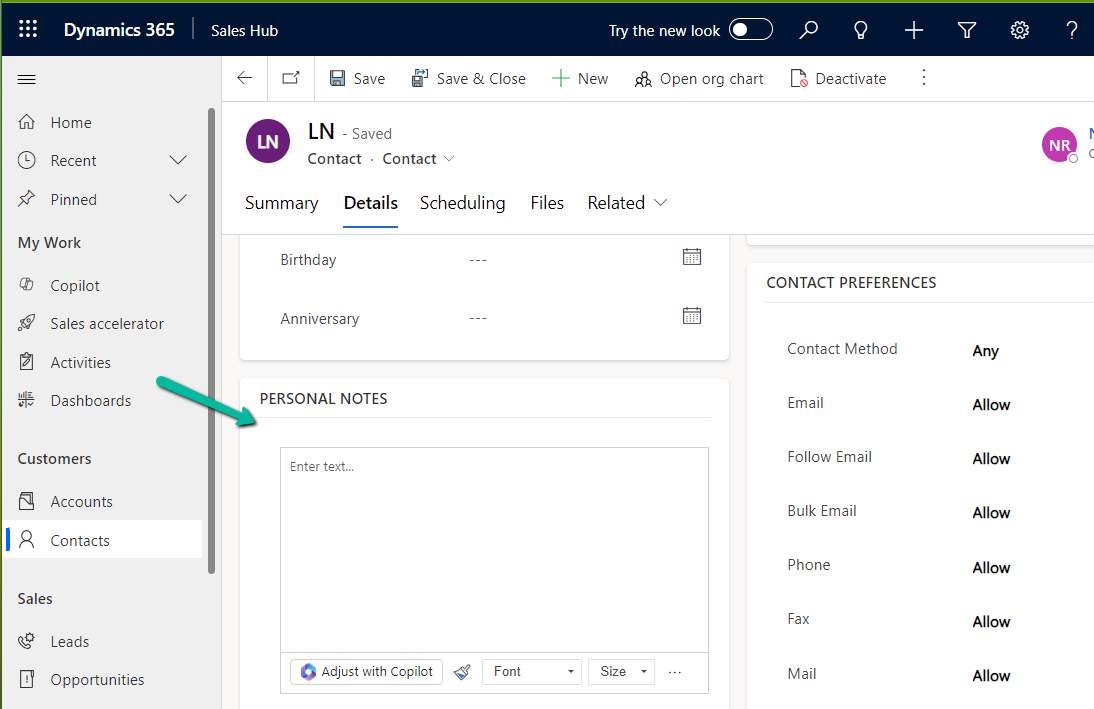
We can see the option Adjust with Copilot added to the toolbar for the control.

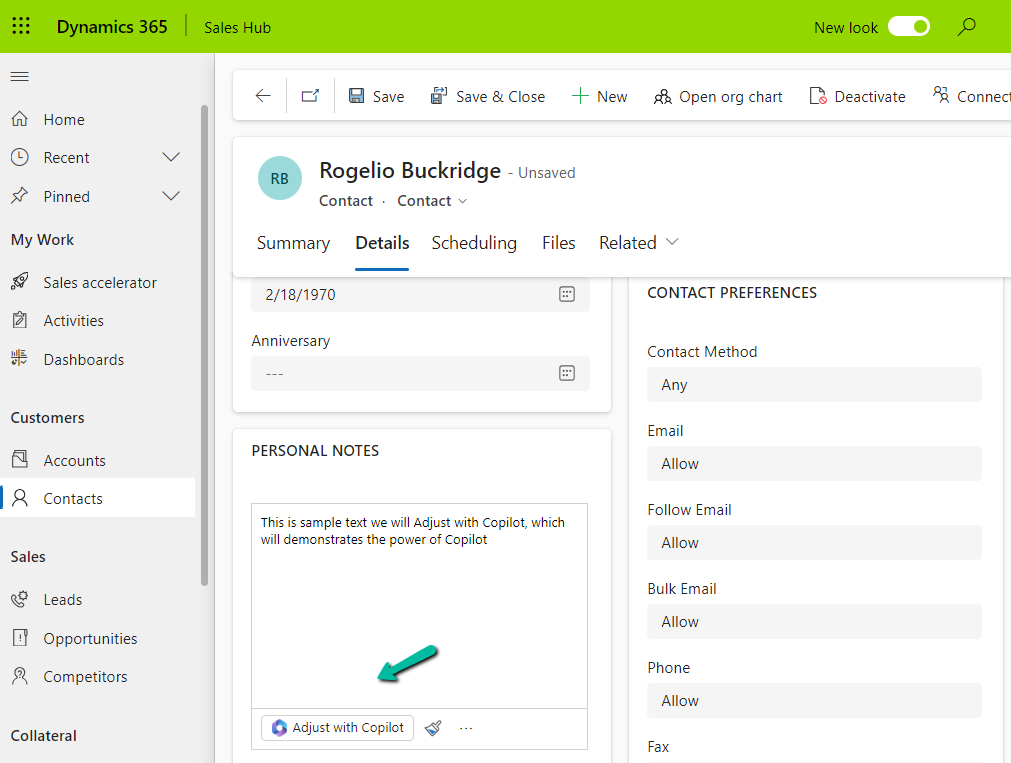
On selecting the text, and clicking on “Adjust with Copilot”, we get the option to update the Tone of the content.

A screenshot of a computer

Description automatically generated

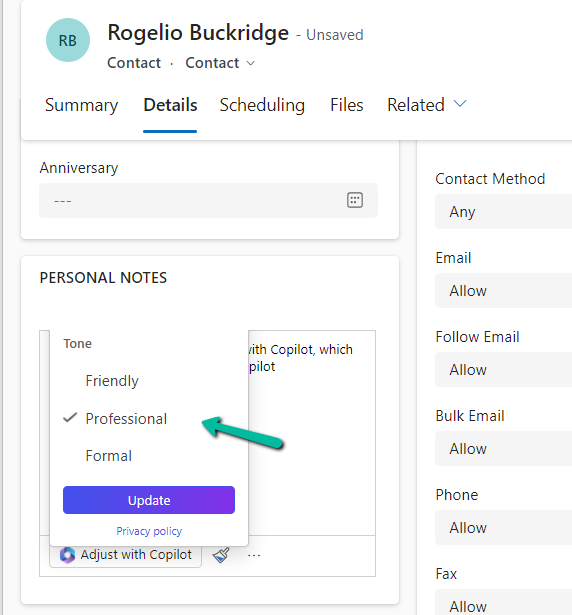
On selecting a Professional tone, the text is updated in the control.

A screenshot of a computer

Description automatically generated

In case we want to apply to all the fields that are using Rich Text Editor Control instead of specifying it for individual fields, we need to update and add the same JSON to the existing RTEGlobalConfiguration.json file.

A screenshot of a computer

Description automatically generated

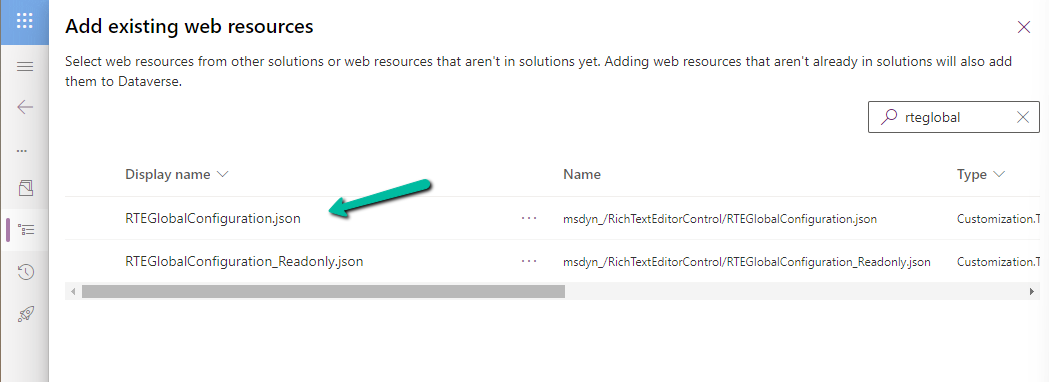
The file is blank by default, and we can specify properties to it that we want to override.

A green screen with black text

Description automatically generated

We updated the RTEGlobalConfiguration.json file, to use the same definition we used earlier for our custom web resource.

A screen shot of a computer

Description automatically generated

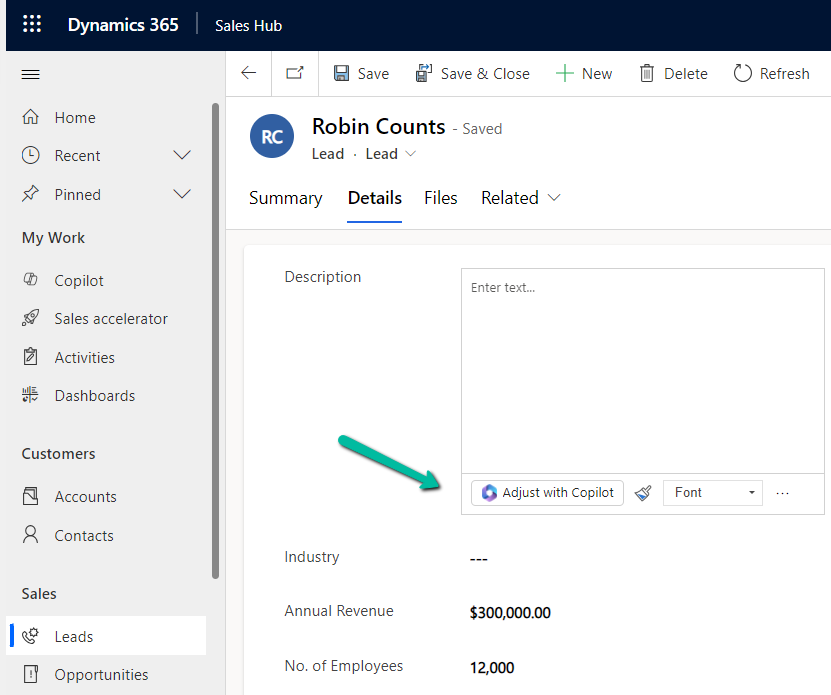
We can see the “Adjust with Copilot” added to the form even without specifying the URL in the static value while customizing the form.

On saving and publishing the changes, we can then see it rendered for all the Rich Text Editor fields.

A screenshot of a computer

Description automatically generated
A screenshot of a computer

Description automatically generated

Also, check – Copilot Control

Hope it helps..

Advertisements

Few points on UTCNow and FormatDateTime – Power Automate / Dataverse


Recently we wrote a flow that will run daily once and will pick all the tasks due in the last 24 hours i.e. schedule end date less than equal to utcNow() and greater than equal to addDays(UTCNow(),-1)

Interestingly we observed one of the task records not picked.

The scheduled end date on the task record was – 2024-07-22T20:00:00Z

And for the flow the filter condition was –

scheduledend le 2024-07-23T20:00:35.5173871Z and scheduledend ge 2024-07-22T20:00:35.5173943Z

If we look at the date for the greater than equal condition, we can see that the seconds part is 35, the exact time when the List rows step would have run, and in case of that particular task record is 00, so it was not picked.

Then we applied the below formatDateTime function, excluding the time part.

(scheduledend le ‘@{formatDateTime(utcNow(),’yyyy-MM-dd’)}’ and scheduledend ge ‘@{formatDateTime(addDays(utcNow(),-1),’yyyy-MM-dd’)}’ and _regardingobjectid_value ne null and statecode eq 0)

Again we saw few tasks not picked,

The records that were not picked had scheduledenddate as

  • 2024-07-25 18:00:00.000
  • 2024-07-25 19:00:00.000

And as per new condition

scheduledend = ‘2024-07-24’ which essentially was

scheduledend = ‘2024-07-24 00:00:00.0000’

Eventually we updated the flow’s Filter Rows condition to include only the hour and minutes, ignoring the seconds/milliseconds because of which we got the issue in the first place.

(scheduledend le ‘@{formatDateTime(utcNow(),’yyyy-MM-dd HH:mm’)}’ and scheduledend ge ‘@{formatDateTime(addDays(utcNow(),-1),’yyyy-MM-dd HH:mm’)}’ and _regardingobjectid_value ne null and statecode eq 0)

One more example for more clarity –

Below we are creating a contact record and setting values for 3 date time fields, UTC1, UTC2, UTC3.

  • UTC1 = utcNow()
  • UTC2 = formatDateTime(utcNow(),’yyyy-MM-dd’)
  • UTC3 = formatDateTime(utcNow(),’yyyy-MM-dd HH:mm’)

The values for those fields inside CRM’s form –

A screenshot of a computer

Description automatically generated

The corresponding values within the Dataverse/ CRM’s database (UTC) –

A screenshot of a computer

Description automatically generated

Hope it helps..

Author a note before saving the form – Timeline (Dynamics 365 / Dataverse)


This feature added to Timeline control allows us to take notes even before creating/saving the record/form.

Select the Timeline control, then Notes properties, and check the “Enable to author a note before saving the form” option.

Save and publish the change.

A screenshot of a computer

Description automatically generated

Before –

Now after enabling the author note before saving option, we can see the option to create a note enabled on the create form.

A screenshot of a computer

Description automatically generated

We can enter the details and also upload an attachment.

A screenshot of a computer

Description automatically generated

On Saving the record, we can see the notes added to the record.

A screenshot of a computer

Description automatically generated
A screenshot of a computer

Description automatically generated

Also, check

Hope it helps..

Advertisements

Mobile Offline Profile – Select columns to be downloaded (Dynamics 365 / Model-driven apps)


With this new feature (preview) now we can specify the columns to be downloaded on mobile devices for offline use.

Select edit for the Model-driven app.

A screenshot of a computer

Description automatically generated

Select Settings and select an existing offline profile or create a new profile.

A screenshot of a computer

Description automatically generated

Select a new table or an existing table for the profile, we can see the Manage Columns option for it.

A screenshot of a computer

Description automatically generated

We can see key columns already selected as part of Required Columns.

We can select columns from the other columns section for our offline profile. The fewer the columns the faster the app will download the data for offline usage.

One point to note is that we get this option only from the Maker Portal not from the Power Platform Admin Center.

Hope it helps..

Perform Age calculation using Formula Columns in Dataverse / Dynamics 365


Below we have created a new field of Data Type Formula and Formula Data Type as Whole Number

A screenshot of a computer

Description automatically generated

Specify the following formula.

RoundDown(DateDiff(birthdate, UTCNow(), TimeUnit.Days) / 365.25, 0)

  • DateDiff calculates the difference in days between birthdate and current UTC Date.
  • Dividing by 365.25 takes care of converting the days to years, considering the leap year into account.
  • Roundown takes care of rounding the result to a nearest integer.

Below we see the field in action.

UTC current date is 10th Wednesday July 2024 for the below example.

A screenshot of a computer

Description automatically generated

Also checkout the helpful video –

and the forum – https://powerusers.microsoft.com/t5/Microsoft-Dataverse/Calculating-age-in-CDS-entity/td-p/495528

Hope it helps..

Advertisements

Use Recycle Bin to restore deleted records (Preview)– Dataverse / Dynamics 365


To enable the feature, log in to

Power Platform Admin Center https://admin.powerplatform.microsoft.com/environments

Environment >> Settings >> Features and enable it

We can specify 30 days as the maximum recovery time.

Let us delete some of the contact and lead records.

A screenshot of a computer

Description automatically generated
A screenshot of a computer

Description automatically generated

Navigate to Environment >> Settings >> Data Management >> View Deleted Records to view the deleted records.

A screenshot of a computer

Description automatically generated

We can select the records and click on Restore to get the deleted records back

We can see the records removed from the Deleted Records view.

A screenshot of a computer

Description automatically generated

Below we can see the restored records – we can also see the Modified On updated.

A screenshot of a computer

Description automatically generated

The feature applies at the environment level, we cannot specify it for individual tables currently. Only the main deleted record and related records deleted via the cascaded relationship behavior will be restored. If a related record is deleted as part of custom business logic, it will not be restored.

Below let us delete the Contact record which has a case and an opportunity record associated.

A screenshot of a computer

Description automatically generated

On deleting the Case the child case and lead records also get deleted.

A screenshot of a computer

Description automatically generated

However, we do not see those records in the Deleted records list only the main (parent) Contact record.

A screenshot of a computer
Description automatically generated
On restoring the deleted contact restores the child case and opportunity record also.

A screenshot of a computer

Description automatically generated

More details on – Restore deleted records

Hope it helps..

Advertisements