Embedding Canvas App on a Model-Driven App’s Form (Preview)


Login to Dynamics 365 CE, open any of the Entity’s form and either pick any of the existing single line of a text field or sub-grid control or add one to the form.

We will use Single Line of Text if we want to pass the current record as context and Sub-Grid if we want to pass the list of related records as context.

In this post, we will first see how to pass the current record as context.

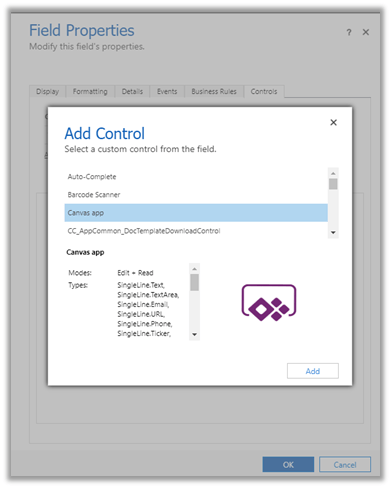
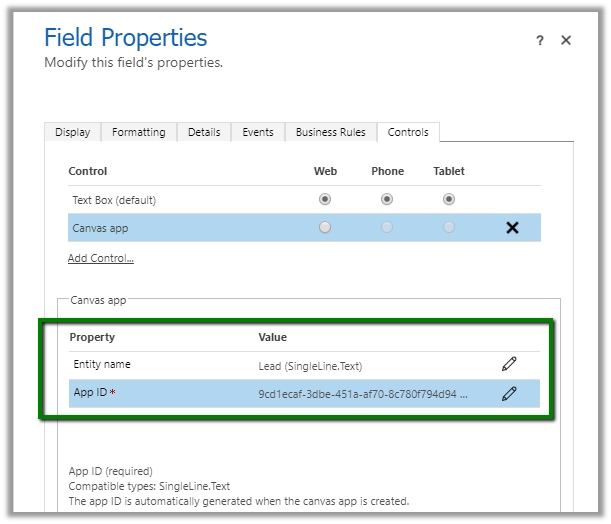
For this let us open Lead form and select Topic field which is a single line of text for customization (Change Properties).

Select Controls tab, and click on Add Control and choose Canvas app.

Here Entity name is auto-populated by the selected Entity and although it seems editable, changing it will have no effect.

App ID is auto-generated on creation of canvas app.


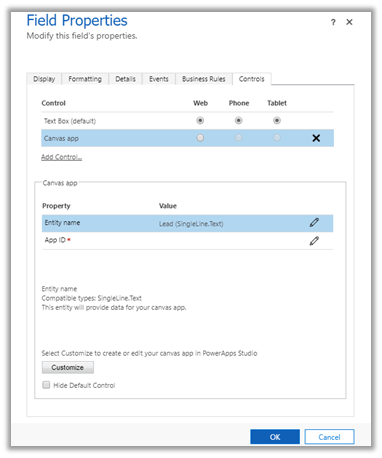
Let us click on Customize to create our canvas app. This opens the PowerApps Studio.

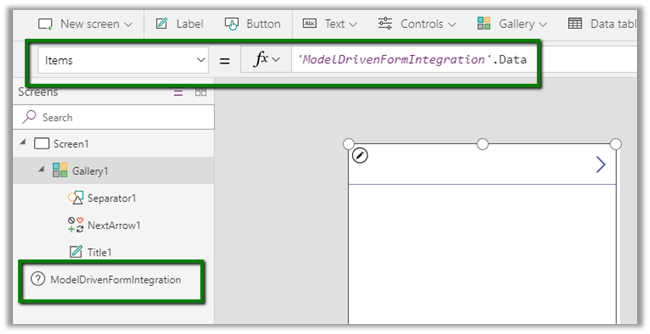
ModelDrivenFormIntegration is the special control which provides us the contextual data from our form.

Clicking on Edit for the Fields property for the gallery1 control opens a pane that shows all the fields from our lead entity.

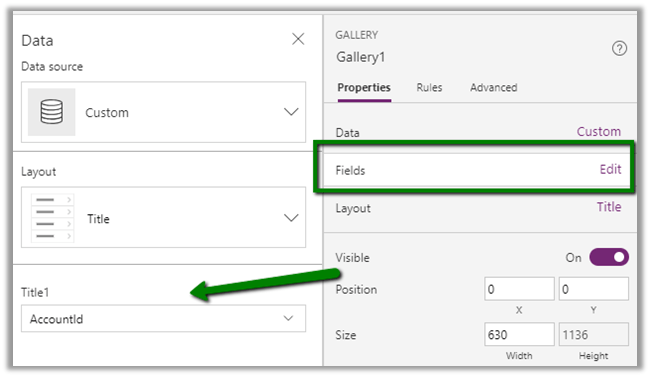
Let us change the Layout to Title, subtitle, and body and set Body1 to the description, Subtitle1 to Fullname and Title2 to Subject.

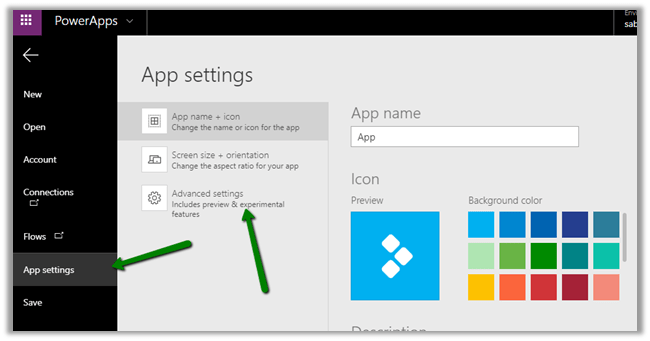
Now before saving and publishing the app, go to File à App Settings à Advanced Settings

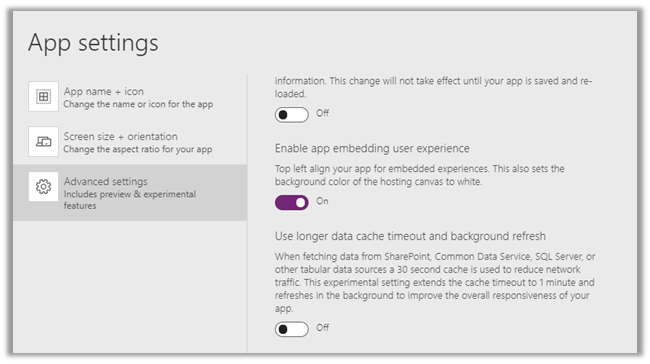
Set Enable app embedding user experience as On.

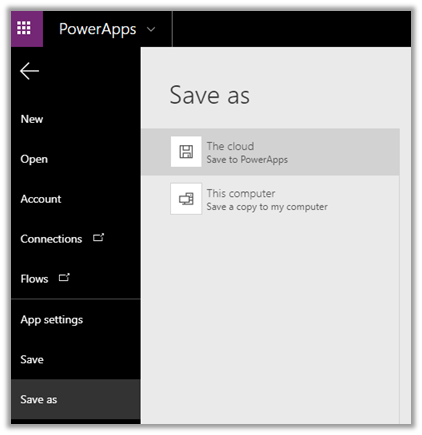
Save the App to the Cloud. This also publishes the app.

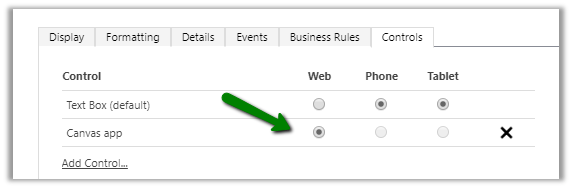
Back in our form editor, we can see the App ID auto-populated

Select Web option for the Canvas App in the Controls Tab.

Click on Ok to close the form, followed by Save and Publish.

We can see the Canvas App in the form in the Unified Client Interface

Although the app doesn’t make much sense, it gives an idea on how to configure things for embedding it within form. This feature really opens up infinite possibilities.

Get all the details here

https://powerapps.microsoft.com/en-us/blog/enrich-your-model-driven-forms-with-embedded-canvas-apps-public-preview/

https://docs.microsoft.com/en-us/powerapps/maker/model-driven-apps/pass-current-embedded-canvas-app

https://docs.microsoft.com/en-us/powerapps/maker/model-driven-apps/embed-canvas-app-in-form

Hope it helps..

How to use special date operators (last-month for ex) in OData and MS Flow


Phani Rajasekhar's avatarPhani Rajasekhar

Today we got a requirement to fetch all the records that are created in the last month by using MS Flow. We can do this by using “Dynamics 365 List records” action and we have to provide OData filter query for this action. I tried to use the same “last-month” operator that we use in the fetch xml. But this will not work for OData query. We need to use “LastMonth” function for this as defined in this link. The below are the examples to use these date functions.

In OData Query

?$filter=Microsoft.Dynamics.CRM.LastMonth(PropertyName=@p1)&@p1=’createdon’

In MS Flow

Hope it is useful….

View original post

Optimum batch size and thread while deleting records using SSIS Integration Toolkit for Microsoft Dynamics 365


Recently we had to delete few records for one of our entities. It was a user owned entity with 1 custom 1 – n relationship with contact having around 190 fields.

It was Dynamics 365 CE Online on version 9.1 and had ExecuteMultiple max limit set to 20. (by raising support ticket with Microsoft)

https://msdn.microsoft.com/en-us/library/microsoft.xrm.sdk.deployment.throttlesettings.executemultipleperorgmaxconnectionsperserver.aspx

Batch Size and the Thread settings were used

Message – Delete

Sample Batch Size – 10000

The result: –

It seems that total thread between 10 – 15 with batch size 50, 100, 250, 500 gives similar results. Batch size of 50 with 15 threads could result into time out issue

https://nishantrana.me/2018/12/18/system-aggregateexception-one-or-more-errors-occurred-ssis-integration-toolkit-for-microsoft-dynamics-365-error-in-kingswaysofts-ssis-integration-toolkit/

So the optimum would be around 100 batch size with thread between 10 to 15.

Check out the below post as well while using UPSERT

https://nishantrana.me/2018/06/04/optimum-batch-size-while-using-ssis-integration-toolkit-for-microsoft-dynamics-365/

Hope it helps..

System.AggregateException: One or more errors occurred. (SSIS Integration Toolkit for Microsoft Dynamics 365) error in KingswaySoft’s SSIS Integration Toolkit


Occasionally we might get the below error in our SSIS Package.

[Dynamics CRM Destination [2]] Error: An error occurred with the following error message: “System.AggregateException: One or more errors occurred. (SSIS Integration Toolkit for Microsoft Dynamics 365, v10.2.0.6982 – DtsDebugHost, v14.0.3002.113)KingswaySoft.IntegrationToolkit.DynamicsCRM.CrmServiceException

: CRM service call returned an error: CRM service call returned an error: The request channel timed out while waiting for a reply after 00:01:59.6189794. Increase the timeout value passed to the call to Request or increase the SendTimeout value on the Binding. The time allotted to this operation may have been a portion of a longer timeout. (Error Type / Reason: Timeout)KingswaySoft.IntegrationToolkit.DynamicsCRM.CrmServiceException

(Status Reason: Timeout): The operation has timed out”.

The way we can fix is either increase the time out in the CDS/CRM Connection Manager as suggested.

However the better solution is to keep the batch size low around 100 or so in the CDS/CRM Destination Component. We have observed that decreasing the batch size helps here in case of this error.

Hope it helps..

Fixed NSIS Error – Error Launching installer in Windows 10.


Recenlty I bought Shanling M0 DAP, and while trying to run the setup.exe for its USD DAC Driver I got the below error.

NSIS (Nullsoft Scriptable Install System) is a tool that allows programmers to create installers for Windows. It is released under an open source license and is completely free for any use

The issue could be because of the setup file failing the self-check. So, installing it might not be successful, and could lead to other problems if continued.

This self-check can be skipped by running the setup through command line using /NCRC command line switch.

/NCRC disables the CRC check, unless CRCCheck force was used in the script.

Running through command line with NCRC switch allowed the driver to be installed.

Hope it helps..

PowerApps – Quick Overview (mind map)


Hi,

I was reading this wonderful whitepaper on PowerApps by David Yack and preparing notes on that using mind map.

Sharing the same.

https://www.goconqr.com/p/16333871-powerapps-mind_maps

PowerApps


Hope it helps..

Nishant Rana's Weblog

Everything related to Microsoft .NET Technology

Skip to content ↓