Azure: Execute SSIS Package using Azure Data Factory – Part 2


Ajit Patra's avatarAjit Patra

In the previous post, we created the required Azure resources. In the last step of the previous post, we created Azure SSIS IR which is basically responsible for creating SSISDB in the Azure SQL Server where we’ll deploy the SSIS package.

In this demo, we are going to execute a SSIS package which will load the data from source table ([SalesLT].[Customer]) to the destination table([dbo].[Customer]). So, let’s create the Customer table in destination database with the same schema as that of Customer table in source database using the below script.


Once done, let’s create one SSIS package using SSDT which will load the data from [sourcedev].[SalesLT].[Customer] to
[destinationdev].[dbo].[Customer].

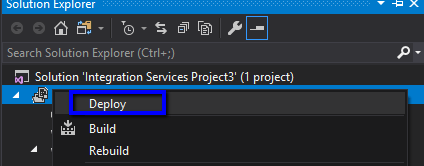
After creating the package, let’s deploy the package from SSDT to the SSISDB database using Deployment Wizard. In Solution Explorer,Right Click on the Project and Click Deploy.

Fill the Azure SQL Server name, credential and click on Connect

View original post 387 more words

Sample code to use RetrievePrincipalAccess Function to get the access rights of the team or user in Dynamics 365 CE


We can use RetrievePrincipalAccess function in Web API to get the access rights of either a user or team on a specific record.

The sample code:


var req = new XMLHttpRequest();

req.open("GET", Xrm.Page.context.getClientUrl() + "/api/data/v9.1/systemusers(D38F5B76-C22E-4256-AF90-CFD14B6589BF)"+
"/Microsoft.Dynamics.CRM.RetrievePrincipalAccess(Target =@Target)?"+ 
"@Target={ 'accountid': '8CB09F67-EB90-E811-A963-000D3AD1CBD6', '@odata.type': 'Microsoft.Dynamics.CRM.account' } ", false);

req.setRequestHeader("OData-MaxVersion", "4.0");
req.setRequestHeader("OData-Version", "4.0");
req.setRequestHeader("Accept", "application/json");
req.setRequestHeader("Content-Type", "application/json; charset=utf-8");
req.onreadystatechange = function () {
if (this.readyState === 4) {
req.onreadystatechange = null;
if (this.status === 200) { 
var results = JSON.parse(this.response);
} else { 
Xrm.Utility.alertDialog(this.statusText);
}
}
};
req.send();

Result:

Hope it helps..

Limitations of Business Rule with Mobile App


Phani Rajasekhar's avatarPhani Rajasekhar

One of our customer reported that couple of Business Rules are not working in Mobile app which are working perfectly in Web application. Spent so much time to understand the problem with Mobile app and finally figured out that one tab on the contact form is not loaded in mobile app because of maximum 5 tabs allowed limitations. Some fields that we are referring in the  business rules are part of this missing tab. So, business rule trying to lock (unlock, mandatory, setvalue etc.,) the field which is not loaded on the form and failing. Finally we decided to create a new form by considering the limitations with mobile app and the business rules that we implemented.

Below are the limitations of Forms in mobile app

  • You shouldn’t have more than 75 fields on the Form
  • You shouldn’t have more than 5 tabs on the Form
  • You shouldn’t have more…

View original post 46 more words

HideCustomAction and Display \ Enable rule in Dynamics 365


Imagine a scenario where we have both the disable rule and HideCustomAction implemented for a ribbon button. Let us see with an example what will happen in this scenario.

First, let us implement the display rule to hide the Delete button from Contact form when it is in a disabled state.

For active record à

We can see the delete button in the command bar.

For disabled record à The delete button is not visible.

Now let us hide the button using HideCustomAction

Interestingly the Delete button is not available in case of the active contact record this time.

The reason for this is because the HideCustomAction button removes the specified node from the ribbon so that it is not rendered instead of hiding it. Therefore any other enable or display rules are not applied to that button.

https://docs.microsoft.com/en-us/dynamics365/customer-engagement/developer/customize-dev/define-custom-actions-modify-ribbon#hide-custom-actions

Hope it helps..

Installation order for Solutions (Patches) in Dynamics 365 Customer Engagement


Let us take see a simple example of how the installation order of solution and patch works in case of Dynamics 365 CE.

Suppose we have a Solution A with only Account Number field with display name renamed to Account Number from Solution A.

Now this solution is exported as managed and imported into the target environment

Now let us create a new solution which renames this field as “Account Number from Solution B” and then import this as managed in the target environment.

So as expected we’d see the display name renamed to Account Number from B as this solution was installed after the solution A.

Now let us create Patch for the first solution, Solution A and rename the field to Account Number from Solution A Patch and import this patch to Target Environment.

After importing the patch solution in Target Environment

We can open the account record and check for the label of the account number field. Interestingly we will see the value to be “Account Number from Solution B”, which was set by the solution B. So installing our patch for solution A didn’t change it.

It is because the platform still gives precedence to the installation order of the solution and not patch. Although we had the patch installed for Solution A after import of Solution B, putting a patch didn’t change the label for the account number as it is belonged to the solution that was imported before Solution B.

Hope it helps..

The following managed solution cannot be imported. The publisher name cannot be changed in Dynamics 365 CE


We can change publisher of a solution using Publisher lookup field of the solution in the Information section.

However, if the solution has already been imported in target environment, changing the publisher and trying to import the solution will result in the below error.

Here we try renaming the publisher from “default..” to “sable37”

https://support.microsoft.com/en-ae/help/4463386/the-publisher-name-cannot-be-changed-from-publisher-name-to-other-publ

One way of doing it is to delete the already installed managed solution (if it is feasible) in the target environment and doing the import again.