PCF Control to show Twitter Likes Timeline


In the same line as Profile Timeline PCF Control, we can use the same concept to create a control that shows likes timeline that displays the recently like tweets of a specific public Twitter Account.

More on this

https://developer.twitter.com/en/docs/twitter-for-websites/timelines/guides/likes-timeline

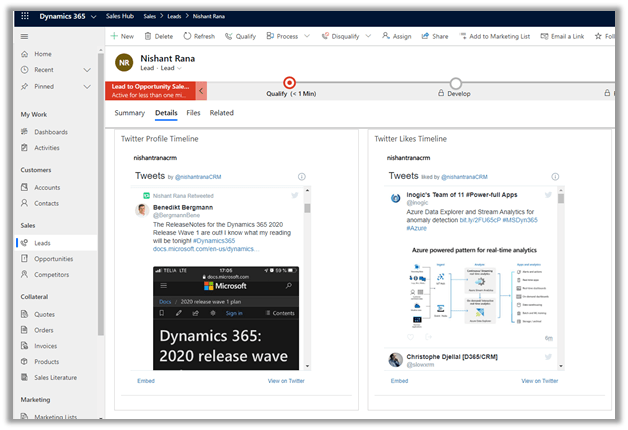
Here we have specified the public twitter account nishantranacrm in this case, it will show all the tweets that are liked by that profile.

We can have both the Profile Timelines and Like Timelines control for the profile that we are interested in for a lead, contact or account record.

Get it here

https://github.com/nishantranacrm/PCFTwitterLikesControl

Hope it helps..

PCF Control to show the Twitter profile timelines


Created a simple PCF Control to show the twitter timelines for the profile. It basically uses embedded tweets.

Get the control here

https://github.com/nishantranacrm/TwitterPCFControl

Simply enter the twitter profile in the text field and it will render the latest tweets of that profile.

Inside an account form à

For the contact record à

Embedded timelines make it extremely easy to embed the Tweets on a web page.

We can navigate to publish.twitter.com to generate the code.

Here I have searched from my profile, which then next gives us the display options to select.

Here we selected the Embedded Timeline display option, which generated the code for us.

The code that we are using inside our PCF Control.

Read more about it here

https://developer.twitter.com/en/docs/twitter-for-websites/timelines/overview

Hope it helps..

Best resources to start with Power Apps Code Component (PCF)


There are so many outstanding blogs, videos out there for learning PCF, below my favourite resources for someone who is just starting with development of Power Apps custom code components

https://debajmecrm.com/2019/04/26/in-depth-end-end-walkthrough-develop-your-custom-controls-using-power-apps-component-framework-and-use-it-on-your-crm-interface/

https://powermaverick.dev/2019/05/18/create-custom-controls-using-powerapp-component-framework/

https://www.xrmvirtual.com/meeting-details/?id=766fc80b-70cf-e911-a860-000d3a537884

PCF Academy 

Thanks Debajit, Danish , Andrew Butenko and Roohi

https://docs.microsoft.com/en-us/powerapps/developer/component-framework/community-resources

and after you have developed an awesome component submit it here

https://pcf.gallery/

Thanks to Guido for managing it.

Very simple PCF Control to show Gravatar


The Gravatar or globally recognised avatar is basically an image associated to our email id, which appears besides our comments, blogs posts, sites etc.

https://en.gravatar.com/site/implement/

To request an image of Gravatar, we need to first calculate hash of the email id and pass it to the URL

The format à

https://www.gravatar.com/avatar/{HASH}

e.g.

https://www.gravatar.com/avatar/205e460b479e2e5b48aec07710c08d50

https://en.gravatar.com/site/implement/images/

Using this information, just created a PCF control for single line of text – email type that will show the Gravatar associated to it. It was more from learning perspective than trying to implement a business case or requirement.

This is how the control looks like within the form.

For another email id, it shows the corresponding avatar image.

For cases where there are no gravatar associated it shows the default image

And as we are using it for the email type of text field, the usual validation provided by the platform works seamlessly.

Get the tool here

https://github.com/nishantranacrm/GravatarPCFControl

Hope it helps..

How to – Use Advanced condition builder in Power Automate (Microsoft Flow)


Was just exploring the advanced condition builder added to the Power Automate (Flow) beginning of the last year.

The new conditional builder makes it very easy to write complex conditional logic compared to using expressions.

We can easily add row (conditions) and group them

The row (condition) can be grouped by either And or Or.

To simplify the view, the group can be collapsed.

The group can be deleted, moved up or down along with ungrouping.


For complex expression, we use the regular Dynamic Content expression builder to enter in the left side of the row as shown below.

Example of its usage – https://nishantrana.me/2020/01/02/using-power-virtual-agent-and-power-automate-flow-to-create-a-simple-bot-for-cases-in-dynamics-365-for-customer-service/

Total 10 conditions can be added after which the option of adding more option gets disabled.

We can add a group as the 10th row and again add conditions in that row.

Similarly, 10 group as row can be added

Similarly, we can have 5 nested groups

The below post by Benitez Here explains it best, and includes comparison with the workflow designer.

http://benitezhere.blogspot.com/2019/02/flow-condition-builder-how-tos.html

Hope it helps..

Advertisements

Publishing the bot– Power Virtual agent


In the last post, we saw how to create a simple bot, now let us see how we can publish it.

Navigate to the Publish tab in the side navigation pane and click on Publish.

After a successful publish click on the demo website to test the bot

Navigate to Manage à Channels to configure it for various channels.

Below are all the channels that the bot can be configured for.

Demo Website à

We can specify the Welcome Message as well as the Conversation starters

Custom Website à

It can be added as Iframe to the existing web sites.

Within Power Apps Portal, we can add the bot to the Iframe Component as shown below

Power Virtual Agent also comes with analytics to show key performance indicators for different topics.

Get all the details here

https://docs.microsoft.com/en-in/power-virtual-agents/analytics-summary

Helpful posts –

https://readyxrm.blog/2019/11/06/adding-a-power-virtual-agent-to-a-power-apps-portal/

https://joegill.com/powerapps-portal-virtual-agent-bot/

Hope it helps..