How to – Configure Voicemail in Omnichannel Voice Channel – Dynamics 365 Customer Service


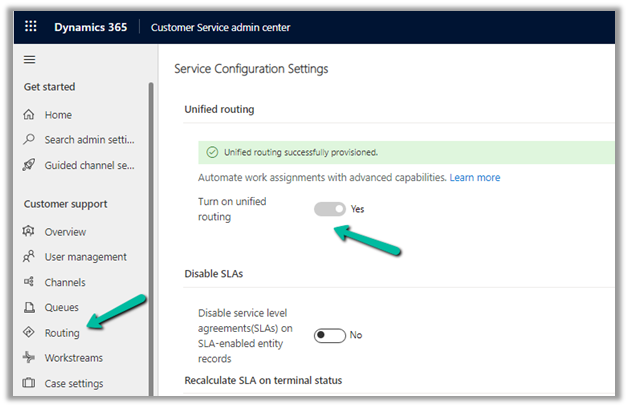
For voice mail to work, make sure Unified Routing is provisioned.

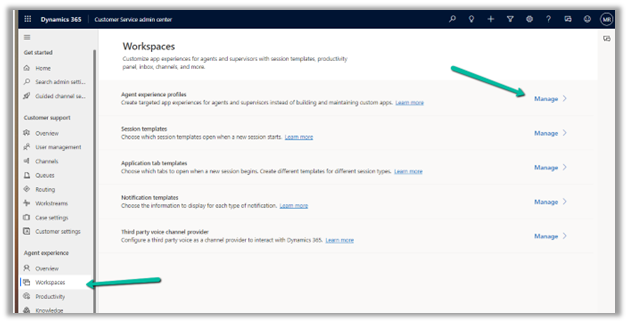
Next, we need to create a new Agent experience profile.

Navigate to Agent Experience >> Workspaces and select Manage for Agent experience profiles.

Create a new record.

Add the users to it. One user can be part of only one Agent experience profile record.

Click on edit for Inbox

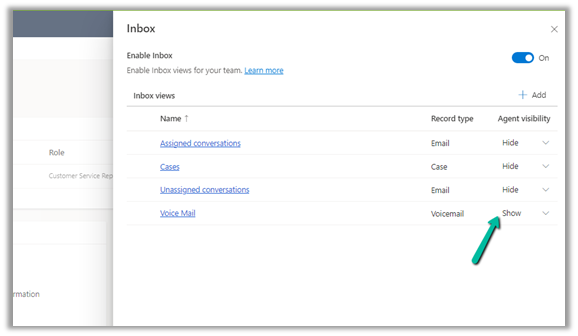
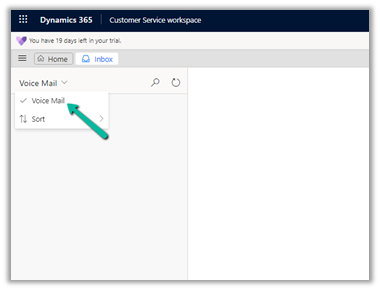
Enable Inbox, and add a view for Voice Mail.

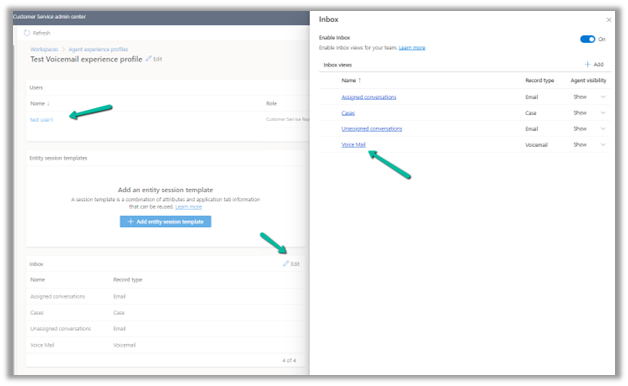
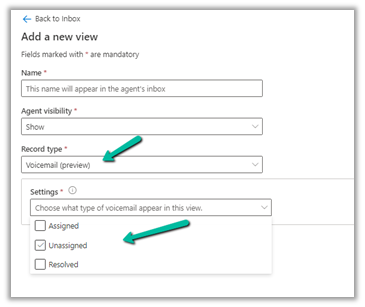
We can specify what views the agent can see in the inbox.

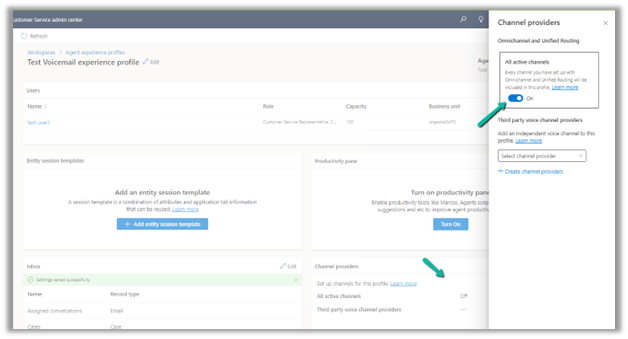
Also, switch on All active channels.

The agent inside Customer Service Workspace can now see the Voice Mail option in his Inbox.

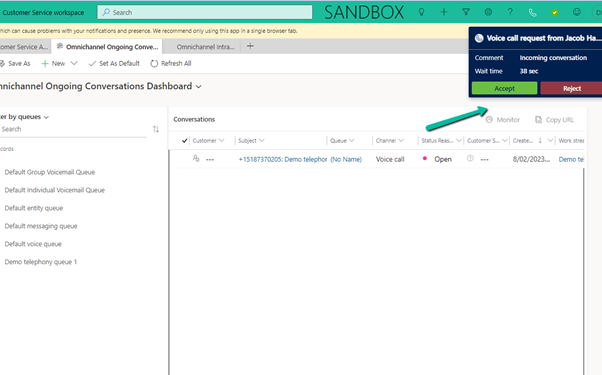
Here we first tested the voice mail feature by calling the personal number assigned to the agent. The agent was not logged into the Customer Service Workspace app.

On calling we get the prompt that the agent is not available and to record the voice message.

After recording the message, if we log in to the CSW app, we can see a voicemail record created for the user.

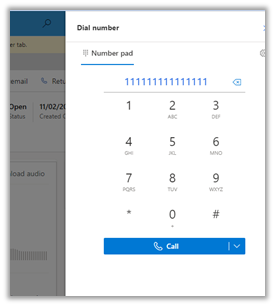
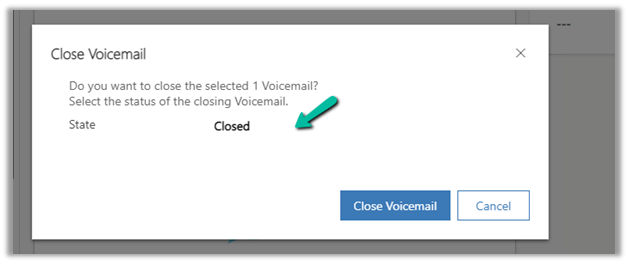
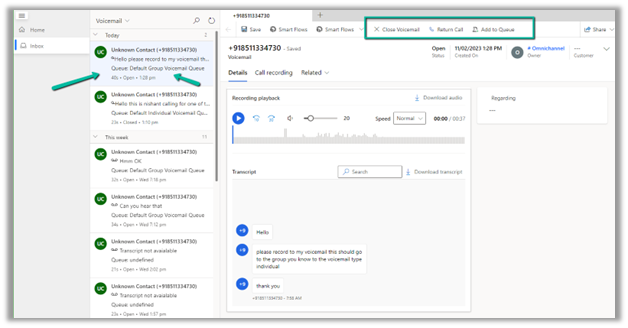
The user can hear the recording, call back the customer using Return Call, Add to Queue, or close the voice mail.

Return Call will launch the phone dialer, with the customer’s number populated.

Close Voicemail will set the status of the voicemail record as Closed.

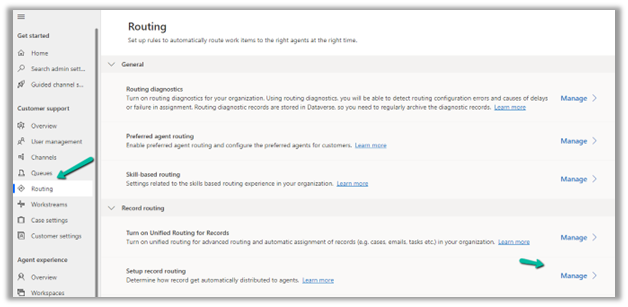
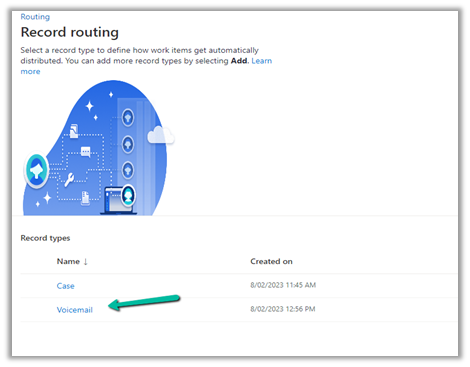
For this to work, we need to have a Record Routing configured for Voicemail.

Navigate to Customer Support >> Routing >> Manage for Setup record routing.

We have created routing rules for the Voicemail record type.


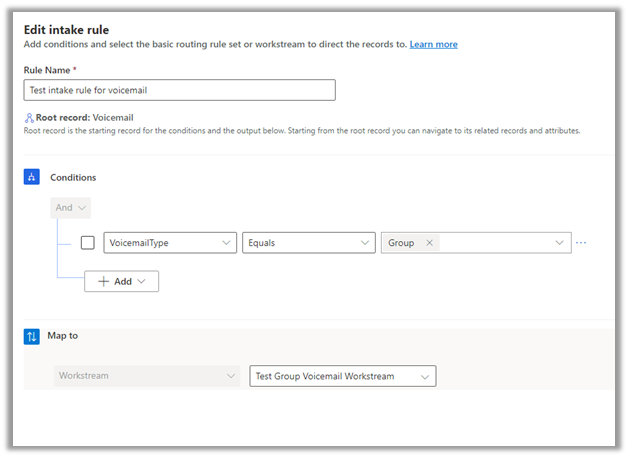
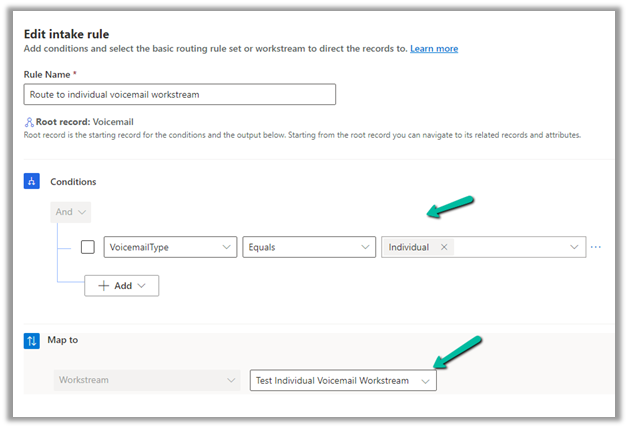
We have 2 intake rules configured, one for Voicemail type individual (which worked in our earlier scenario, when a customer called the personal number of the agent) and one for a group that would apply to Queue.

Intake rule for Group

Intake rule for individual.

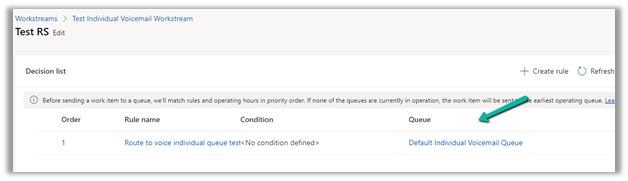
The workstream for the voicemail type individual

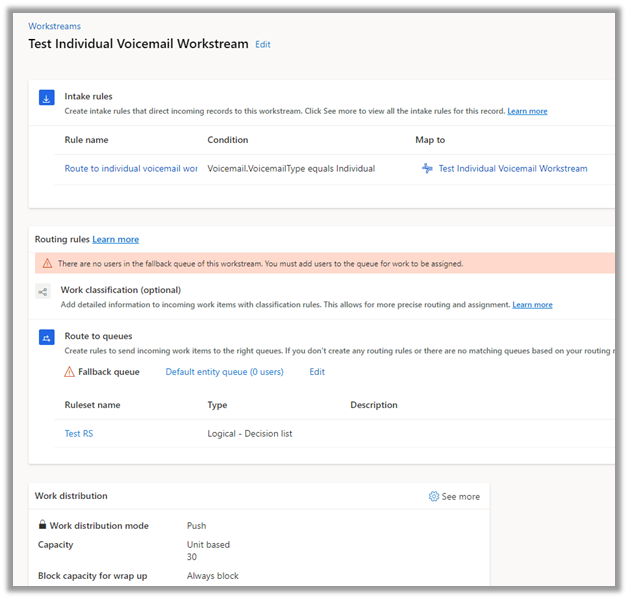
It routes to the Default Individual Voicemail Queue, which the agent is part of.

Similarly we have Workstream for Voicemail type Group

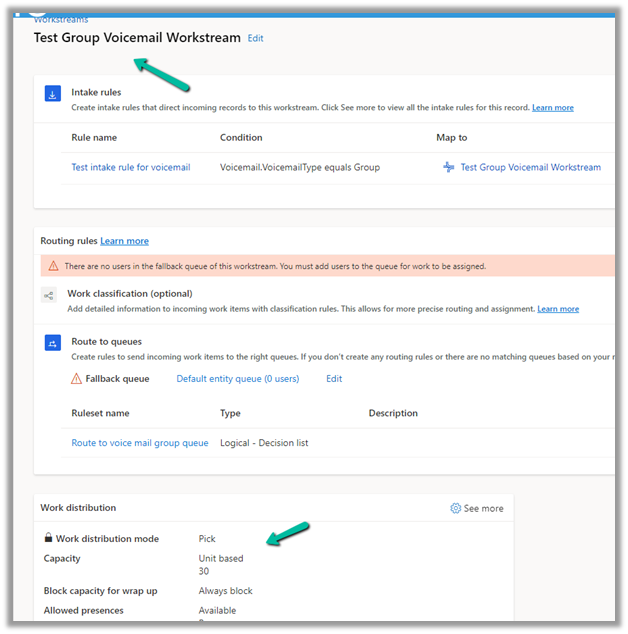
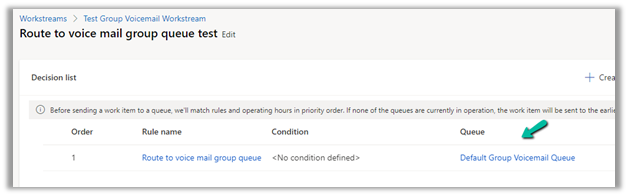
The ruleset in it routes to the Default Group Voicemail Queue.

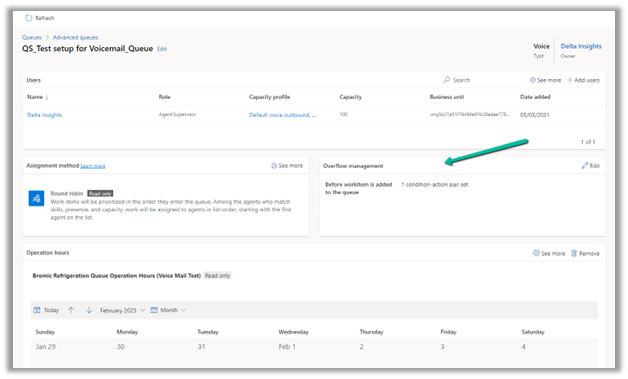
Now to test it, we have created a queue, with only one user currently in it.

Most importantly we have configured an Overflow management rule to it along with operating hours.

Basically if a customer calls out of operation hours, it should go to voicemail.

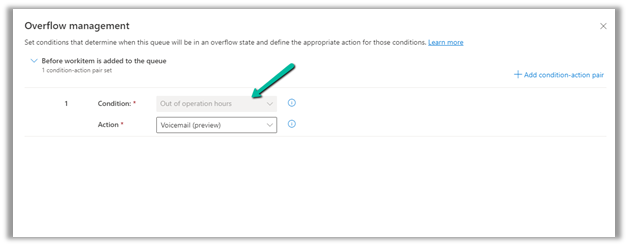
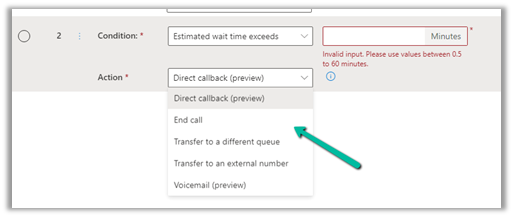
Here we can specify multiple condition-action pairs.

Conditions

Actions

Next, we created a workstream of the type voice channel, which routes to the above queue.

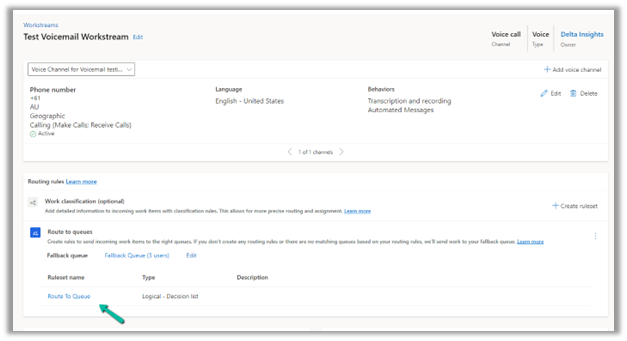
Now as soon as the customer calls the number, it goes to the queue with the overflow conditions, and if the agent is not logged in/out of operation hour condition is fulfilled, the customer is informed to record the message.

When the agent logs in to the CSW app, he can see a voice mail record created and assigned to the Default Group Voicemail Queue.

In short –

Enable

Unified Routing

Configure

Agent Experience Profile for the agent.

Enable Inbox.

Specify a view for Voicemail

2 Queues

Individual / Personal Phone Numbers

Group / Queue

2 Workstreams (type – Record)

(Voicemail)

Individual Workstream – Push Based.

Group / Queue Workstream – Pick Based.

2 Record Routing Rules (Voicemail)

Route – Voicemail type Individual to Individual Queue

Route – Voicemail type Group to Group Queue

Individual Call

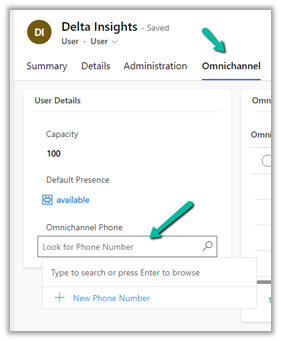
Specify the Phone Number for the agent in the Omnichannel Tab – System User record

Group Call

Create a workstream and specify an overflow condition.

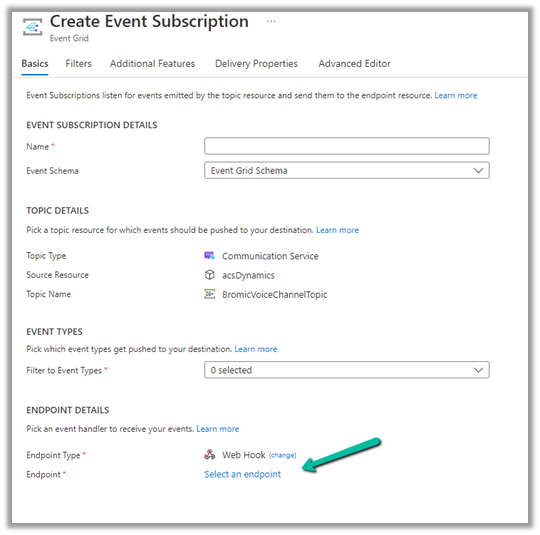
For configuring Call Recording please refer – https://nishantrana.me/2022/12/20/configure-azure-event-grid-system-topic-and-subscription-to-enable-call-recording-and-sms-in-dynamics-365-omnichannel-voice/

Get all the details – Configure Voicemail

Must read – https://neilparkhurst.com/2022/11/08/omnichannel-for-customer-service-voicemail/

Hope it helps..


Advertisements

How to – assign a personal phone number to agents in Voice Channel (Omnichannel)– Dynamics 365 Customer Service


The reason we would assign a personal phone number to the agents is that they can use that number to make an outbound call to the customers or in some scenarios, the customer wants to directly call the specific agent for direct follow-up on a particular case.

Let us first add a new phone number.

Navigate to Customer Service Admin Center >> Customer Support (Channels) >> Phone numbers (Manage)

Select + New number (in case we have purchased a number from Microsoft)

In case of Direct Routing, click on Advanced
>> Bring your own number via Azure Direct Routing

Specify the Phone Number, Carrier, Country / Region, and Number type, and select Receive calls and Make calls.

Open the system user’s record, and specify the phone number added in the Omnichannel Phone field in the Omnichannel tab.

Now login to Customer Service Workspace with the agent’s account.

The agent will now have the option to make an outbound call using the personal number assigned.

Also, we can see the agent receiving a call on that number directly.

Get more details – https://learn.microsoft.com/en-us/dynamics365/customer-service/voice-channel-outbound-calling?tabs=customerserviceadmincenter#assign-personal-phone-numbers-to-agents

Hope it helps..

Advertisements

Connect Voice Channel to using an existing Azure Communication Services (ACS) Resource – Dynamics 365 Customer Service


We had earlier configured Voice Channel in our Dev environment using ACS Direct Routing.

Please refer to this blog post on how to set up a voice channel using a new ACS. https://nishantrana.me/2022/10/17/how-to-set-up-omnichannel-voice-using-azure-communication-service-acs/

Recently while configuring the UAT environment, we thought of reusing the same ACS resource configured earlier.

Highlighting the key steps required for it –

The first step is to install the Voice Channel in the new environment

https://nishantrana.me/2023/02/08/install-voice-channel-in-omnichannel-dynamics-365-customer-service/

Followed by registering a new App in Azure Active Directory.

This will be required while connecting to the Azure Communication Services.

Enter the details of existing ACS, like name, ID, and Connection String.

And the App ID and App Tenant Id while connecting to ACS in the new environment.

Now if we want to use the feature of Call recording, we can reuse the existing Event Grid System Topics created for the Dev environment, by simply creating a new Event Subscription for it.

Copy and specify the webhook endpoint from the UAT / New environment

Select Manage for Channels >> Phone numbers

Select Advanced

Copy the Webhook endpoint for the new event subscription from the UAT / New env.

For the exact steps refer – https://nishantrana.me/2022/12/20/configure-azure-event-grid-system-topic-and-subscription-to-enable-call-recording-and-sms-in-dynamics-365-omnichannel-voice/

The next step would be to configure a new phone number, voice channel, workstream, etc.

So basically we can have multiple environments using the same ACS Resource using different numbers and with call recording for this we need to

  • Create / Register a new Azure AD app for each environment.
  • New Event Subscription for the existing Event Grid System Topics.

Get all the details here – Connect to ACS

Hope it helps..


Advertisements

Install Voice Channel in Omnichannel – Dynamics 365 Customer Service


Make sure all the prerequisites are in place –

https://learn.microsoft.com/en-us/dynamics365/customer-service/omnichannel-provision-license#prerequisites

Login to Power Platform Admin Center >> Environments

https://admin.powerplatform.microsoft.com/environments

Select Resources >> Dynamics 365 apps

Select Manage for Omnichannel for Customer Service – Telephony


It will open Dynamics 365 Administration Center | Omnichannel page

Click on Add environment

Select the required environment and click on Next.

If we do not have the required subscription for a particular channel we will get the below error

Next for Voice, select Add Voice along with Voice and Messaging preview terms.

Keep clicking on Next till confirmation (add other channels if required)

The confirmation page will show all the selections and details.

Clicking on Finish starts the installation process.

After around 1.5 -2 hours or so we could see the installation being successful.

If we want to add another channel e.g. SMS, select the SMS tab and save to start the process.

This starts the update

After an hour or so we see the status as installed for both Voice and SMS.

On opening the Customer Service Admin Center app, we can see the option of getting started with a voice demo.

Assign the account you are using the Omnichannel Agent and Omnichannel Admin role (even if you are a system administrator you need this role to start with the voice demo, admin to configure and agent to test)

It will create the workstreams, acquire a phone number, create a voice channel, power virtual agent, etc. for the demo

After around 2 minutes or so, we will have our voice demo setup done.

We can open the agent app which is either Omnichannel for Customer Service or Customer Service Workspace App and can call the phone number configured to test the application.

We can see the following workstreams created for Voice and Voicemail channels.

The demo telephony workstream 1 

The agent receiving the notification

*At times we have faced an issue when there is a bot configured, so in case you are facing any issues, try removing the bot from the workstream

Hope it helps..

Advertisements