Fixed – AADSTS7000218: The request body must contain the following parameter: ‘client_assertion’ or ‘client_secret


While trying to access Azure resources using UsernamePasswordCredential credential we were getting the below error

https://docs.microsoft.com/en-us/dotnet/api/azure.identity.usernamepasswordcredential?view=azure-dotnet

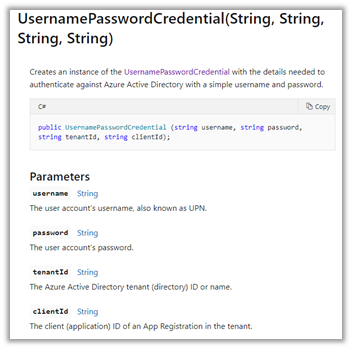
Azure.Identity.AuthenticationFailedException: ‘UsernamePasswordCredential authentication failed: A configuration issue is preventing authentication – check the error message from the server for details.You can modify the configuration in the application registration portal. See https://aka.ms/msal-net-invalid-client for details. Original exception: AADSTS7000218: The request body must contain the following parameter: ‘client_assertion’ or ‘client_secret’.

Trace ID: ef6c9e2b-862a-4a8b-9519-9a9072d23301

Correlation ID: 5f9bae95-e45a-4da5-b27c-ad9704e7334e

Timestamp: 2020-11-28 05:58:05Z’

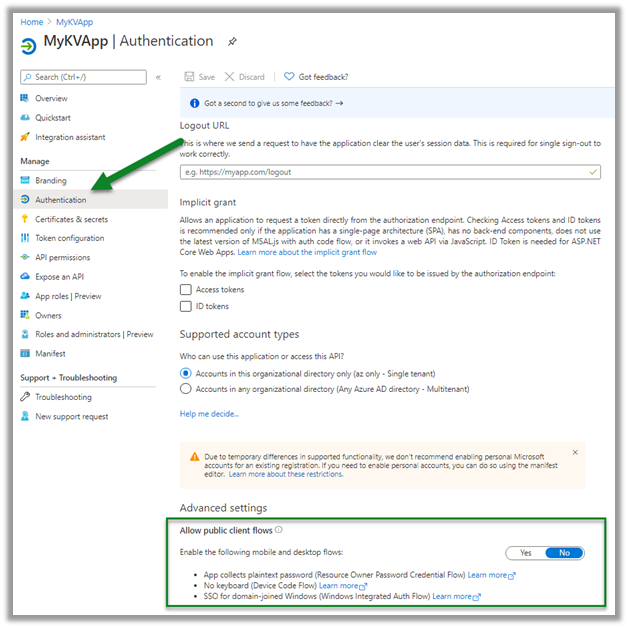
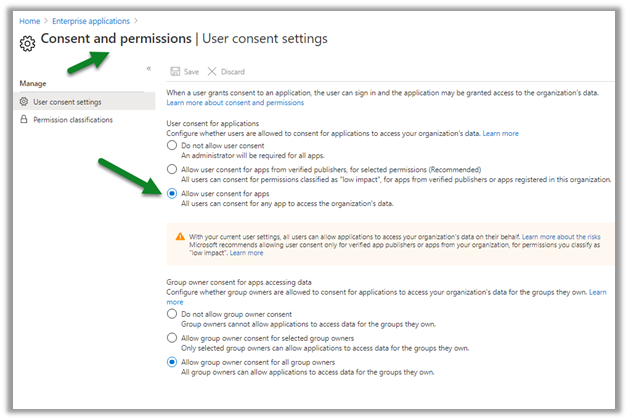
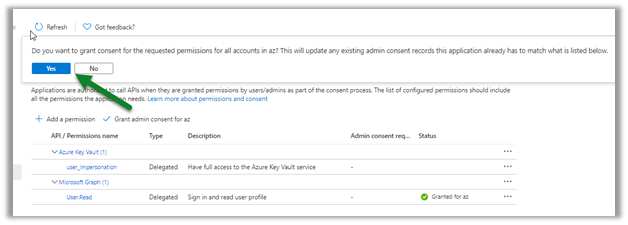
This was because Allow public client flows was disabled for the application registered in Azure AD.

Enabling it fixed the issues for us.

https://docs.microsoft.com/en-gb/azure/active-directory/develop/scenario-desktop-acquire-token?tabs=dotnet#username-and-password

More on ROPC

https://nishantrana.me/2019/08/23/connect-to-dynamics-365-web-api-using-oauth-2-0-resource-owner-password-credential-ropc/

Hope it helps..

Advertisements

Fixed – AADSTS65001: The user or administrator has not consented to use the application with ID


The below error occurs for the application registered with Azure AD (Delegated Permissions), which requires either user or an administrator’s consent for the permissions it needs.

“Azure.Identity.AuthenticationFailedException: ‘UsernamePasswordCredential authentication failed: AADSTS65001: The user or administrator has not consented to use the application with ID ‘9ea6c0e6-5ab5-4816-b787-5391cd41fd7b’ named ‘MyKVApp’. Send an interactive authorization request for this user and resource.”

The below setting specifies that all users can allow applications to access the organization’s data on their behalf.


Here the admin can grant the consent through the portal as shown below from Home > App > API Permissions


or can also use Consent URL

https://docs.microsoft.com/en-us/azure/active-directory/manage-apps/grant-admin-consent#construct-the-url-for-granting-tenant-wide-admin-consent

https://login.microsoftonline.com/{tenant-id}/adminconsent?client_id={client-id}


When trying to access the consent URL using another non-admin user, we might get the below message, which means that only the admin can provide the required consent.


Signing in with the Admin account presents the below message for granting the app the required permissions.


Admin can also revoke the admin consent (along with the permission as shown below) from the portal as shown below through Remove admin consent option.


Get all the details here –

https://docs.microsoft.com/en-us/azure/active-directory/develop/application-consent-experience#consent-and-permissions

Hope it helps..


Advertisements

How to – Read Secret from Azure Key Vault using SecretClient (UsernamePasswordCredential)– C#


In the previous post, we used ClientSecretCredential Token Credential to read the secret from the Key Vault. In this post, we’d use UsernamePasswordCredential class instead.

Login to Azure Portal –

https://portal.azure.com/

Here we have generated a Secret named secret1 inside MyKeyVaultCRM

We have also provided GetSecret permission to the below User account

Also, we have registered an app

And enabled All public client flows for generating the token using username and password.

Let us create a console app to read the secret.

Add the following NuGet packages to the project.

Get the Vault URI and Directory ID (tenant id)

And the Client Id of the App registered

Sample source code:

We are using SecretClient class here.

Get all the details here

https://azuresdkdocs.blob.core.windows.net/$web/dotnet/Azure.Identity/1.4.0-beta.1/api/index.html

Hope it helps..

Advertisements

How to – Read Secret from Azure Key Vault using SecretClient class – Console App C#


Azure Key Vault can save 3 different types of information.

  • Keys – Encryption keys (asymmetric – public/private), can be created in Key Vault or imported, stored in software or HSD
  • Secrets – unstructured text, can be created or imported, stored in the software.
  • Certificates – can be created or imported, contains 3 part – cert metadata, key and secret

Key Vault provides data protection – at rest, in transit, and use.

Key Vault provides Application Security i.e. instead of saving secrets hardcoded in the application, or the configuration files, the secrets can be stored in Key Vault.

Login to Azure Portal

https://portal.azure.com/

Here we have generated a Secret named MyCRMKey inside MyDynamics365KeyVault

We have also provided GetSecret permission to the MyApp application registered in the Azure AD.

Let us create a console app to read the secret.

Add the following NuGet packages to the project.

Get the Vault URI and Directory ID (tenant id)

And the Client Id of the App registered

Sample source code:

We are using SecretClient class here.

Get all the details here

https://azuresdkdocs.blob.core.windows.net/$web/dotnet/Azure.Identity/1.4.0-beta.1/api/index.html

Hope it helps..

Advertisements

How to – Use AzCopy to transfer files from local drive to Azure Blog Storage


AzCopy is a command-line utility that can be used for copying data to and from the storage accounts.

Download the appropriate version of the tool –

https://docs.microsoft.com/en-us/azure/storage/common/storage-use-azcopy-v10#download-azcopy

We’d upload the files to the following container

Below will be the source files

Let us login first (here we are using Azure Active Directory to authorize AzCopy, the other option is using SAS token)

https://docs.microsoft.com/en-us/azure/storage/common/storage-use-azcopy-v10?WT.mc_id=itopstalk-blog-thmaure#authorize-azcopy

It will ask us to open the URL in the browser and enter the code followed by credentials.

After successful sign-in we can close the browser window.

Now let us transfer the directory along with the files inside it using the below syntax

azcopy copy ‘<local-directory-path>’

https://<storage-account-name&gt;.<blob or dfs>.core.windows.net/<container-name>’ – -recursive

in our case,

azcopy copy ‘C:\Customers’ ‘https://storageaccountrg9b58.blob.core.windows.net/mycontainer1‘ – -recursive

Get the URL from the Properties of the container

Make sure the account (service principal) used has the Storage Blob Data Contributor or Storage Blog Data Owner role assigned required for uploading the files.

Run the command.

We can see the folder and files successfully transferred.

Check other posts – 

Transfer files using – Azure Blob Upload task and Premium File transfer task using SSIS Package

https://nishantrana.me/2020/11/24/transfer-files-from-local-drive-to-azure-blob-using-azure-blog-upload-task-ssis/

https://nishantrana.me/2020/11/20/transfer-files-from-local-drive-to-azure-blob-using-premium-file-transfer-task-ssis/

Hope it helps..

Advertisements

Transfer files from local drive to Azure Blob using Azure Blob Upload Task – SSIS


Similar to Premium File Transfer Task,

The Azure Blob Upload Task component can be used to easily transfer files from local drive to Azure Blob storage.

https://docs.microsoft.com/en-us/sql/integration-services/control-flow/azure-blob-upload-task

Let us take a simple example to see it in action.

Here we will pick the folder Customer and its subfolders along with the files inside it and will move it or transfer to the Azure Blob Container.

Create a new SSIS Package and drag the Azure Blob Upload Task to the control flow designer.

Double click the task and specify the following values as shown below

AzureStorageConnection – specify the SSIS Connection Manager for Azure Storage.

Blob Container – the name of the existing blob container

Local Directory – the local directory containing the files to be uploaded.

Search Recursively – specify whether to search for files within Sub-directories.

File Name – specify the pattern for the files to be selected.

Time Range from/to – to pick files modified within that range.

Let us execute the package.

We can see the content transferred successfully to Azure Blog storage


Also, check out –

Using Azure Blob Storage component with Dynamics 365

https://nishantrana.me/2020/10/20/using-kingswaysoft-azure-blob-storage-component-with-dynamics-365/

Hope it helps..

For SharedAccessSignature -specify following details

Account Name – Storage Account Name, Name of blob in the Blob Path.

Select appropriate permissions and Generate SAS Token for the blob, copy and paste the Blob SAS Token in the Token in the connection editor above.

Test Connection –