Recently we were calling an API (that expects multipart/form-data) to pass the image uploaded in Dataverse’s Image Column.
We used Power Automate for this i.e. to get the image uploaded and use HTTP Action to call and pass the Image details to it.
Below is the specification of the API
https://vision.foodvisor.io/docs/#/paths/analysis/post

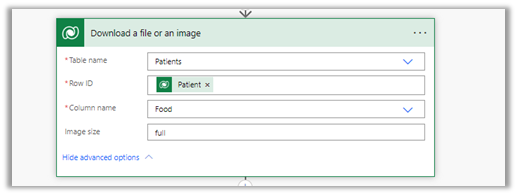
We used the “Download a file or an image” action to get the Image details
Below is how the HTTP action was used to pass the required details.

The successful response –

The body of the HTTP action –
{
"$content-type": "multipart/form-data",
"$multipart": [
    {
      "headers": {
        "Content-Disposition": "form-data; name=\"image\"; fileName=\"@{items('Apply_to_each_2')?['filename']}\""
      },
      "body": @{body('Download_a_file_or_an_image')}
    }
  ]
}
If we want to pass more than one data, we can have multiple headers defined as shown below

Helpful post –
Hope it helps..
Advertisements