Getting started with TypeScript


TypeScript is an open-source programming language developed and maintained by Microsoft.

TypeScript adds Type support to JavaScript, which makes sure type checking is done resulting in fewer bugs, adds autocomplete supports in the TypeScript editor, supports Object Orientation and structuring and packing of the code, etc.

The code written in TypeScript transpiles to JavaScript by TSC i.e. TypeScript Compiler.

The easiest way to install TSC is to install it as a Node.js package using NPM i.e. Node Package Manager at the command line.

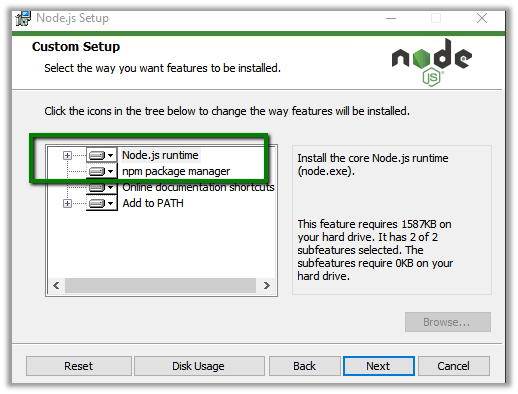
Download and install Node.js first if it is not already installed.

https://nodejs.org/

Make sure to include Node.js runtime and npm package manager.

Now to install TSC, open the terminal and type the below command

npm install -g typescript

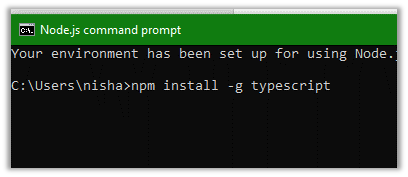
g makes sure that it is installed globally and not just in the directory from which we are running the command.

There are different editors available for TypeScript

Let us see how to configure TypeScript for Visual Studio Code.

Download link for Visual Studio Code (if not already installed)

https://code.visualstudio.com/

Open Visual Studio Code and select the working folder or

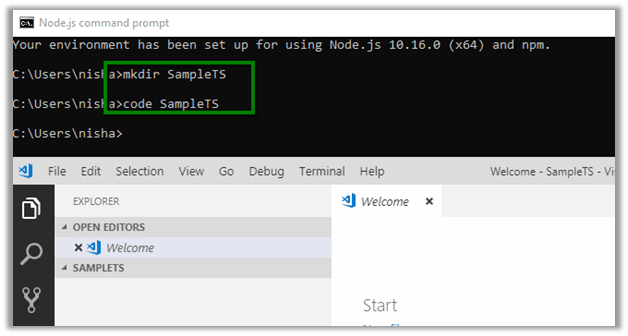
in Node.js command prompt, create the directory and open the visual studio code from there

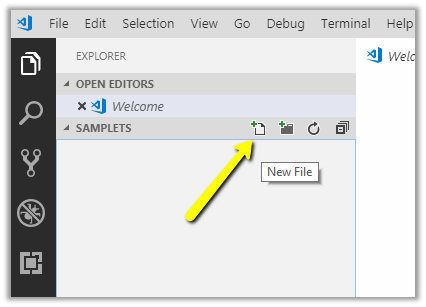
From file explorer in Visual Studio Code, create the new .ts file

Create the typescript file with the extension .ts and add the JavaScript code

To compile the TypeScript code, open the integrated Terminal in Visual Studio Code and type

tsc <<FileName.js>>


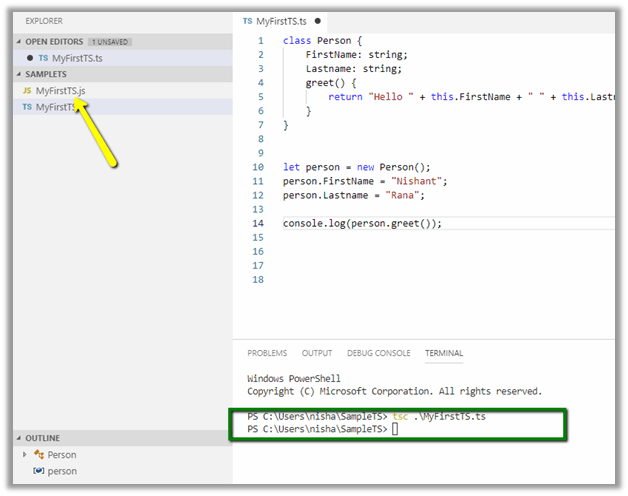
This creates a new corresponding JavaScript file for the TypeScript file.

To run it use the node command

node <<filename>>

We can also modify the TypeScript compiler’s default behavior by adding tsconfig.json.

Here we have added tsconfig.json file in the project with the following code

Check below link for different compilerOptions

https://www.typescriptlang.org/docs/handbook/compiler-options.html

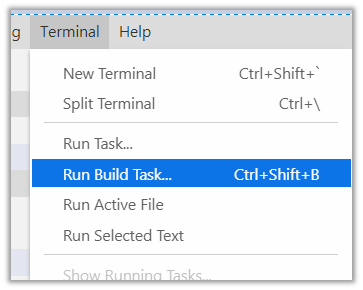
To configure the build, execute Run Build Task…

As we have created the tsconfig.json file earlier, we will be presented with the following option

Select tsc: build to run the build task.

If tsc: watch is selected the compiler will watch for the changes in TypeScript files and runs the transpiler whenever the changes are saved.

To set the build or watch task as default, select Configure Default Build Task from the Terminal menu.

On selecting tsc: build task, tasks.json file is added inside .vscode

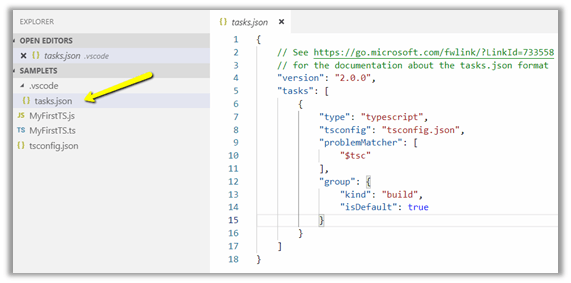
This sets build task as default, so now when we run the Run Build Task, we are not prompted to select a task.

This completes the basic environment setup for using TypeScript with Visual Studio Code.

Hope it helps..

{In-depth end-end walkthrough} Develop your custom controls using Power Apps Component framework and use it on your CRM interface.


Step by Step series on understanding and developing PowerApps Custom Controls using PowerApps Component Framework.

Also the below article

https://danishnaglekar.wordpress.com/2019/05/18/create-custom-controls-using-powerapp-component-framework/

Debajit's avatarDebajit's Dynamic CRM Blog

Before I stepped in the wonderful world of Dynamics, I used to develop custom controls in ASP.NET. Couple of days back when Microsoft announced the release of Power Apps component framework using which you can develop custom controls and use it on Dynamics forms, I was overwhelmed. It was kind of nostalgia for me. Going back to the old glory days of custom control development.

And here I was reading the pre-release documentation from Microsoft. https://docs.microsoft.com/en-us/powerapps/developer/component-framework/custom-controls-overview

As I was reading I could find that while all the pieces are documented, there are certain areas in documentation where developers may get stuck. Also the documentation does not show end to end of how your custom control can end up being used on a CRM Form.

So I am penning down this blog for all my blog readers. A detailed, end-end scenario where you will develop your custom controls and use in…

View original post 142 more words

Few improvements in new model-driven form designer WYSISYG Preview in PowerApps


Few months back I wrote about the features of the new model drive form designer in PowerApps.

https://nishantrana.me/2018/12/24/the-new-model-driven-form-designer-wysisyg-in-powerapps-for-model-driven-apps-dynamics-365-ce-preview/

There are few improvements done in it since then

For e.g.

  • Fields and Sections can now be selected and positioned.

Phone field:

Address Section:

  • Header and Footer are available now for customization.

However still there are few important features missing when compared to our classic form designer like

  • Sub Grid control are not available on the form for configuration.
  • No Business Rules or Form Properties dialog box.
  • No Enable Security Roles option
  • No field explorer or Relationship explorer so cannot create new fields or relationships.

The new model driven form designer looks promising, however we’d have to wait a bit more, before it can have all the expected (or some new) features added to it.

Hope it helps..

{Dynamics 365 for Sales AI} How are relationship analytics calculated? Let Microsoft Docs tell you


Debajit's avatarDebajit's Dynamic CRM Blog

Recently I have been working on setting up various features of Sales AI for a customer and I have to tell you that there is so much to it than meets the eye. And one of them is the Relationship Analytics. If you go to Account/ Contact/ Lead/ Opportunity form then you would see some Relationship Analytics showing up. Below is the screenshot for an opportunity.

image

But the question is – “How is Microsoft showing up all these values? After all they must be based on some logic right?”.

Then answer is – “ Yes they are.” But believe me, if you are not aware of the logic behind it, it may be very difficult to understand. And frequently when we are distress we come home to find salvation. And so you should come back to Microsoft Docs to understand what the complexity is all about.

When I asked my…

View original post 109 more words

Fixed – Error: The “Derived Column” failed because truncation occurred, and the truncation row disposition on “Derived Column.Outputs[Derived Column Output].Columns[FilePath]” specifies failure on truncation. A truncation error occurred on the specified object of the specified component.


We might get the error while using Derived Column in our SSIS Package

To fix it right click the Derived Column component and select Show Advanced Editor ..

Go to Input and Output Properties tab, expand Derived Column Output and select the field and update the length in the properties window.

Hope this helps..

Advertisements

Fixed – Workflows not firing “Waiting For Resources” in Dynamics 365 On-Premise


Recently in one of our environments, we started getting the issue that all our workflows were getting stuck at “Waiting for resources”.

As usual first step was to check if Microsoft Dynamics 365 Asynchronous Processing Service is running it or not.

The service was disabled, so we enabled it. But still, it didn’t fix the issue.

Next thing we tried was as suggested in the below article

https://www.powerobjects.com/blog/2013/03/28/how-to-fix-a-crm-workflow-stuck-in-progress/

The value for AsyncSdkRootDomain was blank which we updated followed by a restart of the service. Still no luck.

Eventually, we came to know that Servers setting for the roles Full Server were in the disabled state inside the Deployment Manager for the organization.

The reason CRM was still working because these services (including IIS Web Site) were already manually started earlier, however, the status was still disabled for this setting within Deployment Manager. (These settings were done by the network team who were planning to create the replica of these machines, and they wanted to disable the applications and our CRM technical team was unaware of it.)

Enabling it fixed the issue for it.

Hope it helps..