Using KingswaySoft Azure Blob Storage component with Dynamics 365


KingswaySoft provides 3 components specific to Azure Blog Storage

  • Azure Blob Connection Manager
  • Azure Blob Storage Source
  • Azure Blob Storage Destination

Check other blog posts on SSIS

https://nishantrana.me/2020/10/16/ssis-kingswaysoft-and-dynamics-365/

Let us take a simple example where we are extracting \ reading contact data from Dynamics 365 \ CDS and saving it as a text file in Azure Blob Storage.

Create a new SSIS Package, and drag the Dynamics CRM Source component to it.

(Define the connection to Dynamics CRM instance using Dynamics CRM Connection Manager)

We have selected emailaddress1, first name, and the last name attributes.

Next drag an Azure Blob Destination Component, we will first define the connection to Azure Storage first

Navigate to the Access keys in the existing Storage account to get the account name and the key (or create a new Storage account)

Paste the values and test the connection.

Below we have specified the name of the existing Blob Container, the name of the file to be created there along with the format.

The mapping column will have the mappings defined

Let us execute the package

We can see the file created in the Blob storage

We can see it populated with the source columns specified in CRM Source component.

Similarly using the Azure Blog Source component, we can read the files and can use it for any destination component including Dynamics 365 Destination.

Hope it helps..

How to – Deploy and run SSIS Integration Toolkit for Dynamics 365 on Azure Data Factory (KingswaySoft)


In the previous post, we saw how to deploy and run SSIS packages on the cloud.

Here we take it one step further and will deploy and run the SSIS packages that use KingswaySoft’ s SSIS Integration Toolkit components.

Here we will need an Azure Subscription, where we will host the SSISDB, followed by provisioning Azure-SSIS Integration runtime instance.

We will also need the Azure Blob Storage account along with Azure Storage Explorer to upload the installation files of the SSIS Integration Toolkit.

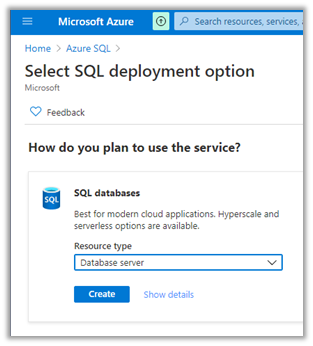
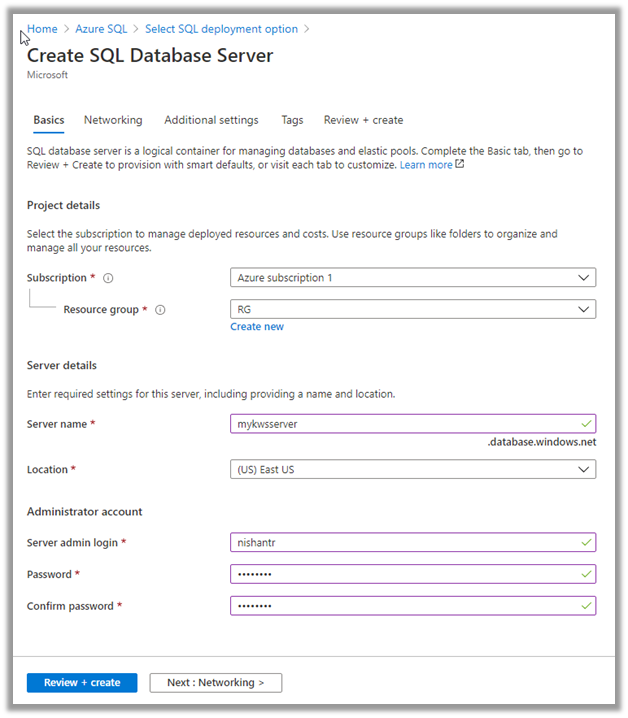
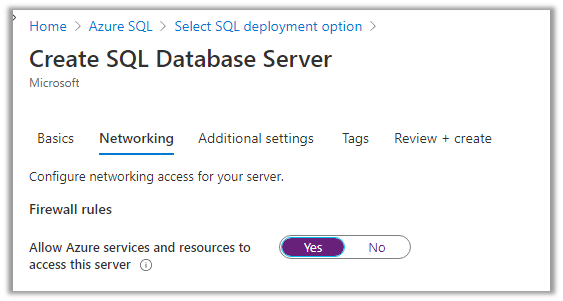
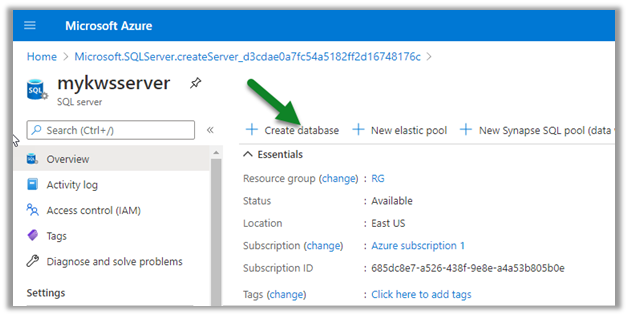
Let us first start by creating an Azure SQL Server instance.

We have specified the below details.

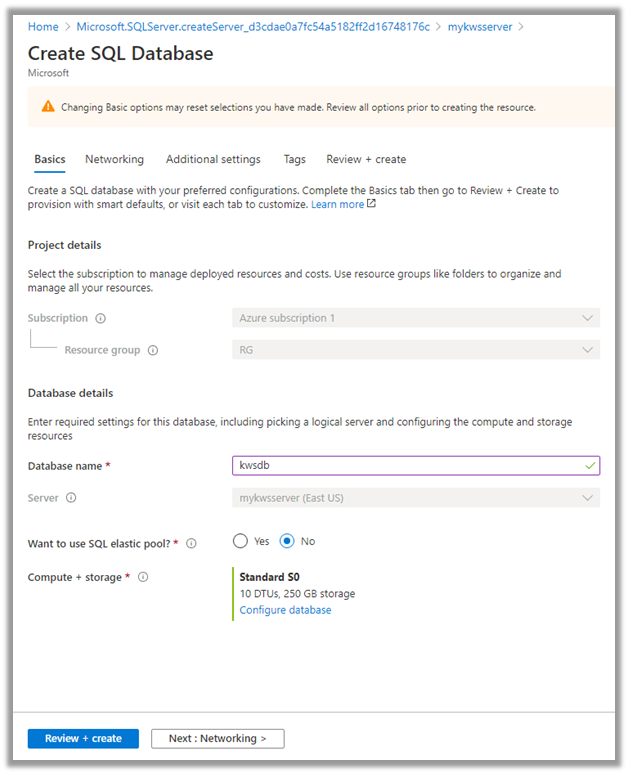
Now next create the database inside the server.

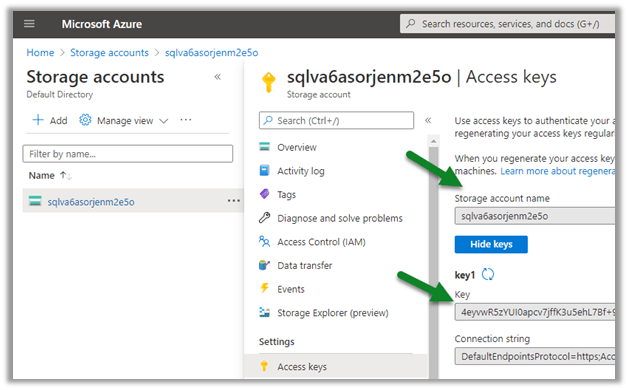
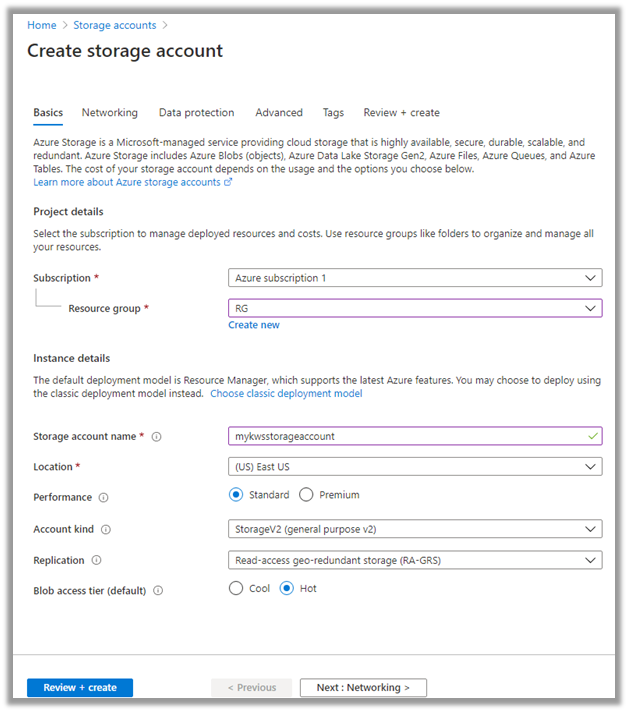
Now with Azure SQL Server and Database created, the next step is to create the Storage account.

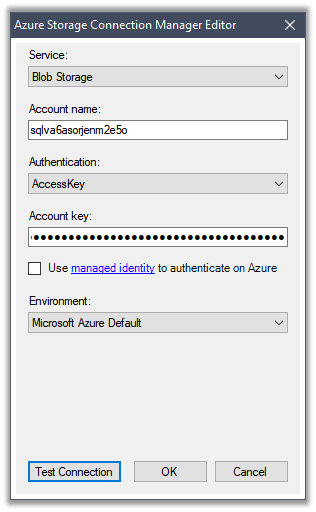
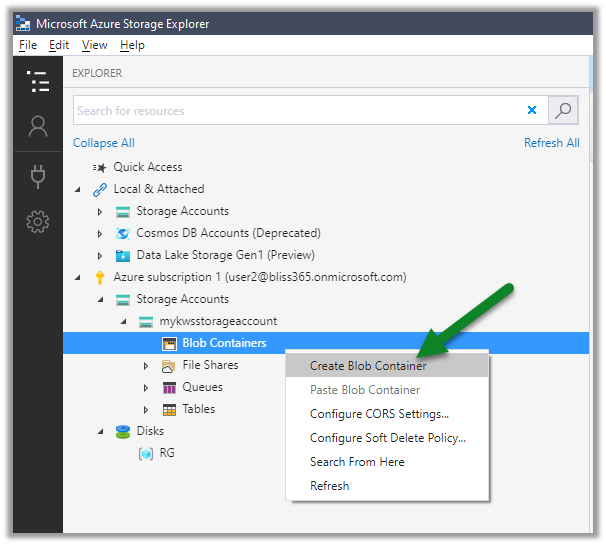
With the Azure Storage created, now let us connect to Azure using the Azure Storage Explorer.

Create a new blob container in the Azure Storage account created.

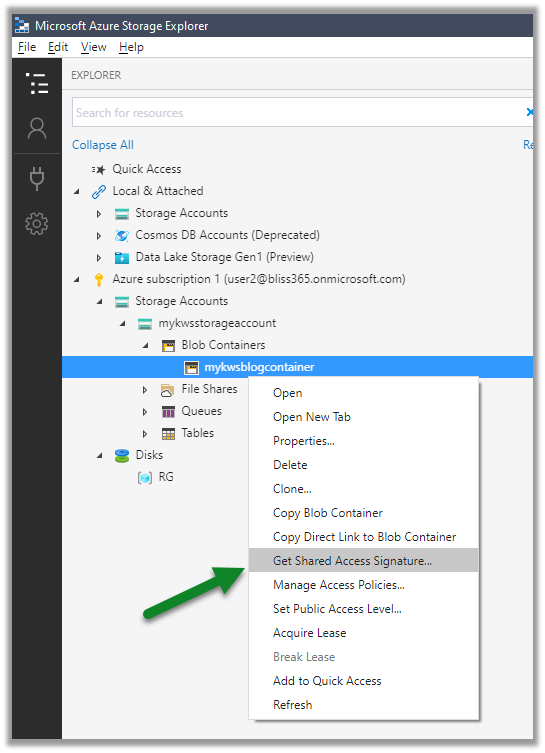
For the blob container created, right-click and select Get Shared Access Signature

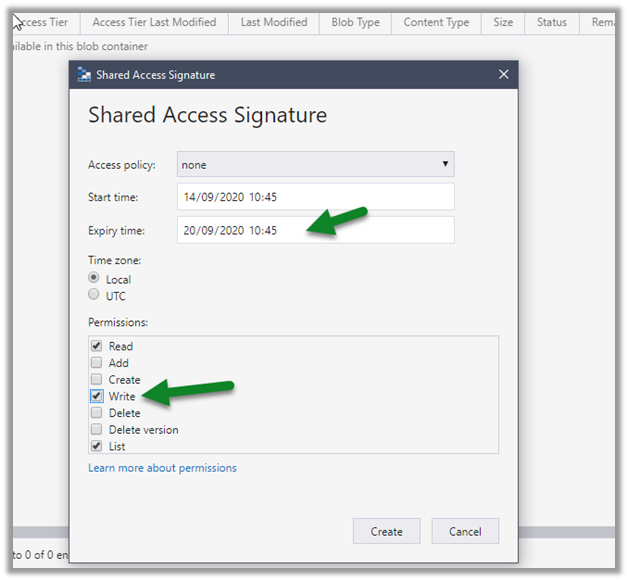
Specify the expiry time along with Write permissions, this is for logging purpose when the Azure-SSIS IR is being provisioned.

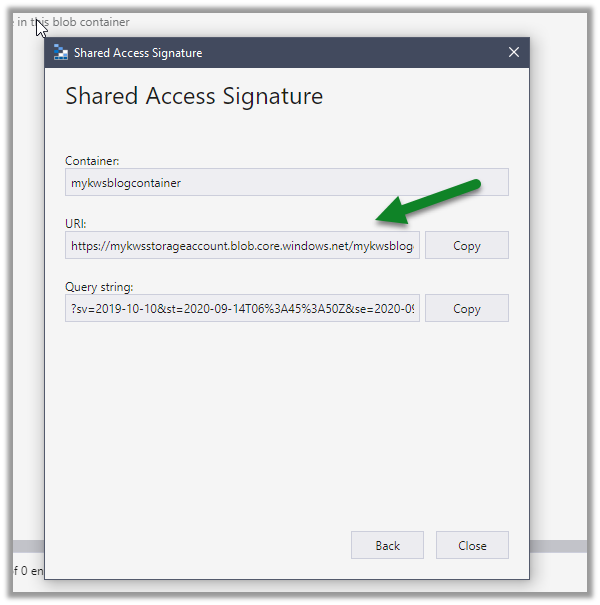
Copy the URL (it will be used in the PowerShell script later)

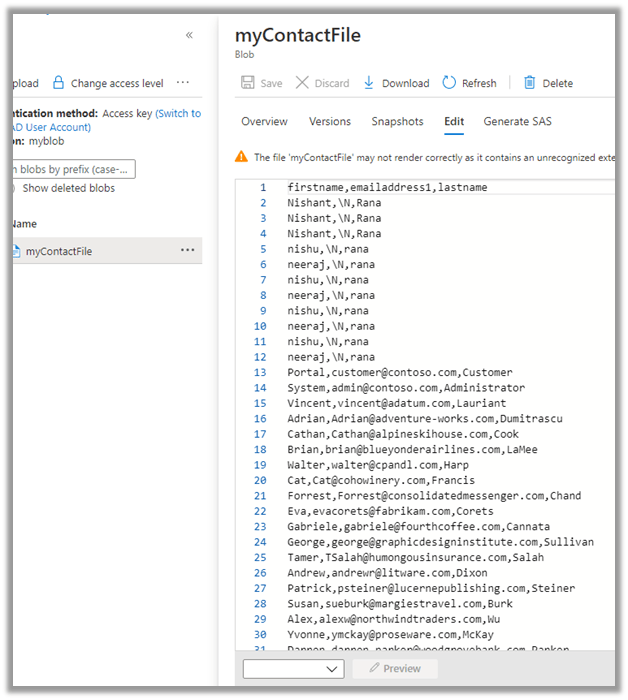
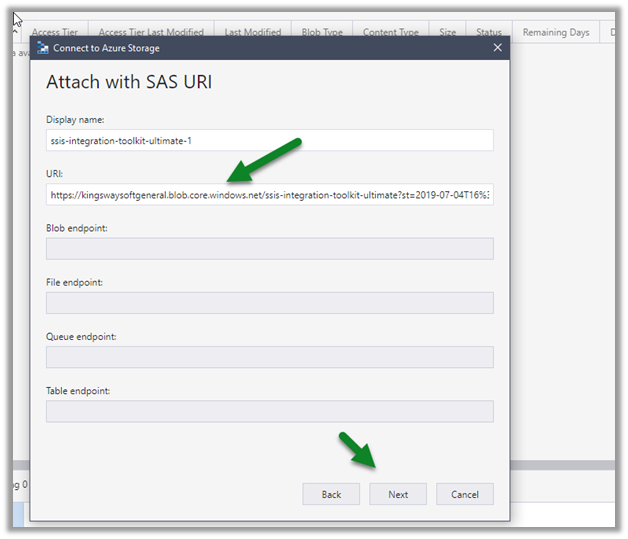
Now let us get the installation files and programs from the KingswaySoft Shared Blob Container, which we’d place in the blob container we just created.

https://kingswaysoftgeneral.blob.core.windows.net/ssis-integration-toolkit-ultimate?st=2019-07-04T16%3A10%3A25Z&se=2059-07-05T16%3A10%3A00Z&sp=rl&sv=2018-03-28&sr=c&sig=LAGvouFpkZHEk%2BH8%2B0pK%2FDNg7B3jPUf%2FJ91%2BJ%2FEeKg0%3D

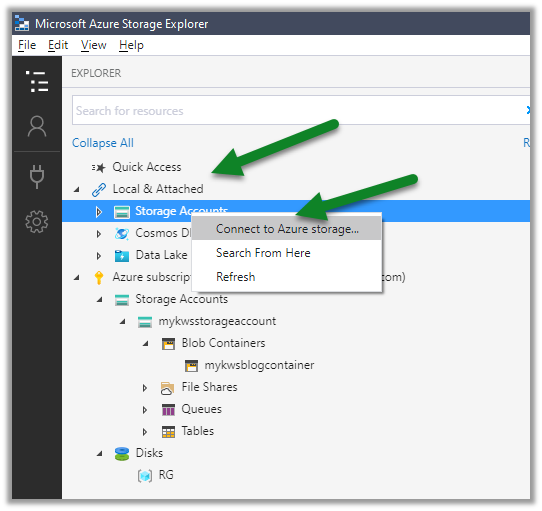
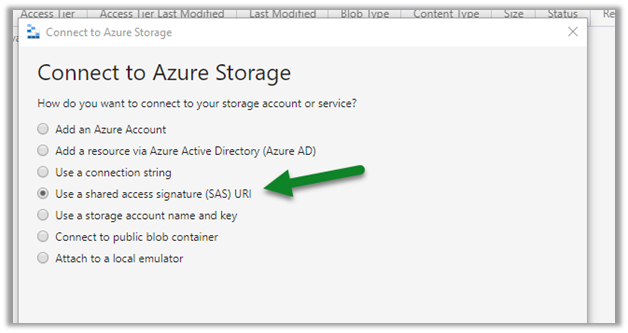
Right-click Storage Accounts and select Connect to Azure Storage

Select Use a shared access signature (SAS) URI

Paste the KingswaySoft blob container URL.

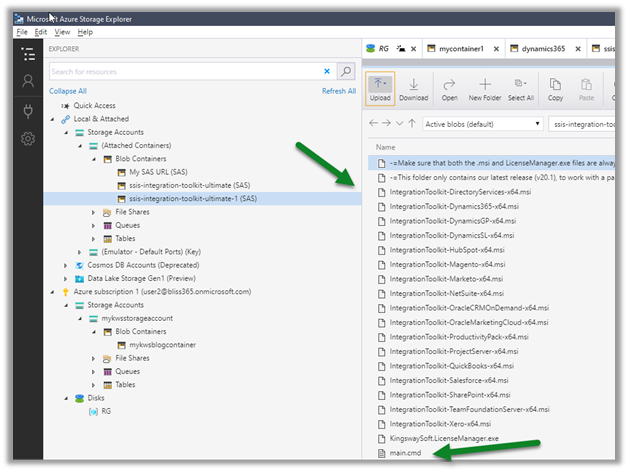
We can see the below contents added to the blob container.

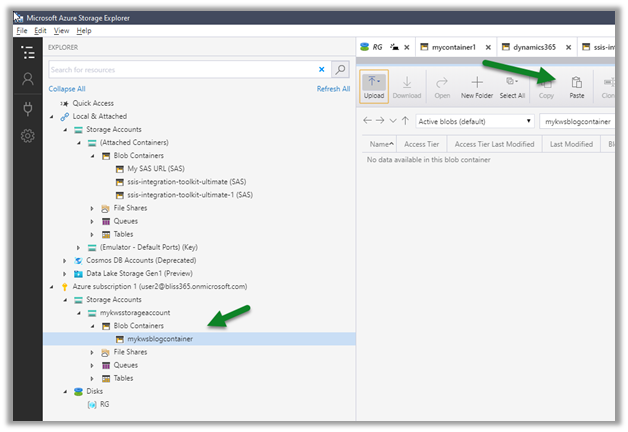
Select all and copy all the files.

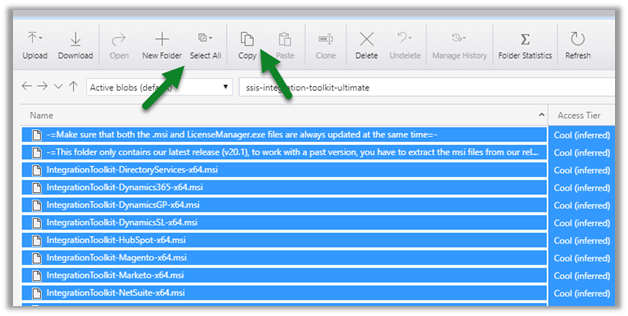
Paste it in the blob container we had created earlier.

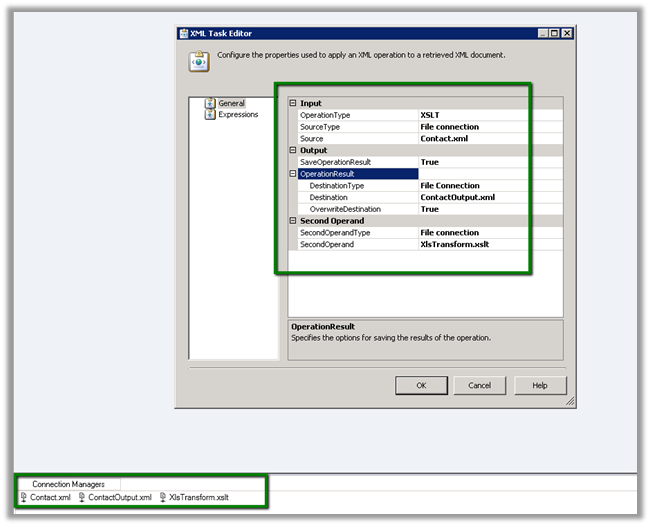
With things now setup, let us get the PowerShell script to provision the Azure-SSIS Integration Runtime Initializations.ps1 and update it.

Specify the appropriate values and run the script. Get the Azure PowerShell.

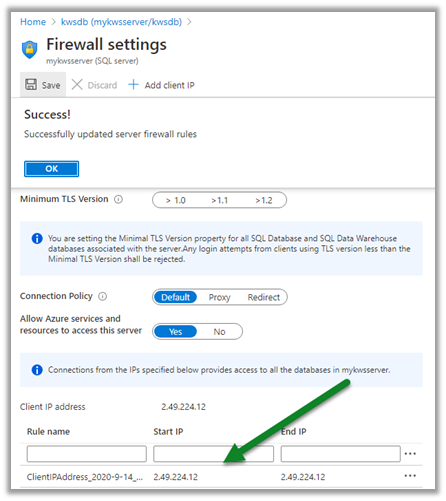
Also, make sure to update the firewall rules to allow the client to connect.

Update the PowerShell Script appropriately

We can check the status as shown below.

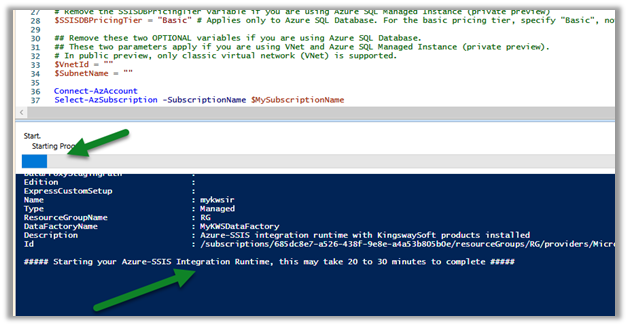
In parallel, we can see our Azure Data Factory created with the integration runtime, which is in Starting status.

After a few minutes, we will have integration runtime up and running.

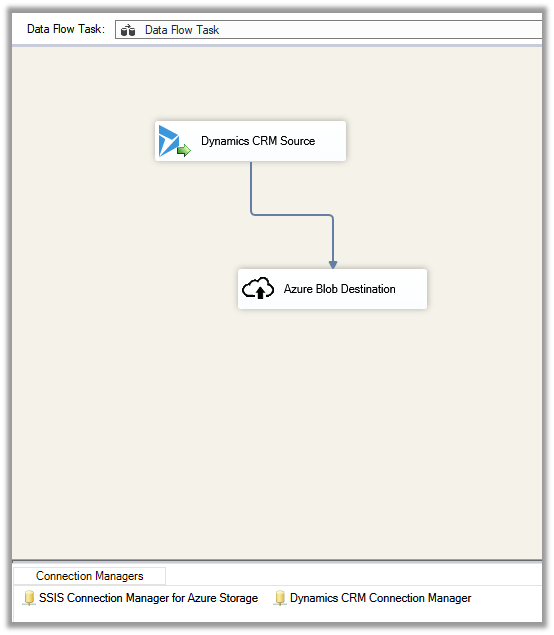
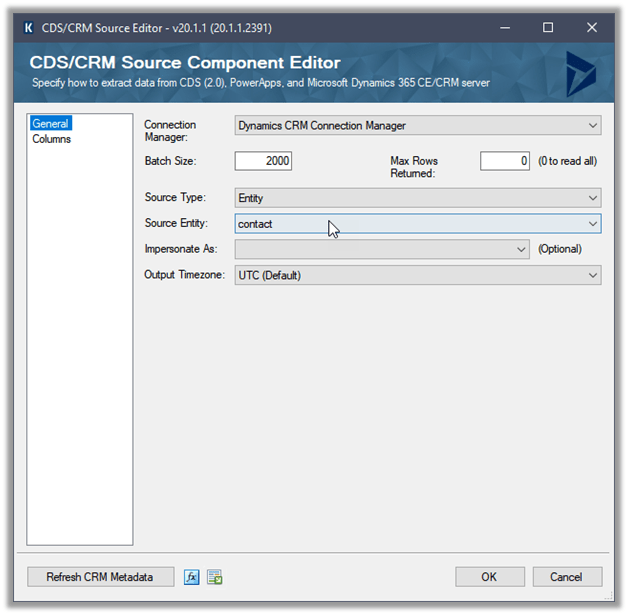
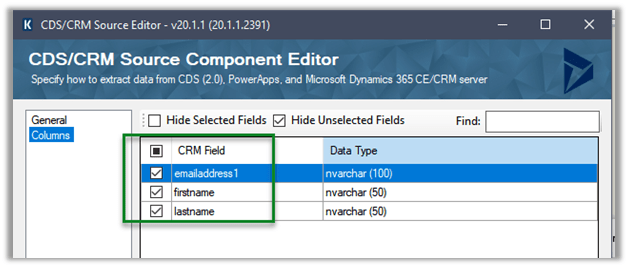
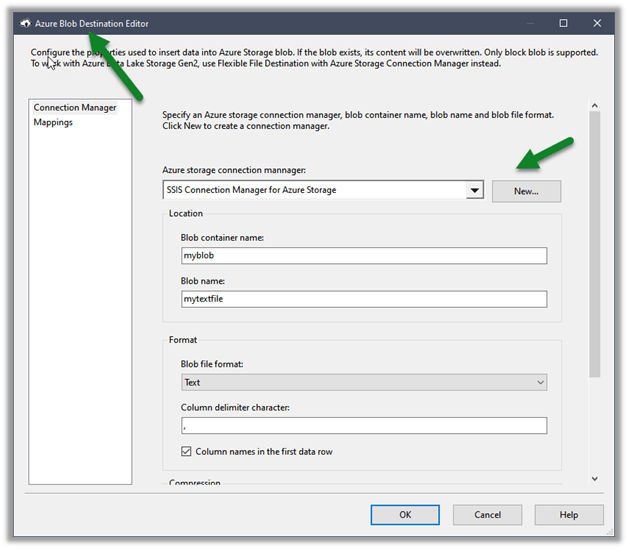
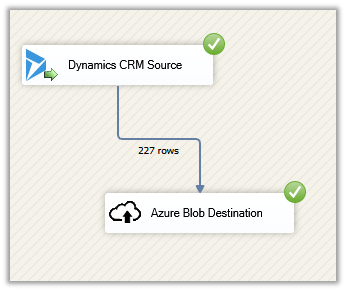
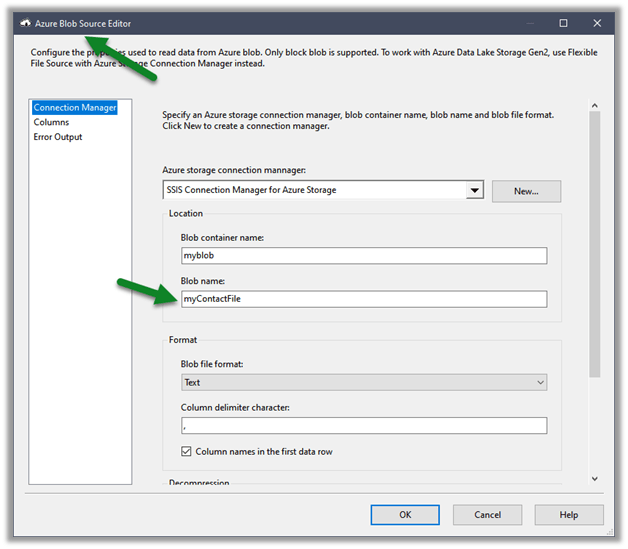
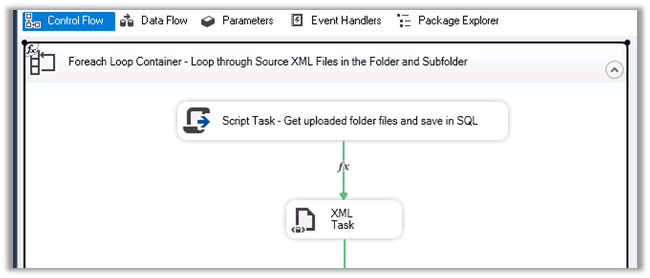
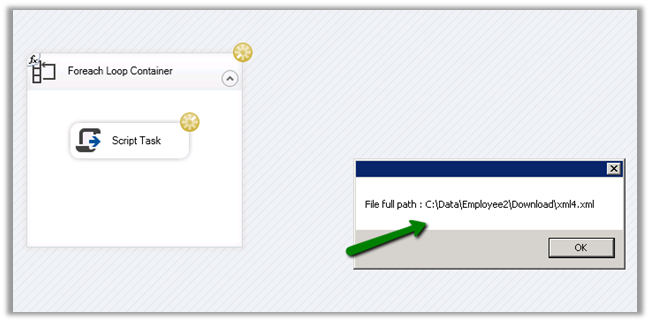
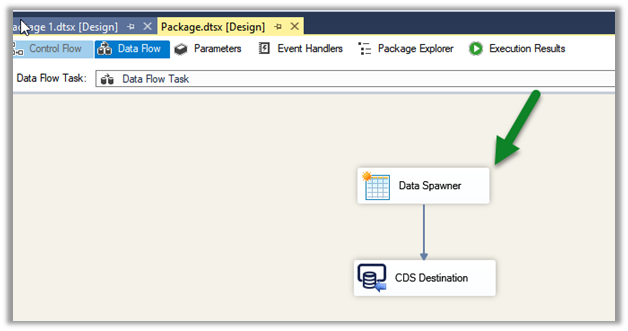
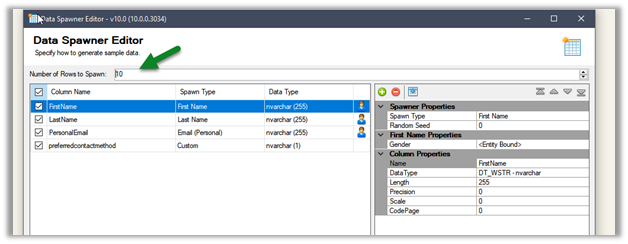
Below is our SSIS Package that we would be deploying to the cloud.

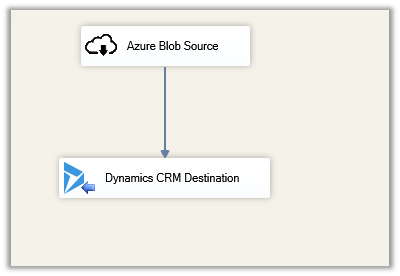
It uses Data Spawner Component to generate test data for Contacts and the CDS Destination component to create those records inside CDS.

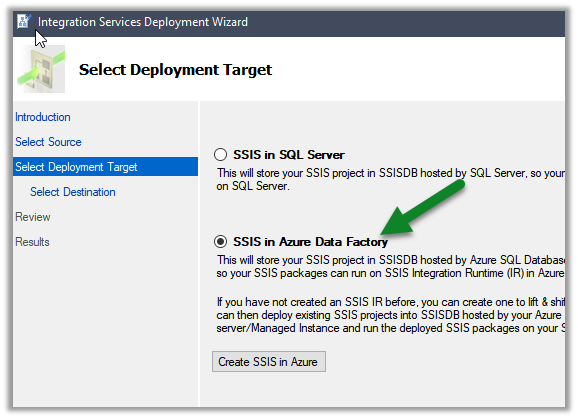
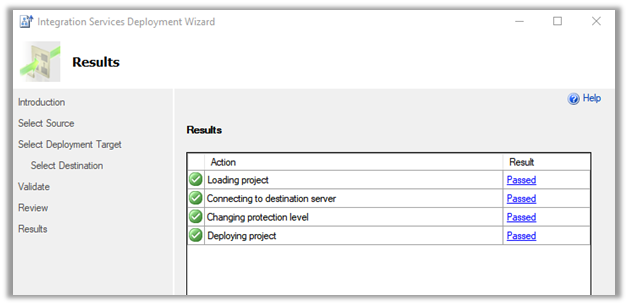
Right-click the integration project and select Deploy

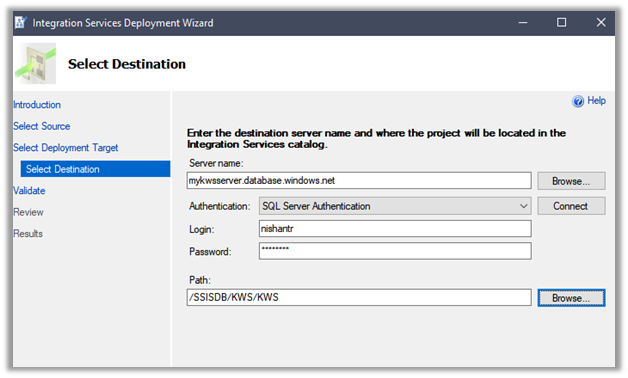
Specify connection details along with Path

After successful deployment, let us create a new pipeline inside the Azure Data Factory.

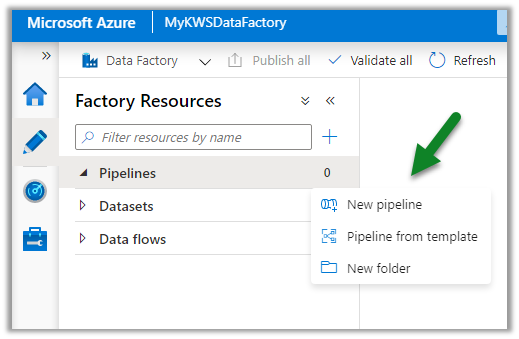
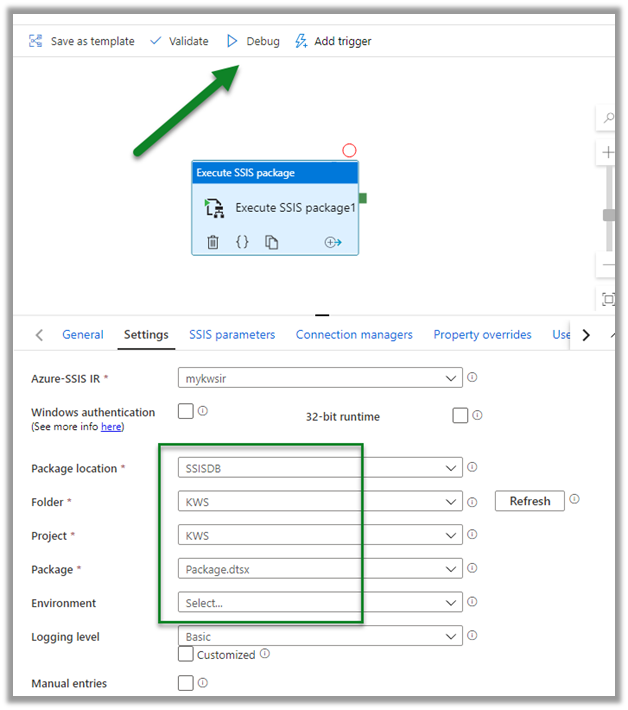
Drag and drop the Execute SSIS Package and click on the Settings tab.

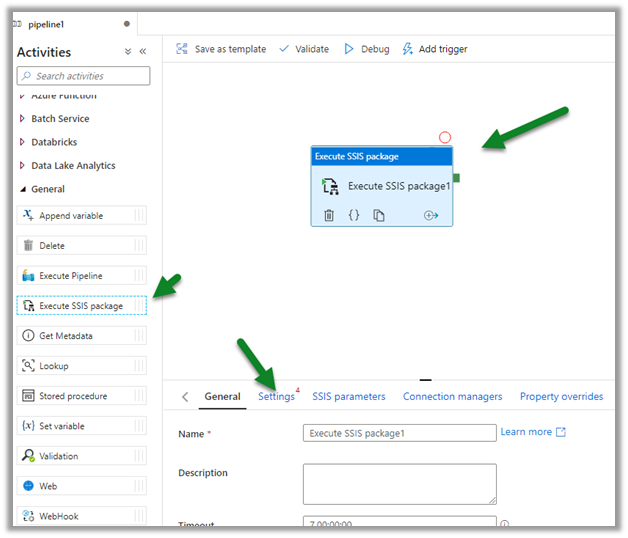
Connect to the package deployed followed by Validate and Debug to test the pipeline.

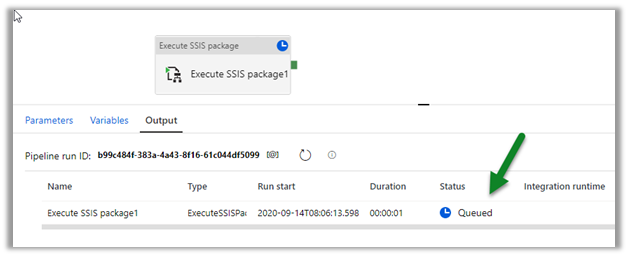
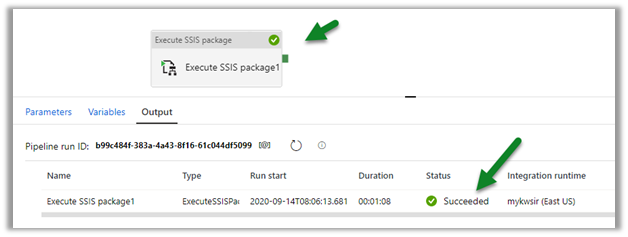
The pipeline will be in Queued status

After successful execution,

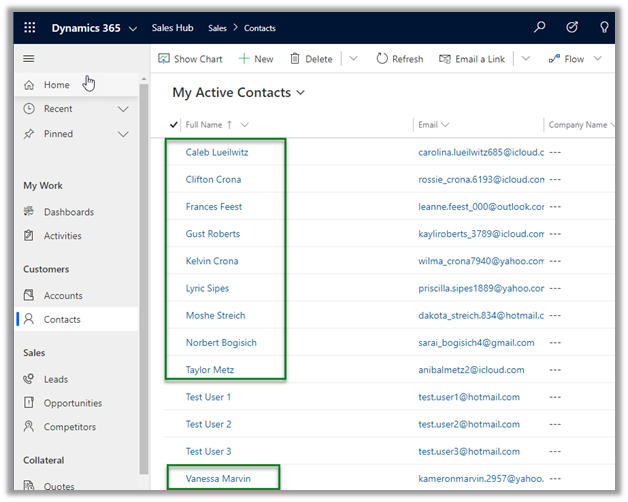
navigate to our Dynamics 365 Sales Hub

We can see 10 contact records created by the SSIS Package.

Hope it helps..

Advertisements

Fixed – Script Component has encountered an exception in user code. Value cannot be null. Parameter name: keyword in SSIS


Recently while trying to use KingswaySoft’ s CRM Connection Manager in the Script Component we got the below error

error

Turned out the issue was because of the wrong version of KingswaySoft.IntegrationToolkit.DynamicsCrm assembly being referred.

C:\Windows\Microsoft.NET\assembly\GAC_MSIL\KingswaySoft.IntegrationToolkit.DynamicsCrm

Referencing the correct one fixed it.

Hope it helps..

How to – Apply XSLT transformation using the XML Task in SSIS


Using the XML Task component in SSIS we can apply XSLT to the input XML file.

Recently we had a requirement to read data from XML file and create/update corresponding records in Dynamics 365 CE. For the child entity tags in the XML, we wanted to insert some of the tags (key) from the parent to the child so that it can be easily used for mapping and setting the parent lookup.

For that we had used Foreach Loop Container to read the XML file, then had applied XSLT transformation using the XML Task before processing the file using XML Source Component and CRM Destination Component of KingswaySoft.

The XML task editor here is using 3 File Connection.

One for the input file, another for output and third for the XLST file.

Here need to select

  • Operation Type as XLST
  • Source Type as file connection as we are specifying XML file as input.
  • For output, we are creating an output XML file and overwriting the destination file if existing.
  • In the Second Operand, we are specifying the XSLT file.

For InputXMLTask file connection, we need to specify the user-defined variable that reads the file in its connection string property for it to work properly.

Same for OutputXMLTask

And for the XSLT File Connection

Let us take a simple example to understand it better à

Suppose below is our source XML i.e. Contact.xml

We want to apply following XSLT transformation to it, which adds the fullname tag to it which is a combination of firstname and lastname tag. i.e. XlsTransform.xslt

Drag the XML task to the control flow of the package.

Specify the following properties for it as shown below

Run the package we will get the below output file, a fullname tag added which is combination of firstname and lastname tag as below i.e. ContactOutput.xml

Hope it helps..

Advertisements

Order of attributes in Alternate Key in Dynamics CRM Destination Component in SSIS (KingwaySoft)


Recently we got the below error in one of our SSIS Packages

error

The packages were working fine in one of the environments and were failing in another.

It was throwing an error in one of the lookup fields that was referring to the alternate key. Here the alternate was defined with 2 fields.

As it turned out in another environment the order of the fields was changed for the alternate key field.

We recreated the alternate key field in the proper order of the attributes to fix this.

Hope it helps..

How to – Use Foreach Loop Container in SSIS to loop through all files in folders and subfolders


Recently while working on an integration requirement we had to loop through all the XML Files within a folder and subfolder and create corresponding records inside Dynamics 365 CE.

For this, we used the XML Source component which is part of KingswaySoft’s Productivity Pack https://www.kingswaysoft.com/products/ssis-productivity-pack/help-manual/json-and-xml-processing/xml-source

Below are the steps we need to perform to loop through the files.

Create an SSIS Project and drag the Foreach Loop Container to the control flow.

Here we are using 3 variables, one for the full path to the file, the other for extension and the third one to specify the folder.

Double click and the Foreach Loop Editor, set the enumerator as Foreach File Enumerator and set the Directory and FileSpec property expressions to use the variables that we had defined.

Check the Traverse Subfolder if we want to traverse the subfolders.

Click on Variable Mapping and set the FilePath variable that will be used to iterate through the files in the Folder and Subfolder specified.

To see it in action, we have added a Script Task inside the container.

Here we have set the FilePath variable as the ReadOnlyVariables that we will read within the Script Task code and show it in the Message Box.

Our source code that reads the FilePath and displays it in the Message Box.

Now just execute the package and we will see it looping through all the XML files with the folder specified.


Hope it helps..

Advertisements