Recently for one our projects,
where had Dynamics CRM On-Premise already installed by the IT team quite sometime back, when we tried create a new organization through Deployment Manager, we got the below error

“Create new Organization (Name=46d256f4-1009-ea11-a2df-00505680070e, Id=FABUAECIBSIT) failed with Exception: System.Exception: Error.ActionFailed Microsoft.Crm.Tools.Admin.InstallPlatformSolutionsAction —> Microsoft.Crm.PackageDeployment.PackageDeployerException: Package BaseCustomControlsCore failed to install on attempt 1. System.AggregateException: One or more errors occurred. —> Microsoft.Crm.MultiTenantPackageDeployment.PackageDeployerException: PackageDeployerWrapper: Import operation timed out. at Microsoft.Crm.MultiTenantPackageDeployment.PdExecutor.Process(PackageDeploymentInputArgs input, JobOutput`1 output, CancellationToken ct) at System.Threading.Tasks.Task.Execute()
— End of inner exception stack trace —
—> (Inner Exception #0) Microsoft.Crm.MultiTenantPackageDeployment.PackageDeployerException: PackageDeployerWrapper: Import operation timed out. at Microsoft.Crm.MultiTenantPackageDeployment.PdExecutor.Process(PackageDeploymentInputArgs input, JobOutput`1 output, CancellationToken ct) at System.Threading.Tasks.Task.Execute()<-”
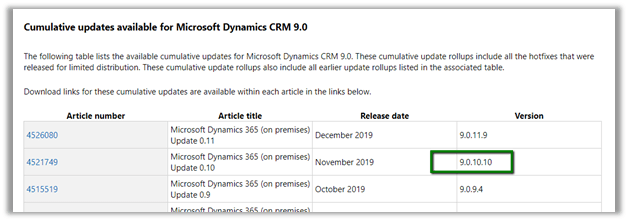
After trying out all the different permutations and combinations (network things, cleaning and setting up the infra etc.), the way it got resolved was by installing the latest cumulative update.
https://support.microsoft.com/en-ae/help/3142345/microsoft-dynamics-365-onpremise-cumulative-updates
https://support.microsoft.com/en-us/help/4521749/service-update-0-10-for-microsoft-dynamics-365-9-0
The reason we applied and went for the cumulative updates options as the last one, because, we had our production in the older version and because of multiple constraints we were not planning to upgrade our production server.
Fortunately, the solution from version 9.0.10.10 got imported successfully in production Dynamics CRM organization that were in version 9.0.2.x.
Hope it helps..