Changing default filter for Contracts Associated View for Account.


For an account record, the associated view of Contract would have default filter set as Draft. So if we want to change it to some other status for example “Active” we can make use of the following JavaScript for that.

This JavaScript is based on the popular JavaScript code used for hiding “add existing button”

Please check this wonderful article

http://blog.davehawes.com/post/2008/04/23/MSCRM-4-Remove-Add-Existing-xxxxx-button.aspx

The JavaScript code for changing default option

var navElement = document.getElementById('navContracts');
 if (navElement != null) {
  navElement.onclick = function LoadAreaOverride()  {
   loadArea('areaContracts');
   SetDefaultOption(document.getElementById('areaContractsFrame'));
  }
 }

function SetDefaultOption(Iframe) {
 if (Iframe != null ) {
  Iframe.onreadystatechange = function SetOption() {
   if (Iframe.readyState == 'complete') {
    var iFrame = frames[window.event.srcElement.id];
    var selectBox=iFrame.document.getElementById('statecode');
     selectBox.options[2].selected=true;
   }
  }
 }

http://social.microsoft.com/Forums/en-US/crmdevelopment/thread/85615ccd-b8e9-48d3-a906-4fd7b301dac0

Bye..

Understanding PrimaryEntityImage, PrimaryEntityPreImage and PrimaryEntityPostImage for Custom Workfow Activity in CRM 4.


Suppose we have written a simple workflow activity that references values for the above Images and have registered it on create of lead record.

The attributes included within the images would be following

Record is created Lead
   
PrimaryEntityImage fullname
  leadid
  owningbusinessunit
   
PrimaryEntityPreImage null
   
PrimaryEntityPostImage leadid
  owningbusinessunit
  ownerid


Now suppose we register it on Record attribute change and select city and description for lead.

Now suppose we specify value for those fields and save the record. Here the values for the images would be

Record attributes change Lead
   
PrimaryEntityImage fullname
  leadid
  owningbusinessunit
   
PrimaryEntityPreImage fullname
  leadid
  owningbusinessunit
  ownerid
   
PrimaryEntityPostImage leadid
  owningbusinessunit
  ownerid


Except for values in PrimaryEntityPreImage there is hardly any change in the Images.

Now lets modify the workflow and add a check condition step that would check if both the city and description field contains data for lead.

Now after modifying the values for city and description field for a lead ,these are the values we get in the images.

Record attributes change (after check condition) Lead
   
PrimaryEntityImage fullname
  leadid
  owningbusinessunit
  address1_city
description
   
PrimaryEntityPreImage fullname
  leadid
  owningbusinessunit
  ownerid
  address1_city
description
   
PrimaryEntityPostImage leadid
  owningbusinessunit
  ownerid


Address1_city and Description field has got added for PrimaryEntityImage and PrimaryEntityPreImage.

Now if we remove check condition for city field for lead,

Record attributes change (after check condition) Lead
   
PrimaryEntityImage fullname
  leadid
  owningbusinessunit
  description
   
PrimaryEntityPreImage fullname
  leadid
  owningbusinessunit
  ownerid
  description
   
PrimaryEntityPostImage leadid
  owningbusinessunit
  ownerid


We could see that address1_city is not there in the images.

Now lets further modify our workflow, remove the check condition and add a step to create an account record and set dynamic values for fields in account using the industrycode and emailaddress1 field of the lead record.

Record attributes change (Step for Creating Record) Lead
   
PrimaryEntityImage fullname
  leadid
  owningbusinessunit
  industrycode
emailaddress1
   
PrimaryEntityPreImage fullname
  leadid
  owningbusinessunit
  ownerid
  industrycode
emailaddress1
   
PrimaryEntityPostImage leadid
  owningbusinessunit
  ownerid


We can see that both these fields are added to images.

And here PrimaryEntityPreImage would contain the values for the field before they were modified and and PrimaryEntityImages would contain the modified values for those field. The PrimaryEntityPostImage would not have these attributes inside it.

So it proves that an attribute would be included in the entity images if we are referencing that property in our Check Condition or as a dynamic value within the workflow.

Bye.

IPluginExecutionContext and IWorkflowContext properties.


Hi,

Check out this link

Context Properties

Bye..

Understanding TargetRelatedLeadToAccount class in CRM


Hi,

I saw one question in Microsoft CRM Development forum, it was regarding the TargetRelatedLeadToAccount class. The user was using this class to update the originatinglead attribute in the account record.

This is how we would be using that class

CrmService service = new CrmService();
service.Credentials = System.Net.CredentialCache.DefaultCredentials;
service.CrmAuthenticationTokenValue = new CrmAuthenticationToken();
service.CrmAuthenticationTokenValue.AuthenticationType = 0;
service.CrmAuthenticationTokenValue.OrganizationName = “orgName”;

TargetRelatedLeadToAccount targetRlTA = new TargetRelatedLeadToAccount();
targetRlTA.AccountId = new Guid(“accountGuid”);
targetRlTA.LeadId = new Guid(“leadGuid”);

SetRelatedRequest srelReq = new SetRelatedRequest();
srelReq.Target = targetRlTA;
SetRelatedResponse srelRes = (SetRelatedResponse)service.Execute(srelReq);

However as it turned out, this class associates an account record to a particular lead record. It doesn’t update the originatinglead attribute in the account record.

We can find a N:N relationships defined between lead and account named “accountleads_association”. Every time we use the above message a particular account record gets associated to the lead.

We can check for it in the following filtered view “FilteredAccountLeads”.

Bye..

Accessing CrmService live or online


This are some of the best articles for this

http://msdn.microsoft.com/en-us/library/bb955360.aspx

http://msdn.microsoft.com/en-us/library/dd548517.aspx

http://blogs.msdn.com/crm/archive/2008/03/10/accessing-crm-live-web-services.aspx

http://blog.philiprichardson.org/2007/12/17/part-3-applications-which-connect-to-crm/

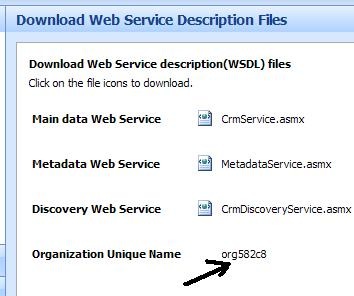
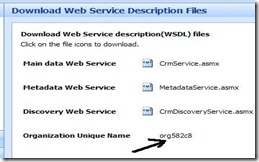
The important thing to remember is that here we need to use the organization’s unique name.

For example the friendly name here is Bliss

the unique name is org582c8 which could be found at

settings—>customization—> Download web service description files.

We need to make use of idcrlwrapper.dll and msidcrl40.dll which needs to placed in our project’s bin\debug folder.

To get  idcrlwrapper.dll we need to do the following

http://msdn.microsoft.com/en-us/library/bb955358.aspx

And lastly we need to add a cs file named windowsliveidticketacquirer.cs in our project. It could be found at the following location

SDK\server\helpers\cs\CrmOnlineAuth.

// Login information For authentication through the Windows Live service.
Static Private String _username = "username@hotmail.com";
Static Private String _password = "password";
Static Private String _partner = "crm.dynamics.com";
Static Private String _environment = "Production";
// Set the name And TCP port Of the server hosting Microsoft Dynamics CRM Live.
Static Private String _hostname = "dev.crm.dynamics.com";
//Set the friendly name Of the target organization.
Static Private String _orgFriendlyName = "Bliss";
// Define an expired authentication ticket Error code.
Static Private String EXPIRED_AUTH_TICKET = "8004A101";
//Passport ticket required To recover from a CrmTicket time out.
Static Private String _passportTicket;
//Attempt a service Call a maximum number Of times before failing.
Static Private int MAX_RETRIES = 5;
Private void Form1_Load(Object sender, EventArgs e)
{
// Step 1,2: Retrieve a policy from the Discovery Web service.
CrmDiscoveryService discoveryService = New CrmDiscoveryService();
discoveryService.Url = String.Format(
"https://{0}/MSCRMServices/2007/{1}/CrmDiscoveryService.asmx",
_hostname, "Passport");
RetrievePolicyRequest policyRequest = New RetrievePolicyRequest();
RetrievePolicyResponse policyResponse =
(RetrievePolicyResponse)discoveryService.Execute(policyRequest);
// Retrieve a Passport ticket from the Windows Live service.
LogonManager lm = New LogonManager();
_passportTicket = lm.Logon(_username, _password, _partner, policyResponse.Policy,
_environment);
// Dispose Of the LogonManager Object To avoid a FileNotOpen exception.
lm.Dispose();

String orgUniqueName = "org582c8"

// Retrieve the CrmTicket.
RetrieveCrmTicketRequest crmTicketRequest = New RetrieveCrmTicketRequest();
crmTicketRequest.OrganizationName = orgUniqueName;
crmTicketRequest.PassportTicket = _passportTicket;
RetrieveCrmTicketResponse crmTicketResponse =(RetrieveCrmTicketResponse)discoveryService.Execute(crmTicketRequest);

//Create And configure an instance Of the CrmService Web service.
CrmAuthenticationToken token = New CrmAuthenticationToken();
// For CRM live Set authentication type To 1
token.AuthenticationType = AuthenticationType.Passport;
// We will need CRM Ticket To Get authenticated
token.CrmTicket = crmTicketResponse.CrmTicket;
token.OrganizationName = crmTicketResponse.OrganizationDetail.OrganizationName;

CrmService crmService = New CrmService();
crmService.Url = crmTicketResponse.OrganizationDetail.CrmServiceUrl;
crmService.CrmAuthenticationTokenValue = token;
// Invoke the desired CrmService Web service methods.
lead myLead = New lead();
myLead.lastname = "Rana";
myLead.firstname = "Nishant";
crmService.Create(myLead);


Bye..

Getting the error messages for custom workflow activity.


Normally if there are any errors in our custom workflow activity for a given workflow instance, its status reason would be set as “waiting” and we would see the following message

"An error has occurred. Try this action again. If the problem continues, check the Microsoft Dynamics CRM Community for solutions or contact your organization’s Microsoft Dynamics CRM Administrator. Finally, you can contact Microsoft Support."

Obviously the above message doesn’t help us much.

So to find the exact reason for the error, we can do the following,

  • Go to Advanced Find View
  • Click on New
  • Select “System Jobs” for look for drop down.
  • Set condition as
  • Status equals Suspended
  • SystemJobType equals Workflow

And also click on “edit columns”, and using “add columns” add Message (Display Name) column.

wfe1

And the results of the advanced find view.

wfe2

Here we can also do this one more thing,

We can customize the system job (asyncoperation) entity’s form to include the message field in it.

However this cannot be done in supported manner. To enable system job entity for customization we need to run the following query against our Org_MSCRM database.

update entity
set iscustomizable=’1′
where name=’Asyncoperation’

And then customize the “System Job” entity’s form to include the Message attribute in it.

This is how it would look like !

wfe3


Bye…