Dynamics CRM 2011 Developer Training Kit is available now.
It has got presentations, videos, hands on labs etc. on different topics.
http://www.microsoft.com/downloads/en/details.aspx?FamilyID=78498c29-28ac-440b-9c20-ec5da6ee6e98
Bye.
Dynamics CRM 2011 Developer Training Kit is available now.
It has got presentations, videos, hands on labs etc. on different topics.
http://www.microsoft.com/downloads/en/details.aspx?FamilyID=78498c29-28ac-440b-9c20-ec5da6ee6e98
Bye.

We had a requirement to use Call Timer which would record the duration for the phone call activity.
Already there is a solution for this for CRM 3.0.
http://code.msdn.microsoft.com/MSCRM3/Release/ProjectReleases.aspx?ReleaseId=96
I am posting the screen shot of it and the updated isv.config file for it to be used in CRM 4.0

<Entity
name=“phonecall“>
– <ToolBar
ValidForCreate=“1“
ValidForUpdate=“0“>
– <Button
Icon=“/ISV/CallTimer/timer.gif“
Url=“/ISV/CallTimer/timer.htm“
WinMode=“2“
WinParams=“dialogHeight:240px;dialogWidth:340px;“>
– <Titles>
<Title
LCID=“1033“
Text=“Time this call“ />
</Titles>
– <ToolTips>
<ToolTip
LCID=“1033“
Text=“Use this to time the duration of this call“ />
</ToolTips>
</Button>
</ToolBar>
</Entity>
Bye..

Recently we had a requirement to write a workflow which would be sending mail to the manager of the owner if a record is not updated within 5 days of it being created or updated.
So here we created two workflows over here one for create and other for update.
For create it would look like this
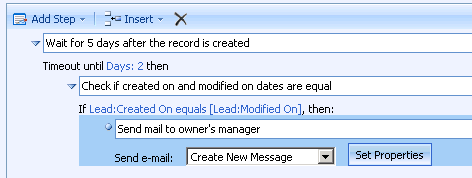
First we’ll have wait condition where we will set the timeout duration to 5 days. After 5 days the workflow will come out of its wait condition and will check if the “created on” and “modified on” values are equal or not. If equal it means the record has not been updated. So it will send a mail to owner’s manager.
In case of update, things would be little tricky as we need to store the “modified on” date value. This value would later be used to compare against the “modified on” date of the record after workflow comes out of the wait condition.
So here we need to write a custom workflow activity with one input and one output parameter. It will take current modified on date value as input and would pass the same value to the output parameter.
Code would be something this
[CrmWorkflowActivity(“Save Date Variable Value”)]
public partial class WorkflowVariable: SequenceActivity{
public WorkflowVariable(){
InitializeComponent();
}
protected override ActivityExecutionStatus Execute(ActivityExecutionContext executionContext){
this.InitialDateOutput = this.InitialDate;
return
ActivityExecutionStatus.Closed;}
public static DependencyProperty InitialDateProperty = DependencyProperty.Register(“InitialDate”, typeof(CrmDateTime), typeof(WorkflowVariable));
[CrmInput(“Initial Date Input”)] //Input Label
public CrmDateTime InitialDate {
get{
return (CrmDateTime)base.GetValue(InitialDateProperty);}
set{
base.SetValue(InitialDateProperty, value);}
}
public static DependencyProperty InitialDateOutputProperty = DependencyProperty.Register(“InitialDateOutput”, typeof(CrmDateTime), typeof(WorkflowVariable));
[CrmOutput(“Initial Date OutPut”)] //Input Label
public CrmDateTime InitialDateOutput {
get {
return (CrmDateTime)base.GetValue(InitialDateOutputProperty);}
set{
base.SetValue(InitialDateOutputProperty, value);}
}}
This is how the final workflow would look for update

Bye.

I had written a pre-update plugin, it was working properly on my environment.
But after sending it across to the client, after he had deployed it we started getting the below mentioned error.
“XmlException: An error occurred while parsing EntityName”
We were actually passing secure configuration information to the plugin in the following format
<Config>
<url>http://CrmServer/MSCRMServices/2007/CrmService.asmx</url>
<orgname>OrgName</orgname>
<username>UserName</username>
<password>Password</password>
<domain>Domain</domain>
</Config>
And the issue was the password that was being used, it had ‘&’ character, which we then replaced with ‘&’ and the error got resolved.
Hope it helps!

Hi got the following error while importing a customization file in CRM 4.
Customization Import failed. Error: Entity with id 02fe2413-00fb-44a9-a604-113c5134589d already has the label Violation for column LocalizedName and language 1033 – update entity with id 8e5456bf-38c1-4252-98fb-0637b9693940 cannot have the same label
It was referring to the custom entity name Violation.
The solution for this is to either change the display name of the already existing entity or the entity being imported.
I changed the display name of the existing entity to ViolationG.
I tried importing the entity again, however this time I got the below error
Customization Import failed. Error: Entity with id 02fe2413-00fb-44a9-a604-113c5134589d already has the label Violations for column LocalizedCollectionName and language 1033 – update entity with id 689586d1-d773-485a-90cf-a62ff54fff18 cannot have the same label
Here Violations was the plural name of the entity. I changed the plural name of the existing custom entity.
Tried importing the file again, and this time it succeeded without any error.
Check out this wonderful post àhttp://mscrm4kb.blogspot.com/2009/11/customization-issue.html
Hope it helps!

In case of OnChange event, at times we need to do some validation and if the validation fails we want the focus to be set back to the same attribute.
We can make use of the following JScript for that
var oField = crmForm.all.crm_myfield;
oField.onblur = function() {
oField.SetFocus();
oField.onblur = null; }
oField.SetFocus();
or
set focus on some other field and then setting it back to our field
Bye..

