Fixed – Windows 10 Remote Desktop (RDP) not saving credentials.


Recently even after saving the credentials in connection settings to an RDP file, every time we were opening it, it was asking us to enter the password.

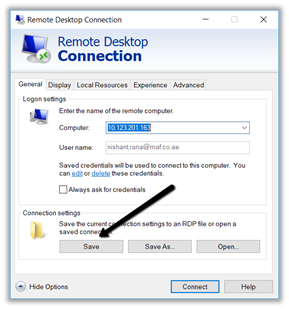
The below steps helped us to fix the issue.

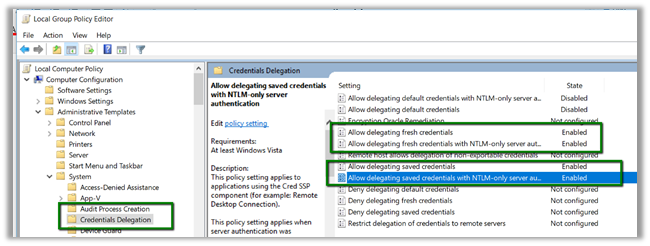
Open Windows Group Policy Editor (gpedit.msc) from the command prompt.

Go to Local Computer Policy – Administrative Templates – System – Credentials Delegation.

Click on Allow delegating fresh credentials, select the option Enabled. Click on Show button and add the value TERMSRV/*

Repeat the step for

  • Allow delegating fresh credentials with NTML – Only server authentication
  • Allow delegation saved credentials
  • Allow delegating saved credentials with NTML – Only server authentication

Then open Credential Manager from the command prompt and a windows credential.

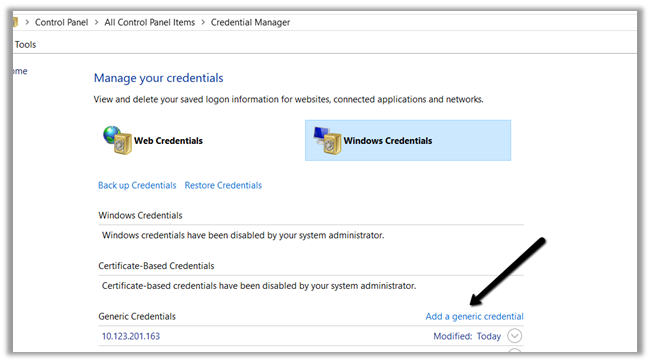
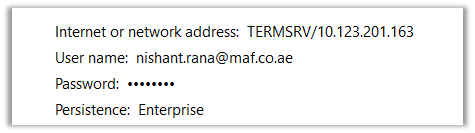
Add a generic credential as shown below
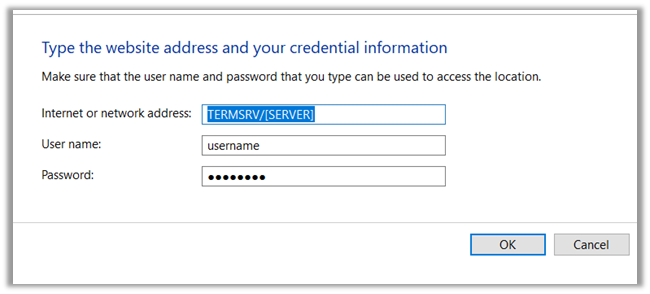
e.g.

Lastly make sure prompt for credentials is set to 0.

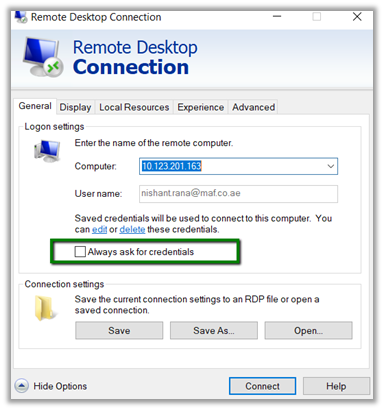
After making these changes we were able take RDP to the server without it asking for password.

Hope it helps..

Advertisements
Advertisements

Deploying Package to SQL Server Integration Services Catalog (SSISDB) from Visual Studio (SSDT)


Deploying packages to SQL Server from SSDT is straightforward. We can either deploy the project or an individual SSIS Package i.e. Project Deployment or Package Deployment. (SQL Server 2016 Onwards).

Here we will see the package deployment.

Right-click the package that we would like to deploy and select Deploy Package.

This opens the Integration Services Deployment Wizard

Click on Next and Specify Server Name and the credentials to connect to the SQL Server an click on Connect.

For the Path specify the existing Project or create a new Project in SSID where we would like to deploy our packages.

Review the details and if all the information is correct, click on Deploy.

The result page would show the status of the deployment.

Inside Integration Service Catalogs we can see our Package Deployed.

Another option for deploying the package is through the Deploy Project option of the Project inside SQL Server Management Studio’s SSIDB node.

It will open the Integration Service Deployment Wizard.

And after selecting the Package folder we can click on Next and follow the wizard as we had done earlier to deploy the package.

We can also run the Wizard directly from Windows Explorer or command prompt – IsDeploymentWizard.exe

Through Stored Procedure à

catalog.deploy_packages

[catalog].[deploy_packages] [ @folder_name = ] folder_name, [ @project_name = ] project_name, [ @packages_table = ] packages_table, [ @operation_id OUTPUT ] operation_id OUTPUT ]

Through Management Object Model API.

Hope it helps..

Audit Information not getting retrieved using SSIS/KingswaySoft Adapter


Update – 29 Oct 2018 –-> We are getting the same issue in one of the entities and it has audit enabled. We have a raised a support ticket for it. Will update the post with the solution.

A few days back I wrote about how we can use CDS/CRM Source component of KingswaysSoft Adapter to get the audit information.

https://nishantrana.me/2018/10/08/using-kingswaysofts-cds-crm-source-component-to-get-audit-information-in-dynamics-365-ce-ssis/

Recently while writing a package for getting audit details against one of the entities, we realized that the records were not getting retrieved and also, we were not getting any error or exception. The package kept on running.

Setting timeout in the CRM Connection Manager also didn’t stop the package, it kept running without retrieving the records.

After spending a good amount of time, we realized the silly mistake that we had made. We were running the package against the entity for which Audit was not enabled.

Thanks to KingswaySoft Support team for their relentless support.

Ideally, we should have been more careful before running the package against that entity, and also it will be helpful if the tool can also check if the audit is enabled for an entity before beggning the execution and if the audit is not enabled inform back the user or at least return 0 rows and complete its execution successfully.

Hope it helps..

D365 V9{Upgrade}: Icebreakers section on Contact Form


Ajit Patra's avatarAjit Patra

Recently, after upgrading our D365 V8 instance to D365 V9, we found that on Contact Form there was some discrepancy in the position of the sections. After comparing the Form Editor in both the instances(V8 and V9) we found the below differences:

D365 V8:

CARD DETAILS section at top right corneraD365 V9:

New Icebreakers section at top right corner instead of CARD DETAILS sectionb

And, we found in upgraded instance that the actual content of the section “CARD DETAILS” was moved towards the end of the form to “Conflicts Tab” Tab with the name “Conflicts Section” section.

c

To fix this issue, We did hide the “Icebreakers section”.

d

Then, moved the section “Conflicts Section” to it’s original position (as D365 V8 instance) and renamed it accordingly to the name we had in D365 V8 instance.

aNOTE:Icebreaker is a feature of LinkedIn Sales Navigator which is used for D365…

View original post 11 more words

Set Up Your Workstation to Create SQL Server Reporting Services Reports for Dynamics 365 Revisited


Step by step guide for Report Authoring in Dynamics 365 V9

Nick Doelman's avatarThe ReadyXRM Blog by Nick Doelman

Summary

  • The process to set up a workstation to create SQL Server Reporting Services (SSRS) reports for Dynamics 365 involves a lot of steps and causes some confusion.
  • The report authoring tool is Visual Studio, but a full licensed version of Visual Studio is not required.
  • The Dynamics 365 Report Authoring Extensions has been recently updated to address TLS 1.2 requirements of Dynamics 365 v9

Revisited

A couple of years ago I wrote a posting on how to set up a workstation to create SSRS reports for Dynamics 365/CRM.  It turned out to be one of my more popular posts.  If you are writing reports for older versions of Dynamics 365/CRM, those instructions are still very relevant.

Click here for the original post.

Since that post, there have been a couple of updates and also an issue with connecting to Dynamics 365 v9 in regards to TLS 1.2 when using…

View original post 707 more words

Uninstalling or Deleting Dynamics 365 Portals Solution


Recently we wanted to remove the Community Portal Solution from one of our Development instances.

Here, the solutions admin page doesn’t give the option of deleting or removing it.

To remove it, we need to uninstall all the solutions installed by the Dynamics 365 Portals – Community Portal.

Back in Dynamics 365 we can see so many solutions installed as part of community portal.

Here we need to remove the solutions in the reverse order of their installation. This information can be found in the solution entity within Dynamics 365 CE.

Thanks to this helpful post by Jon Birnbaum

https://community.dynamics.com/365/b/dynamics365portalssupport/archive/2017/02/27/portal-troubleshooting-part-three-uninstalling-portal-solutions

https://community.dynamics.com/cfs-file/__key/communityserver-blogs-components-weblogfiles/00-00-00-12-86/Uninstallation-Order.png

Also, as soon as we start deleting the solutions, we’d get the Install option back again within the Solutions admin page for that instance.

Hope it helps..

Advertisements