I was getting the above error in one of my windows application. Was because of some section getting repeated in the app.config file.
Removing the duplicate section information from the app.config resolved the issue.
I was getting the above error in one of my windows application. Was because of some section getting repeated in the app.config file.
Removing the duplicate section information from the app.config resolved the issue.

I created a simple windows application just to see how to make use of IOrganizationService within CRM 2011.
Here we need to add references to the following dlls
This is the sample code
Uri organizationUri = new Uri("http://crmservername/orgname/XRMServices/2011/Organization.svc");
Uri homeRealmUri = null;
ClientCredentials credentials = new ClientCredentials();
// set default credentials for OrganizationService
credentials.Windows.ClientCredential = (NetworkCredential)CredentialCache.DefaultCredentials;
// or
credentials.Windows.ClientCredential = System.Net.CredentialCache.DefaultNetworkCredentials;
OrganizationServiceProxy orgProxy = new OrganizationServiceProxy(organizationUri, homeRealmUri, credentials, null);
IOrganizationService _service = (IOrganizationService)orgProxy;
try
{
    Entity myAccount = new Entity("account");
    myAccount["name"] = "Test Account";
    _service.Create(myAccount);
}
catch (Exception ex)
{
    MessageBox.Show(ex.Message);
}
}

Hi,
Today i was just trying to check if the dependent picklist code generated using Microsoft Dynamics CRM Demonstartion Tools for CRM 4.0 will work for CRM 2011 or not.
So i downloaded the tool
I was able to connect CRM 2011 using that tool. Then i generated the code using the tool.
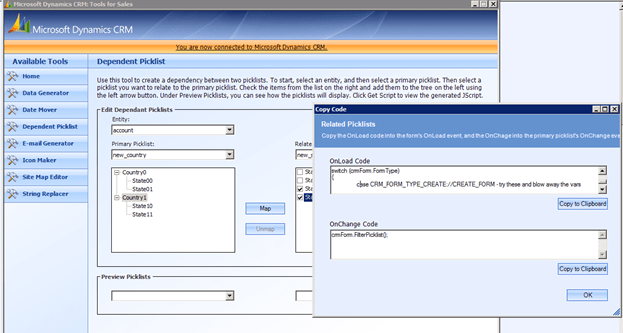
I tried using that code inside CRM 2011 and it worked properly.
Only thing we need to do is to wrap the entire onload code generated by tool inside a function and call that function on the onload of the form and same thing for the onchange code.
Bye.

Hi I got the error while trying to open the SharePoint Site after applying the MOSS SP2 update to it.
This post was helpful in resolving that error
I had the same problem. and i fixed it by going here
http://www.microsoft.com/downloads/details.aspx?familyid=A49472F9-93E…
download the file that matches your OS. ie x32 or x64
If you try to run the file it will tell you the patch is already installed.
but run the file with “/extract” extrace the file to someware and run
“dw20w.msp”
Let it do its thing. It takes a while……Then presto. well as least for
me.
Let me know how you guys go with it.
Hope it helps!

Hi I got the error while trying to upgrade MOSS 2007 Content Database to SharePoint 2010.
http://blog.tallan.com/2011/03/29/upgrading-a-sharepoint-2007-content-database-to-sharepoint-2010/
The reason was the update requires that MOSS 2007 has the SP2 applied to it.
Check out this extremely helpful post
http://mosshowto.blogspot.com/2010/06/migrating-to-sharepoint-2010.html
Bye

I was getting the following error while opening form of one of the entity (new_client) after upgrading the CRM server from beta version to RTM.

and inside application log
Exception information:
Exception type: NullReferenceException
Exception message: Object reference not set to an instance of an object.
at Microsoft.Crm.Application.Controls.AppNavigationBar.CreateOrderedAreas(NavPaneItems navPaneItems)
at Microsoft.Crm.Application.Controls.AppNavigationBar.ConfigureControl()
at Microsoft.Crm.Application.Components.UI.CrmUIControlBase.ConfigureControlInternal()
at System.Web.UI.Control.PreRenderRecursiveInternal()
at System.Web.UI.Control.PreRenderRecursiveInternal()
at System.Web.UI.Control.PreRenderRecursiveInternal()
at System.Web.UI.Control.PreRenderRecursiveInternal()
at System.Web.UI.Control.PreRenderRecursiveInternal()
at System.Web.UI.Control.PreRenderRecursiveInternal()
at System.Web.UI.Control.PreRenderRecursiveInternal()
at System.Web.UI.Page.ProcessRequestMain(Boolean includeStagesBeforeAsyncPoint, Boolean includeStagesAfterAsyncPoint)
The issue was we had commented some of the NavBarArea tag within the FormXml of the Entity.
<!–<NavBarArea Id=”Service”><Titles><Title LCID=”1033″ Text=”Service”/></Titles></NavBarArea><NavBarArea Id=”Marketing”><Titles><Title LCID=”1033″ Text=”Marketing”/></Titles></NavBarArea>–>
Uncommenting it and importing it again resolved the issue.
This was not creating issue for the beta version, however it seems that it won’t allow us to do that in the RC or RTM version.

